WPF开发温度计工业组态
Posted inet_ygssoftware
tags:
篇首语:本文由小常识网(cha138.com)小编为大家整理,主要介绍了WPF开发温度计工业组态相关的知识,希望对你有一定的参考价值。
1、工控温度计组件效果演示
工控上位机温度计组件设计与开发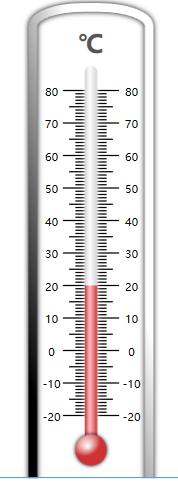
2、画温度计边框
<Rectangle StrokeThickness="7" RadiusX="40" RadiusY="15" Fill="White" />
<Rectangle StrokeThickness="7" RadiusX="40" RadiusY="15">
    <Rectangle.Effect>
        <DropShadowEffect ShadowDepth="0" Direction="0" BlurRadius="7" />
    </Rectangle.Effect>
    <Rectangle.Stroke>
        <LinearGradientBrush StartPoint="0,1" EndPoint="1,0">
            <LinearGradientBrush.RelativeTransform>
                <RotateTransform Angle="40" CenterX="0.5" CenterY="0.5" />
            </LinearGradientBrush.RelativeTransform>
            <GradientStop Color="Black" />
            <GradientStop Color="White" Offset="0.7" />
        </LinearGradientBrush>
    </Rectangle.Stroke>
</Rectangle>
3、画水平柱
<TextBlock Text="℃" HorizontalAlignment="Center" VerticalAlignment="Top"
           FontWeight="Bold" FontSize="20" Margin="0, 20" Foreground="#555"/>
<!--刻度布局和初始化留到代码逻辑实现-->
<Canvas Name="MainCanvas" Width="75" Margin="0,70" />
<Border Width="10" RenderTransformOrigin="0.5,0.5" CornerRadius="5" Margin="0,50">
    <Border.Effect>
        <DropShadowEffect ShadowDepth="0" Direction="0" Color="White" />
    </Border.Effect>
    <Border.Background>
        <LinearGradientBrush StartPoint="0,0" EndPoint="1,0">
            <GradientStop Color="lightGray" Offset="0" />
            <GradientStop Color="White" Offset="0.4" />
            <GradientStop Color="lightGray" Offset="1" />
        </LinearGradientBrush>
    </Border.Background>
    <Border Height="75" VerticalAlignment="Bottom" Name="BorValue">
        <Border.Background>
            <LinearGradientBrush StartPoint="0,0" EndPoint="1,0">
                <GradientStop Color="#CD3333"  />
                <GradientStop Color="#FFC0CB" Offset="0.4" />
                <GradientStop Color="#CD3333" Offset="1" />
            </LinearGradientBrush>
        </Border.Background>
    </Border>
</Border>
4、画水银珠
<Border Height="25" Width="25" CornerRadius="15" VerticalAlignment="Bottom"
        Margin="0 0 0 30">
    <Border.Effect>
        <DropShadowEffect Direction="0" ShadowDepth="0" />
    </Border.Effect>
    <Border.Background>
        <RadialGradientBrush Center="0.3,0.2" GradientOrigin="0.4,0.4">
            <GradientStop Color="White" Offset="0" />
            <GradientStop Color="#CD3333" Offset="1" />
        </RadialGradientBrush>
    </Border.Background>
</Border>
5、后台温度计初始化刻度
/// <summary>
/// 刷新温度计上面的内容适应定义大小
/// </summary>
/// <exception cref="NotImplementedException"></exception>
private void RefreshComponet()

    // 两种方式触发:尺寸变化、区间变化
    var h = this.MainCanvas.ActualHeight;//通过这个判断界面元素是否加载
    if (h == 0) return;
    double w = 75;
    // 类型
    double stepCount = Maxmum - Minmum;// 在这个区间内多少个间隔
    double step = h / (Maxmum - Minmum);// 每个间隔距离

    this.MainCanvas.Children.Clear();

    for (int i = 0; i <= stepCount; i++)

        Line line = new Line();
        line.Y1 = i * step;
        line.Y2 = i * step;
        line.Stroke = Brushes.Black;
        line.StrokeThickness = 1;
        this.MainCanvas.Children.Add(line);

        if (i % 10 == 0)

            line.X1 = 15;
            line.X2 = w - 15;

            // 添加文字
            TextBlock text = new TextBlock

                Text = (Maxmum - i).ToString(),
                Width = 20,
                TextAlignment = TextAlignment.Center,
                FontSize = 9,
                Margin = new Thickness(0, -5, -4, 0)
            ;
            Canvas.SetLeft(text, w - 15);
            Canvas.SetTop(text, i * step);
            this.MainCanvas.Children.Add(text);

            // 添加文字
            text = new TextBlock

                Text = (Maxmum - i).ToString(),
                Width = 20,
                TextAlignment = TextAlignment.Center,
                FontSize = 9,
                Margin = new Thickness(-4, -5, 0, 0)
            ;
            Canvas.SetLeft(text, 0);
            Canvas.SetTop(text, i * step);
            this.MainCanvas.Children.Add(text);

        else if (i % 5 == 0)

            line.X1 = 20;
            line.X2 = w - 20;

        else

            line.X1 = 25;
            line.X2 = w - 25;
6、定义温度控件依赖属性和回调函数
public int Minmum

    get  return (int)GetValue(MinmumProperty);
    set  SetValue(MinmumProperty, value);


// Using a DependencyProperty as the backing store for Minmum.  This enables animation, styling, binding, etc...
public static readonly DependencyProperty MinmumProperty =
    DependencyProperty.Register("Minmum", typeof(int), typeof(Thermometer), new PropertyMetadata(0, new PropertyChangedCallback(OnPropertyValueChanged)));


public int Maxmum

    get  return (int)GetValue(MaxmumProperty);
    set  SetValue(MaxmumProperty, value);


// Using a DependencyProperty as the backing store for Maxmum.  This enables animation, styling, binding, etc...
public static readonly DependencyProperty MaxmumProperty =
    DependencyProperty.Register("Maxmum", typeof(int), typeof(Thermometer), new PropertyMetadata(100, new PropertyChangedCallback(OnPropertyValueChanged)));


public double Value

    get  return (double)GetValue(ValueProperty);
    set  SetValue(ValueProperty, value);


// Using a DependencyProperty as the backing store for Value.  This enables animation, styling, binding, etc...
public static readonly DependencyProperty ValueProperty =
    DependencyProperty.Register("Value", typeof(double), typeof(Thermometer), new PropertyMetadata(0.0, new PropertyChangedCallback(OnPropertyValueChanged)));

/// <summary>
/// 当属性值发生变化的时候直接更新UI内容
/// </summary>
/// <param name="d"></param>
/// <param name="e"></param>
private static void OnPropertyValueChanged(DependencyObject d, DependencyPropertyChangedEventArgs e)

    (d as Thermometer)?.RefreshComponet();
7、限定温度范围值并添加动画
// 限定值的变化范围
var value = this.Value;
if (this.Value < this.Minmum)
    value = this.Minmum;
if (this.Value > this.Maxmum)
    value = this.Maxmum;

// 温度值与Border的高度的一个转换
var newValue = value - this.Minmum;
newValue *= step;
newValue += 20;

// 动画
DoubleAnimation doubleAnimation = new DoubleAnimation(newValue, TimeSpan.FromMilliseconds(500));
this.BorValue.BeginAnimation(HeightProperty, doubleAnimation);
8、通过Modbus连接从站读取温度值
8.1 编程逻辑
public class Thememeter : INotifyPropertyChanged

    public event PropertyChangedEventHandler? PropertyChanged;
    private int thValue;

    public int ThValue

        get  return thValue;
        set  thValue = value; OnPropertyChanged("ThValue");


    public void OnPropertyChanged(string propertyName)

        if (PropertyChanged != null)

            PropertyChanged(this, new PropertyChangedEventArgs(propertyName));
Thememeter th = new Thememeter();
public MainWindow()


    InitializeComponent();
    this.DataContext = th;
    ReadSlaveValue();


/// <summary>
/// 读取从站数据
/// </summary>
/// <exception cref="NotImplementedException"></exception>
private void ReadSlaveValue()

    // 创建一个串口对象
    var serialPort = new SerialPort("COM2", 9600, Parity.None, 8, StopBits.One);
    var master = ModbusSerialMaster.CreateRtu(serialPort);
    if (!serialPort.IsOpen)

        serialPort.Open();

    Task.Run(() =>

                 // 延迟加载
                 Task.Delay(1000).Wait();
                 while (true)

                     var uValue = master.ReadHoldingRegisters((byte)1, (ushort)0, (ushort)1);
                     th.ThValue = uValue[0];

             );
8.2 窗体数据绑定
<TextBox Text="Binding ThValue,UpdateSourceTrigger=PropertyChanged" VerticalAlignment="Bottom" FontSize="20" Name="ThermometerValue" />
以上是关于WPF开发温度计工业组态的主要内容,如果未能解决你的问题,请参考以下文章