YOLOv6 训练自己的数据集
Posted 迪菲赫尔曼
tags:
篇首语:本文由小常识网(cha138.com)小编为大家整理,主要介绍了YOLOv6 训练自己的数据集相关的知识,希望对你有一定的参考价值。


项目地址:https://github.com/meituan/YOLOv6
论文地址:https://arxiv.org/abs/2209.02976
论文解析:http://t.csdn.cn/0ZQbV
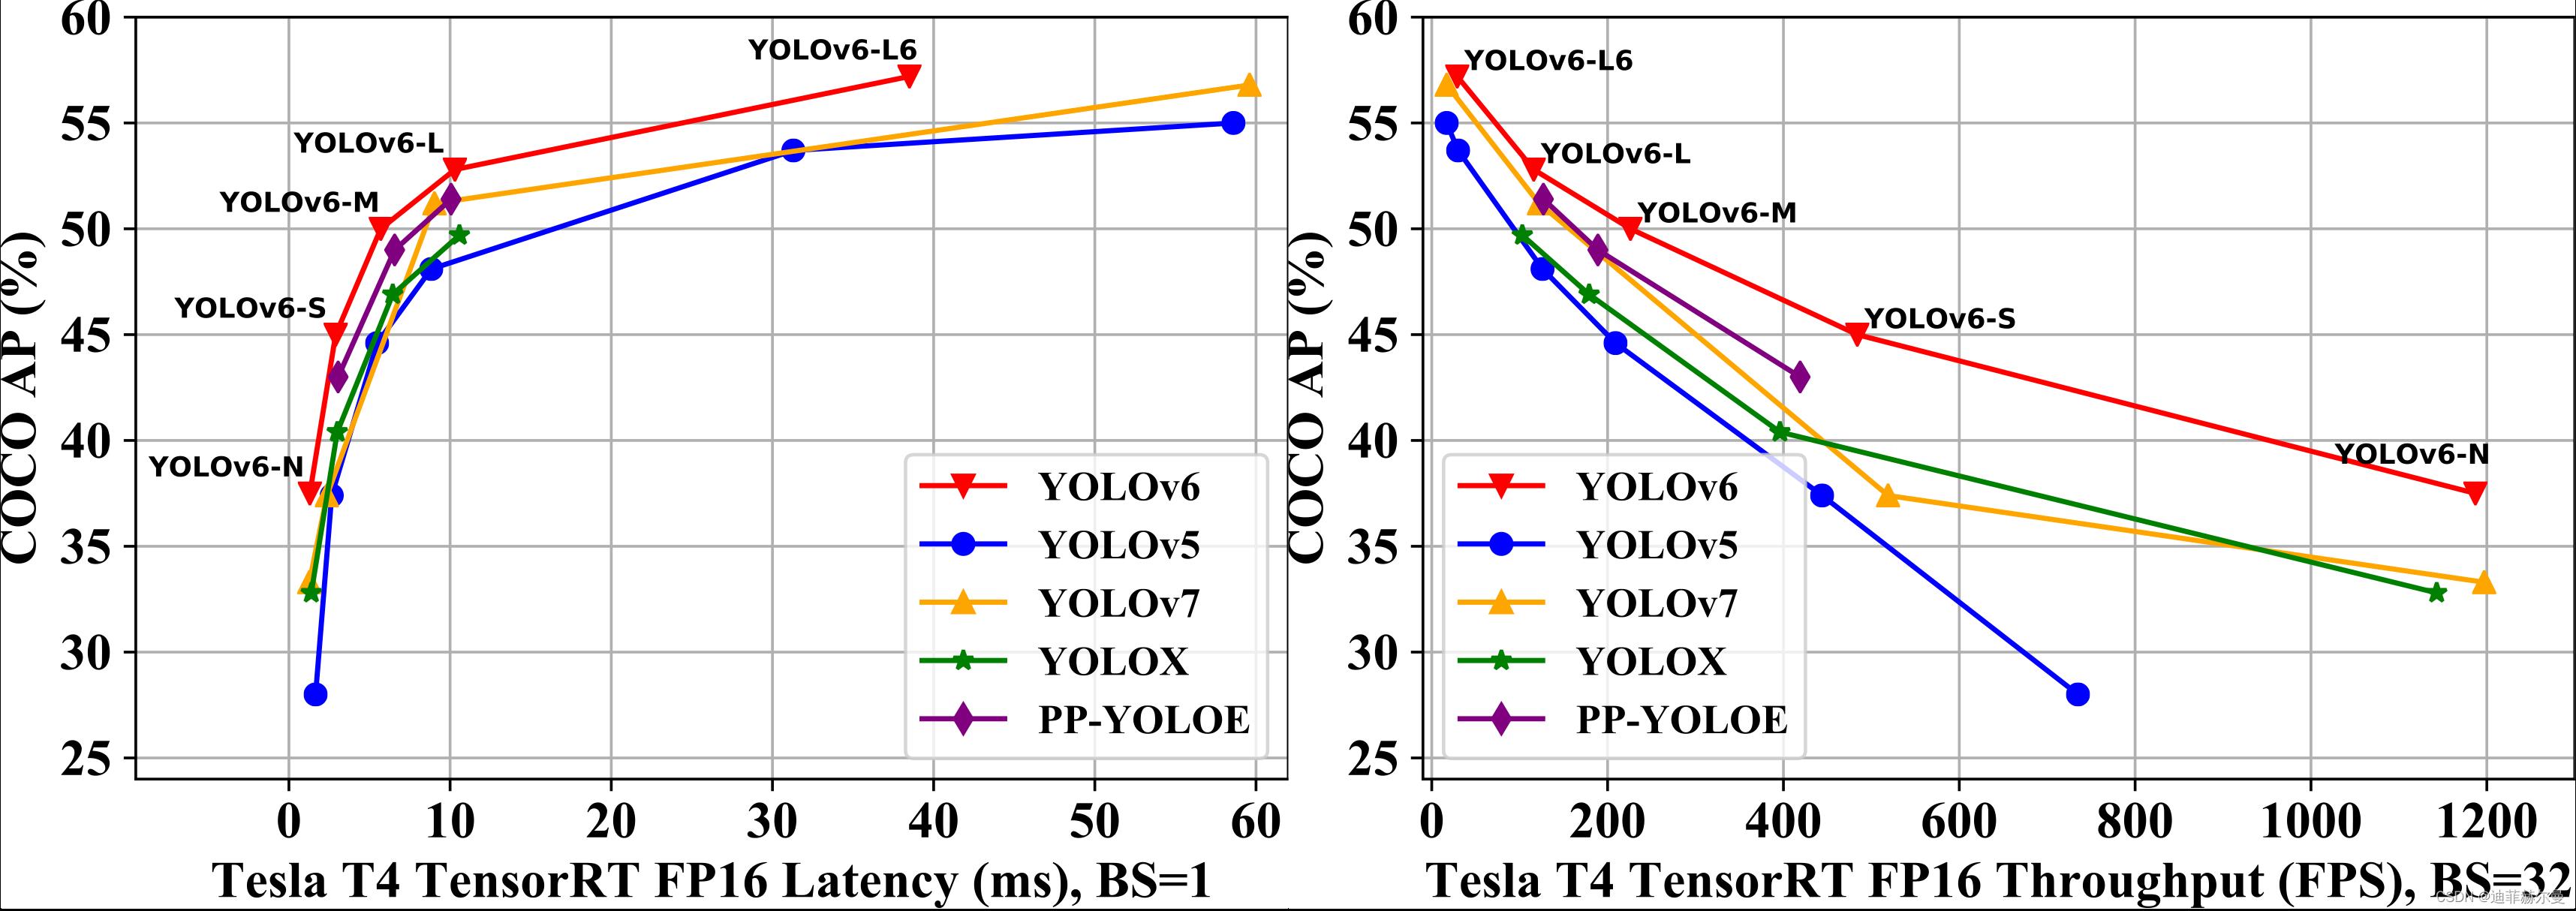
YOLOv6 是一种专为工业应用设计的单级对象检测框架,具有硬件友好的高效设计和高性能。YOLOv6-N 在 NVIDIA Tesla T4 GPU 上以 1234 FPS 的吞吐量在 COCO 数据集上达到 35.9% 的 AP。 YOLOv6-S 以 495 FPS 的速度达到 43.5% 的 AP,优于同规模的其他主流检测器(YOLOv5-S、YOLOX-S 和 PPYOLOE-S)。
YOLOv6-S 量化版本甚至带来了 869 FPS 的最新 43.3% AP。此外,与具有相似推理速度的其他检测器相比,YOLOv6-M/L 还实现了更好的准确度性能(即 49.5%/52.3%)。
模型指标
| 模型 | 输入尺寸 | mAPval 0.5:0.95 | 速度T4 trt fp16 b1 (fps) | 速度T4 trt fp16 b32 (fps) | Params (M) | FLOPs (G) |
|---|---|---|---|---|---|---|
| YOLOv6-N | 640 | 37.5 | 779 | 1187 | 4.7 | 11.4 |
| YOLOv6-S | 640 | 45.0 | 339 | 484 | 18.5 | 45.3 |
| YOLOv6-M | 640 | 50.0 | 175 | 226 | 34.9 | 85.8 |
| YOLOv6-L | 640 | 52.8 | 98 | 116 | 59.6 | 150.7 |
| YOLOv6-N6 | 1280 | 44.9 | 228 | 281 | 10.4 | 49.8 |
| YOLOv6-S6 | 1280 | 50.3 | 98 | 108 | 41.4 | 198.0 |
| YOLOv6-M6 | 1280 | 55.2 | 47 | 55 | 79.6 | 379.5 |
| YOLOv6-L6 | 1280 | 57.2 | 26 | 29 | 140.4 | 673.4 |
文章目录
1. 获取代码
$ git clone https://github.com/meituan/YOLOv6.git
安装环境:
cd YOLOv6
pip install -r requirements.txt
2. 准备数据集
2.1 标注数据集
我们可以通过 Labelme 等标注软件进行标注,然后导出为 YOLO 的格式的标签,YOLOv6 所用数据集格式和 YOLOv5 相同。
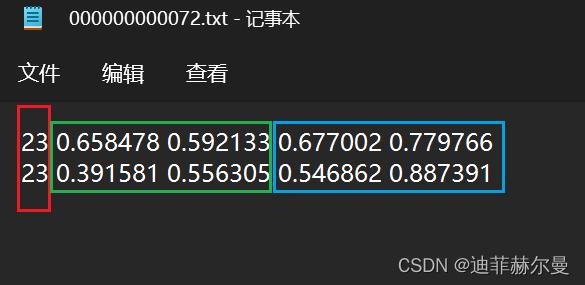
标签的 5 5 5 列数据分别是【类别】 【目标框中心点的x坐标】 【目标框中心点的y坐标】【目标框的宽】 【目标框的高】

2.2 划分数据集
标注完成后我们要将数据集划分成以下的格式
own_dataset
├── images
│   ├── train
│   │   ├── train0.jpg
│   │   └── train1.jpg
│   ├── val
│   │   ├── val0.jpg
│   │   └── val1.jpg
│   └── test
│       ├── test0.jpg
│       └── test1.jpg
└── labels
    ├── train
    │   ├── train0.txt
    │   └── train1.txt
    ├── val
    │   ├── val0.txt
    │   └── val1.txt
    └── test
        ├── test0.txt
        └── test1.txt
2.3 创建数据集配置文件
在 YOLOv6/data/ 路径下创建一个 my_dataset.yaml , 里面要写上你数据集的路径和数据集的类别 ,test集是可选的 , 到这部分整个数据集的准备过程就结束了。
# Please insure that your custom_dataset are put in same parent dir with YOLOv6_DIR
train: ../datasets/images/train # train images
val: ../datasets/images/val # val images
test: ../datasets/images/test # test images (optional)

# whether it is coco dataset, only coco dataset should be set to True.
is_coco: False

# Classes
nc: 20  # number of classes
names: ['aeroplane', 'bicycle', 'bird', 'boat', 'bottle', 'bus', 'car', 'cat', 'chair', 'cow', 'diningtable', 'dog',
        'horse', 'motorbike', 'person', 'pottedplant', 'sheep', 'sofa', 'train', 'tvmonitor']  # class names
3. 创建模型配置文件
我们需要使用模型配置文件来指定网络结构和一些训练参数,比如优化器参数或者数据增强参数等,我们在 YOLOv6/configs/ 路径下创建一个 my_yolov6s_finetune.py ,需要包含以下信息,当然我们也可以使用默认的模型配置文件。
# YOLOv6s model
model = dict(
    type='YOLOv6s',
    pretrained='weights/yolov6s.pt',
    depth_multiple=0.33,
    width_multiple=0.50,
    backbone=dict(
        type='EfficientRep',
        num_repeats=[1, 6, 12, 18, 6],
        out_channels=[64, 128, 256, 512, 1024],
        fuse_P2=True,
        cspsppf=True,
        ),
    neck=dict(
        type='RepBiFPANNeck',
        num_repeats=[12, 12, 12, 12],
        out_channels=[256, 128, 128, 256, 256, 512],
        ),
    head=dict(
        type='EffiDeHead',
        in_channels=[128, 256, 512],
        num_layers=3,
        begin_indices=24,
        anchors=3,
        anchors_init=[[10,13, 19,19, 33,23],
                      [30,61, 59,59, 59,119],
                      [116,90, 185,185, 373,326]],
        out_indices=[17, 20, 23],
        strides=[8, 16, 32],
        atss_warmup_epoch=0,
        iou_type='giou',
        use_dfl=False, # set to True if you want to further train with distillation
        reg_max=0, # set to 16 if you want to further train with distillation
        distill_weight=
            'class': 1.0,
            'dfl': 1.0,
        ,
    )
)

solver = dict(
    optim='SGD',
    lr_scheduler='Cosine',
    lr0=0.0032,
    lrf=0.12,
    momentum=0.843,
    weight_decay=0.00036,
    warmup_epochs=2.0,
    warmup_momentum=0.5,
    warmup_bias_lr=0.05
)

data_aug = dict(
    hsv_h=0.0138,
    hsv_s=0.664,
    hsv_v=0.464,
    degrees=0.373,
    translate=0.245,
    scale=0.898,
    shear=0.602,
    flipud=0.00856,
    fliplr=0.5,
    mosaic=1.0,
    mixup=0.243,
)
4. 训练
4.1 单个显卡训练
python tools/train.py --batch 16 --conf configs/my_yolov6s_finetune.py --data data/my_dataset.yaml --fuse_ab --device 0
4.2 多显卡训练
python -m torch.distributed.launch --nproc_per_node 8 tools/train.py --batch 256 --conf configs/my_yolov6s_finetune.py --data data/my_dataset.yaml --fuse_ab --device 0,1,2,3,4,5,6,7
5. 验证
python tools/eval.py --data data/data.yaml --weights output_dir/name/weights/best_ckpt.pt --task val --device 0
6. 推理
python tools/infer.py --weights output_dir/name/weights/best_ckpt.pt --source img.jpg --device 0
7. 像 YOLOv5 一样训练 YOLOv6 🍀
以上只是官方代码库的训练方式,如果你想像 YOLOv5 那样训练的你的数据集,可以使用以下的仓库:YOLOv6 pro
YOLOv6 pro 基于官方 YOLOv6 的整体架构,使用 YOLOv5 的网络构建方式构建一个 YOLOv6 网络,包括 backbone,neck,effidehead 结构,可以在 yaml 文件中任意修改或添加模块,并且每个修改的文件都是独立可运行的, 并且该仓库作者在
I
E
E
E
U
V
2022
V
i
s
i
o
n
M
e
e
t
s
A
l
a
g
e
IEEE UV 2022 Vision Meets Alage
IEEEUV2022VisionMeetsAlage 目标检测竞赛中取得第一名!感兴趣的同学可以试试~
以上是关于YOLOv6 训练自己的数据集的主要内容,如果未能解决你的问题,请参考以下文章