pytorch生成对抗网络GAN的基础教学简单实例(附代码数据集)
Posted Lizhi_Tech
tags:
篇首语:本文由小常识网(cha138.com)小编为大家整理,主要介绍了pytorch生成对抗网络GAN的基础教学简单实例(附代码数据集)相关的知识,希望对你有一定的参考价值。
1.简介
这篇文章主要是介绍了使用pytorch框架构建生成对抗网络GAN来生成虚假图像的原理与简单实例代码。数据集使用的是开源人脸图像数据集img_align_celeba,共1.34G。生成器与判别器模型均采用简单的卷积结构,代码参考了pytorch官网。
建议对pytorch和神经网络原理还不熟悉的同学,可以先看下之前的文章了解下基础:pytorch基础教学简单实例(附代码)_Lizhi_Tech的博客-CSDN博客_pytorch实例
2.GAN原理
简而言之,生成对抗网络可以归纳为以下几个步骤:
随机噪声输入进生成器,生成虚假图片。
将带标签的虚假图片和真实图片输入进判别器进行更新,最大化 log(D(x)) + log(1 - D(G(z)))。
根据判别器的输出结果更新生成器,最大化 log(D(G(z)))。
3.代码
from __future__ import print_function
import random
import torch.nn as nn
import torch.optim as optim
import torch.utils.data
import torchvision.datasets as dset
import torchvision.transforms as transforms
import torchvision.utils as vutils
import numpy as np
import matplotlib.pyplot as plt

# 设置随机算子
manualSeed = 999
random.seed(manualSeed)
torch.manual_seed(manualSeed)

# 数据集位置
dataroot = "data/celeba"

# dataloader的核数
workers = 2

# Batch大小
batch_size = 128

# 图像缩放大小
image_size = 64

# 图像通道数
nc = 3

# 隐向量维度
nz = 100

# 生成器特征维度
ngf = 64

# 判别器特征维度
ndf = 64

# 训练轮数
num_epochs = 5

# 学习率
lr = 0.0002

# Adam优化器的beta系数
beta1 = 0.5

# gpu个数
ngpu = 1

# 加载数据集
dataset = dset.ImageFolder(root=dataroot,
                           transform=transforms.Compose([
                               transforms.Resize(image_size),
                               transforms.CenterCrop(image_size),
                               transforms.ToTensor(),
                               transforms.Normalize((0.5, 0.5, 0.5), (0.5, 0.5, 0.5)),
                           ]))
# 创建dataloader
dataloader = torch.utils.data.DataLoader(dataset, batch_size=batch_size,
                                         shuffle=True, num_workers=workers)

# 使用cpu还是gpu
device = torch.device("cuda:0" if (torch.cuda.is_available() and ngpu > 0) else "cpu")

# 初始化权重
def weights_init(m):
    classname = m.__class__.__name__
    if classname.find('Conv') != -1:
        nn.init.normal_(m.weight.data, 0.0, 0.02)
    elif classname.find('BatchNorm') != -1:
        nn.init.normal_(m.weight.data, 1.0, 0.02)
        nn.init.constant_(m.bias.data, 0)

# 生成器
class Generator(nn.Module):
    def __init__(self, ngpu):
        super(Generator, self).__init__()
        self.ngpu = ngpu
        self.main = nn.Sequential(
            # input is Z, going into a convolution
            nn.ConvTranspose2d( nz, ngf * 8, 4, 1, 0, bias=False),
            nn.BatchNorm2d(ngf * 8),
            nn.ReLU(True),
            # state size. (ngf*8) x 4 x 4
            nn.ConvTranspose2d(ngf * 8, ngf * 4, 4, 2, 1, bias=False),
            nn.BatchNorm2d(ngf * 4),
            nn.ReLU(True),
            # state size. (ngf*4) x 8 x 8
            nn.ConvTranspose2d( ngf * 4, ngf * 2, 4, 2, 1, bias=False),
            nn.BatchNorm2d(ngf * 2),
            nn.ReLU(True),
            # state size. (ngf*2) x 16 x 16
            nn.ConvTranspose2d( ngf * 2, ngf, 4, 2, 1, bias=False),
            nn.BatchNorm2d(ngf),
            nn.ReLU(True),
            # state size. (ngf) x 32 x 32
            nn.ConvTranspose2d( ngf, nc, 4, 2, 1, bias=False),
            nn.Tanh()
            # state size. (nc) x 64 x 64
        )

    def forward(self, input):
        return self.main(input)

# 实例化生成器并初始化权重
netG = Generator(ngpu).to(device)
netG.apply(weights_init)

# 判别器
class Discriminator(nn.Module):
    def __init__(self, ngpu):
        super(Discriminator, self).__init__()
        self.ngpu = ngpu
        self.main = nn.Sequential(
            # input is (nc) x 64 x 64
            nn.Conv2d(nc, ndf, 4, 2, 1, bias=False),
            nn.LeakyReLU(0.2, inplace=True),
            # state size. (ndf) x 32 x 32
            nn.Conv2d(ndf, ndf * 2, 4, 2, 1, bias=False),
            nn.BatchNorm2d(ndf * 2),
            nn.LeakyReLU(0.2, inplace=True),
            # state size. (ndf*2) x 16 x 16
            nn.Conv2d(ndf * 2, ndf * 4, 4, 2, 1, bias=False),
            nn.BatchNorm2d(ndf * 4),
            nn.LeakyReLU(0.2, inplace=True),
            # state size. (ndf*4) x 8 x 8
            nn.Conv2d(ndf * 4, ndf * 8, 4, 2, 1, bias=False),
            nn.BatchNorm2d(ndf * 8),
            nn.LeakyReLU(0.2, inplace=True),
            # state size. (ndf*8) x 4 x 4
            nn.Conv2d(ndf * 8, 1, 4, 1, 0, bias=False),
            nn.Sigmoid()
        )

    def forward(self, input):
        return self.main(input)

# 实例化判别器并初始化权重
netD = Discriminator(ngpu).to(device)
netD.apply(weights_init)


# 损失函数
criterion = nn.BCELoss()

# 随机输入噪声
fixed_noise = torch.randn(64, nz, 1, 1, device=device)

# 真实标签与虚假标签
real_label = 1.
fake_label = 0.

# 创建优化器
optimizerD = optim.Adam(netD.parameters(), lr=lr, betas=(beta1, 0.999))
optimizerG = optim.Adam(netG.parameters(), lr=lr, betas=(beta1, 0.999))

# 开始训练
img_list = []
G_losses = []
D_losses = []
iters = 0

print("Starting Training Loop...")
for epoch in range(num_epochs):
    for i, data in enumerate(dataloader, 0):
        ############################
        # (1) 更新D: 最大化 log(D(x)) + log(1 - D(G(z)))
        ###########################
        # 使用真实标签的batch训练
        netD.zero_grad()
        real_cpu = data[0].to(device)
        b_size = real_cpu.size(0)
        label = torch.full((b_size,), real_label, dtype=torch.float, device=device)
        output = netD(real_cpu).view(-1)
        errD_real = criterion(output, label)
        errD_real.backward()
        D_x = output.mean().item()

        # 使用虚假标签的batch训练
        noise = torch.randn(b_size, nz, 1, 1, device=device)
        fake = netG(noise)
        label.fill_(fake_label)
        output = netD(fake.detach()).view(-1)
        errD_fake = criterion(output, label)
        errD_fake.backward()
        D_G_z1 = output.mean().item()
        errD = errD_real + errD_fake
        # 更新D
        optimizerD.step()

        ############################
        # (2) 更新G: 最大化 log(D(G(z)))
        ###########################
        netG.zero_grad()
        label.fill_(real_label)
        output = netD(fake).view(-1)
        errG = criterion(output, label)
        errG.backward()
        D_G_z2 = output.mean().item()
        # 更新G
        optimizerG.step()

        # 输出训练状态
        if i % 50 == 0:
            print('[%d/%d][%d/%d]\\tLoss_D: %.4f\\tLoss_G: %.4f\\tD(x): %.4f\\tD(G(z)): %.4f / %.4f'
                  % (epoch, num_epochs, i, len(dataloader),
                     errD.item(), errG.item(), D_x, D_G_z1, D_G_z2))

        # 保存每轮loss
        G_losses.append(errG.item())
        D_losses.append(errD.item())

        # 记录生成的结果
        if (iters % 500 == 0) or ((epoch == num_epochs-1) and (i == len(dataloader)-1)):
            with torch.no_grad():
                fake = netG(fixed_noise).detach().cpu()
            img_list.append(vutils.make_grid(fake, padding=2, normalize=True))

        iters += 1

# loss曲线
plt.figure(figsize=(10,5))
plt.title("Generator and Discriminator Loss During Training")
plt.plot(G_losses,label="G")
plt.plot(D_losses,label="D")
plt.xlabel("iterations")
plt.ylabel("Loss")
plt.legend()
plt.show()


# 生成效果图
real_batch = next(iter(dataloader))

# 真实图像
plt.figure(figsize=(15,15))
plt.subplot(1,2,1)
plt.axis("off")
plt.title("Real Images")
plt.imshow(np.transpose(vutils.make_grid(real_batch[0].to(device)[:64], padding=5, normalize=True).cpu(),(1,2,0)))

# 生成的虚假图像
plt.subplot(1,2,2)
plt.axis("off")
plt.title("Fake Images")
plt.imshow(np.transpose(img_list[-1],(1,2,0)))
plt.show()
4.结果
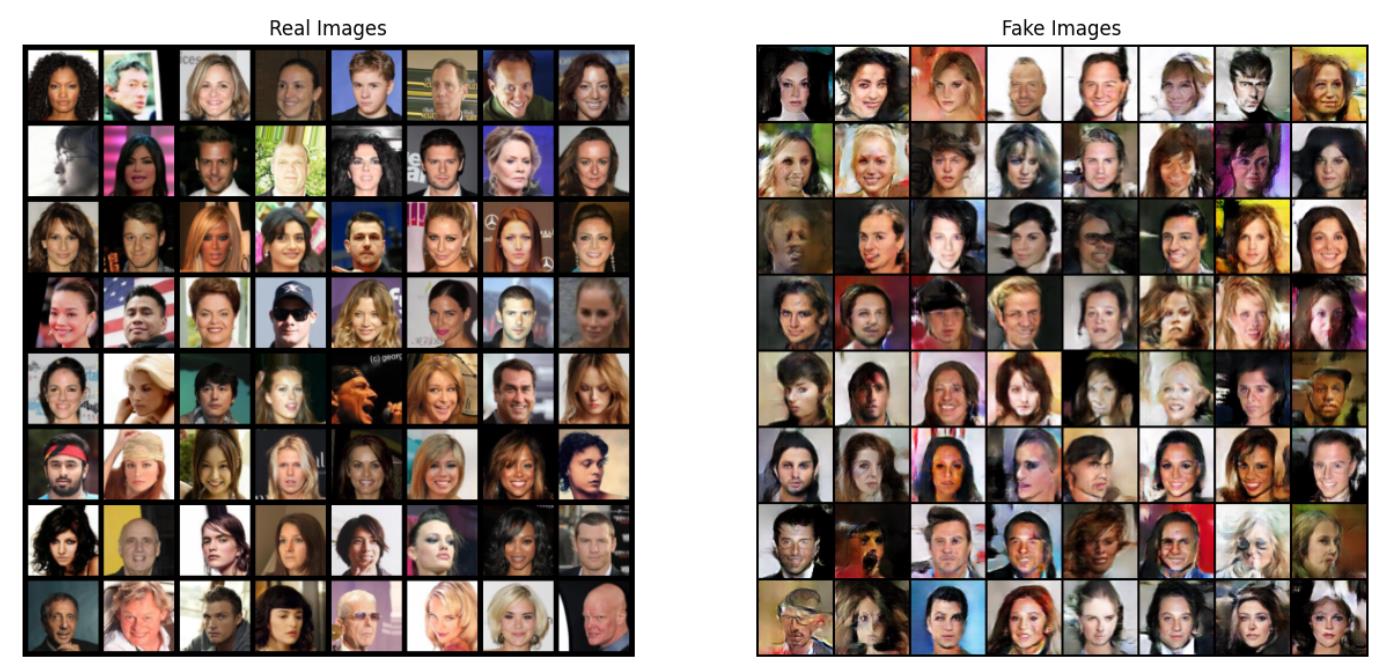
真实图像与生成图像
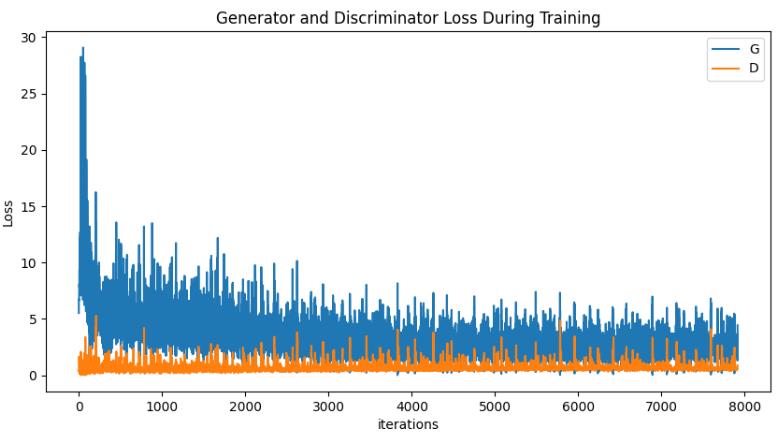
loss曲线
完整的代码与数据集可以在我的github上找到:lizhiTech/pytorch_GAN_simple_example: 介绍了使用pytorch框架构建生成对抗网络GAN来生成虚假图像的原理与简单实例代码 (github.com)
或者csdn下载:
我们也提供包括深度学习、计算机视觉、机器学习等其他方向的其他代码及辅导服务,有需求可以通过csdn私聊或github上的联系方式联系我们。
以上是关于pytorch生成对抗网络GAN的基础教学简单实例(附代码数据集)的主要内容,如果未能解决你的问题,请参考以下文章