微信小程序实现每日签到连续签到
Posted 恪愚
tags:
篇首语:本文由小常识网(cha138.com)小编为大家整理,主要介绍了微信小程序实现每日签到连续签到相关的知识,希望对你有一定的参考价值。
昨天在看自己写的小程序项目,无意中打开了CSDN APP,突然间觉得,我去,如果在小程序中加个“签到”功能,岂不美哉!(好吧,其实是买的书昨天没到货,然后闲着无事,就想起了大明湖畔的“签到”)
但是吧,又不想写和服务器交互的,本着“简单点”的原则,我想起了曾经的挚爱—— 本地存储 。
先说说相关注意吧:
其一就是 storage中只能存放字符串!
我去,昨晚大部分时间都是在搞这个。以前一直认为存放的是对象,兴致勃勃写完发现点击以后出现了“NAN”…
觉得 事情并没有这么简单。
仔细回去看了一下曾经Vue写过的localStorage ,发现一直弄错了,应该存放字符串 !
开篇
搞清楚这个以后,又有一个问题:你要“ 点击加1 ”,这里总是把数字和字符串弄反,甚至想了用数组形式存放。。。最终想到了解决办法:把存放的字符串转为数字,加1后再转为字符串存放到storage中 。
想到这我不禁喜形于色,终于可以了!
wx.setStorage(
	key: 'FirstTime',
	data: (parseInt(this.data.firstTime) + 1).toString(),
)
但是当我无意中狂点16下的时候,我又哭了…
new Date()函数控制日期——一分钟/一天/…只能点一次:
var D=(new Date()).getDate().toString();
if(D != wx.getStorageSync('D'))   //判断是否过了当天
	//如果是新的一天,则...
else
	//否则,例如:
	wx.showToast(
		title: '今日打卡已完成!',
		icon:'loading',
		duration:1200,
		mask:true
	)
这里又出现一个问题,我在当前页面开始时onLoad里面加了一段代码:把当前时间存放到storage中,但是我发现,这样以后就点不了了(当天),为什么?
因为冲突了啊,加载页面时存放此时时间,那么你如果在这个事件内(本例:一天)去点击,如上面代码第一、二行,它不成立——都是“今天”,所以会执行else语句。
解决办法: 去掉onLoad函数,这样开始执行if时候会发现storage中没有存储,也就“!=”了。
下面放上示例代码:
hello.wxml
<view class="container">
  <view class="mxc1">
    <text>您已签到 firstTime 次</text>
  </view>
  <view class="flag?'mxc2-1':'mxc2-2'" bindtap="onBindTap" disabled="flag">
    <text>我要签到</text>
  </view>
</view>
disabled——小程序禁用事件!
hello.wxss
.container
  background-color: ghostwhite;
  width: 100%;
  height: 100%;
  flex-direction: column;
  display: flex;
  align-items: center;
  min-height: 100vh;

.mxc1
  position: relative;
  width: 100%;
  height: 400rpx;
  border-top: 1px solid #000;
  border-bottom: 1px solid #000;
  margin-top: -70rpx;
  flex-direction: column;
  display: flex;
  align-items: center;
  background-color: #efeff4;

.mxc1 text
  font-size: 30rpx;
  font-weight: bold;
  line-height: 400rpx;

.mxc2-1
  position: absolute;
  width: 60%;
  height: 74rpx;
  border: 1px solid rgba(247, 2, 2, 0.959);
  background-color: rgba(247, 2, 2, 0.959);
  border-radius: 3px;
  flex-direction: column;
  display: flex;
  align-items: center;
  margin-top: 396rpx;

.mxc2-1 text
  color: white;
  font-size: 32rpx;
  line-height: 74rpx;

.mxc2-2
  position: absolute;
  width: 60%;
  height: 74rpx;
  border: 1px solid rgba(182, 177, 177, 0.959);
  background-color: rgba(182, 177, 177, 0.959);
  border-radius: 3px;
  flex-direction: column;
  display: flex;
  align-items: center;
  margin-top: 396rpx;

.mxc2-2 text
  color: #000;
  font-size: 32rpx;
  line-height: 74rpx;
hello.js
Page(
  data:
    firstTime:'0',
    flag:true
  ,
  onBindTap:function()
    var D=(new Date()).getDate().toString();
    if(D != wx.getStorageSync('D'))
      wx.setStorageSync('D', D);
      wx.setStorage(
        key: 'FirstTime',
        data: (parseInt(this.data.firstTime) + 1).toString(),
      )
      var that = this;
      var firstTime = wx.getStorage(
        key: 'FirstTime',
        success: function (res)
          that.setData(
            firstTime: res.data,
            flag:false
          )
          wx.showToast(
            title: '签到成功!',
            icon: 'success',
            duration: 1200,
            mask: true
          )
        ,
      )
    else
      wx.showToast(
        title: '今日打卡已完成!',
        icon:'loading',
        duration:1200,
        mask:true
      )

  ,
  onShow:function(options)
    var that = this;
    var firstTime = wx.getStorage(
      key: 'FirstTime',
      success: function (res)
        that.setData(
          firstTime: res.data
        )
      ,
    )
    var D = (new Date()).getDate().toString();
    if (D != wx.getStorageSync('D'))
      this.setData(
        flag:true
      )
    else
      this.setData(
        flag:false
      )

  ,
)
hello.json
  "navigationBarTitleText": "签到",
  "navigationBarTextStyle": "black"
扩展时刻
刚刚实现了简单的签到功能,那么,怎么实现连续签到呢?
我想了一晚上,因为刚开始时思路跑到了“误区”——判断点击后加1的事件是否匹配。但是你点击后加1是个被动事件,唯一条件就是点击,拿这个判断岂不是很难受?
于是,我们同样可以用parseInt()函数来把当前日期(时间)和缓存日期(时间)作比较 ,判断他们是否满足:
var D=(new Date()).getDate().toString();
在点击事件onBindTap里:
var DT=wx.getStorageSync('D');
if(parseInt(D)!=parseInt(DT)+1)
	//非连续签到 对应的操作
else
	//连续签到
易错点提示:
上面 hello.js 代码中有这么一行:this.data.firstTime
那有没有人想过 只写firstTime?
小程序中用data中的数据(变量)必须加上“this.data.”前缀!
================================================================
2020-08-12更新
怎么判断「是否已经过了一段时间」?
最近做一个项目中需要限制“当点击了按钮之后两个小时之内不能点击”。
开始想到的是用Date对象相关的一系列API组合起来然后判断,因为“如果只判断getHours()的话只能判断当天的”。才写了两行就写不下去了:实在是太麻烦了。
查阅了资料发现可以用格林豪顿时间 ,也就是时间戳转换:
let hourtime=wx.getStorageSync('hourtime')
if(hourtime && (Date.now()-hourtime)<2*60*60*1000)
    wx.showToast(
      title: '操作过于频繁!',
      icon:'none',
      duration:900
    )
    return
else
    wxrequest.post('xxxx',xxxx).then((res)=>   //wxrequest:封装好的request请求
      if(res.code==0)
        wx.setStorage(
          data: Date.now(),
          key: 'hourtime',
        )

   )
扩展:第三方插件实现小程序“心情签到”功能开发(新)
为什么要增加这么一个功能?
因为笔者近期发现了一个非常好玩的插件:日历插件,在小程序内使用插件需要经过下面三步。
- 在小程序管理后台添加三方服务插件
登录小程序管理后台,依次进入「设置 -> 第三方服务」搜索日历插件的 AppID(wx92c68dae5a8bb046)就可以搜索到「极点日历」,这时候申请授权即可。 - 在 app.json 中增加插件配置
第二步是在项目的 app.json 中增加 plugins 字段内容:
"plugins":
    "calendar":
        "version": "1.1.3",
        "provider": "wx92c68dae5a8bb046"
- 在 diary 页面增加组件配置
在 pages/diary/index.json 的页面配置中的 usingComponents 里增加 calendar 的插件地址:
  "usingComponents":
    "calendar": "plugin://calendar/calendar",
    "icon": "../../components/icon/index"
经过上面三步之后,我们就可以在页面中使用 <calendar /> 标签了:
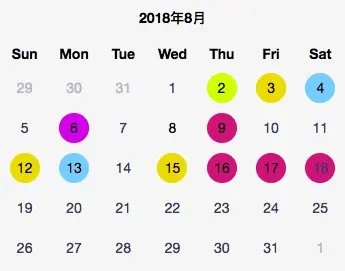
在心情设置上,笔者设计了 5 种心情,由 5 种颜色来表示,具体数值如下:
// client/pages/diary/index.js-Page-data
emotions: ['serene', 'hehe', 'ecstatic', 'sad', 'terrified'],
colors:
  serene: '#64d9fe',
  hehe: '#d3fc1e',
  ecstatic: '#f7dc0e',
  sad: '#ec238a',
  terrified: '#ee1aea'
签到不同的心情,最终在日历上会展现出下面的效果:

要在某天设置该天的背景颜色,需要使用日历的 days-color 属性,这里笔者将 days-color 与 daysStyle 进行绑定:
<!--diary/index.wxml-->
<calendar days-color="daysStyle" />
daysStyle 的计算和赋值是在 setCalendarColor 方法内的:
// diary/index.js
setCalendarColor(year, month)
  year = year || new Date().getFullYear()
  month = month || new Date().getMonth() + 1
  // 从数据库读取数据
  getEmotionByOpenidAndDate(this.data.openid, year, month)
    .then((r) =>
      const data = r.data || []
      const styles = []
      const now = new Date()
      const today = dateFormat(now)
      let todayEmotion = ''
      let colors = this.data.colors
      // 遍历日期,存在表情的日期则设置对应的颜色
      data.forEach((v) =>
        let ts = v.tsModified
        let date = new Date(ts)
        let day = date.getDate()
        if (today === dateFormat(date))
          todayEmotion = v.emotion || ''

        styles.push(
          month: 'current',
          day,
          color: 'black',
          background: colors[v.emotion]
        )
      )
      // 设置 daysStyle
      this.setData(
        lastMonth: `$year-$('00' + month).slice(-2)`,
        showPublish: true,
        todayEmotion,
        daysStyle: styles
      )
    )
    .catch((e) =>
      wx.showToast(
        title: '加载已签数据失败,请稍后再试',
        icon: 'none',
        duration: 3000
      )
    )
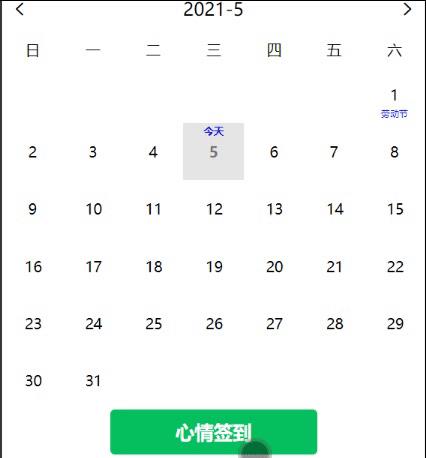
自定义组件实现“心情签到”
上面花里胡哨的功能采用了第三方插件,但这并不能满足一些稀奇古怪的需求。所幸,笔者开源的组件库中有“日历”的自定义组件,再三思考之后,还是决定把这个功能添加上去:

在笔者的实现中,调用方只需要传入一些特定的值:
    emotions:
      '开心':'serene',
      '平静':'hehe',
      '难过':'sad'
    ,  // 开心、平静、伤心、难过....设置一个值,这个值是下面colors里面的映射名。比如用户选择“开心”,你传的是“serene”和当前日期之类的
    colors:
      serene: '#64d9fe',
      hehe: '#d3fc1e',
      ecstatic: '#f7dc0e',
      sad: '#ec238a',
      terrified: '#ee1aea'
    ,
    DateColor:[]   // 心情签到用
这里的 emotions 不必当做参数传入,因为它是充当了一个“关联表”,在用户选择当天心情后映射对应的值。
如何调用?
<y-calendar
	before_show="1"
	task_show="0"
	yDateTimes="dateTimes"
	yEmotions="colors"
	yDayColor="DateColor"
	bind:timeload="timeload"
	bind:timechanged="timechanged"
></y-calendar>
它还接受两个回调函数 —— 负责在用户刚进入页面时和用户点击后传回日期。
具体使用和参数含义还请移步项目GitHub:https://github.com/1314mxc/yunUI#calendar日历组件
以上是关于微信小程序实现每日签到连续签到的主要内容,如果未能解决你的问题,请参考以下文章