机器学习笔记 - 深入了解TensorFlow模型优化工具包
Posted 坐望云起
tags:
篇首语:本文由小常识网(cha138.com)小编为大家整理,主要介绍了机器学习笔记 - 深入了解TensorFlow模型优化工具包相关的知识,希望对你有一定的参考价值。
一、概述
TensorFlow 模型优化工具包是一套用于优化 ML 模型以进行部署和执行的工具。TensorFlow 模型优化工具包 (TF MOT) 支持的不同模型优化技术。
该工具包支持用于:
降低云和边缘设备(例如移动设备、物联网)的延迟和推理成本。
将模型部署到对处理、内存、功耗、网络使用和模型存储空间有限制的边缘设备。
为现有硬件或新的专用加速器启用执行和优化。
使用以下命令安装 TensorFlow 模型优化工具包
pip install tensorflow-model-optimization二、训练基础模型
1、导入包
import os
import numpy as np
import tensorflow as tf
from tensorflow import keras
import tensorflow_datasets as tfds
from tensorflow.keras.models import Model
import tensorflow_model_optimization as tfmot
from tensorflow.keras.layers import Dropout, Dense, BatchNormalization
2、加载数据集
这里使用猫狗大战数据集
(train_ds, val_ds, test_ds), info = tfds.load('cats_vs_dogs', split=['train[:70%]', 'train[70%:90%]', 'train[90%:]'], shuffle_files=True, as_supervised=True, with_info=True)
查看数据集
# Printing dataset information.
print("Number of  Classes: " + str(info.features['label'].num_classes))
print("Classes : " + str(info.features['label'].names))
NUM_TRAIN_IMAGES = tf.data.experimental.cardinality(train_ds).numpy()
print("Training Images: " + str(NUM_TRAIN_IMAGES))
NUM_VAL_IMAGES = tf.data.experimental.cardinality(val_ds).numpy()
print("Validation Images: " + str(NUM_VAL_IMAGES))
NUM_TEST_IMAGES = tf.data.experimental.cardinality(test_ds).numpy()
print("Testing Images: " + str(NUM_TEST_IMAGES))
3、调整数据集大小
# Defining batch size and input image size.
batch_size = 16
img_size = [224, 224]
# Resizing images in the dataset.
train_ds = train_ds.map(lambda x, y: (tf.image.resize(x, img_size), y))
val_ds = val_ds.map(lambda x, y: (tf.image.resize(x, img_size), y))
test_ds = test_ds.map(lambda x, y: (tf.image.resize(x, img_size), y))train_ds = train_ds.cache().batch(batch_size).prefetch(buffer_size=10)
val_ds = val_ds.cache().batch(batch_size).prefetch(buffer_size=10)
test_ds = test_ds.cache().batch(batch_size).prefetch(buffer_size=10)4、加载模型
这里基于之前的模型基础上进行继续训练。
# Importing the keras model.
model = tf.keras.models.load_model('/content/drive/MyDrive/TFLiteBlog/models/model.h5')
# Compiling the model.
model.compile( optimizer=tf.keras.optimizers.Adam(0.0001), loss =tf.keras.losses.SparseCategoricalCrossentropy(from_logits=False), metrics = ["accuracy"])model.summary()
定义回调和损失函数
# Defining file path.
filepath = '/content/model.h5'

# Defining Model Save Callback and Reduce Learning Rate Callback for achieving better results.
model_save = tf.keras.callbacks.ModelCheckpoint(
    filepath,
    monitor="val_accuracy",
    verbose=0,
    save_best_only=True,
    save_weights_only=False,
    mode="max",
    save_freq="epoch")

reduce_lr = tf.keras.callbacks.ReduceLROnPlateau(monitor='loss', factor=0.1, patience=3, verbose=1, min_delta = 5*1e-3,min_lr = 5*1e-9,)

callback = [model_save, reduce_lr]
5、训练模式
# Training the model for 2 epochs.
model.fit(train_ds, epochs=2, steps_per_epoch = (len(train_ds)//batch_size), validation_data=val_ds, validation_steps = (len(val_ds)//batch_size), shuffle = False, callbacks=callback)

# Evaluating the model on the test dataset.
_, baseline_model_accuracy = model.evaluate(test_ds, verbose=0)
print(Baseline Keras Model Test Accuracy:', baseline_model_accuracy*100)
验证结果
Baseline Keras Model Test Accuracy : 98.49 %三、使用修剪优化模型
模型的修剪涉及删除模型中对其预测影响最小的参数。在权重修剪中,权重张量中不必要的值被消除。神经网络参数的值设置为零,以消除神经网络各层之间不必要的连接。这是在训练过程中完成的,以允许神经网络适应变化。有效的剪枝可以显着减小模型大小。

在这里,我们将只修剪最终的密集层。我们将克隆基础模型并将修剪应用到其最终的密集层。
# Dense layers train with pruning.
def apply_pruning_to_dense(layer):
  if isinstance(layer, tf.keras.layers.Dense):
    return tfmot.sparsity.keras.prune_low_magnitude(layer)
  return layer
# Using `tf.keras.models.clone_model` to apply `apply_pruning_to_dense`  to the layers of the model.
model_for_pruning = tf.keras.models.clone_model(model, clone_function = apply_pruning_to_dense)
继续编译具有与基本模型相同的损失函数和指标的模型
# Compiling model for pruning.
model_for_pruning.compile(
      optimizer=tf.keras.optimizers.Adam(0.0001),
      loss =tf.keras.losses.SparseCategoricalCrossentropy(from_logits=False),                     metrics = ["accuracy"])
tfmot.sparsity.keras.UpdatePruningStep 在训练期间是必需的,因为它使用优化器步骤更新修剪包装器,并tfmot.sparsity.keras. PruningSummaries提供用于跟踪进度和调试的日志。
# Defining the Callbacks and assigning the log directory.
logdir = 'content/logs'
callbacks = [
  tfmot.sparsity.keras.UpdatePruningStep(),
  tfmot.sparsity.keras.PruningSummaries(log_dir=logdir),
]
微调模型
# Fine tuning the model.
model_for_pruning.fit(train_ds, batch_size=batch_size, epochs=2, validation_data=val_ds, callbacks=callbacks)
评估这个修剪后的模型
# Evaluating pruned Keras model on the test dataset._, model_for_pruning_accuracy = model_for_pruning.evaluate(test_ds, verbose=0)
print('Baseline Keras Model Test Accuracy:', baseline_model_accuracy*100)
print('Pruned Keras Model Test Accuracy:', model_for_pruning_accuracy*100)
修剪前后比较
Baseline Keras Model Test Accuracy: 98.49 %
Pruned Keras Model Test Accuracy: 99.14 % 保存修剪的模型,使用strip_pruning()消除tf.Variable了仅在训练期间需要进行的所有修剪,否则会在推理期间增加模型大小。
# Exporting pruned Keras
modelmodel_for_export = tfmot.sparsity.keras.strip_pruning(model_for_pruning)
tf.keras.models.save_model(model_for_export, '/content/pruned_keras_model.h5', include_optimizer=False)
四、使用权重聚类优化模型
聚类的工作原理是将模型中每一层的权重分组到预定义数量的集群中,然后共享属于每个单独集群的权重的质心值。这减少了模型中唯一权重值的数量,从而降低了其复杂性。因此,可以更有效地压缩集群模型,提供类似于修剪的部署优势。要对模型进行聚类,需要先对其进行全面训练,然后再将其传递给聚类 API。由于我们已经训练了我们的基线模型,我们现在可以继续对我们的模型进行聚类。

使用 TFMOT 定义聚类权重和质心初始化。
# Defining clustered weights using TFMOT.
cluster_weights = tfmot.clustering.keras.cluster_weights
CentroidInitialization =tfmot.clustering.keras.CentroidInitialization
该number_of_clusters 参数是对层/模型进行聚类时要形成的聚类质心的数量。这里我们设置为 16。这将确保每个权重张量的唯一值不超过 16 个。该参数确定如何初始化集群质心。
# Setting clustering parameters
clustering_params =  'number_of_clusters': 16,  'cluster_centroids_init': CentroidInitialization.LINEAR
clustered_model = cluster_weights(model, **clustering_params)
编译权重聚类模型。
# Compiling clustered model.
clustered_model.compile(optimizer=tf.keras.optimizers.Adam(0.0001), loss =tf.keras.losses.SparseCategoricalCrossentropy(from_logits=False), metrics = ["accuracy"])
微调权重聚类模型
# Fine-tune model.
clustered_model.fit(train_ds, batch_size= batch_size, epochs=2, validation_data = val_ds)
在测试集上评估聚类模型
# Evaluating the Fine-tuned clustered model._, clustered_model_accuracy = clustered_model.evaluate(test_ds, verbose=0)
print('Baseline Keras Model Test Accuracy:', baseline_model_accuracy*100)
print('Pruned Keras Model Test Accuracy:', model_for_pruning_accuracy*100)print('Clustered Keras Model Test Accuracy:', clustered_model_accuracy*100)
输出
Baseline Keras Model Test Accuracy: 97.76 %
Pruned Keras Model Test Accuracy: 99.35 %
Clustered Keras Model Test Accuracy: 70.16 %
导出集群模型并将其保存为 Keras 的 .h5 格式。在这里,我们将使用strip_clustering() 删除在训练期间添加的掩码并返回与基本模型相似大小的权重指标。
# Saving the clustered model.
final_model = tfmot.clustering.keras.strip_clustering(clustered_model)
clustered_keras_file = '/content/weight_clustered_keras_model.h5'
tf.keras.models.save_model(final_model, clustered_keras_file, include_optimizer=False)
五、使用Quant-aware训练优化模型
当从浮点数转移到较低的精度时,通常会精度显着下降,因为这是一个有损过程。这种损失可以在量化感知训练的帮助下最小化。Quant-aware 训练模拟正向传递中的低精度行为,而反向传递保持不变。这会引起一些量化误差,这些误差会累积在模型的总损失中,因此优化器会尝试通过相应地调整参数来减少它。这使我们的参数对量化更加鲁棒,使我们的过程几乎无损。
仅量化最终的密集层
# Only the dense layers are quantized.
def apply_quantization_to_dense(layer):
  if isinstance(layer, tf.keras.layers.Dense):
    return tfmot.quantization.keras.quantize_annotate_layer(layer)
  return layer

# Cloning base model and applying quantization on dense layers.
annotated_model = tf.keras.models.clone_model(
    model,
    clone_function=apply_quantization_to_dense,
)

quant_aware_model = tfmot.quantization.keras.quantize_apply(annotated_model)
quant_aware_model.summary()
编译模型
# Compiling the quant aware
model.quant_aware_model.compile(optimizer=tf.keras.optimizers.Adam(0.0001), loss =tf.keras.losses.SparseCategoricalCrossentropy(from_logits=False), metrics = ["accuracy"]
)
微调模型
# Fine-tuning quantization aware trained model.
quant_aware_model.fit(train_ds, batch_size=batch_size, epochs=2, validation_data=val_ds)
在测试集上评估这个新训练的模型
# Evaluating quantization aware trained model on test dataset.
_, quant_aware_model_accuracy = quant_aware_model.evaluate(test_ds, verbose=0)
print('Baseline Keras Model Test Accuracy:', baseline_model_accuracy*100)
print('Pruned Keras Model Test Accuracy:', model_for_pruning_accuracy*100)
print('Clustered Keras Model Test Accuracy:', clustered_model_accuracy*100)
print('Quantization Aware Trained Model Test accuracy:', quant_aware_model_accuracy*100)
输出
Baseline Keras Model Test Accuracy: 98.49%
Pruned Keras Model Test Accuracy: 99.14%
Clustered Keras Model Test Accuracy: 70.16%
Quantization Aware Trained Model Test accuracy: 99.35%
保存模型
# Saving quantization aware trained Keras model.
quant_aware_model.save('/content/quant_aware_keras_model.h5')
为了加载经过量化感知训练的 Keras 模型,需要对其进行反序列化。quantize_scope()函数用于反序列化要加载的 Keras 模型。
六、优化模型对比
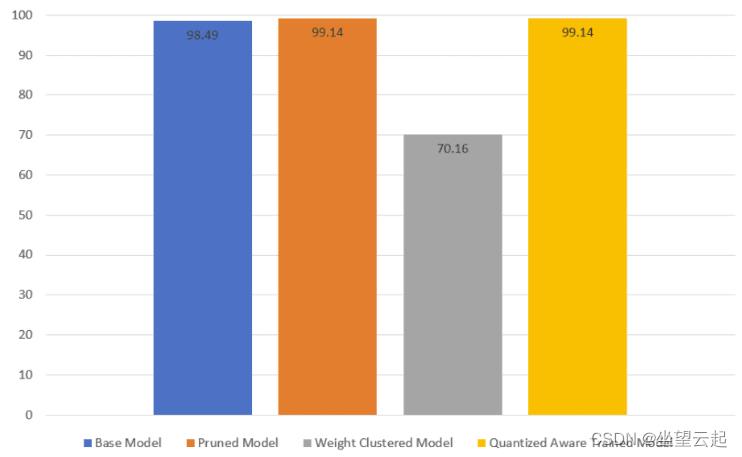
剪枝模型和量化感知训练模型具有相似的测试精度,并且它们在测试集上的性能优于基础模型。权重聚类模型的测试精度明显低于基础模型。

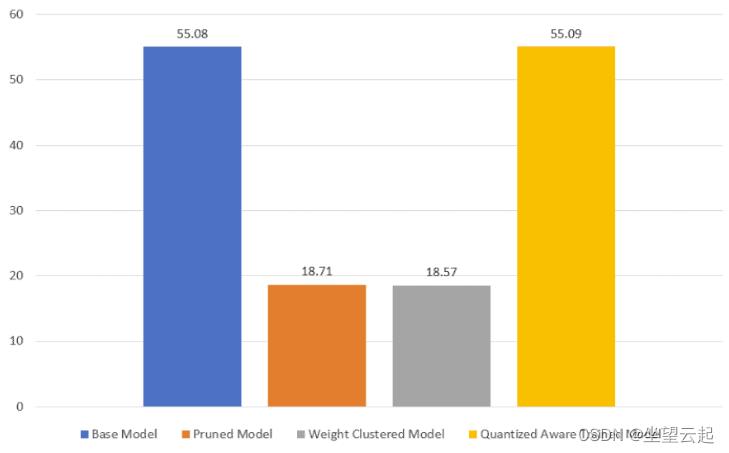
在剪枝和权重聚类模型中观察到了多达 3 倍的尺寸减小。量化感知模型的大小与基本模型的大小相似。
以上是关于机器学习笔记 - 深入了解TensorFlow模型优化工具包的主要内容,如果未能解决你的问题,请参考以下文章