Dagger2教程五之单例模式(原)
Posted 工程师阿杜
tags:
篇首语:本文由小常识网(cha138.com)小编为大家整理,主要介绍了Dagger2教程五之单例模式(原)相关的知识,希望对你有一定的参考价值。
为了介绍Dagger2的使用,我们搭建了一个Demo来逐步分析,大家可以在这里下载源码(https://github.com/dushaofeng/DaggerDemo.git)。
上一节我们介绍了《Dagger2教程四之多构造方法的情况》,这一节我们来介绍Dagger2中的单例模式的使用。
Dagger2中有一个极其具有迷惑性的注释" @Singleton",字面意思感觉可以达到单例模式的作用,但实际上他的这个"单例"有点假。为什么说有点假呢?因为他的确可以在一些情况下达到单例的作用,但是又和我们通常意义上的单例模式相差很远,用错了,可能会适得其反。
一、Singleton注释的使用
我们先来看一下这个注释的使用方法。如果我们在目标类中存在两个同样的注入类,它们实际上是两个不同的对象,请看这个定义:
        @Inject
        BeanNeedParam mBeanNeedParamCC;
        @Inject
BeanNeedParam mBeanNeedParamDD; //测试注入对象的地址
if (mBeanNeedParamCC != null)
Log.d(TAG, "mBeanNeedParamCC 地址:" + mBeanNeedParamCC);
if (mBeanNeedParamDD != null)
Log.d(TAG, "mBeanNeedParamDD 地址:" + mBeanNeedParamDD);

我们看到这两个对象的地址不同,这表明, 虽然mBeanNeedParamCC和mBeanNeedParamDD都是用BeanNeedParam进行注入,但是它们是分别单独注入的,每个对象都是独立的。
如果我们想要实现单例模式该如何办呢?比如我们想要mBeanNeedParamCC和mBeanNeedParamDD是同一个对象该怎么办呢?
这时候就可以用Singleton的注释了,进行如下改造:
1.1、改造BeanModule中的方法
在提供BeanNeedParam的方法上面添加@Singleton注释: @Singleton
@Provides
public BeanNeedParam providerBean(String name)
BeanNeedParam bean = new BeanNeedParam(name);
return bean;
1.2、改造BeanComponent
需要在BeanComponent中添加注释: @Singleton
@Component(modules = BeanModule.class)
public interface BeanComponent
void inject(MainActivity activity);
1.3、效果展示
然后我们再次运行程序,mBeanNeedParamCC和mBeanNeedParamDD的地址就变成同一个了:
它们打印出来地址相同, 这说明mBeanNeedParamCC和mBeanNeedParamDD是同一个对象,Singleton完成了单例模式的注入。
二、Singleton的假单例行为
看了上面的例子,我们发现Singleton的确实现了BeanNeedParam的单例注入,但是当我们把同样的"单例类"注入到其他类中时,再来看一下效果。我们现在创建一个新的类,为了方便测试,我们就 在Activity中创建一个子类OtherClass:
        class OtherClass
            @Inject
            BeanNeedParam mBeanNeedParamEE;


            @Inject
            BeanNeedParam mBeanNeedParamFF;


            public OtherClass()
                //重新注入
                DaggerBeanComponent.create().inject(this);
                this.testDagger();


            private void testDagger()
                //测试注入对象的地址
                if (mBeanNeedParamEE != null)
                    Log.d(TAG, "mBeanNeedParamEE 地址:" + mBeanNeedParamEE);

                if (mBeanNeedParamDD != null)
                    Log.d(TAG, "mBeanNeedParamFF 地址:" + mBeanNeedParamFF);
这里由于我们需要对OtherClass进行注入,因此需要在BeanComponent中添加新的inject()方法,如下:
        @Singleton
        @Component(modules = BeanModule.class)
        public interface BeanComponent
            //将BeanModule注入MainActivity中
            void inject(MainActivity activity);
            //将BeanModule注入OtherClass
            void inject(MainActivity.OtherClass otherClass);
OtherClass otherClass = new OtherClass();
这时我们发现,MainActivity中的mBeanNeedParamCC和mBeanNeedParamDD是同一个对象,而OtherClass中的mBeanNeedParamEE和mBeanNeedParamFF是另外的一个对象。
这说明, @Singleton的单例作用,只对同一次的inject()有效。
三、Singleton的单例作用范围
那么再进一步来分析,inject()方法实际上是通过DaggerBeanComponent.create()创建的BeanComponent对象的一个成员方法,也就是说: DaggerBeanComponent.create().inject(this); BeanComponent beanComponent = DaggerBeanComponent.create();
beanComponent.inject(this);下面我们将MainActivity和OtherClass用同一个BeanComponent进行注入来看一下效果。
在MainActivity中,我们将beanComponent对象传递给OtherClass:
private void testDagger()
            BeanComponent beanComponent = DaggerBeanComponent.create();
            beanComponent.inject(this);
if (mBeanNeedParamCC != null)
Log.d(TAG, "mBeanNeedParamCC 地址:" + mBeanNeedParamCC);
if (mBeanNeedParamDD != null)
Log.d(TAG, "mBeanNeedParamDD 地址:" + mBeanNeedParamDD);
OtherClass otherClass = new OtherClass(beanComponent);
        class OtherClass
            @Inject
            BeanNeedParam mBeanNeedParamEE;


            @Inject
            BeanNeedParam mBeanNeedParamFF;


            public OtherClass(BeanComponent bc)
                //使用Activity创建的BeanComponent进行注入
                bc.inject(this);
                this.testDagger();


            private void testDagger()
                //测试注入对象的地址
                if (mBeanNeedParamEE != null)
                    Log.d(TAG, "mBeanNeedParamEE 地址:" + mBeanNeedParamEE);

                if (mBeanNeedParamDD != null)
                    Log.d(TAG, "mBeanNeedParamFF 地址:" + mBeanNeedParamFF);

我们发现此时四个BeanNeedParam变量实际上是指向了同一个对象。
这说明, 在同一个BeanComponent对象内,单例是有效的。
四、让@Singleton成为全局单例
我们知道了@Singleton的作用范围之后,就可以根据不同需求来使用它, 当我们需要全局的单例时,就可以在Application中创建Component对象,然后将其提供给需要的类,从而实现App范围内的单例模式。具体实现步骤:
1、在应用的Application中创建Component对象,并将其暴露出来:
        public class DaggerApplication extends Application
            private BeanComponent mBeanComponent;


            @Override
            public void onCreate()
                super.onCreate();
                mBeanComponent = DaggerBeanComponent.create();


            public BeanComponent getBeanComponent()
                return mBeanComponent;
            BeanComponent beanComponent = ((DaggerApplication)getApplication()).getBeanComponent();
            beanComponent.inject(this);
五、@Scope注释
Dagger2中的@Scope注释的作用描述如下: /**
* Identifies scope annotations. A scope annotation applies to a class
* containing an injectable constructor and governs how the injector reuses
* instances of the type. By default, if no scope annotation is present, the
* injector creates an instance (by injecting the type's constructor), uses
* the instance for one injection, and then forgets it. If a scope annotation
* is present, the injector may retain the instance for possible reuse in a
* later injection. If multiple threads can access a scoped instance, its
* implementation should be thread safe. The implementation of the scope
* itself is left up to the injector.
*/看这个描述,他与@Singleton的作用非常相似,而实际上, @Singleton注释就是@Scope的一个默认实现。
因此,我们完全可以自定义一个全新的注释来实现和@Singleton相同的作用。
比如我们可以定义一个叫做MySingleton的注释来实现单例模式:
        @Scope
        @Documented
        @Retention(RUNTIME)
        public @interface MySingleton
六、Dagger流程总结
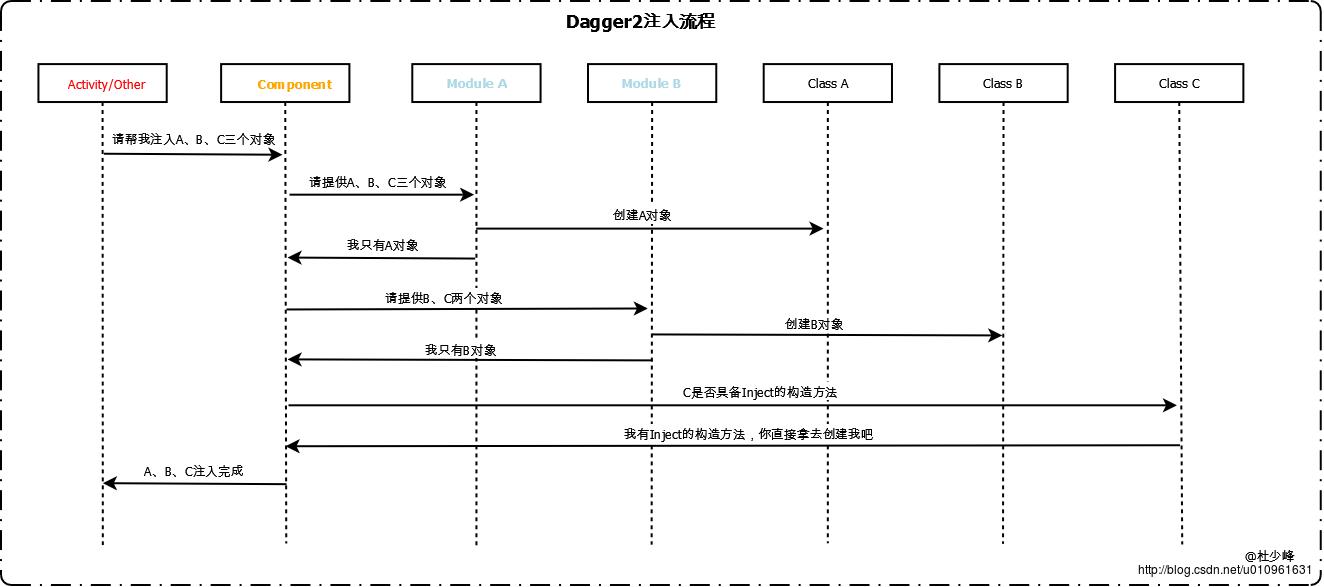
现在我们回头来看一下Dagger2中两大组件所起到的作用:Module:它用来提供各个注入类的集合,Dagger2在需要注入对象时, 将会先从Module中寻找要注入的类,找不到的话再去寻找标记了Inject的构造方法。
Component:它是目标类和注入类之间的桥梁和接口, 告诉Dagger2需要向哪里注入哪些类。
我们用一个图示来说明它们之间的关系:
下一节我们来介绍 《Dagger2教程六之Component的组织方法》。
以上是关于Dagger2教程五之单例模式(原)的主要内容,如果未能解决你的问题,请参考以下文章