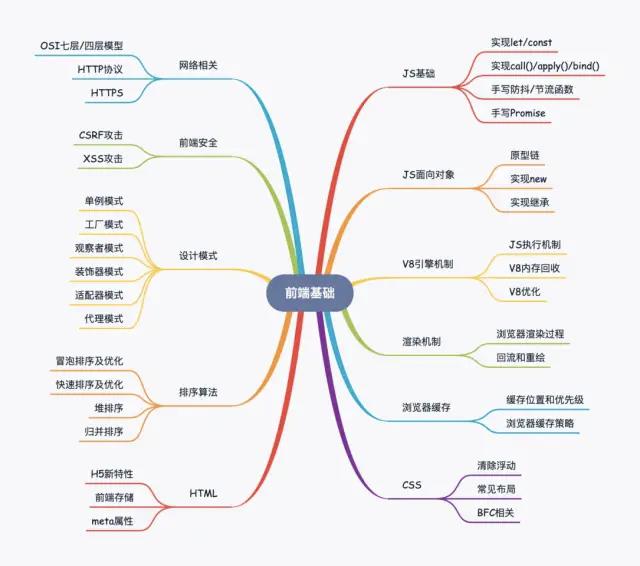
这2万字的前端基础知识查漏补缺,请你收藏好
Posted Jay_帅小伙
tags:
篇首语:本文由小常识网(cha138.com)小编为大家整理,主要介绍了这2万字的前端基础知识查漏补缺,请你收藏好相关的知识,希望对你有一定的参考价值。

一,JS基础
1.如何在es5环境下实现let
对于这个问题,我们可以直接查看babel转换前后的结果,看一下在循环中通过let定义的变量是如何解决变量提升的问题
- 源码
//源码
for(let i=0; i<10; i++)
	console.log(i)

	console.log(i)
babel转码
for(var _i = 0; _i < 10; _i++)
	console.log(_i)

	console.log(i)
babel在let定义的变量前加了道下划线,避免在块级作用域外访问到该变量,除了对变量名的转换,我们也可以通过自执行函数来模拟块级作用域。
(function()
 for(var i = 0; i < 5; i ++)
    console.log(i)  // 0 1 2 3 4

 )();
 console.log(i)      // Uncaught ReferenceError: i is not defined
2、如何在ES5环境下实现const
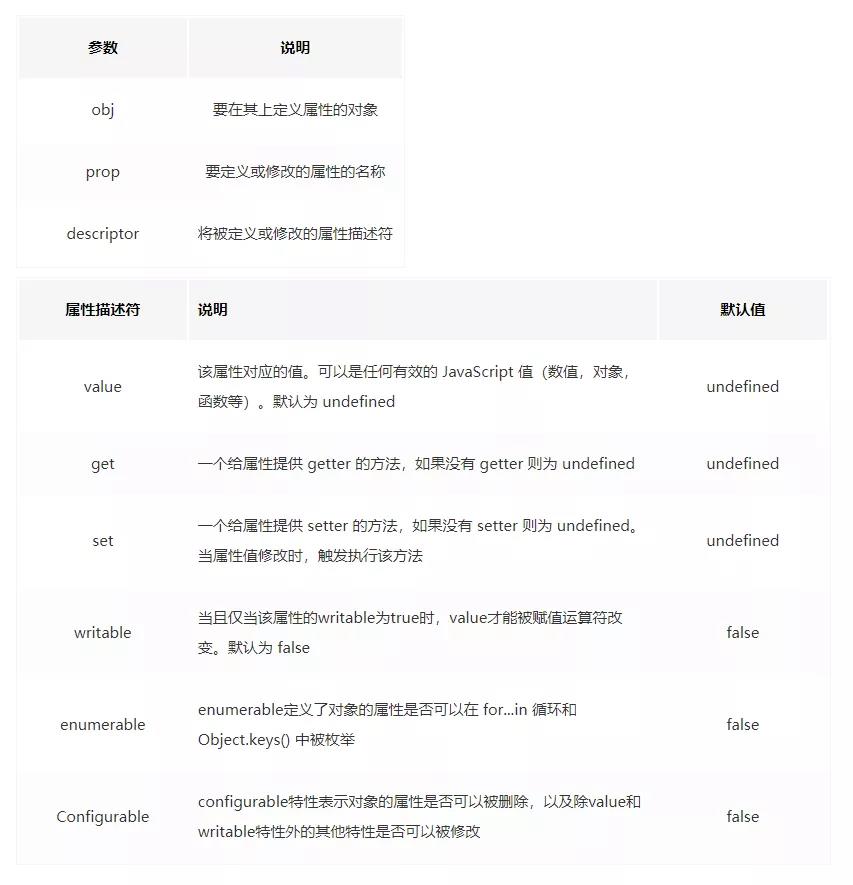
实现const的关键在于Object.defineProperty()这个API,这个API用于在一个对象上增加或修改属性。通过配置属性描述符,可以精确地控制属性行为。Object.defineProperty() 接收三个参数:
Object.defineProperty(obj, prop, desc)

- 对于const不可修改的特性,我们通过设置writable属性来实现
function _const(key, value)
   const desc =
        value,
        writable: false

  Object.defineProperty(window, key, desc)


_const('obj', a: 1)   //定义obj
obj.b = 2               //可以正常给obj的属性赋值
obj =                 //抛出错误,提示对象read-only
参考资料:如何在 ES5 环境下实现一个const ?
手写call()
call() 方法使用一个指定的 this 值和单独给出的一个或多个参数来调用一个函数
语法:function.call(thisArg, arg1, arg2, …)
call()的原理比较简单,由于函数的this指向它的直接调用者,我们变更调用者即完成this指向的变更:
//变更函数调用者示例
function foo()
 console.log(this.name)


// 测试
const obj =
name: '写代码像蔡徐抻'

obj.foo = foo   // 变更foo的调用者
obj.foo()       // '写代码像蔡徐抻'
- 基于以上原理, 我们两句代码就能实现call()
Function.prototype.myCall = function(thisArg, ...args)
    thisArg.fn = this              // this指向调用call的对象,即我们要改变this指向的函数
    return thisArg.fn(...args)     // 执行函数并return其执行结果
但是我们有一些细节需要处理:
Function.prototype.myCall = function(thisArg, ...args)
  const fn = Symbol('fn')  // 声明一个独有的Symbol属性, 防止fn覆盖已有属性
   thisArg = thisArg || window   // 若没有传入this, 默认绑定window对象
    thisArg[fn] = this // this指向调用call的对象,即我们要改变this指向的函数
    const result = thisArg[fn](...args)  // 执行当前函数
    delete thisArg[fn]          // 删除我们声明的fn属性
    return result       // 返回函数执行结果

    //测试
    foo.myCall(obj)   // 输出'写代码像蔡徐抻'
4. 手写apply()
apply() 方法调用一个具有给定this值的函数,以及作为一个数组(或类似数组对象)提供的参数。
apply()和call()类似,区别在于call()接收参数列表,而apply()接收一个参数数组,所以我们在call()的实现上简单改一下入参形式即可
Function.prototype.myApply = function(thisArg, args)
   const fn = Symbol('fn')        // 声明一个独有的Symbol属性, 防止fn覆盖已有属性
    thisArg = thisArg || window    // 若没有传入this, 默认绑定window对象
    thisArg[fn] = this              // this指向调用call的对象,即我们要改变this指向的函数
    const result = thisArg[fn](...args)  // 执行当前函数
    delete thisArg[fn]              // 删除我们声明的fn属性
    return result                  // 返回函数执行结果


//测试
foo.myApply(obj, [])     // 输出'写代码像蔡徐抻'
5、手写bind()
bind() 方法创建一个新的函数,在 bind() 被调用时,这个新函数的 this 被指定为 bind() 的第一个参数,而其余参数将作为新函数的参数,供调用时使用。
语法: function.bind(thisArg, arg1, arg2, …)
从用法上看,似乎给call/apply包一层function就实现了bind():
Function.prototype.myBind = function(thisArg, ...args)
 return () =>
   this.apply(thisArg, args)
但我们忽略了三点:
- bind()除了this还接收其他参数,bind()返回的函数也接收参数,这两部分的参数都要传给返回的函数
- new的优先级:如果bind绑定后的函数被new了,那么此时this指向就发生改变。此时的this就是当前函数的实例
- 没有保留原函数在原型链上的属性和方法
Function.prototype.myBind = function (thisArg, ...args)
  var self = this
  // new优先级
  var fbound = function ()
        self.apply(this instanceof self ? this : thisArg, 		args.concat(Array.prototype.slice.call(arguments)))

// 继承原型上的属性和方法
    fbound.prototype = Object.create(self.prototype);

return fbound;


//测试
const obj =  name: '写代码像蔡徐抻'
function foo()
console.log(this.name)
console.log(arguments)


foo.myBind(obj, 'a', 'b', 'c')()    //输出写代码像蔡徐抻 ['a', 'b', 'c']
6、手写一个防抖函数
防抖和节流的概念都比较简单,所以我们就不在“防抖节流是什么”这个问题上浪费过多篇幅了,简单点一下:
防抖,即短时间内大量触发同一事件,只会执行一次函数,实现原理为设置一个定时器,约定在xx毫秒后再触发事件处理,每次触发事件都会重新设置计时器,直到xx毫秒内无第二次操作,防抖常用于搜索框/滚动条的监听事件处理,如果不做防抖,每输入一个字/滚动屏幕,都会触发事件处理,造成性能浪费。
function debounce(func, wait)
 let timeout = null
 return function()
  let context = this
  let args = arguments
  if (timeout) clearTimeout(timeout)
   timeout = setTimeout(() =>
            func.apply(context, args)
    , wait)
7、手写一个节流函数
防抖是延迟执行,而节流是间隔执行,函数节流即每隔一段时间就执行一次,实现原理为设置一个定时器,约定xx毫秒后执行事件,如果时间到了,那么执行函数并重置定时器,和防抖的区别在于,防抖每次触发事件都重置定时器,而节流在定时器到时间后再清空定时器
方式一 延时器
function throttle(func, wait)
let timeout = null
return function()
let context = this
let args = arguments
if (!timeout)
            timeout = setTimeout(() =>
                timeout = null
                func.apply(context, args)
            , wait)
实现方式2:使用两个时间戳prev旧时间戳和now新时间戳,每次触发事件都判断二者的时间差,如果到达规定时间,执行函数并重置旧时间戳
function throttle(func, wait)
var prev = 0;
return function()
let now = Date.now();
let context = this;
let args = arguments;
if (now - prev > wait)
            func.apply(context, args);
            prev = now;
数组扁平化
对于[1, [1,2], [1,2,3]]这样多层嵌套的数组,我们如何将其扁平化为[1, 1, 2, 1, 2, 3]这样的一维数组呢:
- 1.ES6的flat()
const arr = [1, [1,2], [1,2,3]]
arr.flat(Infinity)  // [1, 1, 2, 1, 2, 3]
- 2.序列化后正则
const arr = [1, [1,2], [1,2,3]]
const str = `[$JSON.stringify(arr).replace(/(\\[|\\])/g, '')]`
JSON.parse(str)   // [1, 1, 2, 1, 2, 3]
- 3.递归
对于树状结构的数据,最直接的处理方式就是递归
const arr = [1, [1,2], [1,2,3]]
function flat(arr)
let result = []
for (const item of arr)
    item instanceof Array ? result = result.concat(flat(item)) : result.push(item)

return result


flat(arr) // [1, 1, 2, 1, 2, 3]
- 4.reduce()递归
const arr = [1, [1,2], [1,2,3]]
function flat(arr)
return arr.reduce((prev, cur) =>
return prev.concat(cur instanceof Array ? flat(cur) : cur)
  , [])


flat(arr)  // [1, 1, 2, 1, 2, 3]
- 5.迭代+展开运算符
let arr = [1, [1,2], [1,2,3]]
while (arr.some(Array.isArray))
  arr = [].concat(...arr);


console.log(arr)  // [1, 1, 2, 1, 2, 3]
9. 手写一个Promise
异步编程二三事 | Promise/async/Generator实现原理解析 | 9k字
二、JS面向对象
在JS中一切皆对象,但JS并不是一种真正的面向对象(OOP)的语言,因为它缺少类(class)的概念。虽然ES6引入了class和extends,使我们能够轻易地实现类和继承。但JS并不存在真实的类,JS的类是通过函数以及原型链机制模拟的,本小节的就来探究如何在ES5环境下利用函数和原型链实现JS面向对象的特性。
在开始之前,我们先回顾一下原型链的知识,后续new和继承等实现都是基于原型链机制。很多介绍原型链的资料都能写上洋洋洒洒几千字,但我觉得读者们不需要把原型链想太复杂,容易把自己绕进去,其实在我看来,原型链的核心只需要记住三点:
- 每个对象都有__proto__属性,该属性指向其原型对象,在调用实例的方法和属性时,如果在实例对象上找不到,就会往原型对象上找
- 构造函数的prototype属性也指向实例的原型对象
- 原型对象的constructor属性指向构造函数

1、模拟实现new
首先我们要知道new做了什么
- 创建一个新对象,并继承其构造函数的prototype,这一步是为了继承构造函数原型上的属性和方法
- 执行构造函数,方法内的this被指定为该新实例,这一步是为了执行构造函数内的赋值操作
- 返回新实例(规范规定,如果构造方法返回了一个对象,那么返回该对象,否则返回第一步创建的新对象)
// new是关键字,这里我们用函数来模拟,new Foo(args) <=> myNew(Foo, args)
function myNew(foo, ...args)
// 创建新对象,并继承构造方法的prototype属性, 这一步是为了把obj挂原型链上, 相当于obj.__proto__ = Foo.prototype
let obj = Object.create(foo.prototype)

// 执行构造方法, 并为其绑定新this, 这一步是为了让构造方法能进行this.name = name之类的操作, args是构造方法的入参, 因为这里用myNew模拟, 所以入参从myNew传入
let result = foo.apply(obj, args)

// 如果构造方法已经return了一个对象, 那么就返回该对象, 一般情况下,构造方法不会返回新实例,但使用者可以选择返回新实例来覆盖new创建的对象 否则返回myNew创建的新对象
return typeof result === 'object' && result !== null ? result : obj


function Foo(name)
this.name = name

const newObj = myNew(Foo, 'zhangsan')
console.log(newObj)                 // Foo name: "zhangsan"
console.log(newObj instanceof Foo)  // true
2、ES5如何实现继承
说到继承,最容易想到的是ES6的extends,当然如果只回答这个肯定不合格,我们要从函数和原型链的角度上实现继承,下面我们一步步地、递进地实现一个合格的继承
- 1). 原型链继承
原型链继承的原理很简单,直接让子类的原型对象指向父类实例,当子类实例找不到对应的属性和方法时,就会往它的原型对象,也就是父类实例上找,从而实现对父类的属性和方法的继承
// 父类
function Parent()
this.name = '写代码像蔡徐抻'

// 父类的原型方法
Parent.prototype.getName = function()
return this.name

// 子类
function Child()

// 让子类的原型对象指向父类实例, 这样一来在Child实例中找不到的属性和方法就会到原型对象(父类实例)上寻找
Child.prototype = new Parent()
Child.prototype.constructor = Child // 根据原型链的规则,顺便绑定一下constructor, 这一步不影响继承, 只是在用到constructor时会需要

// 然后Child实例就能访问到父类及其原型上的name属性和getName()方法
const child = new Child()
child.name          // '写代码像蔡徐抻'
child.getName()     // '写代码像蔡徐抻'
原型继承的缺点:
- 由于所有Child实例原型都指向同一个Parent实例, 因此对某个Child实例的父类引用类型变量修改会影响所有的Child实例
- 在创建子类实例时无法向父类构造传参, 即没有实现super()的功能
// 示例:
function Parent()
 this.name = ['写代码像蔡徐抻']

Parent.prototype.getName = function()
 return this.name

function Child()

Child.prototype = new Parent()
Child.prototype.constructor = Child

// 测试
const child1 = new Child()
const child2 = new Child()
child1.name[0] = 'foo'
console.log(child1.name)          // ['foo']
console.log(child2.name)          // ['foo'] (预期是['写代码像蔡徐抻'], 对child1.name的修改引起了所有child实例的变化
- 2)、 构造函数继承
构造函数继承,即在子类的构造函数中执行父类的构造函数,并为其绑定子类的this,让父类的构造函数把成员属性和方法都挂到子类的this上去,这样既能避免实例之间共享一个原型实例,又能向父类构造方法传参
function Parent(name)
 this.name = [name]

Parent.prototype.getName = function()
 return this.name

function Child()
    Parent.call(this, 'zhangsan')   // 执行父类构造方法并绑定子类的this, 使得父类中的属性能够赋到子类的this上


//测试
const child1 = new Child()
const child2 = new Child()
child1.name[0] = 'foo'
console.log(child1.name)          // ['foo']
console.log(child2.name)          // ['zhangsan']
child2.getName()                  // 报错,找不到getName(), 构造函数继承的方式继承不到父类原型上的属性和方法
构造函数继承的缺点:
继承不到父类原型上的属性和方法
- 3)、 组合式继承
既然原型链继承和构造函数继承各有互补的优缺点, 那么我们为什么不组合起来使用呢, 所以就有了综合二者的组合式继承
function Parent(name)
this.name = [name]

Parent.prototype.getName = function()
return this.name

function Child()
// 构造函数继承
    Parent.call(this, 'zhangsan')

//原型链继承
Child.prototype = new Parent()
Child.prototype.constructor = Child

//测试
const child1 = new Child()
const child2 = new Child()
child1.name[0] = 'foo'
console.log(child1.name)          // ['foo']
console.log(child2.name)          // ['zhangsan']
child2.getName()                  // ['zhangsan']
组合式继承的缺点:
-
每次创建子类实例都执行了两次构造函数(Parent.call()和new Parent()),虽然这并不影响对父类的继承,但子类创建实例时,原型中会存在两份相同的属性和方法,这并不优雅
-
4)、寄生式组合继承
为了解决构造函数被执行两次的问题, 我们将指向父类实例改为指向父类原型, 减去一次构造函数的执行
function Parent(name)
this.name = [name]
Parent.prototype.getName = function()
return this.name
function Child()
// 构造函数继承
Parent.call(this, 'zhangsan')
//原型链继承
// Child.prototype = new Parent()
Child.prototype = Parent.prototype //将`指向父类实例`改为`指向父类原型`
Child.prototype.constructor = Child
//测试
const child1 = new Child()
const child2 = new Child()
child1.name[0]