《翻转组件库之卡片设计》
Posted 杨晓风-linda
tags:
篇首语:本文由小常识网(cha138.com)小编为大家整理,主要介绍了《翻转组件库之卡片设计》相关的知识,希望对你有一定的参考价值。
背景
本次组件库的实现以封装一个卡片组件为例,本篇博客主要展现基本流程和大致思路
设计思路

设计原则
注重通用性,提高开发效率
具体方案
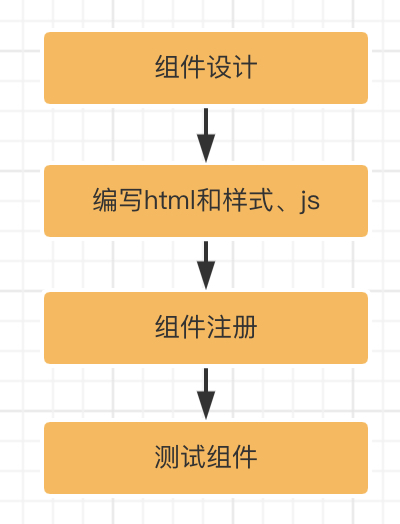
组件设计
UI

Attributes

编写html和样式
html
1、components → lib

2、components/lib/card/src/main.vue
<!--
 * @Descripttion:
 * @version: v1.0
 * @Author: linda
 * @Date: 2022-03-02 22:47:04
 * @LastEditors: linda
 * @LastEditTime: 2022-03-02 23:24:28
-->
<template>
  <div class="m-card"
       :style="width? width: width + 'px': ">
    <div class="m-card-img"
         :style="imgHeight? height: imgHeight + 'px':">
      <img :src="imgSrc"
           alt="img">
    </div>
    <div v-if="summary"
         class="m-card-summary">
      summary
    </div>
    <div class="m-card-summary">
      <slot></slot>
    </div>
    <slot name="footer"></slot>
  </div>
</template>

<script>
export default
  name: 'm-card',
  props:
    width:
      type: Number,
      default: 0
    ,
    imgSrc:
      type: String,
      default: ''
    ,
    imgHeight:
      type: Number,
      default: 0
    ,
    summary:
      type: String,
      default: ''


</script>
样式
sass官方网址:Sass世界上最成熟、稳定和强大的CSS扩展语言 | Sass中文网
1、目录结构 components → css

2、components/css/card.scss
.m-card
  width: 270px;
  border-radius: 8px;
  background: #fff;
  overflow: hidden;
  box-shadow: 0 16px 10px 0 rgba(95, 101, 105, 0.15);
  padding-bottom: 8px;

  &-img
    height: 152px;
    img
      width: 100%;
      height: 100%;


  &-summary
    padding: 8px;
    font-size: 14px;
    text-align: left;
3、components/css/index.scss
@import './card.scss';组件注册
1、examples/main.js
/*
 * @Descripttion:
 * @version: v1.0
 * @Author: linda
 * @Date: 2022-03-02 17:12:28
 * @LastEditors: linda
 * @LastEditTime: 2022-03-02 23:00:18
 */
import Vue from 'vue'
import App from './App.vue'

import '../components/css/card.scss'
import Card from '../components/lib/card/index.js'

// 注册组件的流程是Card.install →  Vue.component,所以如果直接使用Vue.use注册组件的话,需要写逻辑
Vue.use(Card)

Vue.config.productionTip = false


new Vue(
  render: h => h(App),
).$mount('#app')
注册组件的流程是Card.install → Vue.component,所以如果直接使用Vue.use注册组件的话,需要将Card组件实现一个install方法,然后真正实现Vue.component的逻辑。如下第二步设计一个组件,第三步是设计多个组件的时候实现的install方法的逻辑
2、components/lib/card/index.js (单个组件)
/*
 * @Descripttion:
 * @version: v1.0
 * @Author: linda
 * @Date: 2022-03-02 22:46:52
 * @LastEditors: linda
 * @LastEditTime: 2022-03-02 22:48:10
 */
import Card from './src/main.vue'

Card.install = function(Vue)
  Vue.component(Card.name, Card)


export default Card
3、components/lib/index.js(多个组件共同导出)
/*
 * @Descripttion:
 * @version: v1.0
 * @Author: linda
 * @Date: 2022-03-03 22:56:18
 * @LastEditors: linda
 * @LastEditTime: 2022-03-03 23:00:44
 */
import Card from './card'

const components =
  Card


const install = function (Vue)

  if(install.installed) return;
  Object.keys(components).forEach(key=>
    Vue.component(components[key].name, components[key])
  )


const API =  install

export default API;
测试组件
examples/App.vue
<!--
 * @Descripttion:
 * @version: v1.0
 * @Author: linda
 * @Date: 2022-03-02 17:12:28
 * @LastEditors: linda
 * @LastEditTime: 2022-03-02 23:34:50
-->
<template>
  <div id="app">
    <div class="m-card-container">
      <m-card imgSrc="https://cube.elemecdn.com/6/94/4d3ea53c084bad6931a56d5158a48jpeg.jpeg"
              summary="翻转组件库搭建全流程"
              :width="370"
              :imgHeight="152">
        本课程旨在帮助你如何快速搭建一个组件库
        <template v-slot:footer>
          <div class="footer-spring">
            <div class="level">作者 . 花又开</div>
            <div class="price">英文.linda</div>
          </div>
        </template>
      </m-card>
    </div>

  </div>
</template>

<script>

export default
  name: 'App',

</script>

<style>
#app
  font-family: Avenir, Helvetica, Arial, sans-serif;
  -webkit-font-smoothing: antialiased;
  -moz-osx-font-smoothing: grayscale;
  text-align: center;
  color: #2c3e50;
  margin-top: 10px;


.m-card-container
  margin-top: 10px;
  display: flex;
  flex-direction: row;
  justify-content: space-around;


.footer
  padding: 0 8px;
  font-size: 12px;
  text-align: left;


.level
  color: #9199a1;
  margin-bottom: 8px;


.price
  color: #f01414;


.footer-spring
  display: flex;
  justify-content: space-between;
  padding: 0 8px;
  font-size: 12px;

</style>
至此,一个卡片组件就诞生了~ 接下来将要进行打包、构建、发布的相关步骤了,敬请期待...
以上是关于《翻转组件库之卡片设计》的主要内容,如果未能解决你的问题,请参考以下文章