Android APM方案完成代码注入
Posted TonyW92
tags:
篇首语:本文由小常识网(cha138.com)小编为大家整理,主要介绍了Android APM方案完成代码注入相关的知识,希望对你有一定的参考价值。
什么是APM
APM 是Application perfmance monitor的简称, 应用性能监控。在移动互联网对人们生活影响越来越大的今天,App的功能越来越全面,从吃穿住行,到支付开房,全方面覆盖。相同功能的App存在很多竞品,比如携程和艺龙,天猫和京东,网易云音乐和QQ音乐。随之而来的就是App性能的要求越来越高,不能被动的等待用户异常的发生然后根据线上日志去修复bug,再发补丁版本。主动监控App性能,变得越来越重要,分析App的耗电,UI卡顿,网络性能(Socket连接时间,首字节接受时间等等)成为了当物之急。但是如何能在不更改业务方代码的同时完成一个移动端的监控呢?AOP成为了我们一个很好的选择,我们首先了解一些基本概念。
一些基本概念
- JavaAgent
代理 (agent) 是在你的main方法前的一个拦截器 (interceptor),也就是在main方法执行之前,执行agent的代码。
主要作用
可以在加载class文件之前做拦截,对字节码做修改
agent的代码与你的main方法在同一个JVM中运行,并被同一个system classloader装载,被同一的安全策略 (security policy) 和上下文 (context) 所管理。
用法
public class MyAgent
    public static void agentmain(String args, Instrumentation instrumentation)
        permain(args, instrumentation);


    public static void permain(String args, Instrumentation instrumentation)
        instrumentation.addTransformer(new MainTransformer());
如果javaagent是在虚拟机启动之后加载的,我们需要在它的manifest文件中指定Agent-Class属性,它的值是javaagent的实现类,这个实现类需要实现一个agentmain方法
public static void agentmain(String args, Instrumentation instrumentation)
        permain(args, instrumentation);
但是如果javaagent是在JVM启动时通过命令行参数加载的,情况会不太一样,需要在它的manifest文件中指定Premain-Class属性,它的值是javaagent的实现类,这个实现类需要实现一个premain方法。
public static void permain(String args, Instrumentation instrumentation)
        instrumentation.addTransformer(new MainTransformer());
- Instrumentation
从Agent的两个方法可以看到都会传入2个参数,一个是参数agrs,另一个就是Instrumentation。那Instrumentation是什么呢
来看一段官方的解释
java.lang.instrument
public interface Instrumentation
This class provides services needed to instrument Java programming language code. Instrumentation is the addition of byte-codes to methods for the purpose of gathering data to be utilized by tools. Since the changes are purely additive, these tools do not modify application state or behavior. Examples of such benign tools include monitoring agents, profilers, coverage analyzers, and event loggers.
There are two ways to obtain an instance of the Instrumentation interface:
- When a JVM is launched in a way that indicates an agent class. In
that case an Instrumentation instance is passed to the premain
method of the agent class.- When a JVM provides a mechanism to start agents sometime after the
JVM is launched. In that case an Instrumentation instance is passed
to the agentmain method of the agent code.
大致意思是该类提供了用于设计Java编程语言代码所需的服务。同时举了两个改接口被实例化的例子。在permain和agentMain这个2个方法,jvm会提供2个被实例化的接口供我们调用。我们在这里只用到了addTransformer这个方法
 /**
     * Registers the supplied transformer.
     * <P>
     * Same as <code>addTransformer(transformer, false)</code>.
     *
     * @param transformer          the transformer to register
     * @throws java.lang.NullPointerException if passed a <code>null</code> transformer
     * @see    #addTransformer(ClassFileTransformer,boolean)
     */
    void
    addTransformer(ClassFileTransformer transformer);
它向JVM提供一个我们实现的ClassFileTransformer
- ClassFileTransformer
再来看下ClassFilesTransformer是什么
同样是一段官方API注释
java.lang.instrument
public interface ClassFileTransformer
An agent provides an implementation of this interface in order to transform class files. The transformation occurs before the class is defined by the JVM.
Note the term class file is used as defined in section 3.1 of The Java™ Virtual Machine Specification, to mean a sequence of bytes in class file format, whether or not they reside in a file.
Agent提供了一个实现该接口的实例,用来转换我们的Class文件。这种转换发生在JVM加在这些class文件之前。
那到底是如何转换的呢
让我们看看transform()这个方法
byte[]
    transform(  ClassLoader         loader,
                String              className,
                Class<?>            classBeingRedefined,
                ProtectionDomain    protectionDomain,
                byte[]              classfileBuffer)
        throws IllegalClassFormatException;
JVM向我们提供了该class的类加载器,类名,类型,还有最关键的字节码,然后我们利用下节会讲到的ASM工具,把classfileBuffer字节码改造成我们想要的样子,然后返回给JVM,就能达到我们静态织入字节码的目的的。我们可以利用这套流程干很多监控的事,比如统计网络情况,现在很流行的插桩埋点,统计方法时长。
如何实现hook
一个完整的无侵入APM分为3部分
- Agent
- plugin
- 业务代码
Agent很好理解,hook的入口,帮助我们获得每个类的字节码
plugin把Agent挂载到JVM上,在main()入口前,让Agent发挥它的作用
业务代码,根据我们的实际需求,改造获得的字节码,从而达到修改目标代码的目的
首先看下Agent的实现
- 新建一个Agent类
public class MyAgent
    public static void agentmain(String args, Instrumentation instrumentation)
        permain(args, instrumentation);


    public static void permain(String args, Instrumentation instrumentation)
        instrumentation.addTransformer(new MainTransformer());
- 然后实现我们的ClassFileTransformer
public class MainTransformer implements ClassFileTransformer

    @Override
    public byte[] transform(ClassLoader classLoader, String className, Class<?> classBeingRedefined, ProtectionDomain protectionDomain, byte[] classfileBuffer)
            throws IllegalClassFormatException
        System.out.println("className : " + className);
        return classfileBuffer;
这样一个最简单的Agent就实现了,等后面实现具体业务的时候,把
System.out.println("className : " + className);
替换成我们的实际业务改造代码就行了
最后主要在MANIFEST.MF文件中加上
Premain-Class: com.apm.MyAgent  //对应premain方法
Agent-Class: com.apm.MyAgent    //对应agentmain方法
打成jar包备用
- 构建一个plugin
plugin的作用是把我们之前编写的Agent插件注入到JVM里去。
由于我使用的IDE是android Studio,所以我选择的Plugin的承载形式是Gradle插件。
然后选择编写这个Gradle插件的IDE是IntelliJ IDEA,大家可以自行下载一下。
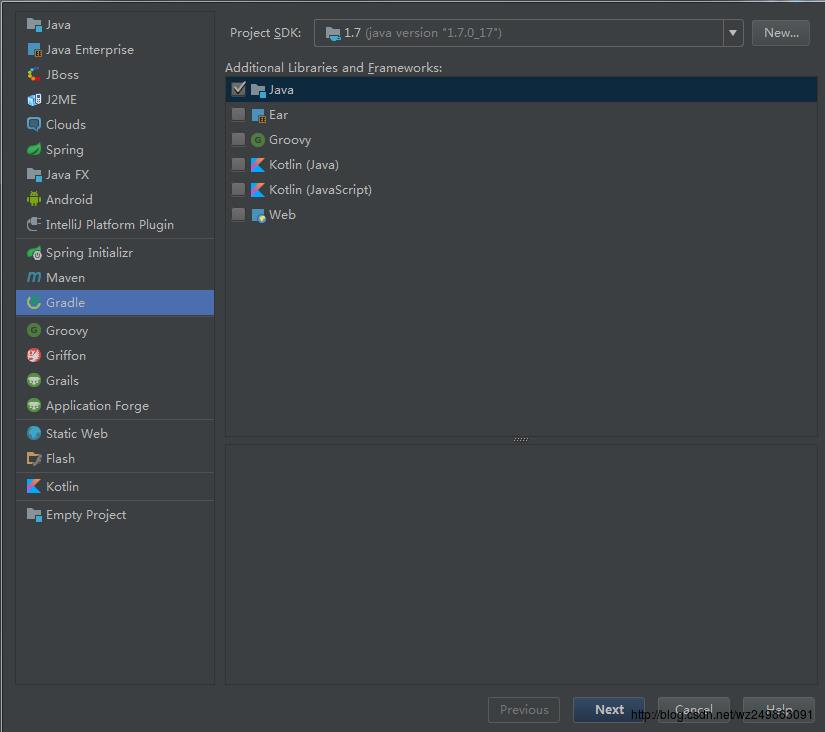
下载完IDE之后,我们需要新建一个Gralde插件的Project

这里千万千万注意,Project SDK 这里要选择1.7的JDK,如果选择1.8的话后面会引起Plugin加入到AndroidStudio后 ,报一个
If you are using the ‘java’ gradle plugin in a library submodule add targetCompatibility = ‘1.7’ 的错误
新建完项目之后,需要在root根目录下新建一个libs的文件夹,加入我们之前编写的apm.jar和Java\\jdk1.7.0_17\\lib下面的tools.jar,但是要注意打包的时候千万不要把这2个jar包打进去。
新建一个Java Class作为plugin
public class ApmPlugin implements Plugin<Project>
    @Override
    public void apply(Project project)
         //得到虚拟机的名字
        String nameOfRunningVM = ManagementFactory.getRuntimeMXBean().getName();
        int p = nameOfRunningVM.indexOf('@');
        String pid = nameOfRunningVM.substring(0, p);
        try
            //这里jar包的路径,就取一个Agent里的文件的路径就好了
            //这也是为什么我们要引入Agent.jar
            String jarFilePath = MyAgent.class.getProtectionDomain().getCodeSource().getLocation().toURI().getPath();
            jarFilePath = new File(jarFilePath).getCanonicalPath();
            VirtualMachine vm = VirtualMachine.attach(pid);
            vm.loadAgent(jarFilePath);
            vm.detach();
         catch (URISyntaxException | IOException | AgentInitializationException | AttachNotSupportedException | AgentLoadException e)
            throw new RuntimeException(e);
有了plugin之后,我们要告诉编译器这个plugin在哪
于是,在目录下新建resources目录,然后在resources目录里面再新建META-INF目录,再在META-INF里面新建gradle-plugins目录。最后在gradle-plugins目录里面新建properties文件。这个properties文件的名字可以是任取的,但是后面加在Plugin的时候,会用到这个名字。比如你新建了一个myagent.properties,那么你AndroidStudio的app module就需要加上
apply plugin: 'myagent'然后在myagent.properties文件里面指明你自定义的类
implementation-class=com.apm.myagent.ApmPlugin再然后就是最后一步了,打包成一个jar,供AndroidStudio使用
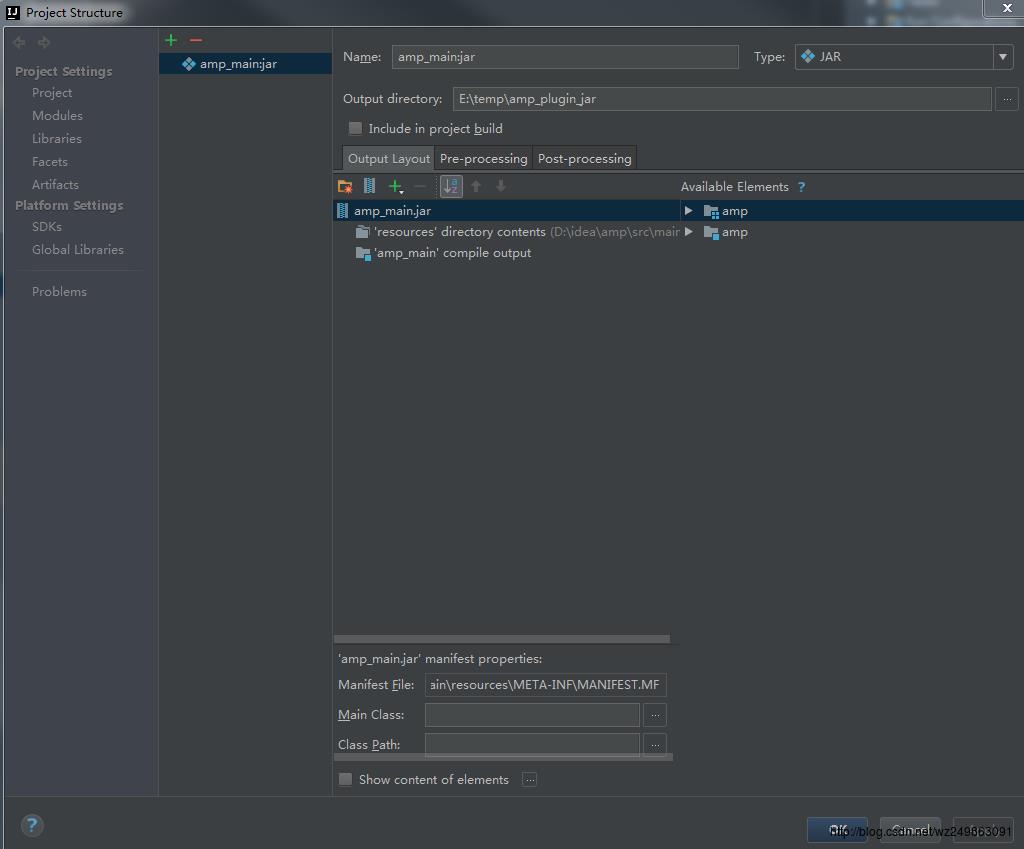
打开Project Structure(快捷键 Ctrl + Alt + Shift + S)
再Project Settings中找到Artifacts,然后按照下图配置

最后在Build中找到Build Artifacts点击之后再点击Build就能生成最后的Plugin的Jar包了
- 最后的配置
到目前为止我们已经有了2个jar包,一个Agent.jar,另一个Plugin.jar
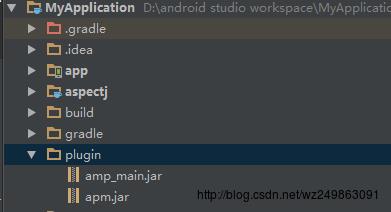
然后再我们AndroidStudio的项目根目录下新建一个plugin目录

然后再项目的gradle文件中加入(注意不是module的gradle文件)
dependencies
        classpath 'com.android.tools.build:gradle:2.3.1'
        classpath fileTree(dir: 'plugin', include: '*.jar')
最后在App module的gradle文件中加入
apply plugin: 'openapm'最后在Build中选择MakeProject,然后Clean
我们可以在控制台中看见

在这里被坑了下,这里的数据不会再Android Monitor输出,是在Gradle Console中显示
至此,我们已经成功把我们的Agent挂载到JVM上了,至于要编写哪些功能
再下一章节我们可以会修改Agent,完成一些真实的监控场景
参考文献
IBM Instrumentation 新功能 https://www.ibm.com/developerworks/cn/java/j-lo-jse61/
以上是关于Android APM方案完成代码注入的主要内容,如果未能解决你的问题,请参考以下文章