YOLOv1代码分析——pytorch版保姆级教程
Posted I松风水月
tags:
篇首语:本文由小常识网(cha138.com)小编为大家整理,主要介绍了YOLOv1代码分析——pytorch版保姆级教程相关的知识,希望对你有一定的参考价值。
目录
前言
前面我们介绍了yolov1-v5系列的目标检测理论部分,以及R-CNN,Fast R-CNN,Faster R-CNN,SSD目标检测算法的理论部分,有不懂的小伙伴可以回到前面看看,下面附上链接:
- 目标检测实战篇1——数据集介绍(PASCAL VOC,MS COCO)
- YOLOv1目标检测算法——通俗易懂的解析
- YOLOv2目标检测算法——通俗易懂的解析
- YOLOv3目标检测算法——通俗易懂的解析
- YOLOv4目标检测算法——通俗易懂的解析
- YOLOv5目标检测算法——通俗易懂的解析
- R-CNN、Fast RCNN和Faster RCNN网络介绍
- SSD目标检测算法——通俗易懂解析
这篇博文,我们来详细的剖析下yolov1的代码部分,内容很长,看的过程可能会很艰苦,详细你看完一定会有意想不到的收获。完整的代码放在我的github上了:https://github.com/chasecjg/yolov1
一.整体代码结构
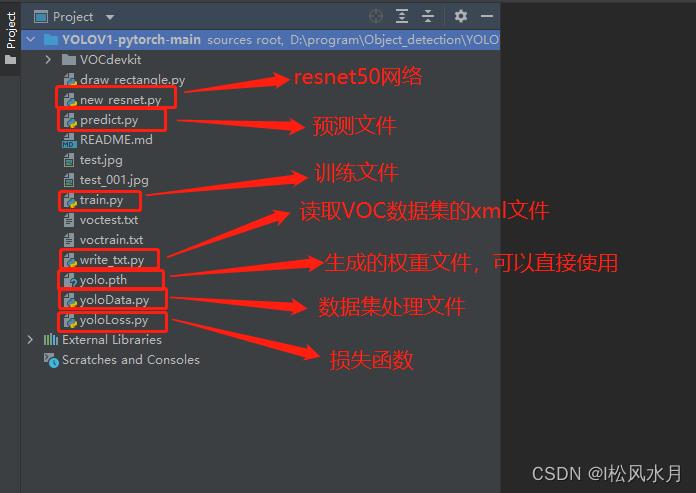
先来看下代码的整体结构,代码没有运行之前主要分为六个文件:
write_txt.py
yoloData.py
new_resnet.py
yoloLoss.py
train.py
predict.py

下面我们来逐一解读这六个文件的功能。
二.write_txt.py
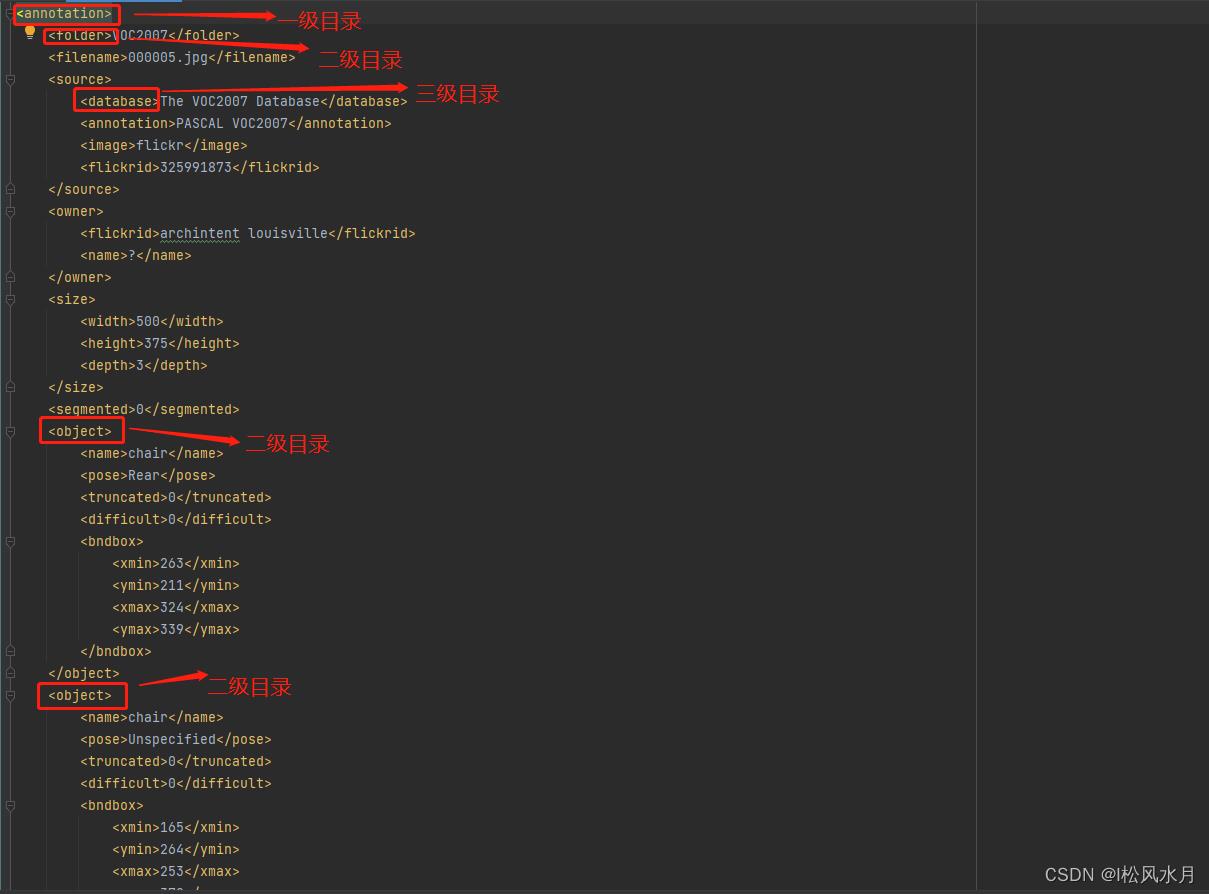
这个代码的作用是用来解析voc数据集的xml文件,在前面介绍数据集的时候我们介绍过voc数据集的标注文件信息内容长什么样。这个脚本的作用就是用来解析这些标注文件,把标注信息中的标注框和类别都给提取出来。我们再来看下这个xml文件里面都是什么信息:

从上面得xml信息可以看出我们的目标是放在二级目录中的,也就是我们要提取的信息,object下面包含物体的类别,识别难易程度,坐标信息。那我们应该怎么提取这些信息呢?看着很复杂,不要慌,在python中提供了现成的库来解析这些xml信息,就是ElementTree这个库,我们先来简答看下这个库怎么使用的:
class ElementTree:
    """
    ElementTree类是专门解析xml的一个类,在xml.etree.ElementTree包中
    """
    def __init__(self, element=None, file=None):
    	"""
    	element:指的是xml文件的根节点
    	file:指的是已经使用open打开的一个文件对象
    	"""
    def getroot(self):
        """
        返回树的根节点
        """
    def _setroot(self, element):
        """
        替换根节点
        """
    def parse(self, source, parser=None):
        """
        加载xml文件,解析文件
        source:是open打开的xml文件的对象
        parser:是是用什么方式解析xml文件
        return:返回值是xml文件的根节点
        """

    def iter(self, tag=None):
        """
        创建并返回根标签下所有的元素的迭代器
        tag:字符串,指的是根标签下的元素的子标签名称,如果不指定,就返回所有的子标签,如果指定只返回该名称的子节点
        """

    # compatibility
    def getiterator(self, tag=None):
        """
		这个方法已经弃用了,使用上面的iter替代
		"""
        warnings.warn(
            "This method will be removed in future versions.  "
            "Use 'tree.iter()' or 'list(tree.iter())' instead.",
            PendingDeprecationWarning, stacklevel=2
        )
        return list(self.iter(tag))

    def find(self, path, namespaces=None):
        """
        查找名为path标签的内容
        path:要查找的标签名字
        """
    def findtext(self, path, default=None, namespaces=None):
        """
		根据标记名称或路径找到第一个匹配的元素
		path:查找的子标签的名称
		namespace:命名空间
		返回值是要查找的标签的内容,不存在时返回None
        """
    def findall(self, path, namespaces=None):
        """
		查找所有名为path的子标签的内容
		path:标签的名称
		namespace:命名空间
		返回值是一个list,包含所有的名称为path的子标签的内容
        """
    def iterfind(self, path, namespaces=None):
        """
        根据标记名称找到所有的名为path的子标签的内容,返回值是一个迭代器
        path:
        namespace:
        返回值是一个迭代器
        """
    def write(self, file_or_filename,
              encoding=None,
              xml_declaration=None,
              default_namespace=None,
              method=None, *,
              short_empty_elements=True):
上面是ElementTree这个类,里面有很多的函数,那么我们怎么利用里面的提供的函数来解析voc数据集的xml文件呢?其实主要用到的就那么几个函数:
 # 加载xml文件,解析文件
parse(self, source, parser=None)
# 查找名为path标签的内容
find(self, path, namespaces=None)
# 查找所有名为path的子标签的内容
findall(self, path, namespaces=None)
知道了怎么利用ElementTree解析xml文件,下面我们正式进入write_txt.py文件,看看里面是怎么解析的,我们逐个分析,下面再附上这个文件的完整代码,先来看下第一个函数parse,前面用到的参数也放在这了
# 定义一些参数
train_set = open('voctrain.txt', 'w')
test_set = open('voctest.txt', 'w')
Annotations = 'VOCdevkit//VOC2007//Annotations//'
xml_files = os.listdir(Annotations)
random.shuffle(xml_files)  # 打乱数据集
train_num = int(len(xml_files) * 0.7)  # 训练集数量
train_lists = xml_files[:train_num]   # 训练列表
test_lists = xml_files[train_num:]    # 测测试列表

def parse_rec(filename):  # 输入xml文件名
    tree = ET.parse(filename)
    objects = []
    # 查找xml文件中所有object元素
    for obj in tree.findall('object'):
        # 定义一个字典,存储对象名称和边界信息
        obj_struct =
        # .text意思是获取文本内容
        difficult = int(obj.find('difficult').text)
        if difficult == 1:  # 若为1则跳过本次循环
            continue
        obj_struct['name'] = obj.find('name').text
        bbox = obj.find('bndbox')
        obj_struct['bbox'] = [int(float(bbox.find('xmin').text)),
                              int(float(bbox.find('ymin').text)),
                              int(float(bbox.find('xmax').text)),
                              int(float(bbox.find('ymax').text))]
        objects.append(obj_struct)

    return objects
上面的代码的功能是,传入要解析的xml文件名,使用ET.parse()方法去解析。查找xml文件中所有的object元素,并将物体类别和位置信息存储在一个字典中。对于每个对象,我们忽略比较难检测的对象。最后,将所有的对象字典存储在一个列表中,并将该列表作为函数的输出返回。接下来,我们再来看下write_txt()函数。
write_txt函数:
def write_txt():
    count = 0
    # 生成训练集txt
    for train_list in train_lists:
        count += 1
        image_name = train_list.split('.')[0] + '.jpg'  # 图片文件名
        results = parse_rec(Annotations + train_list)
        # 检查训练集文件是否包含对象
        if len(results) == 0:
            print(train_list)
            continue
        # 将当前图片文件名写入训练集文本文件
        train_set.write(image_name)
        for result in results:
            class_name = result['name']
            bbox = result['bbox']
            # 将当前对象的名称转为其在voc列表中的索引
            class_name = VOC_CLASSES.index(class_name)
            train_set.write(' ' + str(bbox[0]) +
                            ' ' + str(bbox[1]) +
                            ' ' + str(bbox[2]) +
                            ' ' + str(bbox[3]) +
                            ' ' + str(class_name))
        train_set.write('\\n')
    train_set.close()

	# 生成测试集txt
    for test_list in test_lists:
        count += 1
        image_name = test_list.split('.')[0] + '.jpg'  # 图片文件名
        results = parse_rec(Annotations + test_list)
        if len(results) == 0:
            print(test_list)
            continue
        test_set.write(image_name)
        for result in results:
            class_name = result['name']
            bbox = result['bbox']
            class_name = VOC_CLASSES.index(class_name)
            test_set.write(' ' + str(bbox[0]) +
                            ' ' + str(bbox[1]) +
                            ' ' + str(bbox[2]) +
                            ' ' + str(bbox[3]) +
                            ' ' + str(class_name))
        test_set.write('\\n')
    test_set.close()
上面这段代码的主要作用是生成训练集和测试集的txt文件,里买保存的都是按照每张图像保存的类别信息和位置信息,一行表示一张图像。把上面两个函数合并,看下完整的代码是什么:
import xml.etree.ElementTree as ET
import os
import random

VOC_CLASSES = (  # 定义所有的类名
    'aeroplane', 'bicycle', 'bird', 'boat',
    'bottle', 'bus', 'car', 'cat', 'chair',
    'cow', 'diningtable', 'dog', 'horse',
    'motorbike', 'person', 'pottedplant',
    'sheep', 'sofa', 'train', 'tvmonitor')  # 使用其他训练集需要更改

# 定义一些参数
train_set = open('voctrain.txt', 'w')
test_set = open('voctest.txt', 'w')
Annotations = 'VOCdevkit//VOC2007//Annotations//'
xml_files = os.listdir(Annotations)
random.shuffle(xml_files)  # 打乱数据集
train_num = int(len(xml_files) * 0.7)  # 训练集数量
train_lists = xml_files[:train_num]  # 训练列表
test_lists = xml_files[train_num:]  # 测测试列表


def parse_rec(filename):  # 输入xml文件名
    tree = ET.parse(filename)
    objects = []
    # 查找xml文件中所有object元素
    for obj in tree.findall('object'):
        # 定义一个字典,存储对象名称和边界信息
        obj_struct =
        difficult = int(obj.find('difficult').text)
        if difficult == 1:  # 若为1则跳过本次循环
            continue
        obj_struct['name'] = obj.find('name').text
        bbox = obj.find('bndbox')
        obj_struct['bbox'] = [int(float(bbox.find('xmin').text)),
                              int(float(bbox.find('ymin').text)),
                              int(float(bbox.find('xmax').text)),
                              int(float(bbox.find('ymax').text))]
        objects.append(obj_struct)

    return objects


def write_txt():
    count = 0
    for train_list in train_lists:  # 生成训练集txt
        count += 1
        image_name = train_list.split('.')[0] + '.jpg'  # 图片文件名
        results = parse_rec(Annotations + train_list)
        # 检查训练集文件是否包含对象
        if len(results) == 0:
            print(train_list)
            continue
        # 将当前图片文件名写入训练集文本文件
        train_set.write(image_name)
        for result in results:
            class_name = result['name']
            bbox = result['bbox']
            # 将当前对象的名称转为其在voc列表中的索引
            class_name = VOC_CLASSES.index(class_name)
            train_set.write(' ' + str(bbox[0]) +
                            ' ' + str(bbox[1]) +
                            ' ' + str(bbox[2]) +
                            ' ' + str(bbox[3]) +
                            ' ' + str(class_name))
        train_set.write('\\n')
    train_set.close()

    for test_list in test_lists:  # 生成测试集txt
        count += 1
        image_name = test_list.split('.')[0] + '.jpg'  # 图片文件名
        results = parse_rec(Annotations + test_list)
        if len(results) == 0:
            print(test_list)
            continue
        test_set.write(image_name)
        for result in results:
            class_name = result['name']
            bbox = result['bbox']
            class_name = VOC_CLASSES.index(class_name)
            test_set.write(' ' + str(bbox[0]) +
                           ' ' + str(bbox[1]) +
                           ' ' + str(bbox[2]) +
                           ' ' + str(bbox[3]) +
                           ' ' + str(class_name))
        test_set.write('\\n')
    test_set.close()


if __name__ == '__main__':
    write_txt()
运行上面的代码会生成两个文件,即voctest.txt和voctrain.txt,我们打开voctrain.txt这文件看下这个脚本最后的生成文件长什么样:

第二行我们框出来总共7个目标,类别分别为8和14即人和椅子(代码开头有些),我们来看下对应的原图是不是7个目标:

从上面的图中可以看到图中确实是椅子和人,证明我们的标注信息解析是没问题的。
三.yoloData.py
在write_txt.py文件中,我们已经把每张图的标注信息都已经解析好按行保存在了voctest.txt和voctrain.txt文件中了,接下来就是根据保存的信息来制作标注框了,也就是自定义数据集__init__,__getitem__,__len__这三块内容。下面我们来逐一分析这部分的代码。每行代码都添加了注释。
import pandas as pd
import torch
import cv2
import os
import os.path
import random
import numpy as np
from torch.utils.data import DataLoader, Dataset
from torchvision.transforms import ToTensor
from PIL import Image
pd.set_option('display.max_rows', None) # ÏÔʾȫ²¿ÐÐ
pd.set_option('display.max_columns', None) # ÏÔʾȫ²¿ÁÐ
# 根据txt文件制作ground truth
CLASS_NUM = 20 # 使用其他训练集需要更改
class yoloDataset(Dataset):
image_size = 448 # 输入图片大小
# list_file为txt文件 img_root为图片路径
def __init__(self, img_root, list_file, train, transform):
# 初始化参数
self.root = img_root
self.train = train
self.transform = transform
# 后续要提取txt文件的信息,分类后装入以下三个列表
# 文件名
self.fnames = []
# 位置信息
self.boxes = []
# 类别信息
self.labels = []
# 网格大小
self.S = 7
# 候选框个数
self.B = 2
# 类别数目
self.C = CLASS_NUM
# 求均值用的
self.mean = (123, 117, 104)
# 打开文件,就是voctrain.txt或者voctest.txt文件
file_txt = open(list_file)
# 读取txt文件每一行
lines = file_txt.readlines()
# 逐行开始操作
for line in lines:
# 去除字符串开头和结尾的空白字符,然后按照空白字符(包括空格、制表符、换行符等)分割字符串并返回一个列表
splited = line.strip().split()
# 存储图片的名字
self.fnames.append(splited[0])
# 计算一幅图片里面有多少个bbox,注意voctrain.txt或者voctest.txt一行数据只有一张图的信息
num_boxes = (len(splited) - 1) // 5
# 保存位置信息
box = []
# 保存标签信息
label = []
# 提取坐标信息和类别信息
for i in range(num_boxes):
x = float(splited[1 + 5 * i])
y = float(splited[2 + 5 * i])
x2 = float(splited[3 + 5 * i])
y2 = float(splited[4 + 5 * i])
# 提取类别信息,即是20种物体里面的哪一种 值域 0-19
c = splited[5 + 5 * i]
# 存储位置信息
box.append([x, y, x2, y2])
# 存储标签信息
label.append(int(c))
# 解析完所有行的信息后把所有的位置信息放到boxes列表中,boxes里面的是每一张图的坐标信息,也是一个个列表,即形式是[[[x1,y1,x2,y2],[x3,y3,x4,y4]],[[x5,y5,x5,y6]]...]这样的
self.boxes.append(torch.Tensor(box))
# 形式是[[1,2],[3,4]...],注意这里是标签ÿ以上是关于YOLOv1代码分析——pytorch版保姆级教程的主要内容,如果未能解决你的问题,请参考以下文章
安装GPU版本的pytorch(解决pytorch安装时默认安装CPU版本的问题)保姆级教程
ESP 保姆级教程 疯狂点灯篇 —— 案例:ESP8266 + LED + 按键 + 阿里云生活物联网平台 + 公有版App(项目:菜鸟之家)
ESP 保姆级教程 疯狂点灯篇 —— 案例:ESP8266 + LED + 按键 + 阿里云生活物联网平台 + 公有版App + 天猫精灵(项目:菜鸟之家)