STM32G070RBT6基于Arduino框架下eeprom使用示例
Posted perseverance52
tags:
篇首语:本文由小常识网(cha138.com)小编为大家整理,主要介绍了STM32G070RBT6基于Arduino框架下eeprom使用示例相关的知识,希望对你有一定的参考价值。
STM32G070RBT6基于Arduino框架下eeprom使用示例
🎉说明:本示例来源于核心固件里自带的示例程序。写入、读取示例是分开的两个示例,分开编译和上传,用以验证eeprom写入和读取功能。
- 📌示例位置:

📚以STM32G070RBT6为例,eeprom大小为:2 KBytes,这是STM32G0xx系列里面定义的容量范围。
📍文件定义位置:
C:\\Users\\Administrator\\AppData\\Local\\Arduino15\\packages\\STMicroelectronics\\hardware\\stm32\\2.3.0\\system\\Drivers\\STM32G0xx_HAL_Driver\\Src\\stm32g0xx_hal_flash.c
#define FLASH_PAGE_SIZE 0x00000800U /*!< FLASH Page Size, 2 KBytes */
🌷eeprom相关功能函数
- 🌿
void write(int idx, uint8_t val)//idx为eeprom地址, val为存储的值。 - 🌿
void update(int idx, uint8_t val)//idx为eeprom地址, val为存储的值。
🍂以下为内联函数(inline)
- 🌿
template< typename T > T &get(int idx, T &t),也就是:EEPROM.get(int idx, val); - 🌿
template< typename T > const T &put(int idx, const T &t)也就是:EEPROM.put(int idx, val);这里的val可以是任意数据类型的变量值。
🌼eeprom写入示例
#include <EEPROM.h>

struct MyObject
  float field1;
  byte field2;
  char name[10];
;

void setup()

  Serial.begin(115200);
  while (!Serial)
    ; // wait for serial port to connect. Needed for native USB port only


  float f = 123.456f;  //将浮点数变量的值存储到EEPROM中。
  int eeAddress = 0;   //放置数据的位置。


  //地址在前面,对象在后。完成数据的存储
  EEPROM.put(eeAddress, f);

  Serial.println("Written float data type!");

  /** Put也可以用于自定义结构体。. **/

  //Data to store.
  MyObject customVar =
    3.14f,
    65,
    "Working!"
  ;

  eeAddress += sizeof(float); //Move address to the next byte after float 'f'.

  EEPROM.put(eeAddress, customVar);
  Serial.print("Written custom data type! \\n\\nView the example sketch eeprom_get to see how you can retrieve the values!");


void loop()
  /* Empty loop */
- ✅串口打印

🌻从eeprom中读取数据示例
#include <EEPROM.h>

void setup()

  float f = 0.00f;   //变量来存储从EEPROM读取的数据。
  int eeAddress = 0; //从EEPROM地址0,开始读取。

  Serial.begin(115200);
  while (!Serial)
    ; // wait for serial port to connect. Needed for native USB port only

  Serial.print("Read float from EEPROM: ");

  //从EEPROM中获取位置为'eeAddress'的浮点数据
  EEPROM.get(eeAddress, f);
  Serial.println(f, 3);    //如果EEPROM内的数据不是有效浮点数,则可能打印'ovf, nan'。

  /***
    As get also returns a reference to 'f', you can use it inline.
    E.g: Serial.print( EEPROM.get( eeAddress, f ) );
  ***/

  /***
    Get can be used with custom structures too.
    I have separated this into an extra function.
  ***/

  secondTest(); //Run the next test.


struct MyObject
  float field1;
  byte field2;
  char name[10];
;

void secondTest()
  int eeAddress = sizeof(float); //将地址移动到float 'f'变量后面的下一个字节。

  MyObject customVar; //变量来存储从EEPROM读取的结构体对象。
  EEPROM.get(eeAddress, customVar);

  Serial.println("Read custom object from EEPROM: ");
  Serial.println(customVar.field1);
  Serial.println(customVar.field2);
  Serial.println(customVar.name);

void loop()
  /* Empty loop */
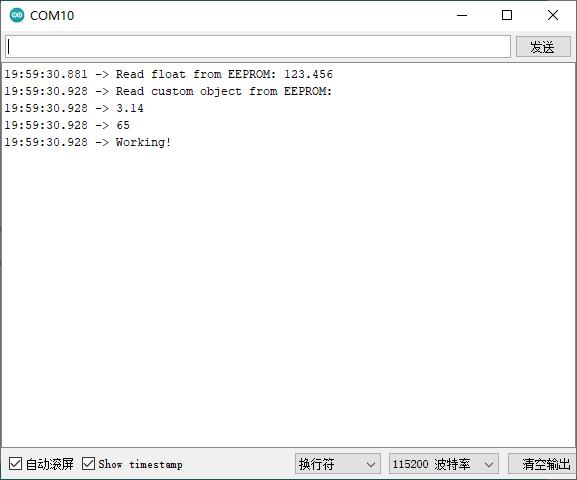
- 📜串口打印信息

🌺read 和write 示例
- 🍁通过
eeprom.write()写入eeprom数据
/*
 * EEPROM Write
 *
 * Stores values read from analog input 0 into the EEPROM.
 * These values will stay in the EEPROM when the board is
 * turned off and may be retrieved later by another sketch.
 */

#include <EEPROM.h>

/** the current address in the EEPROM (i.e. which byte we're going to write to next) **/
int addr = 0;

void setup()
    Serial.setRx(PA10);
    Serial.setTx(PA9); //指定串口1引脚,默认是PA2、PA1
  Serial.begin(115200);
  /** Empty setup. **/
   while (!Serial)
    ; // wait for serial port to connect. Needed for native USB port only


void loop()
  /***
    Need to divide by 4 because analog inputs range from
    0 to 1023 and each byte of the EEPROM can only hold a
    value from 0 to 255.
  ***/

  int val = analogRead(0) / 4;
Serial.println(val);
  /***
    Write the value to the appropriate byte of the EEPROM.
    these values will remain there when the board is
    turned off.
  ***/

  EEPROM.write(addr, val);

  /***
    Advance to the next address, when at the end restart at the beginning.

    Larger AVR processors have larger EEPROM sizes, E.g:
    - Arduno Duemilanove: 512b EEPROM storage.
    - Arduino Uno:        1kb EEPROM storage.
    - Arduino Mega:       4kb EEPROM storage.

    Rather than hard-coding the length, you should use the pre-provided length function.
    This will make your code portable to all AVR processors.
  ***/
  addr = addr + 1;
  if (addr == EEPROM.length())
    Serial.println("eeprom 已经写满了");
    while(1);//写满eeprom就停止
//    addr = 0;


  /***
    As the EEPROM sizes are powers of two, wrapping (preventing overflow) of an
    EEPROM address is also doable by a bitwise and of the length - 1.

    ++addr &= EEPROM.length() - 1;
  ***/


  delay(500);
- 🍁串口打印

- 通过
eeprom.read()读取eeprom数据
#include <EEPROM.h>

// start reading from the first byte (address 0) of the EEPROM
int address = 0;
byte value;

void setup()
      Serial.setRx(PA10);
    Serial.setTx(PA9); //指定串口1引脚,默认是PA2、PA1
  Serial.begin(115200);
  while (!Serial)
    ; // wait for serial port to connect. Needed for native USB port only


void loop()
  // read a byte from the current address of the EEPROM
  value = EEPROM.read(address);

  Serial.print(address);
  Serial.print("\\t");
  Serial.print(value, DEC);
  Serial.println();

  /***
    Advance to the next address, when at the end restart at the beginning.

    Larger AVR processors have larger EEPROM sizes, E.g:
    - Arduno Duemilanove: 512b EEPROM storage.
    - Arduino Uno:        1kb EEPROM storage.
    - Arduino Mega:       4kb EEPROM storage.

    Rather than hard-coding the length, you should use the pre-provided length function.
    This will make your code portable to all AVR processors.
  ***/
  address = address + 1;
  if (address == EEPROM.length())
   Serial.println("eeprom 读取完毕");
    while(1);//读完eeprom就停止
  // address = 0;


  /***
    As the EEPROM sizes are powers of two, wrapping (preventing overflow) of an
    EEPROM address is also doable by a bitwise and of the length - 1.

    ++address &= EEPROM.length() - 1;
  ***/

  delay(50);
- 🍁串口打印

以上是关于STM32G070RBT6基于Arduino框架下eeprom使用示例的主要内容,如果未能解决你的问题,请参考以下文章