前端如何做极致的首屏渲染速度优化
Posted Sahadev_
tags:
篇首语:本文由小常识网(cha138.com)小编为大家整理,主要介绍了前端如何做极致的首屏渲染速度优化相关的知识,希望对你有一定的参考价值。
这里说的极致是技术上可以达到最优的性能。
这里不讨论常见的优化手段,比如:Script标签放到底部、DNS预解析、HTTP2.0、CDN、资源压缩、懒加载等。
这里讨论的是如何使First Contentful Paint的时间降到最低,这个指标决定了白屏的时间有多长。
在正式开始之前,我们以LCG(Vue组件代码生成平台来说),它的FCP(First Contentful Paint)速度在Slow 3G情况下在将近40s左右:

这显然是一个让人无法忍受的时间。
常规情况下,我们为了缩短First Contentful Paint的时间,可以在index.html中内联一个Loading效果。
但拿大型项目来说,尤其是以VueCli创建的项目来说,这个Loading的效果不见得能有多提前,因为大型项目中所依赖的资源非常多。所以说能做到极致并不容易。
问题出在哪?默认Vue-Cli会在生成的文件头部增加很多的link,而这些link会阻碍后面静态Html内容的处理,等这些静态Html内容处理完才会有Dom的生成以及动画的执行。
假设我们最终输出的index.html文件内部是这样的:

那我们的loading效果显然不会出现的有多早。所以,我们的极致目标就是让loading动画尽可能的早。
为了看出优化前优化后的效果差异,一切都在浏览器的Slow 3G网络情况下验证。
有Loading情况下优化前后效果数据比对
下面的图展示了单纯的在index.html顶部增加loading.css文件的效果,这个时间从40秒缩短到了22秒左右,效果是要好一些了,但是还是让人无法忍受:
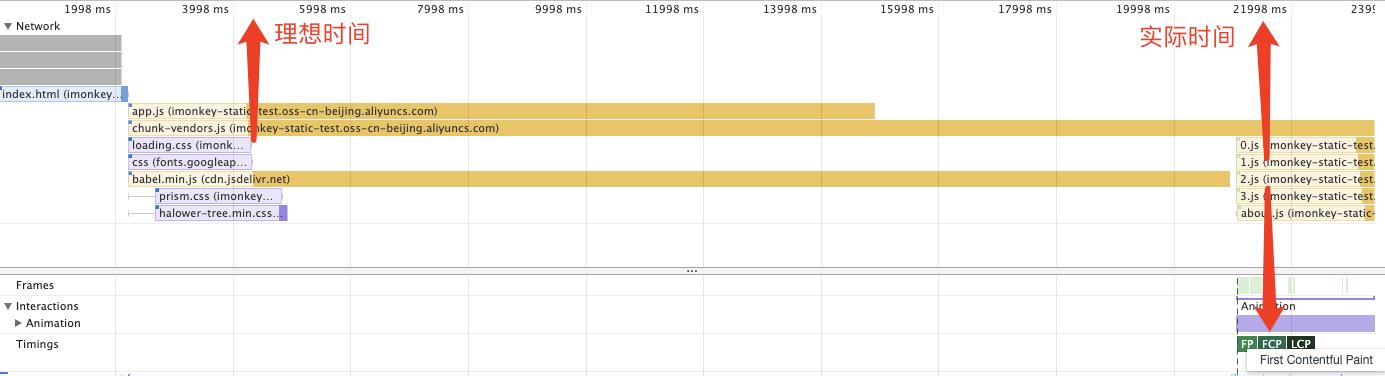
而优化后可以将时间缩短到2.4秒不到,注意这是在Slow 3G网络情况下测试的结果,且网络传输速度花费了2.14秒:

这个时间是要比百度还要好一些的:

那究竟是怎么做到的呢?
思路
我们可以从第二张图中看到,FCP很明显是在babel.min.js文件加载之后才开始进行的。而我们理想中的时间应该在4秒多一些。显然,是一些JS文件的加载阻碍了DOM的解析。
但真的只有JS文件对loading有影响吗?其它类型的,比如PNG、SVG、CSS、JSON会影响Loading的渲染速度吗?
会,FCP会等待所有的CSS加载完成才开始进行,而css文件的加载优先级默认是最高的。如果script标签拥有rel="preload"并且书写在css之前则会比css优先加载(这里的正确性有待验证),资源的加载默认情况下是按照书写顺序进行的。更具体的内容可以查看末尾的延伸阅读。
所以我们可以试着将所有的link放置到body的最后面。
怎么做
因为使用的是VueCli(4.5.9版),因此我们可用的HtmlWebpackPlugin的版本只有3.2.0。而这个版本是在3年前发布的,所以只能对这个版本现有的能力动一下刀子。文档:html-webpack-plugin 3.2.0。
在文档中查到这个版本其实是支持一些事件钩子的:
- html-webpack-plugin-before-html-generation
- html-webpack-plugin-before-html-processing
- html-webpack-plugin-alter-asset-tags
- html-webpack-plugin-after-html-processing
- html-webpack-plugin-after-emit
文档下方有个简单的例子演示了这些钩子怎么使用,但实际发现时,它这里的例子是有些问题的,因为cb是一个undefined:
function MyPlugin(options)
  // Configure your plugin with options...


MyPlugin.prototype.apply = function (compiler)
  compiler.plugin('compilation', (compilation) =>
    console.log('The compiler is starting a new compilation...');

    compilation.plugin(
      'html-webpack-plugin-before-html-processing',
      (data, cb) =>
        data.html += 'The Magic Footer'

        cb(null, data)

    )
  )


module.exports = MyPlugin
不过这些难不倒我,通过调试时的堆栈得知,我所使用的html-webpack-plugin在回调自定义方法时是同步进行的,所以只需要将data return就可以了。
经过这样的方式一步步调试,最终知道了html-webpackp-plugin是怎么生成html代码的:
  injectAssetsIntoHtml (html, assets, assetTags)
    const htmlRegExp = /(<html[^>]*>)/i;
    const headRegExp = /(<\\/head\\s*>)/i;
    const bodyRegExp = /(<\\/body\\s*>)/i;
    const body = assetTags.body.map(this.createHtmlTag.bind(this));
    const head = assetTags.head.map(this.createHtmlTag.bind(this));

    if (body.length)
      if (bodyRegExp.test(html))
        // Append assets to body element
        html = html.replace(bodyRegExp, match => body.join('') + match);
       else
        // Append scripts to the end of the file if no <body> element exists:
        html += body.join('');


	// 这里就是我要找的关键部分
    if (head.length)
      // Create a head tag if none exists
      if (!headRegExp.test(html))
        if (!htmlRegExp.test(html))
          html = '<head></head>' + html;
         else
          html = html.replace(htmlRegExp, match => match + '<head></head>');


      // Append assets to head element
      html = html.replace(headRegExp, match => head.join('') + match);


    // Inject manifest into the opening html tag
    if (assets.manifest)
      html = html.replace(/(<html[^>]*)(>)/i, (match, start, end) =>
        // Append the manifest only if no manifest was specified
        if (/\\smanifest\\s*=/.test(match))
          return match;

        return start + ' manifest="' + assets.manifest + '"' + end;
      );

    return html;
那么知道了它是怎么做的,但它没有提供对外的方法来干扰这些head要放到什么位置。比如我现在就想把他们放到body最后面,但它是不支持的。
那么我初步的想法是在html生成后将那部分的head手动转移一下。但突发奇想,既然有钩子可以更改AssetTags,那我岂不是可以不让它内部生成而让我自己生成?这个想法很妙。经过一番调试得知,可以在html-webpack-plugin-alter-asset-tags这个钩子中拿到data.head的内容,再将data.head给置空数组。这样它原本的head就不会生成了。这里的head代表的就是即将插到head中的那些标签。
然后再在html-webpack-plugin-after-html-processing这个钩子中按照html-wepack-plugin的方式给拼接到body的最后面。
于是有了最终代码:
// AlterPlugin.js
function AlterPlugin(options)


function createHtmlTag(tagDefinition)
    const attributes = Object.keys(tagDefinition.attributes || )
        .filter(attributeName => tagDefinition.attributes[attributeName] !== false)
        .map(attributeName =>
            if (tagDefinition.attributes[attributeName] === true)
                return attributeName;

            return attributeName + '="' + tagDefinition.attributes[attributeName] + '"';
        );
    const voidTag = tagDefinition.voidTag !== undefined ? tagDefinition.voidTag : !tagDefinition.closeTag;
    const selfClosingTag = tagDefinition.voidTag !== undefined ? tagDefinition.voidTag : tagDefinition.selfClosingTag;
    return '<' + [tagDefinition.tagName].concat(attributes).join(' ') + (selfClosingTag ? '/' : '') + '>' +
        (tagDefinition.innerHTML || '') +
        (voidTag ? '' : '</' + tagDefinition.tagName + '>');


AlterPlugin.prototype.apply = function (compiler)
    compiler.plugin('compilation', (compilation) =>
        let innerHeadTags = null;
        compilation.plugin(
            'html-webpack-plugin-before-html-generation',
            (data, cb) =>
                return data;

        )
        compilation.plugin(
            'html-webpack-plugin-before-html-processing',
            (data, cb) =>
                return data;

        )
        compilation.plugin(
            'html-webpack-plugin-alter-asset-tags',
            (data, cb) =>
            	// 获取到它原来的那些headTag
                innerHeadTags = data.head.map(createHtmlTag);
                data.head = [];
                return data;

        )
        compilation.plugin(
            'html-webpack-plugin-after-html-processing',
            (data, cb) =>
                // 在这里进行html的内容变更
                data.html = data.html.replace(/(<\\/body\\s*>)/i, match =>
                    return innerHeadTags.join('') + match
                );
                return data;

        )
        compilation.plugin(
            'html-webpack-plugin-after-emit',
            (data, cb) =>
                return data;

        )
    )


module.exports = AlterPlugin
最后只需要在vue.config.js中引用一下这个新的Plugin就可以了:
const AlterPlugin = require('./AlterPlugin');

module.exports =
  ...

  configureWebpack:
    plugins: [
      new AlterPlugin()
    ]
  ,

  ...
;
最终的代码输出是我想要的结果:
<!DOCTYPE html>
<html lang="en">

<head>
  <meta charset="utf-8" />
  <meta http-equiv="X-UA-Compatible" content="IE=edge" />
  <meta name="viewport" content="width=device-width,initial-scale=1.0" />
  <link rel="stylesheet" href="loading.css" />
</head>

<body>
  <div id="app">
    ...
  </div>
  ...
  <script defer src="https://cdn.jsdelivr.net/npm/@babel/standalone@7.0.0-beta.42/babel.min.js"></script>
  <!--以下部分都是AlterPlugin作用的结果,这部分结果本来会被放置到head中的-->
  <script type="text/javascript" src="/vue-creater-platform/js/chunk-vendors.js"></script>
  <script type="text/javascript" src="/vue-creater-platform/js/app.js"></script>
  <link href="/vue-creater-platform/js/0.js" rel="prefetch">
  <link href="/vue-creater-platform/js/1.js" rel="prefetch">
  <link href="/vue-creater-platform/js/2.js" rel="prefetch">
  <link href="/vue-creater-platform/js/3.js" rel="prefetch">
  <link href="/vue-creater-platform/js/about.js" rel="prefetch">
  <link href="/vue-creater-platform/js/app.js" rel="preload" as="script">
  <link href="/vue-creater-platform/js/chunk-vendors.js" rel="preload" as="script">
  <link rel="icon" type="image/png" sizes="32x32" href="/vue-creater-platform/img/icons/favicon-32x32.png">
  <link rel="icon" type="image/png" sizes="16x16" href="/vue-creater-platform/img/icons/favicon-16x16.png">
  <link rel="manifest" href="/vue-creater-platform/manifest.json">
  <meta name="theme-color" content="#4DBA87">
  <meta name="apple-mobile-web-app-capable" content="no">
  <meta name="apple-mobile-web-app-status-bar-style" content="default">
  <meta name="apple-mobile-web-app-title" content="vue-component-creater">
  <link rel="apple-touch-icon" href="/vue-creater-platform/img/icons/apple-touch-icon-152x152.png">
  <link rel="mask-icon" href="/vue-creater-platform/img/icons/safari-pinned-tab.svg" color="#4DBA87">
  <meta name="msapplication-TileImage" content="/vue-creater-platform/img/icons/msapplication-icon-144x144.png">
  <meta name="msapplication-TileColor" content="#000000">
</body>

</html>
写到一半时发现,因为不严谨的试验导致了错误的结果,所以这篇文章的产出可以算只有一个可以转移head标签的Plugin。
如果把loading.css文件直接内联效果会不会效果更好?
是可以的,将Loading的样式直接写在html中会与上面的一系列操作是同样的效果。也可以说FCP不需要等待所有的CSS加载完毕再进行。这个结论与文章中有矛盾,还需要验证First Contentful Paint的具体触发时机。
*后记:
如果要触发First Contentful Paint,则需要在Dom中至少存在文本或者图片,否则它是不会被触发的。原文:
The First Contentful Paint time stamp is when the browser first rendered any text, image (including background images), non-white canvas or SVG. This excludes any content of iframes, but includes text with pending webfonts. This is the first time users could start consuming page content.
延伸阅读:
- Paint Timing 1 草案 简要概述:This document defines an API that can be used to capture a series of key moments (first paint, first contentful paint) during pageload which developers care about.
- Chrome的First Paint触发的时机探究 非常详细
- User-centric performance metrics
以上是关于前端如何做极致的首屏渲染速度优化的主要内容,如果未能解决你的问题,请参考以下文章