[CKA备考实验][Service] 3.1 创建ClusterIP和NodePort类型的Service
Posted Greyplayground
tags:
篇首语:本文由小常识网(cha138.com)小编为大家整理,主要介绍了[CKA备考实验][Service] 3.1 创建ClusterIP和NodePort类型的Service相关的知识,希望对你有一定的参考价值。
通过K8S内置负载均衡器访问Pod的途径
K8S的组件kube-proxy为我们在集群内提供了Load Balancer的功能,即负载均衡器,这种服务是通过创建Service资源对象来实现的。
1. ClusterIP
为了实现集群内Pod的互访,kube-proxy提供了ClusterIP模式的Service
这种模式下,集群内的Pod只能使用集群内部IP地址互访,集群外是无法访问的。说得再具体一点,当你在本地环境的K8S集群中创建了几个nginx Pod后,你是无法通过浏览器访问到这些Pod中运行的Nginx的
2. NodePort
为了实现从集群外访问集群内的几个Pod,kube-proxy提供了NodePort模式的Service
这种模式下,集群内的Pod不仅可以使用集群内部地址实现互访,还可以通过每个运行着容器的节点IP地址访问到Pod
访问Pod
简介到此为止,我们直接上实验配置。实验环境中有三个worker节点,我们通过Deployments资源对象随机生成几个Nginx Pod供Service使用
1. 通过Deployments创建3个Pod副本
Deployments的名字为deploy1,label是name: deploy1
Deployments的selector:app: deploy1 (记住这个标签,后面用得上)
Deployments部署的Pod的标签是app: deploy1,镜像是nginx:1.23(记住这个标签,后面用得上)
# deploy1.yaml
apiVersion: apps/v1
kind: Deployment
metadata:
  labels:
    name: deploy1
  annotations:
    name: deploy1
  name: deploy1
  namespace: default
spec:
  replicas: 3
  selector:
    matchLabels:
      app: deploy1
  strategy:
  template:
    metadata:
      labels:
        app: deploy1
    spec:
      containers:
      - image: nginx:1.23
        name: nginx
        resources:
创建名为deploy1的Deployments资源对象
$ kubectl apply -f deploy1.yaml
root@node-1:~/service# kubectl get pods -o wide --show-labels | grep deploy1
deploy1-5b5f4bd5dd-4bbsm   1/1     Running   0          22h    10.200.139.94   node-3   <none>           <none>            app=deploy1,pod-template-hash=5b5f4bd5dd
deploy1-5b5f4bd5dd-bjgwq   1/1     Running   0          22h    10.200.139.93   node-3   <none>           <none>            app=deploy1,pod-template-hash=5b5f4bd5dd
deploy1-5b5f4bd5dd-l7wc7   1/1     Running   0          22h    10.200.247.34   node-2   <none>           <none>            app=deploy1,pod-template-hash=5b5f4bd5dd
生成的3个Pod副本分布在node-2和node-3上,都包含标签值app=deploy1
2. 为3个Pod副本创建ClusterIP类型的Service
准备配置文件
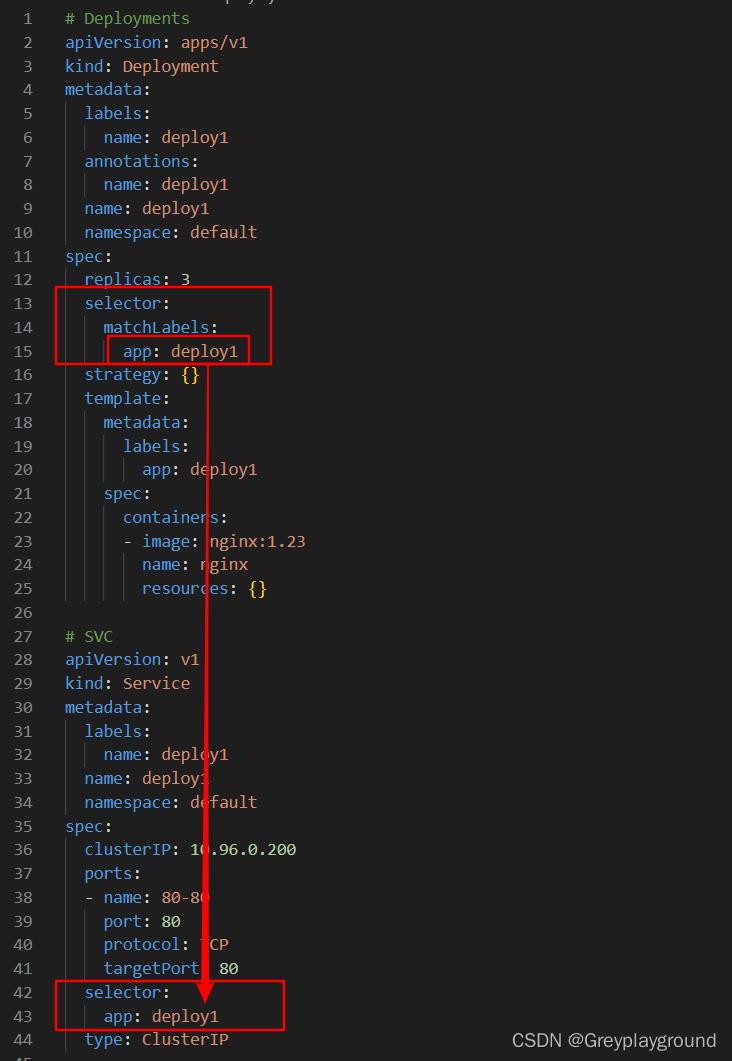
下图中列出了刚才使用的Deployments配置文件(文件名字是deploy1.yaml)的内容和我们即将要使用的Service配置文件(名字也是deploy1.yaml,只不过放在了另外一个文件夹下)
我们主要对比三个配置参数:
- Deployments的selector中的标签值
- Deployments的template中分给Pod的标签值
- Service的Selector中的标签值
以上三个值需要保持一致,这样Service才能与这些Pod进行关联
把这里的Service配置以文本形式贴出来,方便大家复制
# SVC(deploy1.yaml)
apiVersion: v1
kind: Service
metadata:
  labels:
    name: deploy1
  name: deploy1
  namespace: default
spec:
  clusterIP: 10.96.0.200
  ports:
  - name: 80-80
    port: 80
    protocol: TCP
    targetPort: 80
  selector:
    app: deploy1
  type: ClusterIP
注意配置文件中最后一样为type: ClusterIP,这就决定了该Service是ClusterIP类型的
ports配置中,
前端port为80,即访问时我们以< ClusterIP >:80的形式访问服务
后端port为80,即访问实际发往Pod的80端口,也可以是其他端口如8080,视具体情况而定
实施配置文件
$ kubectl apply -f deploy1.yaml
root@node-1:~/service# kubectl get svc | grep deploy1
deploy1      ClusterIP   10.96.0.200    <none>        80/TCP         6s
名为deploy1的service就创建好了,这里给出了我们设置的ClusterIP是10.96.0.200(如果不在配置文件中设置则在预设的网段中随机分配一个。预设的网段配置在了kubeadm配置文件中,这是部署阶段的内容)
3. 验证ClusterIP方式连接
使用上一节得到的ClusterIP访问Pod
注意,这个地址只能在集群中的node上使用,我们随便选取一个node执行如下访问命令
root@node-3:~# curl 10.96.0.200
<!DOCTYPE html>
<html>
<head>
<title>Welcome to nginx!</title>
<style>
html  color-scheme: light dark;
body  width: 35em; margin: 0 auto;
font-family: Tahoma, Verdana, Arial, sans-serif;
</style>
</head>
<body>
<h1>Welcome to nginx!</h1>
<p>If you see this page, the nginx web server is successfully installed and
working. Further configuration is required.</p>

<p>For online documentation and support please refer to
<a href="http://nginx.org/">nginx.org</a>.<br/>
Commercial support is available at
<a href="http://nginx.com/">nginx.com</a>.</p>

<p><em>Thank you for using nginx.</em></p>
</body>
</html>
通过curl指令访问到了我们的nginx,这个返回内容可能是我们之前创建的3个Pod中的任何一个产生的
我们查看一下这个service的具体信息:
root@node-1:~/service# kubectl describe svc deploy1
Name:              deploy1
Namespace:         default
Labels:            name=deploy1
Annotations:       <none>
Selector:          app=deploy1
Type:              ClusterIP
IP Family Policy:  SingleStack
IP Families:       IPv4
IP:                10.96.0.200
IPs:               10.96.0.200
Port:              80-80  80/TCP
TargetPort:        80/TCP
Endpoints:         10.200.139.93:80,10.200.139.94:80,10.200.247.34:80
Session Affinity:  None
Events:            <none>
root@node-1:~/service# kubectl get pods -o wide | grep deploy1
deploy1-5b5f4bd5dd-4bbsm   1/1     Running   0          23h    10.200.139.94   node-3   <none>           <none>
deploy1-5b5f4bd5dd-bjgwq   1/1     Running   0          23h    10.200.139.93   node-3   <none>           <none>
deploy1-5b5f4bd5dd-l7wc7   1/1     Running   0          23h    10.200.247.34   node-2   <none>           <none>
通过上边这两个输出可以看出,这个Service有三个endpoint,其地址刚好跟我们生成的三个Pod地址信息吻合
4. 为3个Pod副本创建NodePort类型的Service
准备配置文件
我们仍使用刚刚生成的三个Pod为例创建第二个Service,名字是deploy2
配置文件如下:
# deploy2.yaml
apiVersion: v1
kind: Service
metadata:
  labels:
    name: deploy2
  name: deploy2
  namespace: default
spec:
  clusterIP: 10.96.0.201
  ports:
  - name: 80-80
    port: 80
    protocol: TCP
    targetPort: 80
    NodePort: 30080
  selector:
    app: deploy1
  type: NodePort
配置关注点:
- ports配置中一共有三个配置点:
- port: 80
- targetPort: 80
- NodePort: 30080(新出现的Port配置,这个端口号供集群外访问Pod时使用的,一会儿将展示它的威力)
- selector配置:该Service为标有app:deploy1
- type:决定了该Service是一个NodePort类型的Service
实施配置文件
$ kubectl apply -f deploy2.yaml
root@node-1:~/service# kubectl get svc | grep deploy2
deploy2      NodePort    10.96.0.201   <none>        80:30080/TCP   3s
root@node-1:~/service# kubectl describe svc deploy2
Name:                     deploy2
Namespace:                default
Labels:                   name=deploy2
Annotations:              <none>
Selector:                 app=deploy1
Type:                     NodePort
IP Family Policy:         SingleStack
IP Families:              IPv4
IP:                       10.96.0.201
IPs:                      10.96.0.201
Port:                     80-80  80/TCP
TargetPort:               80/TCP
NodePort:                 80-80  30080/TCP
Endpoints:                10.200.139.93:80,10.200.139.94:80,10.200.247.34:80
Session Affinity:         None
External Traffic Policy:  Cluster
Events:                   <none>
还是那三个endpoints,对应着三个Pod的地址
这里多了一个NodePort参数,NodePort: 80-80 30080/TCP,表示我们可以通过30080作为端口号从集群外访问这三个Pod
5. 验证NodePort方式连接
我们当然可以在集群内部通过10.96.0.201这个地址访问三个Pod中的任何一个
root@node-3:~# curl 10.96.0.201
<!DOCTYPE html>
<html>
<head>
<title>Welcome to nginx!</title>
<style>
html  color-scheme: light dark;
body  width: 35em; margin: 0 auto;
font-family: Tahoma, Verdana, Arial, sans-serif;
</style>
</head>
<body>
<h1>Welcome to nginx!</h1>
<p>If you see this page, the nginx web server is successfully installed and
working. Further configuration is required.</p>

<p>For online documentation and support please refer to
<a href="http://nginx.org/">nginx.org</a>.<br/>
Commercial support is available at
<a href="http://nginx.com/">nginx.com</a>.</p>

<p><em>Thank you for using nginx.</em></p>
</body>
</html>
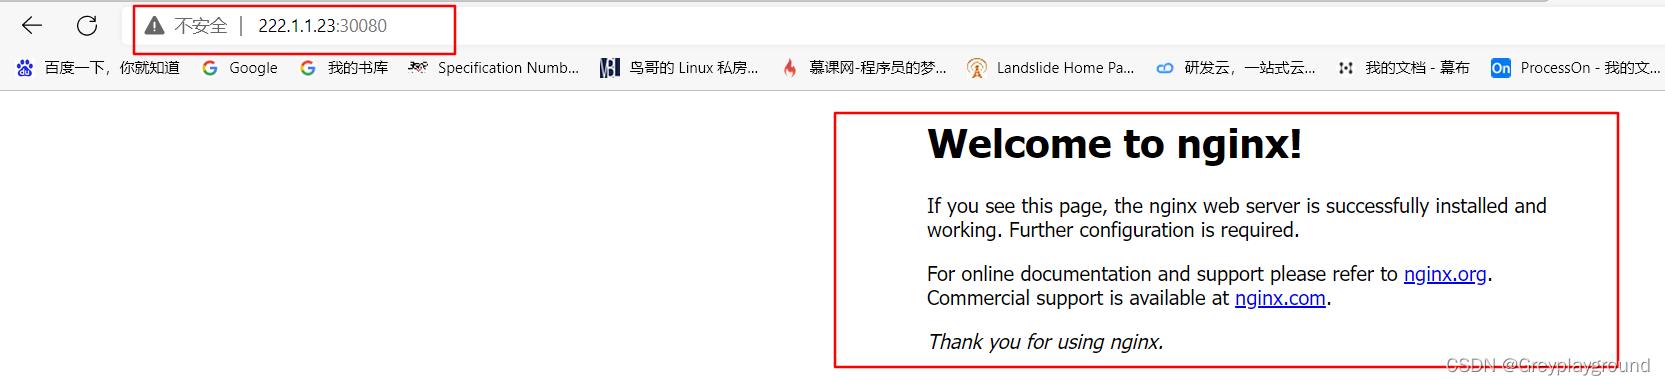
有了NodePort,我们可以在集群外通过浏览器访问Pod了,访问地址是集群中任何一个Worker节点的IP地址+端口号30080
我们以222.1.1.23这个Worker节点为例进行访问
6. 验证Service的负载均衡能力
为了验证我们每次究竟访问的是哪个Pod,我决定分别创建三个Pod,每个Pod被访问时都会返回一个特定的值
如:
访问Pod1时返回aaa
访问Pod2时返回bbb
访问Pod3时返回ccc
root@node-1:~/service# kubectl get pods -o wide
NAME                       READY   STATUS    RESTARTS   AGE    IP              NODE     NOMINATED NODE   READINESS GATES
deploy1-5b5f4bd5dd-4bbsm   1/1     Running   0          25h    10.200.139.94   node-3   <none>           <none>
deploy1-5b5f4bd5dd-bjgwq   1/1     Running   0          25h    10.200.139.93   node-3   <none>           <none>
deploy1-5b5f4bd5dd-l7wc7   1/1     Running   0          25h    10.200.247.34   node-2   <none>           <none>
进入这三个Pod,分别设置相应的返回值
root@node-1:~/service# kubectl exec -it deploy1-5b5f4bd5dd-4bbsm -- bash
root@deploy1-5b5f4bd5dd-4bbsm:/# echo aaa > /usr/share/nginx/html/index.html
root@deploy1-5b5f4bd5dd-4bbsm:/# exit
exit
root@node-1:~/service# kubectl exec -it deploy1-5b5f4bd5dd-bjgwq -- bash
root@deploy1-5b5f4bd5dd-bjgwq:/# echo bbb > /usr/share/nginx/html/index.html
root@deploy1-5b5f4bd5dd-bjgwq:/# exit
exit
root@node-1:~/service# kubectl exec -it deploy1-5b5f4bd5dd-l7wc7 -- bash
root@deploy1-5b5f4bd5dd-l7wc7:/# echo ccc > /usr/share/nginx/html/index.html
root@deploy1-5b5f4bd5dd-l7wc7:/# exit
exit
ClusterIP模式的负载分担
再次查询一次service的ClusterIP
root@node-1:~/service# kubectl get svc | grep deploy1
deploy1      ClusterIP   10.96.0.200    <none>        80/TCP         6s
然后在集群内的一台设备上使用curl访问Service的ClusterIP,返回值每次都不同,明显可以看到轮训的痕迹
root@node-2:~# curl 10.96.0.200
ccc
root@node-2:~# curl 10.96.0.200
aaa
root@node-2:~# curl 10.96.0.200
bbb
root@node-2:~# curl 10.96.0.200
ccc
root@node-2:~# curl 10.96.0.200
aaa
root@node-2:~# curl 10.96.0.200
bbb
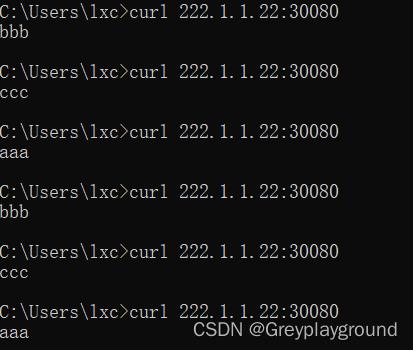
NodePort模式的负载分担
通过NodePort方式,从集群外部使用curl也可以发现轮训的痕迹
以上是关于[CKA备考实验][Service] 3.1 创建ClusterIP和NodePort类型的Service的主要内容,如果未能解决你的问题,请参考以下文章