视觉slam学习:初识slam,三维空间刚体运动代码实战,Eigen库的使用
Posted 神佑我调参侠
tags:
篇首语:本文由小常识网(cha138.com)小编为大家整理,主要介绍了视觉slam学习:初识slam,三维空间刚体运动代码实战,Eigen库的使用相关的知识,希望对你有一定的参考价值。
前言
经过摄像头获取的信息进行定位和建图的方法叫做视觉slam,相机分为单目(无法获得距离,要通过运动,但是具有尺寸不确定性),双目(需要的计算资源特别大),深度(受环境影响比较大)
经典视觉slam框架

视觉里程计
通过分析相邻帧间的图像估计相机运动,恢复场景的空间结构!很重要的,首先通过数次的估计就可以知道相机运动的轨迹,就是定位;并且如果还知道距离的话,地图也就建出来了。
但是不能只是单独使用视觉里程计,因为会出现累积漂移的问题,因为一次的误差就会导致后面一直有误差,这是不容许的,其实我用相似三角形测距的时候也是这种情况呀,然后这里的话使用了后端优化和回环检测进行纠正
后端优化
处理噪声问题,后端主要是滤波和非线性算法,而前端就是视觉处理。
回环检测
对付漂移时出现的。
环境安装
这里一定要用Linux的,建议安装个虚拟机,https://xiazai.zol.com.cn/detail/4/37058.shtml#comment,激活码看下面的评论。这里默认大家已经安装好了。
虚拟机软件一定不要太老,我开始用12的不好使,后转到16的就好了
镜像的话,ubuntu18.04或20.04吧,我用的后者,这个自行下载吧。

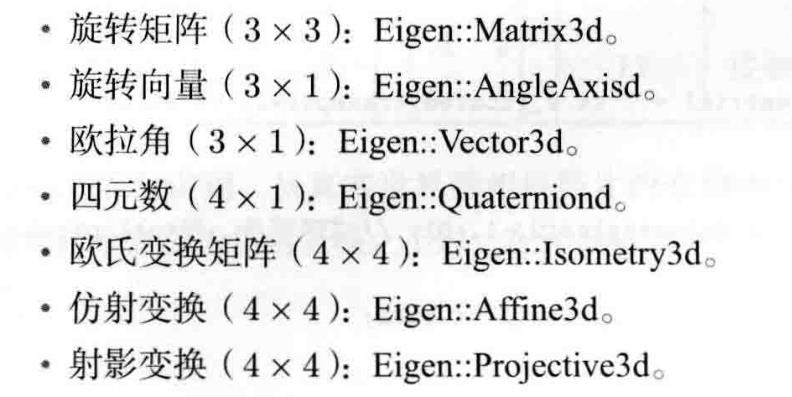
三维空间刚体运动
旋转矩阵
Eigen库的使用
Eigen是一个C++开源的线性代数库,可以进行矩阵运算,像一些上层的如g2o就是基于此,这里我们先进行该库的安装
sudo apt-get install libeigen3-dev
然后安装后我们查看一下,具体操作看下面:
sudo apt install mlocate
sudo updatedb
locate eigen3

然后我们可以看到已经安装上去了。
这里注意一下,就是Eigen是一个只有头文件的库,使用的时候直接引用即可
Eigen使用demo
使用的时候还是要先导入要用到的库
#include <iostream>
using namespace std;
#include <ctime>
#include </usr/include/eigen3/Eigen/Core>
#include </usr/include/eigen3/Eigen/Dense>
using namespace Eigen;
然后我们开始使用这个库,第一步当然是定义变量:
//Eigen::Matrix
Matrix<float,2,3> Matrix_23;
然后我们输入几个数
Matrix_23 << 1,2,3,4,5,6;
cout<<"matrix_23:\\n"<<Matrix_23<<endl;

然后我们来访问指点的元素:
for(int i=0;i<2;i++)

	for(int j=0;j<3;j++)

		cout<<Matrix_23(i,j)<<"\\t"<<endl;

接下来是进行运算:
v_3d<<3,2,1;
Matrix<double,2,1> result = Matrix_23.cast<double>() * v_3d;
cout<<"result:\\t"<<result.transpose()<<endl;
这里说下。cast是强转的意思,两个相同类型的才能运算,然后后面的transpose()是将多行列向量在一行打印出来的意思。

其他的我们后期结合具体的案例再来学习
Eigen几何模块
#include <iostream>
#include <cmath>
using namespace std;

#include </usr/include/eigen3/Eigen/Core>
//下面这个模块中定义了旋转和平移的表示
#include </usr/include/eigen3/Eigen/Geometry>
using namespace Eigen;

int main(int argc, char const *argv[])

	//1.定义3D旋转矩阵Matrix3X,Identity初始化的作用
	Matrix3d rotation_matrix = Matrix3d::Identity();
	//cout<<"rotation_matrix:\\n"<<rotation_matrix<<endl;
	/*
	rotation_matrix:
	1 0 0
	0 1 0
	0 0 1
	*/

	//2.定义旋转向量用AngleAxisd,;这里注意一下,计算的时候是当成矩阵进行运算,所以要转换
	AngleAxisd rotation_vector(M_PI / 4 ,Vector3d(0,0,1));
	cout.precision(3);//控制输出的浮点数为小数点后3位
	//cout<<"rotation_vector:\\n"<<rotation_vector.matrix()<<endl;
	/*
	rotation_vector:
 	0.707 -0.707      0
 	0.707  0.707      0
    0      0          1
	*/

	//3.赋值操作
	rotation_matrix = rotation_vector.toRotationMatrix();
	//cout<<"赋值后\\n"<<rotation_matrix<<endl;
	/*赋值后
 	0.707 -0.707      0
 	0.707  0.707      0
    0      0          1
	*/

	//4.用AngleAxis进行坐标转换
	Vector3d v(1,0,0);
	Vector3d v_rotated = rotation_vector * v;
	//cout<<"坐标转换后\\n"<<v_rotated.transpose()<<endl;
	/*
	坐标转换后
	0.707 0.707     0
	*/

	//5.欧拉角:可以将旋转矩阵直接转换成欧拉角
	Vector3d euler_angles = rotation_matrix.eulerAngles(2,1,0);//ZYX, roll , pitch, yaw
	//cout<<"欧拉角(ZYX):\\n"<<euler_angles.transpose()<<endl;
	/*
	欧拉角(ZYX):
	0.785    -0     0
	*/

	//6.欧式变换矩阵:使用Eigen::Isometry,涉及到一个旋转和一个平移向量
	Isometry3d T = Isometry3d::Identity();//初始化
	T.rotate(rotation_vector);//按照rotation_vector旋转
	T.pretranslate(Vector3d(1,3,4));//平移向量设为(1,3,4)
	//cout<<"欧式变换矩阵:\\n"<<T.matrix()<<endl;
	/*
	欧式变换矩阵:
 	0.707 -0.707      0      1
 	0.707  0.707      0      3
    0      0      	  1      4
    0      0          0      1
	*/

	//7.四元数:可以直接把AngleAxis或Matrix进行赋值
	Quaterniond q = Quaterniond(rotation_vector);
	cout<<"四元数:\\n"<<q.coeffs().transpose()<<endl;//.coeffs()的顺序是先虚部,后实部
	/*
	四元数:
    0     0 0.383 0.924
	*/
	q = Quaterniond(rotation_matrix);
	cout<<"四元数:\\n"<<q.coeffs().transpose()<<endl;
	/*
	四元数:
    0     0 0.383 0.924
	*/

	return 0;
坐标变换demo

#include<iostream>
#include<vector>
#include <algorithm>
#include </usr/include/eigen3/Eigen/Core>
#include </usr/include/eigen3/Eigen/Geometry>

using namespace std;
using namespace Eigen;

int main()

	//四元数表示旋转
	Quaterniond q1(0.35,0.2,0.3,0.1),q2(-0.5,0.4,-0.1,0.2);
	//四元数使用的时候要进行正则化
	q1.normalize();
	q2.normalize();
	//定义平移向量
	Vector3d t1(0.3,0.1,0.1),t2(-0.1,0.5,0.3);
	//用向量表示p1点坐标
	Vector3d p1(0.5,0,0.2);
	//定义变换矩阵
	Isometry3d T1w(q1),T2w(q2);
	//放入平移向量
	T1w.pretranslate(t1);
	T2w.pretranslate(t2);
	//按照公式求解
	Vector3d p2 = T2w * T1w.inverse() * p1;
	cout<<"result:\\n"<<p2.transpose()<<endl;
	/*
	result:
	-0.0309731    0.73499   0.296108
	*/
	return 0;
可视化演示
这里我们要先安装一下gui库:https://github.com/stevenlovegrove/Pangolin
# Get Pangolin
cd ~/your_fav_code_directory
git clone --recursive https://github.com/stevenlovegrove/Pangolin.git
cd Pangolin

# Install dependencies (as described above, or your preferred method)
./scripts/install_prerequisites.sh recommended

# Configure and build
mkdir build && cd build
cmake ..
cmake --build .

# GIVEME THE PYTHON STUFF!!!! (Check the output to verify selected python version)
cmake --build . -t pypangolin_pip_install

# Run me some tests! (Requires Catch2 which must be manually installed on Ubuntu.)
ctest
以上是关于视觉slam学习:初识slam,三维空间刚体运动代码实战,Eigen库的使用的主要内容,如果未能解决你的问题,请参考以下文章