VMware下linux非LVM管理的根目录扩容
Posted Carlton Xu
tags:
篇首语:本文由小常识网(cha138.com)小编为大家整理,主要介绍了VMware下linux非LVM管理的根目录扩容相关的知识,希望对你有一定的参考价值。
1. 需求描述
VMware上面一台CentOS7.3操作系统,在安装软件时候发现提示空间不足,通过查看磁盘容量,根分区只有8Gb的空间容量,导致空间满了,无法正常安装,此时需要将虚拟机硬盘从20Gb调整到40G,然后再把根分区扩大到30Gb,以下是扩容的整体操作步骤。
2. 操作环境
运行平台:VMware虚拟化
操作系统:CentOS7.3.1611
源磁盘容量:20Gb
根分区容量:14Gb
调整磁盘容量:50Gb
调整后根分区容量:47Gb
3. 步骤分析
对Linux下标准分区或者LVM分区扩容问题,主要分为以下三个步骤,需要按照顺序依次执行即可完成分区扩容。
💡 如果是缩容,则是反向操作,缩容一般只有LVM分区可以做到,标准分区暂时没有好办法进行处理
Step01: 扩磁盘    <先将磁盘容量增加到一定容量>
Step02: 扩分区    <在将磁盘下需要扩容的分区进行拉伸,扩展到所需大小容量>
Step03: 刷新文件系统容量 <分区扩展完成后,需将分区的文件系统进行刷新,根据不同文件系统选择刷新指令>
4. 具体操作实现
扩容的具体操作步骤,按照步骤分析的三大步骤来完成扩容,操作细化步骤如下内容。
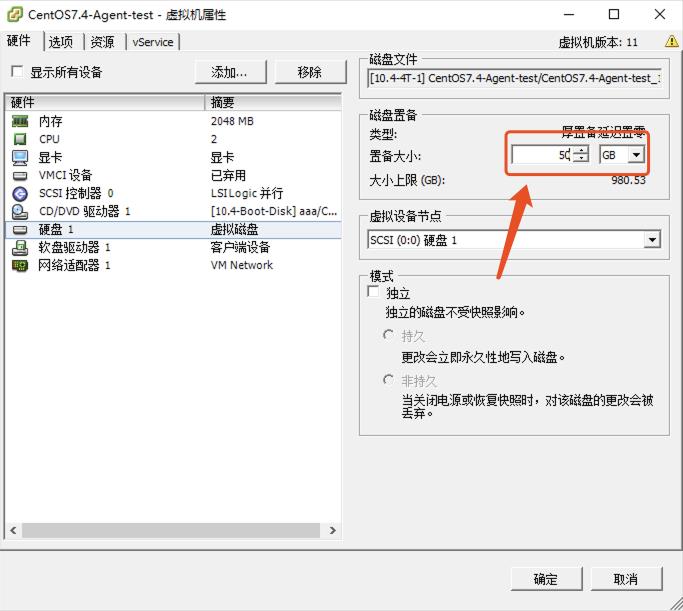
4.1. 磁盘扩大
VMware 管理平台VSphere Client登陆,将需要扩容的虚拟机进行关机操作,然后编辑设置,将磁盘大小进行调整
4.2. 扩分区
4.2.1. 查看当前分区信息
以下指令可以查看到根分区是sda3,sda3分区总容量只有14G大小
[root@localhost ~]# df -h
Filesystem      Size  Used Avail Use% Mounted on
/dev/sda3        14G   13G  795M  95% /
devtmpfs        899M     0  899M   0% /dev
tmpfs           913M     0  913M   0% /dev/shm
tmpfs           913M  8.9M  904M   1% /run
tmpfs           913M     0  913M   0% /sys/fs/cgroup
/dev/sda1       297M  195M  103M  66% /boot
tmpfs           183M     0  183M   0% /run/user/0
可以看到当前磁盘容量已经增加到50Gb了,但是分区仍是之前的大小,所以接下来我们需要按照步骤,将分区大小进行调整
[root@localhost ~]# fdisk -l

Disk /dev/sda: 51.5 GB, 51539607552 bytes, 100663296 sectors
Units = sectors of 1 * 512 = 512 bytes
Sector size (logical/physical): 512 bytes / 512 bytes
I/O size (minimum/optimal): 512 bytes / 512 bytes
Disk label type: dos
Disk identifier: 0x000e780b

   Device Boot      Start         End      Blocks   Id  System
/dev/sda1   *        2048      616447      307200   83  Linux
/dev/sda2          616448     3762175     1572864   82  Linux swap / Solaris
/dev/sda3         3762176   100663295    48450560   83  Linux
4.2.2. 增加根分区大小
💡注意:标准分区的扩容方式其实是将原有分区删除掉,然后再重建时增加容量,但是千万要记住以下步骤,通过fdisk操作时,不要将根分区删除后就执行w保存,这样会导致所有数据写盘丢失
[root@localhost ~]# fdisk /dev/sda
Welcome to fdisk (util-linux 2.23.2).

Changes will remain in memory only, until you decide to write them.
Be careful before using the write command.

Command (m for help): p  //这里输入p,列出分区列表,记住下面的start和end,后续操作才能保证数据不会丢失。

Disk /dev/sda: 51.5 GB, 51539607552 bytes, 100663296 sectors
Units = sectors of 1 * 512 = 512 bytes
Sector size (logical/physical): 512 bytes / 512 bytes
I/O size (minimum/optimal): 512 bytes / 512 bytes
Disk label type: dos
Disk identifier: 0x000e780b

   Device Boot      Start         End      Blocks   Id  System
/dev/sda1   *        2048      616447      307200   83  Linux
/dev/sda2          616448     3762175     1572864   82  Linux swap / Solaris
/dev/sda3         3762176    31457279    13847552   83  Linux

Command (m for help): d   //这里输入d,表示删除一个分区
Partition number (1-3, default 3): 3     //这里输入3,是因为之前的分区是/dev/sda3(记住一定不要执行执行w保存)
Partition 3 is deleted

Command (m for help): n    //删除完,输入n新建一个分区
Partition type:
   p   primary (2 primary, 0 extended, 2 free)
   e   extended
Select (default p): p   //选择主分区
Partition number (3,4, default 3): 3  //还是/dev/sda3
First sector (3762176-100663295, default 3762176):      //这里直接回车
Using default value 3762176
Last sector, +sectors or +sizeK,M,G (3762176-100663295, default 100663295):    //这里明显可以看到,不仅包含了之前的sda3的start和end,而且远大于了,使用默认的将剩余的空间都给这个新建的分区。
Using default value 100663295
Partition 3 of type Linux and of size 46.2 GiB is set

Command (m for help): w      //最后写入保存
The partition table has been altered!

Calling ioctl() to re-read partition table.

WARNING: Re-reading the partition table failed with error 16: Device or resource busy.
The kernel still uses the old table. The new table will be used at
the next reboot or after you run partprobe(8) or kpartx(8)
Syncing disks.
You have new mail in /var/spool/mail/root
4.2.3. 查看扩容分区信息
sda3经过分区重建后,大小已经有了变化
[root@localhost ~]# df -T /dev/sda3
Filesystem     Type 1K-blocks     Used Available Use% Mounted on
/dev/sda3      xfs   13837312 13022968    814344  95% /
4.3. 刷新文件系统
分区扩容完成后,就可以执行执行来刷新文件系统,让文件系统得知分区已经发生变化可以更新信息,这里需要根据不同的文件系统类型来执行不同的刷新指令,前边我们查看sda3的文件系统是xfs,所以这里我们使用xfs_growfs来刷新
[root@localhost ~]# reboot //先重启操作系统
[root@localhost ~]# xfs_growfs /dev/sda3
meta-data=/dev/sda3              isize=256    agcount=4, agsize=865472 blks
         =                       sectsz=512   attr=2, projid32bit=1
         =                       crc=0        finobt=0
data     =                       bsize=4096   blocks=3461888, imaxpct=25
         =                       sunit=0      swidth=0 blks
naming   =version 2              bsize=4096   ascii-ci=0 ftype=0
log      =internal               bsize=4096   blocks=2560, version=2
         =                       sectsz=512   sunit=0 blks, lazy-count=1
realtime =none                   extsz=4096   blocks=0, rtextents=0
data blocks changed from 3461888 to 12112640
最后我们有看到执行后的输出,数据块发生了改变,则表示已经成功刷新文件系统,文件系统并做了更新
- 查看最终根目录容量大小
已经将根分区扩容成功,后续就可以正常使用了
[root@localhost ~]# df -h
Filesystem      Size  Used Avail Use% Mounted on
/dev/sda3        47G   13G   34G  27% /
devtmpfs        899M     0  899M   0% /dev
tmpfs           913M     0  913M   0% /dev/shm
tmpfs           913M  8.9M  904M   1% /run
tmpfs           913M     0  913M   0% /sys/fs/cgroup
/dev/sda1       297M  195M  103M  66% /boot
tmpfs           183M     0  183M   0% /run/user/0
以上是关于VMware下linux非LVM管理的根目录扩容的主要内容,如果未能解决你的问题,请参考以下文章