Android自定义半透明背景弹窗非popwindow/dialog超简单任意编写!
Posted 骑鲸鱼的企鹅
tags:
篇首语:本文由小常识网(cha138.com)小编为大家整理,主要介绍了Android自定义半透明背景弹窗非popwindow/dialog超简单任意编写!相关的知识,希望对你有一定的参考价值。
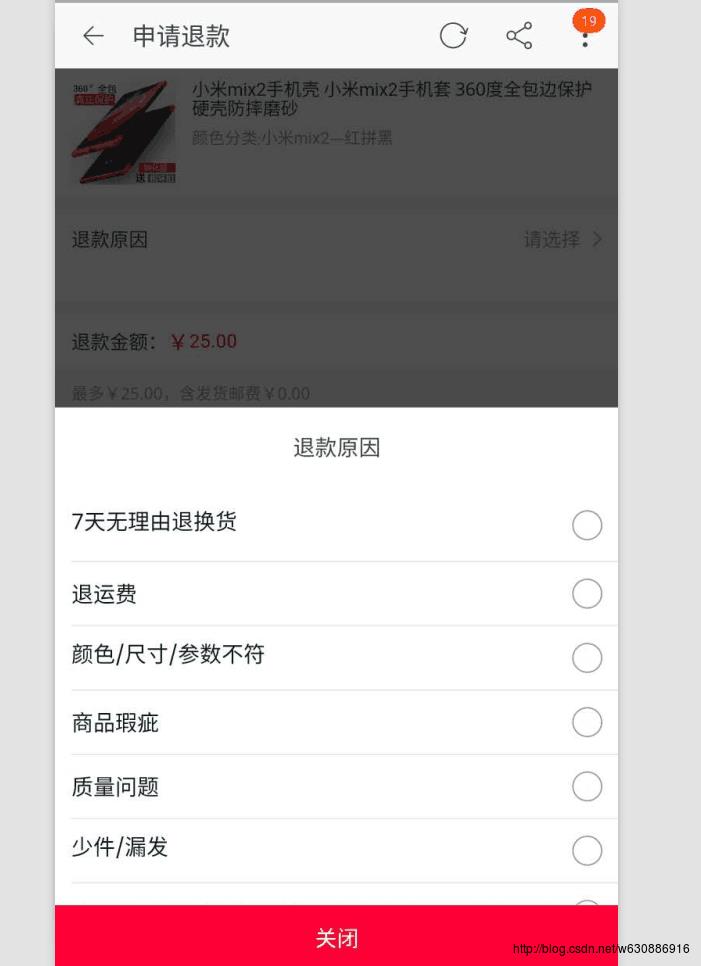
前日,一个朋友问我有没有好看的弹窗,功能不需要太难,说了一点需求,图:

然后我就写了个Demo给他。
Activity的弹窗各种各样。很早就有,但是有的太过于单调,样式也不好看,有的自定义起来非常繁琐。
我结合自定义Activity主题style,写了个很简单的Fragment组合应用。
前提说明:
——开发工具:android studio64位 3.0 版本
——声明控件使用butterknife
(build.gradle文件里dependencies内直接加入compile ‘com.jakewharton:butterknife:8.6.0’)
——模拟器版本:逍遥模拟器Android 4.3
——Demo中有些地方引用了自定义的color和style(路径:src-mian-res-values)
——AndroidManifest.xml 里对应的CustomPopwindowActivity类(弹窗类)自定义了主题
   <activity
            android:name=".CustomPopwindowActivity"
            android:theme="@style/bottom_dialog"></activity>
这里注意一下:
布局文件为了显示效果写了很多无用的控件,主要是为了体现效果,主要关键地方,我会单独描述出来
三段式介绍:主要内容摘要介绍,主要代码块粘贴,文末有Demo下载
先上个比较粗糙的效果图:

然后上干货:
主要代码块:
主页面:
/**
 * 自定义弹窗
 * 声明控件用的是butterknife,添加方法:
 * app的build.gradle里面
 * dependencies  括号里添加
 * annotationProcessor 'com.jakewharton:butterknife-compiler:8.6.0'
 * compile 'com.jakewharton:butterknife:8.6.0'
 * 用什么声明随意,根据自己要求就行
 */
public class MainActivity extends AppCompatActivity

    @BindView(R.id.button)
    Button button;
    @BindView(R.id.button2)
    Button button2;

    @Override
    protected void onCreate(Bundle savedInstanceState)
        super.onCreate(savedInstanceState);
        setContentView(R.layout.activity_main);
        ButterKnife.bind(this);


    //两个按钮的点击事件
    @OnClick(R.id.button, R.id.button2)
    public void onClick(View view)
        switch (view.getId())

            case R.id.button:
                Bundle bundle = new Bundle();
                bundle.putInt("key", 1);
                Intent intent = new Intent(MainActivity.this, CustomPopwindowActivity.class);
                intent.putExtras(bundle);
                startActivity(intent);
                break;
            case R.id.button2:
                Bundle bundle2 = new Bundle();
                bundle2.putInt("key", 2);
                Intent intent2 = new Intent(MainActivity.this, CustomPopwindowActivity.class);
                intent2.putExtras(bundle2);
                startActivity(intent2);
                break;
主页面 布局:
<LinearLayout xmlns:android="http://schemas.android.com/apk/res/android"
    xmlns:tools="http://schemas.android.com/tools"
    android:layout_width="match_parent"
    android:layout_height="match_parent"
    android:orientation="vertical"
    tools:context="com.individual.wzq.custompopwindow.MainActivity">

    <TextView
        android:layout_width="match_parent"
        android:layout_height="50dp"
        android:background="@color/colorAccent"
        android:text="这个是底面"
        android:textSize="35sp" />

    <Button
        android:id="@+id/button"
        android:layout_width="wrap_content"
        android:layout_height="wrap_content"
        android:text="点击弹出窗口001" />
    <Button
        android:id="@+id/button2"
        android:layout_width="wrap_content"
        android:layout_height="wrap_content"
        android:text="点击弹出窗口002" />
</LinearLayout>
第二个Activity页面:
/**
 * 显示的弹窗主页面
 * 在AndroidManifest.xml里,
 * CustomPopwindowActivity的添加自定义主题样式,自定义一些style属性(在src-main-res-values-style里)
 */
public class CustomPopwindowActivity extends AppCompatActivity

    @BindView(R.id.body)
    LinearLayout body;

    private int type;
    //创建一个基类Fragment
    BaseFragment baseFragment;

    @Override
    protected void onCreate(Bundle savedInstanceState)
        super.onCreate(savedInstanceState);
        setContentView(R.layout.activity_custom_popwindow);
        ButterKnife.bind(this);

        //加载数据
        getData();

        //计算弹窗显示的大小
        Window dialogWindow = getWindow();
        WindowManager.LayoutParams lp = dialogWindow.getAttributes(); // 获取对话框当前的参数值
        lp.width = WindowManager.LayoutParams.MATCH_PARENT;
        lp.height = WindowManager.LayoutParams.MATCH_PARENT;
        dialogWindow.setAttributes(lp);

        //添加Fragment
        addFragment();


    private void getData()
        Bundle bundle = getIntent().getExtras();
        if (bundle != null)
            type = bundle.getInt("key", 1);//默认为1 按需求可以任意写值(可以不写,系统默认为0)


    private void addFragment()
        //通过动态配置参数,替换Fragment显示
        switch (type)
            case 1:
                baseFragment = new NewFragment();
                break;
            case 2:
                baseFragment = new NewFragment2();
                break;

        getSupportFragmentManager().beginTransaction().replace(R.id.body, baseFragment).commit();
第二个Activity 布局文件:
<?xml version="1.0" encoding="utf-8"?>
<RelativeLayout xmlns:android="http://schemas.android.com/apk/res/android"
    android:layout_width="match_parent"
    android:layout_height="match_parent"
    android:background="@color/half10_transparent"
    android:focusable="true"
    android:focusableInTouchMode="true">

    <ScrollView
        android:layout_width="match_parent"
        android:layout_height="wrap_content"
        android:layout_alignParentBottom="true">

        <LinearLayout
            android:id="@+id/body"
            android:layout_width="match_parent"
            android:layout_height="wrap_content"
            android:orientation="vertical"
            android:transitionName="EditModel"></LinearLayout>
    </ScrollView>
</RelativeLayout>
内嵌的Fragment第一个:
/**
 * 继承父类BaseFragment(用于写一些公共的方法和资源)
 * 根据自己需求,编写本页面需要的样式和功能
 */
public class NewFragment extends BaseFragment
    @BindView(R.id.radioButton1)
    RadioButton radioButton1;
    @BindView(R.id.radioButton2)
    RadioButton radioButton2;
    @BindView(R.id.radioButton3)
    RadioButton radioButton3;
    @BindView(R.id.radioButton4)
    RadioButton radioButton4;
    @BindView(R.id.button2)
    Button button2;
    @BindView(R.id.bottomView)
    LinearLayout bottomView;

    @Nullable
    @Override
    public View onCreateView(LayoutInflater inflater, @Nullable ViewGroup container, @Nullable Bundle savedInstanceState)
        View view = inflater.inflate(R.layout.add_new_expect_layout, null);

        ButterKnife.bind(this, view);
        button2.setOnClickListener(new View.OnClickListener()
            @Override
            public void onClick(View view)
                getActivity().finish();

        );
        return view;


    @Override
    public void onDestroyView()
        super.onDestroyView();
第一个Fragment布局文件:
<?xml version="1.0" encoding="utf-8"?>
<LinearLayout xmlns:android="http://schemas.android.com/apk/res/android"
    android:id="@+id/bottomView"
    android:layout_width="match_parent"
    android:layout_height="wrap_content"
    android:background="@color/white"
    android:orientation="vertical">

    <TextView
        android:layout_width="match_parent"
        android:layout_height="wrap_content"
        android:gravity="center"
        android:text="退款原因" />

    <RadioGroup
        android:layout_width="match_parent"
        android:layout_height="wrap_content">

        <RadioButton
            android:id="@+id/radioButton1"
            android:layout_width="match_parent"
            android:layout_height="wrap_content"
            android:text="RadioButton" />

        <RadioButton
            android:id="@+id/radioButton2"
            android:layout_width="match_parent"
            android:layout_height="wrap_content"
            android:text="RadioButton" />

        <RadioButton
            android:id="@+id/radioButton3"
            android:layout_width="match_parent"
            android:layout_height="wrap_content"
            android:text="RadioButton" />

        <RadioButton
            android:id="@+id/radioButton4"
            android:layout_width="match_parent"
            android:layout_height="wrap_content"
            android:text="RadioButton" />
    </RadioGroup>


    <Button
        android:id="@+id/button2"
        android:layout_width="match_parent"
        android:layout_height="wrap_content"
        android:background="@color/colorAccent"
        android:text="关 闭"
        android:textSize="25sp" />
</LinearLayout>
内嵌的Fragment第二个:
/**
 * 继承父类BaseFragment(用于写一些公共的方法和资源)
 * 根据自己需求,编写本页面需要的样式和功能
 */
public class NewFragment2 extends BaseFragment


    @BindView(R.id.button2)
    Button button2;
    @BindView(R.id.bottomView)
    LinearLayout bottomView;

    @Nullable
    @Override
    public View onCreateView(LayoutInflater inflater, @Nullable ViewGroup container, @Nullable Bundle savedInstanceState)
        View view = inflater.inflate(R.layout.add_new_expect_layout2, null);

        ButterKnife.bind(this, view);
        button2.setOnClickListener(new View.OnClickListener()
            @Override
            public void onClick(View view)
                getActivity().finish();

        );
        return view;


    @Override
    public void onDestroyView()
        super.onDestroyView();
第二个Fragment布局文件:
<?xml version="1.0" encoding="utf-8"?>
<LinearLayout xmlns:android="http://schemas.android.com/apk/res/android"
    android:id="@+id/bottomView"
    android:layout_width="match_parent"
    android:layout_height="wrap_content"
    android:background="@color/white"
    android:orientation="vertical">

    <TextView
        android:layout_width="match_parent"
        android:layout_height="wrap_content"
        android:background="@color/colorPrimaryDark"
        android:gravity="center"
        android:text="另一个窗口"
        android:textSize="30sp" />

    <EditText
        android:layout_width="match_parent"
        android:layout_height="wrap_content"
        android:hint="这里可以的输入内容" />

    <Button
        android:layout_width="match_parent"
        android:layout_height="wrap_content"
        android:text="Button" />

    <Button
        android:layout_width="match_parent"
        android:layout_height="wrap_content"
        android:text="Button" />

    <Button
        android:layout_width="match_parent"
        android:layout_height="wrap_content"
        android:text="Button" />

    <Button
        android:layout_width="match_parent"
        android:layout_height="wrap_content"
        android:text="Button" />

    <Button
        android:id="@+id/button2"
        android:layout_width="match_parent"
        android:layout_height="wrap_content"
        android:background="@color/colorAccent"
        android:text="关 闭"
        android:textSize="25sp" />
</LinearLayout>Demo下载:http://download.csdn.net/download/w630886916/10050624
以上是关于Android自定义半透明背景弹窗非popwindow/dialog超简单任意编写!的主要内容,如果未能解决你的问题,请参考以下文章