第十一篇微信小程序-input组件
Posted 久冬不雨
tags:
篇首语:本文由小常识网(cha138.com)小编为大家整理,主要介绍了第十一篇微信小程序-input组件相关的知识,希望对你有一定的参考价值。
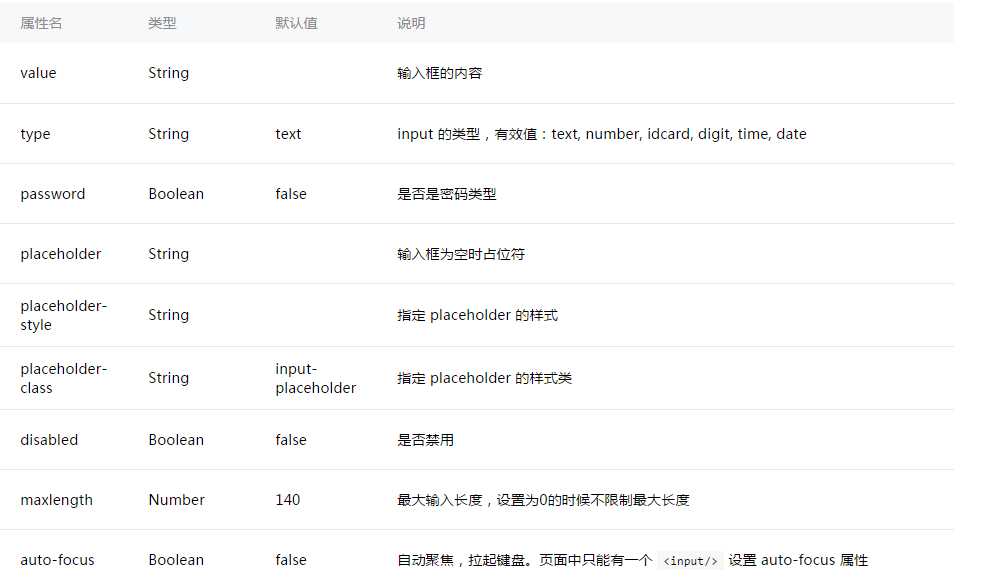
主要属性:

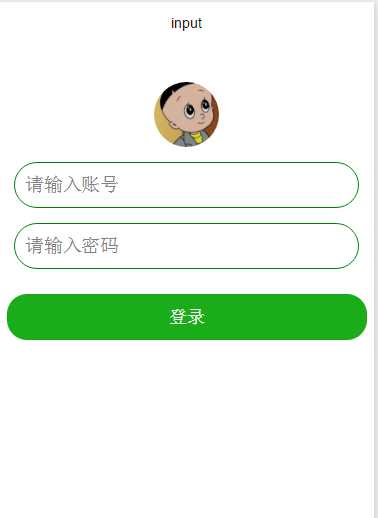
效果图:

ml:
<!--style的优先级比class高会覆盖和class相同属性-->
<!--头像-->
<view style="display:flex;justify-content: center;">
    <image  style="width:130rpx;height:130rpx;border-radius:50%;margin-top:10%;" src="../../image/logo.jpg"> </image>
</view>
<!--这个是输入框背景-->
<view class="inputView">
    <!--这个是输入框-->
    <input class="input"  type="number" placeholder="请输入账号" placeholder-style="color: gray" bindinput="listenerPhoneInput" />
</view>
<view class="inputView">
    <input class="input" password="true" placeholder="请输入密码" placeholder-style="color: gray" bindinput="listenerPasswordInput"/>
</view>
<!--登录按钮-->
<button style="margin-left: 15rpx; margin-right: 15rpx; margin-top: 50rpx; border-radius: 40rpx" type="primary" bindtap="listenerLogin">登录</button>
ss:
.input{
    padding-left: 10px;
    height: 44px;
}
.inputView{
    /*边界:大小1px, 为固体,为绿色*/
    border:  1px solid green;
    /*边界角的弧度*/
    border-radius: 30px;
    margin-left: 15px;
    margin-right: 15px;
    margin-top: 15px;
}
js:
Page({
   /**
   * 初始化数据
   */
  data:{
    phone: ‘‘,
    password: ‘‘,
  },
  /**
   * 监听手机号输入,并把输入的值保存在data变量中
   */
  listenerPhoneInput: function(e) {
      console.log(‘Phone=‘+e.detail.value)
      this.data.phone = e.detail.value;
  },
  /**
   * 监听密码输入,并把输入的值保存在data变量中
   */
  listenerPasswordInput: function(e) {
      console.log(‘Password=‘+e.detail.value)
      this.data.password = e.detail.value;
  },
  /**
   * 监听登录按钮,获取保存在data变量中的值
   */
  listenerLogin: function() {
      //打印收入账号和密码
    console.log(‘手机号为: ‘, this.data.phone);
    console.log(‘密码为: ‘, this.data.password);
  },
})
以上是关于第十一篇微信小程序-input组件的主要内容,如果未能解决你的问题,请参考以下文章