Linux文件系统4--打开文件
Posted HZero
tags:
篇首语:本文由小常识网(cha138.com)小编为大家整理,主要介绍了Linux文件系统4--打开文件相关的知识,希望对你有一定的参考价值。
1.前言
本文所述关于文件管理的系列文章主要是对陈莉君老师所讲述的文件系统管理知识讲座的整理。
Linux可以支持不同的文件系统,它源于unix文件系统,也是unix文件系统的一大特色。
本文将以不同文件系统之间的拷贝为实例进行讲述
2. 实例:文件拷贝

图 不同文件系统之间的拷贝

图 文件拷贝对应的C语言片段
3.打开文件
3.1 open函数
文件读写之前都要先打开文件,打开函数的原型如下:

- open通过路径名、标志和mask信息,打开或创建文件,最后返回此文件对应的fd
- 用户态下调用open,进入系统调用处理程序后,会调用内核相应的系统调用服务例程
3.2 打开文件的内核实现
从整体流程来看,open的内核实现如下:
-
进程从用户态获取路径名到内核缓冲区;
-
然后查找到父目录;如果设置了O_CREAT标志,则继续查找路径最后一个分量
-
最后获取对应文件的打开文件结构
-
将这个结构与当前进程的打开文件表联系起来,返回相应的fd。
4. do_sys_open
 1 long do_sys_open(int dfd, const char __user *filename, int flags, umode_t mode)
 2 {
 3     struct open_flags op;
 4     int fd = build_open_flags(flags, mode, &op);
 5     struct filename *tmp;
 6
 7     if (fd)
 8         return fd;
 9
10     tmp = getname(filename);
11     if (IS_ERR(tmp))
12         return PTR_ERR(tmp);
13
14     fd = get_unused_fd_flags(flags);
15     if (fd >= 0) {
16         struct file *f = do_filp_open(dfd, tmp, &op);
17         if (IS_ERR(f)) {
18             put_unused_fd(fd);
19             fd = PTR_ERR(f);
20         } else {
21             fsnotify_open(f);
22             fd_install(fd, f);
23         }
24     }
25     putname(tmp);
26     return fd;
27 }
open系统调用服务例程的核心为do_sys_open
4.1 do_filp_open
 1 struct file *do_filp_open(int dfd, struct filename *pathname,
 2         const struct open_flags *op)
 3 {
 4     struct nameidata nd;
 5     int flags = op->lookup_flags;
 6     struct file *filp;
 7
 8     set_nameidata(&nd, dfd, pathname);
 9     filp = path_openat(&nd, op, flags | LOOKUP_RCU);
10     if (unlikely(filp == ERR_PTR(-ECHILD)))
11         filp = path_openat(&nd, op, flags);
12     if (unlikely(filp == ERR_PTR(-ESTALE)))
13         filp = path_openat(&nd, op, flags | LOOKUP_REVAL);
14     restore_nameidata();
15     return filp;
16 }
-
当内核要访问一个文件时,第一步需要找到这个文件,这由do_filp_open完成
-
在do_filp_open的实现中,查找文件过程由path_openat调用path_init和link_path_walk完成
-
这两个函数将用户传进来的用字符串表示的文件路径,转换成一个dentry结构,建立好相应的inode,并返回file对象
4.2 fd_install
1 void fd_install(unsigned int fd, struct file *file)
2 {
3     __fd_install(current->files, fd, file);
4 }
 1 void __fd_install(struct files_struct *files, unsigned int fd,
 2         struct file *file)
 3 {
 4     struct fdtable *fdt;
 5
 6     might_sleep();
 7     rcu_read_lock_sched();
 8
 9     while (unlikely(files->resize_in_progress)) {
10         rcu_read_unlock_sched();
11         wait_event(files->resize_wait, !files->resize_in_progress);
12         rcu_read_lock_sched();
13     }
14     /* coupled with smp_wmb() in expand_fdtable() */
15     smp_rmb();
16     fdt = rcu_dereference_sched(files->fdt);
17     BUG_ON(fdt->fd[fd] != NULL);
18     rcu_assign_pointer(fdt->fd[fd], file);
19     rcu_read_unlock_sched();
20 }
- do_sys_open完成以上处理后,将获取到的file结构体通过fd_install到当前进程的打开文件表中。其索引为fd
4.3 do_sys_open剩余操作
do_sys_open的剩余将进程关联的file的描述符返回用户
用户随后通过文件描述符,来访问这些数据结构
如上打开文件的核心是查找文件
5.查找文件
1. 打开文件的核心为查找,通常内核将查找过程分为两部分:
- 查找起始位置信息
主要是判断是系统根目录还是当前工作目录,以获取后面循环查找的起始位置(如/home/clj/file1.c中的“/”)
- 循环查找路径名后续分量
以起始位置开始,循环查找后续每个路径分量
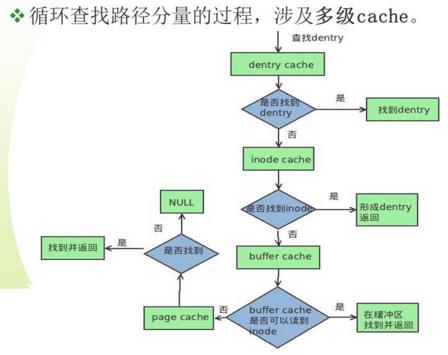
2. 循环查找路径分量的过程,涉及多级cache.
循环查找后续路径分量,首先从dentry cache开始查找,在dentry cache中查找对应的dentry,若找到则直接返回;
若没有找到,则必须去底层文件系统查找对应的dentry

5.1 dentry cache的引入
由于块设备速度比较慢,可能需要很长时间才能找到与一个文件名关联的inode信息,所以引入dentry cache
5.2 dentry cache的描述
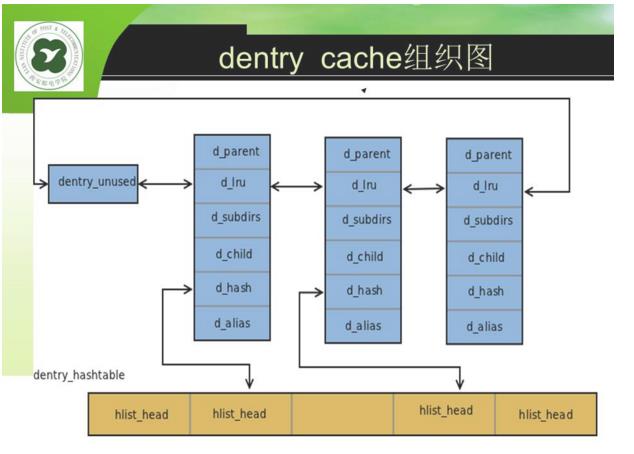
- 缓存的组织
散列表:包含了所有活动的dentry对象。散列表由dentry_hashtable组织,dentry通过d_hash连入散列表中;
LRU链表:dentry结构体中由d_lru链表组织。LRU链表中的元素同时也在dentry cache中;
- 缓存的查找
缓存由d_hash计算散列值,通过值对应的索引从dentry_hashtable中查找相应的队列;
再从队列头循环查找对应的dentry;
并将其从LRU中移除

图 dentry cache组织图
5.3 快速查找关键结构体qstr
1 struct qstr {
2     union {
3         struct {
4             HASH_LEN_DECLARE;
5         };
6         u64 hash_len;
7     };
8     const unsigned char *name;
9 };
5.4 dentry cache查找关键代码
 1 struct dentry *__d_lookup(const struct dentry *parent, const struct qstr *name)
 2 {
 3     unsigned int len = name->len;
 4     unsigned int hash = name->hash;
 5     const unsigned char *str = name->name;
 6     struct hlist_bl_head *b = d_hash(parent, hash);
 7     struct hlist_bl_node *node;
 8     struct dentry *found = NULL;
 9     struct dentry *dentry;
10
11     /*
12      * Note: There is significant duplication with __d_lookup_rcu which is
13      * required to prevent single threaded performance regressions
14      * especially on architectures where smp_rmb (in seqcounts) are costly.
15      * Keep the two functions in sync.
16      */
17
18     /*
19      * The hash list is protected using RCU.
20      *
21      * Take d_lock when comparing a candidate dentry, to avoid races
22      * with d_move().
23      *
24      * It is possible that concurrent renames can mess up our list
25      * walk here and result in missing our dentry, resulting in the
26      * false-negative result. d_lookup() protects against concurrent
27      * renames using rename_lock seqlock.
28      *
29      * See Documentation/filesystems/path-lookup.txt for more details.
30      */
31     rcu_read_lock();
32
33     hlist_bl_for_each_entry_rcu(dentry, node, b, d_hash) {
34
35         if (dentry->d_name.hash != hash)
36             continue;
37
38         spin_lock(&dentry->d_lock);
39         if (dentry->d_parent != parent)
40             goto next;
41         if (d_unhashed(dentry))
42             goto next;
43
44         /*
45          * It is safe to compare names since d_move() cannot
46          * change the qstr (protected by d_lock).
47          */
48         if (parent->d_flags & DCACHE_OP_COMPARE) {
49             int tlen = dentry->d_name.len;
50             const char *tname = dentry->d_name.name;
51             if (parent->d_op->d_compare(parent, dentry, tlen, tname, name))
52                 goto next;
53         } else {
54             if (dentry->d_name.len != len)
55                 goto next;
56             if (dentry_cmp(dentry, str, len))
57                 goto next;
58         }
59
60         dentry->d_lockref.count++;
61         found = dentry;
62         spin_unlock(&dentry->d_lock);
63         break;
64 next:
65         spin_unlock(&dentry->d_lock);
66      }
67      rcu_read_unlock();
68
69      return found;
70 }
以上是关于Linux文件系统4--打开文件的主要内容,如果未能解决你的问题,请参考以下文章