源码安装 apache 2.4.27
Posted
tags:
篇首语:本文由小常识网(cha138.com)小编为大家整理,主要介绍了源码安装 apache 2.4.27相关的知识,希望对你有一定的参考价值。
源码安装 apache 2.4.27
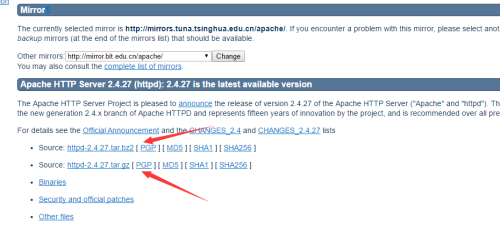
登陆apache官网下载源码安装包
http://mirrors.tuna.tsinghua.edu.cn/apache//httpd/httpd-2.4.27.tar.gz
下载所需软件源码包
§ Apache
Apr: http://mirrors.tuna.tsinghua.edu.cn/apache//apr/apr-1.6.2.tar.gz
Apr-Util: http://mirror.bit.edu.cn/apache//apr/apr-util-1.6.0.tar.gz
pcre: https://sourceforge.net/projects/pcre/files/pcre/8.41/pcre-8.41.tar.gz/download
apache:http://mirrors.tuna.tsinghua.edu.cn/apache//httpd/httpd-2.4.27.tar.gz
§ (点击或者这里下载其他版本)
tar -xf httpd-2.4.25.tar.gz#先用cd命令切换到软件包所在的目录,用ls命令查看当前目录内容
· 1
《一》安装前准备
以下面压缩包为列
Samba-4.6.5.tar.gz或者. samba-4.6.5.tar.bz2
Tar
-c: 建立压缩档案
-x:解压
-t:查看内容
-r:向压缩归档文件末尾追加文件
-u:更新原压缩包中的文件
这五个是独立的命令,压缩解压都要用到其中一个,可以和别的命令连用但只能用其中一个。下面的参数是根据需要在压缩或解压档案时可选的。
-z:有gzip属性的
-j:有bz2属性的
-Z:有compress属性的
-v:显示所有过程
-O:将文件解开到标准输出
下面的参数-f是必须的
-f: 使用档案名字,切记,这个参数是最后一个参数,后面只能接档案名。
《一》Samba-4.6.5.tar.gz 格式解压等操作 二 samba-4.6.5.tar.bz2
解压命令 tar zxvf apache2.4.27.tar.gz 解压命令 tar jxvf apache 2.4.27.tar.bz2
创建命令 tar zcvf apache2.4.27.tar.gz 创建命令 tar jcvf apache 2.4.27.tar.bz2
查看命令 tar ztvf apache2.4.27.tar.gz 查看命令 tar jtvf apache 2.4.27.tar.bz2
注意事项:wget vim gcc gcc-c++ cmake 这几个也是安装 Apache 所需要的小环境 。有的小环境,一般 Cnetos7 自带,我个人建议还是手动的再用 yum install 安装 或者 更新一下。
开始安装吧!
第一步:解压下载好的 Apache 包
[[email protected] ~]# tar -zxvf apache 2.4.27.tar.gz
//进入目录 编译解压的原文件
# cd 解压目录
编译解压的原文件
#./configure --prefix=/soft/httpd/apache #配置安装目录 --prefix=/soft/httpd/apache
1.如果正常执行 (说明你的Linux安装过Apache,或者已经安装过所需的依赖包)
2.如果不正常执行、会出现以下错误信息
configure:
checking for APR... no
configure: error: APR not found. Please read the documentation.
解决方案:就是安装 刚刚下载好的 Apr。 Apache在安装时需要一些准备环境、这里需要安装另外一个 Apr(Apache portable runtime)
《二》解压下载好的 Apr 包
[[email protected] ~]# tar -zxvf apr-1.6.2.tar.gz
//进入目录 编译解压的原文件
[[email protected] apr-1.6.2]# ./configure --prefix=/soft/httpd/apr/ #配置安装目录
//安装目录配置完成
make && make install 在指定地址生成目录和文件
[[email protected] apr-1.6.2]# make && make install
《三》:解压下载好的 Apr-util 包
[[email protected] ~]# tar -zxvf apr-util-1.6.0.tar.gz
//进入目录 编译解压的原文件
[[email protected] apr-util-1.6.0]# ./configure --prefix=/usr/local/apr-util/ #配置安装目录
//报错 看到错误信息 现在自己就知道了吧
--with-apr
[[email protected] apr-util-1.6.0]# ./configure --prefix=/usr/local/apr-util/ --with-apr=/soft/httpd/apr/
//安装目录配置完成 就 make && make install 在指定地址生成目录和文件
[[email protected] apr-util-1.6.0]# make && make install
《四》:继续安装 Apache
//切换到 Apache 源文件
[[email protected] httpd-2.4.27]# ./configure --prefix=/soft/httpd/apache/ --with-apr=/usr/local/apr/ --with-apr-util=/usr/local/apr-util/
//还会出现下面的错误 原因是:还是缺少环境 PCRE
checking for pcre-config... false
configure: error: pcre-config for libpcre not found. PCRE is required and available from http://pcre.org/
《五》:继续安装 pcre pcre2-10.23....版本会报错了所有我们下载pcre版本
解决方案: 下载地址 http://jaist.dl.sourceforge.net/project/pcre/pcre/8.41/pcre-8.41.tar.gz 下载最新版本 我下载的是 pcre-8.41.tar.gz
[[email protected] ~]# wget http://jaist.dl.sourceforge.net/project/pcre/pcre/8.41/pcre-8.41.tar.gz
[[email protected] ~]# tar -zxvf pcre-8.41.tar.gz
[[email protected] pcre-8.41]# ./configure --prefix=/usr/local/pcre/
[[email protected] pcre-8.41]# make && make install
继续安装 Apache
[[email protected] httpd-2.4.27]# ./configure --prefix=/soft/httpd/apache/ --with-apr=/soft/httpd/apr/ --with-apr-util=/soft/httpd/apr-util/ --with-pcre=/usr/local/pcre/
[[email protected] httpd-2.4.20]# make && make install
《六》:测试 Apache
centos7使用systemctl代替chkconfig管理服务,
防火墙也由iptables更换成了firewalld
首先用systemctl关闭防火墙:
systemctl stop firewalld.service
systemctl disable firewalld.service
开启 Apache 服务 停止 stop
[[email protected]~]# cd /soft/httpd/apache/bin/
[[email protected] bin]# ./apachectl start
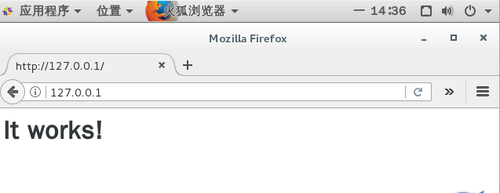
《七》:在客户端浏览器输入自己的 IP 地址,看看能够成功访问 Apache。 It works
本文出自 “步步高升” 博客,请务必保留此出处http://1085858.blog.51cto.com/1075858/1950448
以上是关于源码安装 apache 2.4.27的主要内容,如果未能解决你的问题,请参考以下文章
