Python1双系统安装/深度学习环境,目标检测,csv/excel/matplotlib,进程,文件/xml操作,百度人脸API,hal/aiohttp/restful/curl
Posted 码农编程录
tags:
篇首语:本文由小常识网(cha138.com)小编为大家整理,主要介绍了Python1双系统安装/深度学习环境,目标检测,csv/excel/matplotlib,进程,文件/xml操作,百度人脸API,hal/aiohttp/restful/curl相关的知识,希望对你有一定的参考价值。
文章目录
- 1.安装双系统
- 2.ubuntu安装常用软件
- 3.Win10系统有nvidia显卡后配深度学习环境:CUDA9.0、cudnn7.3、tensorflow_gpu1.12
- 4.Ubuntu + CUDA9.0 + tensorflow-gpu安装过程:
- 5.目标检测实战(Tensorflow_API_SSD)
- 6.csv/excel/matplotlib
- 7.时间复杂度/顺序表/链表
- 8.进程
- 9.文件
- 10.xml
- 11.百度人脸API
- 12. hal层
- 13.aiohttp
- 14.restfulAPI
- 15.curl:http请求
1.安装双系统
Ubuntu镜像网站:http://mirrors.ustc.edu.cn/ubuntu-releases/16.04/。

以下就只需要按两个按钮,其他默认。
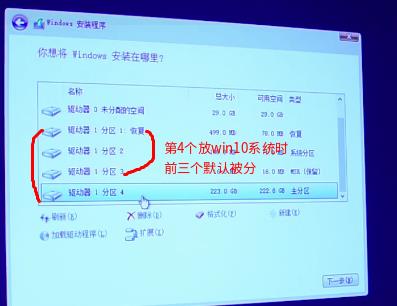
如下图先删除所有,再在驱动1即固态上新建满存再应用,默认被分成4个区,选中分区4安装win10
此电脑右击管理到磁盘管理(或搜索磁盘管理选择创建并格式化分区),右击删除卷(或压缩卷)到未分配,右击新建简单卷再命名。压缩卷C盘分出50G装ubuntu,ubuntu自动识别未分配空间。
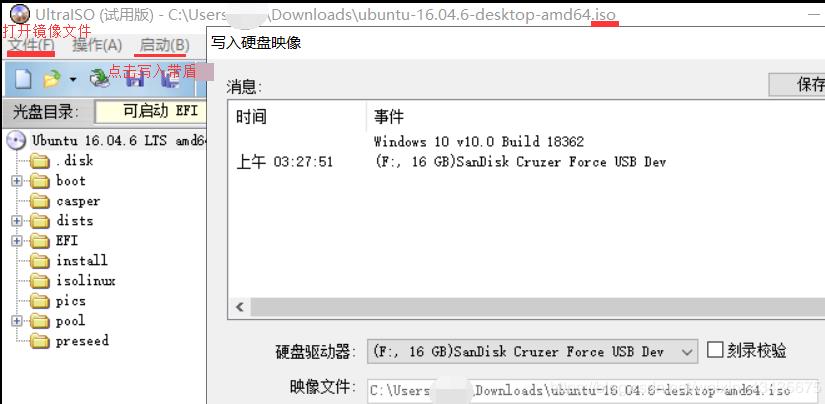
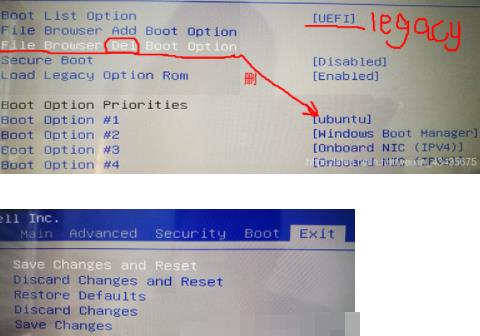
软碟通Ultraiso将从itellyou下载的win10镜像(用户customer版64位,复制链接迅雷下载)或ubuntu镜像写入U盘,Boot设置为UEFI启动U盘,legacy为老版本不用。下面两图都为f2。注意f12选择UEFI OPTIONS:USB1…启动,进入安装界面会提示与其他系统共存…
2.ubuntu安装常用软件
2.1 anaconda3
anaconda3镜像: https://mirrors.tuna.tsinghua.edu.cn
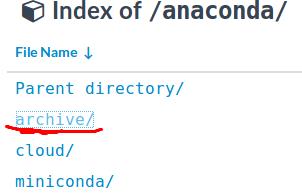
在.sh目录下打开命令行终端输入
bash Anaconda3........sh
不断按回车和yes,遇“Do you wish to proceed with the installation of Microsoft VSCode? [yes|no]”,输入no
若是conda --version或anaconda-navigator未找到命令则解决如下:
echo 'export PATH="/home/yuta/anaconda3/bin:$PATH"' >> ~/.bashrc
source ~/.bashrc
同理安装pycharm社区版不要激活: http://www.jetbrains.com/pycharm/download/#section=linux,选择linux版本
解压pycharm进入bin目录执行终端命令sh ./pycharm.sh(也是打开命令),跳出命令下一步。
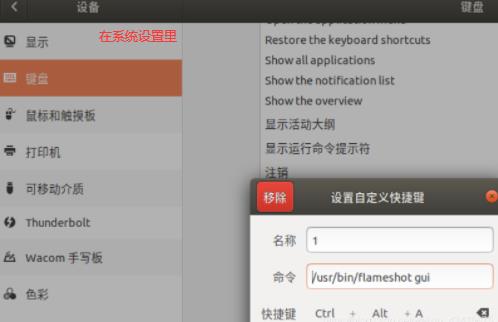
2.2 flameshot(截图)
sudo apt-get install flameshot (sudo apt-get remove --purge 软件名称)
apt命令来安装软件,可能报“E:无法定位软件包”,解决:
使用apt新装软件的时候,会使用官方网站去下载软件,但是会因为国内的转接点太多,导致下载速度慢 ,可以通过换成一些中间的节点来进行下载,比如阿里源,中科大源,清华源等,这样的网站会定时和官方的源进行同步和更新,我们直接同步他们,速度就会比直接同步官方的源快
cd /etc/apt/
sudo cp sources.list sources.list.bak
sudo vi sources.list  # 删除里面内容,百度Ubuntu源粘贴
sudo apt-get update  # 执行了这句话后,会访问源列表中的每个网址,并读取软件列表,然后保存在我们的电脑上
sudo apt-get upgrade # 执行了这句话后,会与刚才下载的软件列表里面的软件进行对比,需要更新高版本的软件 就会下载与安装
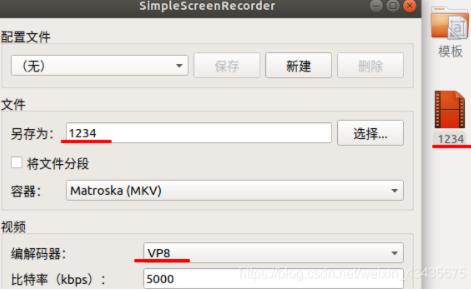
2.3 SimpleScreenRecorder(录屏)
添加源:sudo add-apt-repository ppa:maarten-baert/simplescreenrecorder
更新源:sudo apt-get update
安装:sudo apt-get install simplescreenrecorder
2.4 teamview
https://www.teamviewer.com/zhcn/download/linux/
安装依赖包,终端进入到下载路径中,执行命令:(64位系统没有执行这个命令也成功,32位的系统则需要执行)
sudo apt-get install libjpeg62:i386 libxinerama1:i386 libxrandr2:i386 libxtst6:i386 ca-certificates
安装deb软件包:sudo dpkg -i teamviewer_12.0.76279_i386.deb
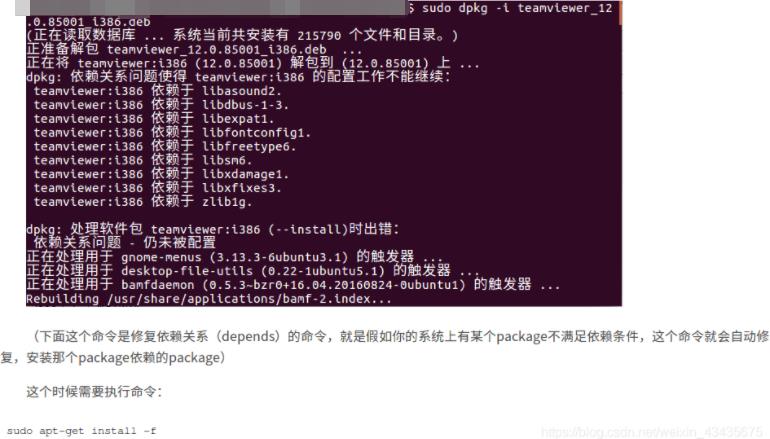
再重新执行:sudo dpkg -i teamviewer_12.0.76279_i386.deb
2.5 win_VMware_Ubuntu
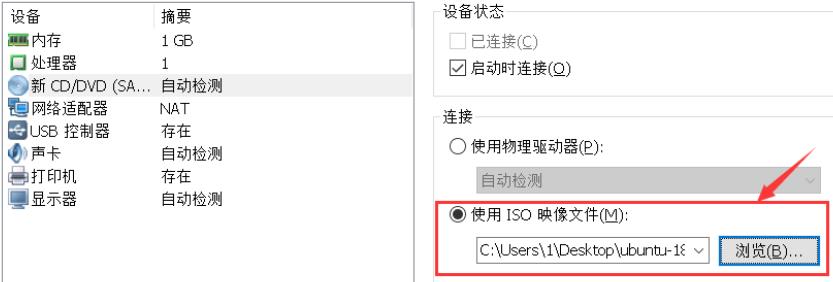
下载Ubuntu镜像文件:http://www.ubuntu.com,配置VMware,下载地址:www.linuxprobe.com/tools。创建新虚拟机—自定义(高级)
3.Win10系统有nvidia显卡后配深度学习环境:CUDA9.0、cudnn7.3、tensorflow_gpu1.12
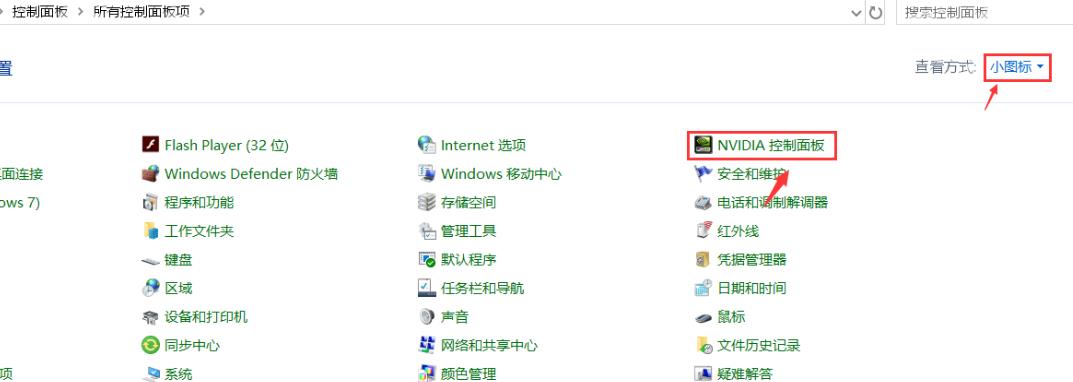
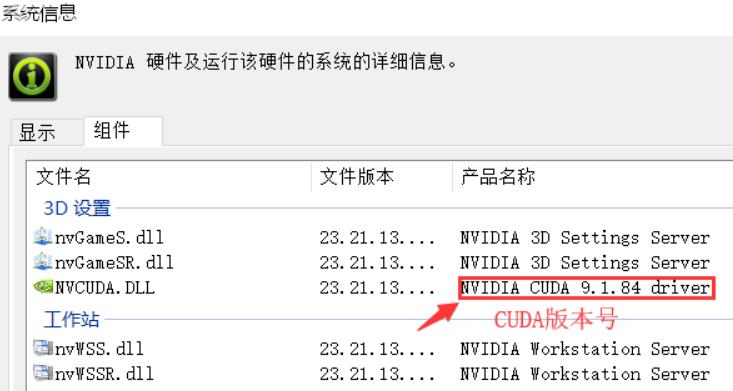
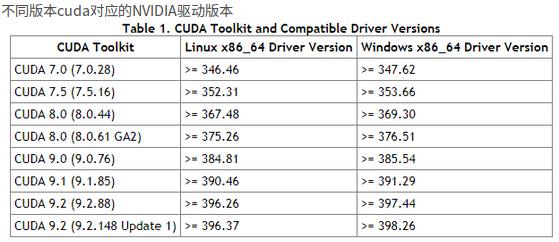
查看CUDA版本号可以安装CUDA Toolkit(可分离cpu和gpu代码)。本文作者CUDA版本号为9.1可装CUDA Toolkit 9.0、CUDA Toolkit 9.1、CUDA Toolkit 8.0
帮助-系统信息
3.1 需要下载的安装包
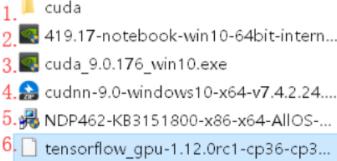
1: 为4的解压
2:安装英伟达驱动程序,设备管理器中查看显卡型号,到官网选择对应驱动下载,可以先卸载所有驱动再进行安装
3:用于做并行(一个核一个进程)计算的平台CUDA toolkit,版本为9.0,前提是电脑拥有Nvidia独立显卡,看显卡对应使用cuda版本号
4:用于做深度学习加速计算的cuDNN库,版本为7.3
5:Microsoft出品,在Windows操作系统运行所有软件都依赖的Net Framework库,版本为4.6
6:Google出品,提供给开发人员的深度学习开发框架TensorFlow。其有2个版本,cpu版和gpu版,本文要安装的是gpu版本,因为gpu版本是cpu版本运行速度的50倍
3.2 Net FrameWork4.6
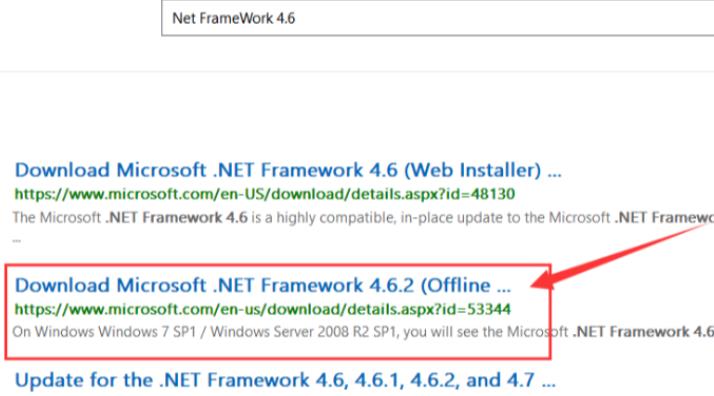
在Windows操作系统运行所有软件都依赖的.Net Framework库。一般来说,安装Win10操作系统的时,会自动更新.Net Framework到较新版本,但是为了避免个别读者的软件版本较久,建议下载并安装.Net Framework4.6。进入Windows官网,链接:https://www.microsoft.com,进入后页面如下图所示:在搜索框搜索:Net Framework 4.6,Offline中文叫离线,需要下载Offline Installer版本,双击直接安装:
3.3 CUDA9.0(toolkit)
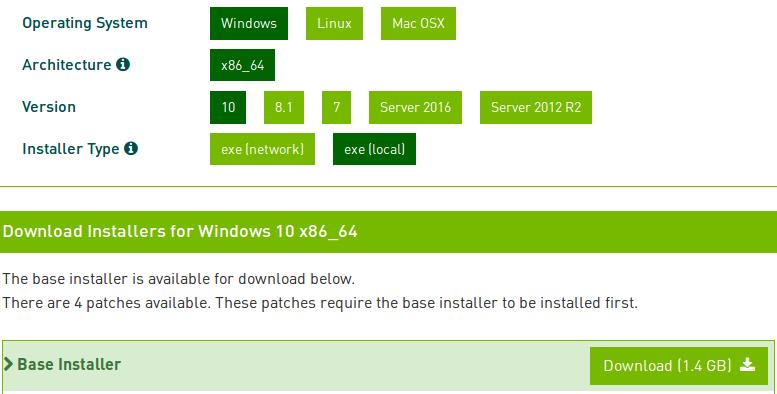
进入Nvidia官网,链接:https://www.nvidia.com,安装时不要修改默认安装位置,一般CUDA安装失败都是由于Visual Studio(VS) Intergration无法安装导致的,可以通过自定义方式取消Visual Studio(VS) Intergration进行安装。
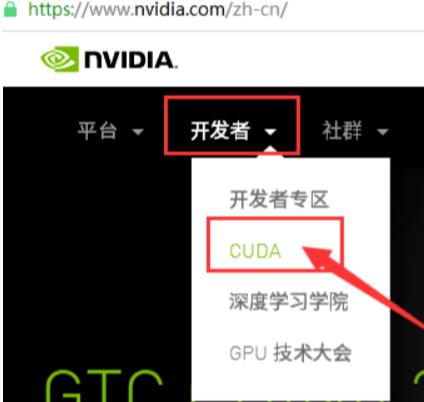
Legacy Releases中文叫做遗留版本,即旧版本CUDA的下载页面需要从此处进入。

3.4 cudnn7.3
开发者-CUDA-Downloads。

cudnn中的cu是CUDA的简写,dnn是deep neural network的简写。
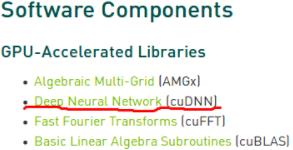
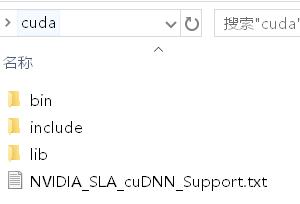
注册登陆下载,安装:使用解压软件将压缩文件cudnn-9.0-windows10-x64-v7.3.1.20.zip解压到当然文件夹。
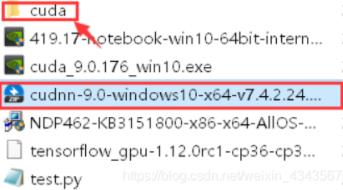
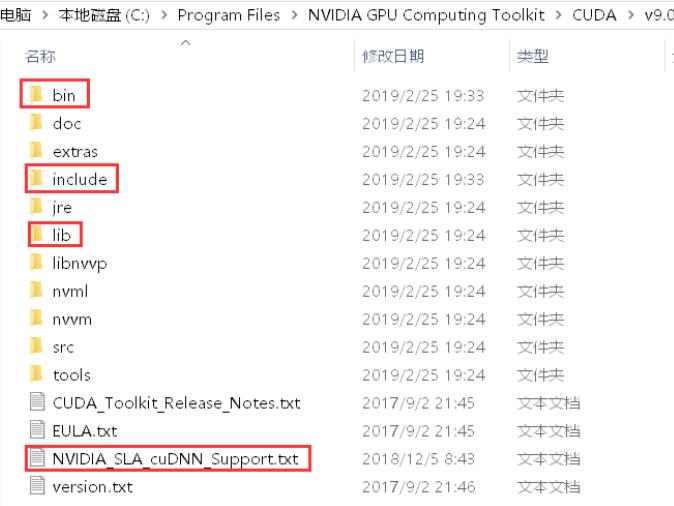
打开压缩后的cuda文件夹,将这四个文件全部复制到:C:\\Program Files\\NVIDIA GPU Computing Toolkit\\CUDA\\v9.0,即安装CUDA9.0默认路径。
3.5 tensorflow_gpu1.12
进入阿里云pypi镜像,链接:http://mirrors.aliyun.com/pypi/simple/
下载后对应文件夹打开命令行pip install+名称,考虑到部分读者可能没有安装运行tensorflow必需的msgpack库,在cmd中输入命令:pip install msgpack
3.6 测试
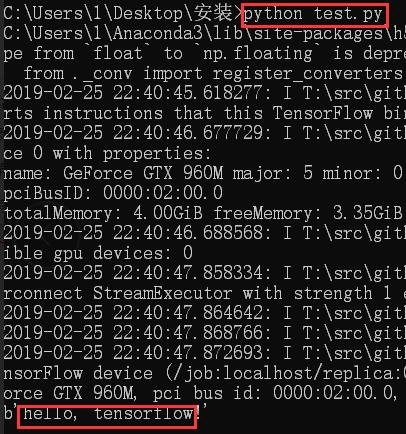
在文件夹中新建.txt文件,将代码写入.txt文件中,写入后改为test.py文件。

import tensorflow as tf
hello = tf.constant('hello, tensorflow!')
session = tf.Session()
print(session.run(hello))
运行py文件成功。
建议先将Nvidia相关驱动卸载干净后,重新安装Nvidia驱动,再实现本文当中的操作。如果一直出现找不到tensorflow库的错误,本文读者提示可以使用conda install tensorflow_gpu的方法先解决环境问题,然后再conda uninstall tensorflow_gpu再实现本文当中的操作。
4.Ubuntu + CUDA9.0 + tensorflow-gpu安装过程:

4.1 安装NVIDIA驱动
1.卸载NVIDIA驱动:sudo apt-get remove --purge nvidia*
下面这步禁用我没用到,但记录下:
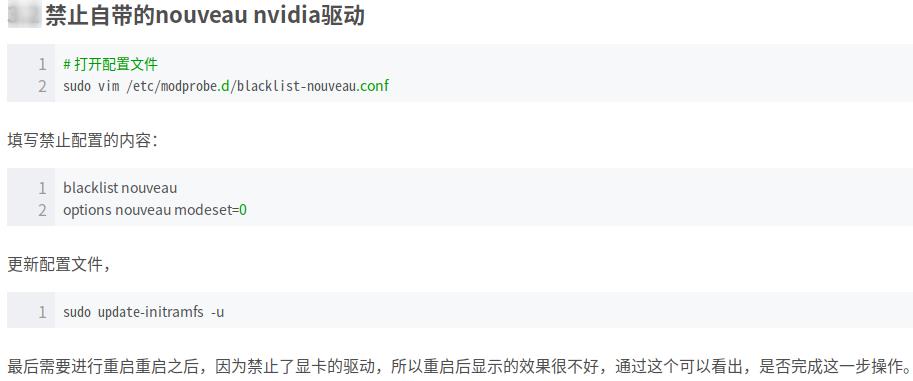
2.添加Graphic Drivers PPA:
sudo add-apt-repository ppa:graphics-drivers/ppa
sudo apt-get update
3.查看推荐驱动版本:ubuntu-drivers devices
4.安装驱动:sudo apt-get install nvidia-driver-430
5.安装完成后重启:sudo reboot
6.查看:watch nvidia-smi或者系统设置详细信息
4.2 CUDA
1..GCC降低版本:CUDA9.0要求GCC版本是5.x或者6.x,通过以下命令才对GCC版本进行修改:
版本安装,并通过命令替换掉之前的版本
g++ --version
sudo apt-get install gcc-5
sudo apt-get install g++-5
sudo update-alternatives --install /usr/bin/gcc gcc /usr/bin/gcc-5 50
sudo update-alternatives --install /usr/bin/g++ g++ /usr/bin/g++-5 50
附:gcc降级
$ gcc -v  #在此显示我的gcc版本为7
$ ls /usr/bin/gcc*  #查看安装有哪些版本的gcc
$ sudo apt-get install gcc-5 g++-5 #如果没有需要的版本,则需要安装指定版本
#配置gcc优先级,数值越低优先级越高
$ sudo update-alternatives --install /usr/bin/gcc gcc /usr/bin/gcc-7 50
$ sudo update-alternatives --install /usr/bin/gcc gcc /usr/bin/gcc-5 40
$ sudo update-alternatives --config gcc #确认配置
#同样也设置一下g++
$ sudo update-alternatives --install /usr/bin/g++ g++ /usr/bin/g++-7 50
$ sudo update-alternatives --install /usr/bin/g++ gc++/usr/bin/g++-5 40
$ sudo update-alternatives --remove gcc /usr/bin/gcc-7 #想删除可选项
$ gcc -v
2.CUDA9.0下载地址:https://developer.nvidia.com/cuda-toolkit-archive
选择版本:linux–x86-64,Ubuntu–16.04,runfile(local),下载Base Installer并同级目录终端安装回车到底,accept后第一步输入n (不装nvidia驱动driver,因为已经装过)后面全y:
sudo sh cuda_9.0.176_384.81_linux.run
如果run文件出现问题,需要安装下面依赖,我没遇到过仅记录下:
sudo apt-get install freeglut3-dev build-essential libx11-dev libxmu-dev libxi-dev libgl1-mesa-glx libglu1-mesa libglu1-mesa-dev
sudo apt-get install libprotobuf-dev libleveldb-dev libsnappy-dev libopencv-dev libhdf5-serial-dev protobuf-compiler
sudo apt-get install --no-install-recommends libboost-all-dev
sudo apt-get install libopenblas-dev liblapack-dev libatlas-base-dev
sudo apt-get install libgflags-dev libgoogle-glog-dev liblmdb-dev
3.添加环境变量(.bashrc就是环境配置文件):sudo vim ~/.bashrc ,按i进入插入模式,在末尾添加以下内容:
export PATH=/usr/local/cuda-9.0/bin$PATH:+:$PATH
export LD_LIBRARY_PATH=/usr/local/cuda-9.0/lib64$LD_LIBRARY_PATH:+:$LD_LIBRARY_PATH

按下ESC键后输入:wq 保存退出,然后刷新:source ~/.bashrc
4.重启后,测试CUDA是否成功:
cd ~/NVIDIA_CUDA-9.0_Samples/1_Utilities/deviceQuery
make -j4
sudo ./deviceQuery
若会输出相应的显卡性能信息,Result = PASS,表明CUDA安装成功。
5.卸载CUDA:在计算机磁盘可以找到usr文件夹:sudo rm -rf /usr/local/cuda-9.0/或

4.3 CUDANN
https://developer.nvidia.com/cudnn
注册登陆选择cudann7.0

解压下载的文件,可以看到cuda文件夹,在同级目录打开终端,拷贝文件并赋予权限,没有报错就是全部安装完成:
 sudo cp cuda/include/cudnn.h /usr/local/cuda/include/
 sudo cp cuda/lib64/libcudnn* /usr/local/cuda/lib64/
 sudo chmod a+r /usr/local/cuda/include/cudnn.h
 sudo chmod a+r /usr/local/cuda/lib64/libcudnn*
查看cudann版本:cat /usr/local/cuda/include/cudnn.h | grep CUDNN_MAJOR -A 2或nvcc -V
4.4 tensorflow-gpu
1.创建一个python3X名为tf12的虚拟环境:conda create -n tf12 python=3.6或=3(最新)
2.激活虚拟环境:source/conda activate tf12 或source tf12/bin/activate
3.在虚拟环境里用conda安装:conda install tensorflow-gpu==1.12,pip show tensorflow,conda info --envs

在tf12环境中conda install jupyter notebook打开,不然默认打开base环境的jupyter
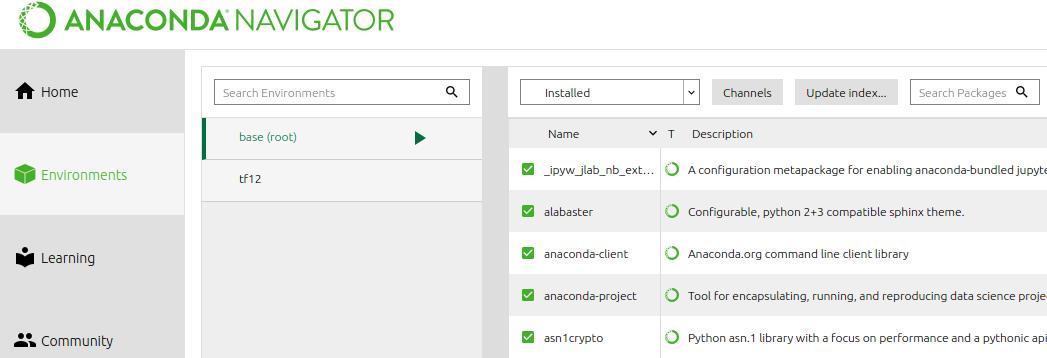
ubuntu16.04启动Anaconda Navigator 图形化界面,可以删除虚拟环境:
source ~/anaconda3/bin/activate root #进入base环境
anaconda-navigator
4.5 调用gpu
# 让Keras只使用GPU来进行训练
import os
os.environ["CUDA_DEVICE_ORDER"] = "PCI_BUS_ID"
os.environ["CUDA_VISIBLE_DEVICES"] = ""  #"0,1"
# 让显存不一次性占满
import tensorflow as tf
gpu_options = tf.GPUOptions(allow_growth=True)
sess = tf.Session(config=tf.ConfigProto(gpu_options=gpu_options))
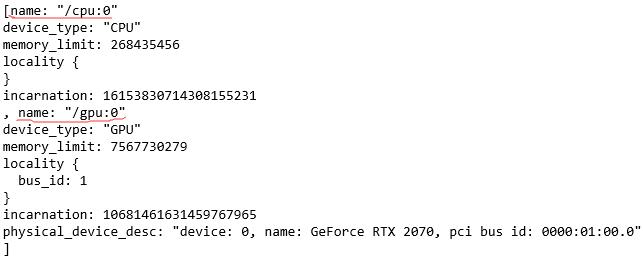
tf.test.is_gpu_available()
True
tf.test.gpu_device_name()
‘/gpu:0’
from tensorflow.python.client import device_lib
print (device_lib.list_local_devices())
5.目标检测实战(Tensorflow_API_SSD)
5.1 运行tensorflow官方示例
本文基于window10,python3.6 ,tensorflow1.12。在官网model里的research文件夹 :https://github.com/tensorflow/models/tree/master/research
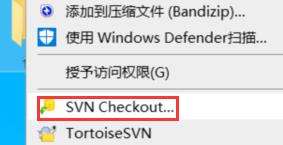
1.window下载子目录: object_detection文件夹右击复制链接地址将/branches/branchname/替换成/trunk/,下载TortoiseSVN软件,桌面新建文件夹选中右击svn checkout。
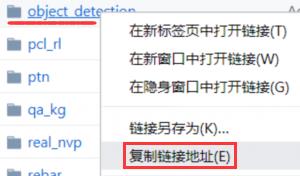

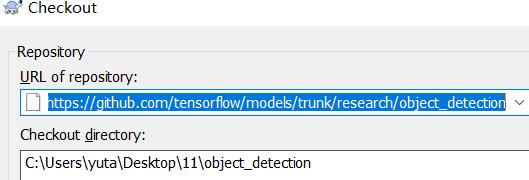
2.ubuntu下载子目录: 安装svn:sudo apt-get install subversion,同上改为trunk,新文件夹里命令$svn checkout +改后地址。
3.ubuntu下载单文件: wget+含raw的新地址

5.2 proto文件转py文件
Protobuf是google开发的的一套用于数据存储,网络通信时用于协议编解码的工具库。它和XML和Json数据差不多,把数据以某种形式保存起来。不同之处,它是一种二进制的数据格式,具有更高的传输,打包和解包效率。下载Protobuf网址:https://github.com/google/protobuf/releases 下载压缩文件protoc-3.7.0-win64.zip,解压后将bin文件夹中protoc.exe复制到c/window,在工程object_detection文件夹中,进入文件夹protos,文件夹中有很多以proto为后缀的文件,把这些proto文件转换为py文件。与工程object_detection文件夹同级目录中,打开cmd,不进入object_detection文件夹,运行jupyter notebook,新建一个ipynb文件,即点击选择New->Python3,复制下面一段代码运行:
import os
file_list = os.listdir('object_detection/protos/')
proto_list = [file for file in file_list if '.proto' in file]
print('object_detection/proto文件夹中共有%d个proto文件' %len(proto_list))
for proto in proto_list:
    execute_command = 'protoc object_detection/protos/%s --python_out=.' %proto
    os.popen(execute_command) # 相当于cmd直接打开路径
file_list = os.listdir('object_detection/protos/')
py_list = [file for file in file_list if '.py' in file]
print('通过protoc命令产生的py文件共有%d个' %(len(py_list) - 1))
重进入文件夹object_detection/protos,文件夹中每个proto文件后都有一个py文件,即将proto文件转py文件成功。

5.3 下载模型并运行ipynb文件
object_detection_tutorial.ipynb中有下载预训练好的模型的代码语句。代码可以运行,但是无法得到结果,因为代码中的下载链接是国外的网址,所以下文删除代码中Download Model块,本人提供百度云盘:链接:https://pan.baidu.com/s/1a4u-Xeu8KDKABlE6DfmM3Q 提取码:ek3n 。将下载好的压缩文件放到工程object_detection文件夹中并解压:文件夹ssd_mobilenet_v1_coco_2017_11_17中有文件夹saved_model文件夹和6个文件
在工程object_detection文件夹中运行cmd,打开jupter notebook,运行下面文件:

删除代码块,再run all 模块:
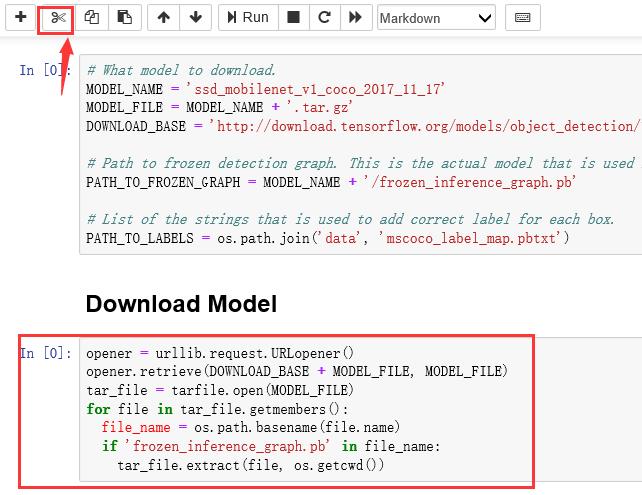
本人在运行时出现两个报错:1.删除红色框中内容,运行成功。
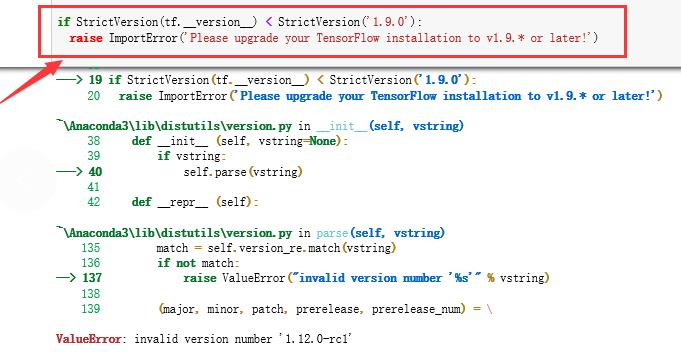
2.pillow库版本之前-U升级过,版本过高,按提示安装旧版:先pip uninstall,再用阿里云镜像安装:

5.4 tf_SSD
桌面新建目标检测2文件夹,以下为本次项目会用到的文件:
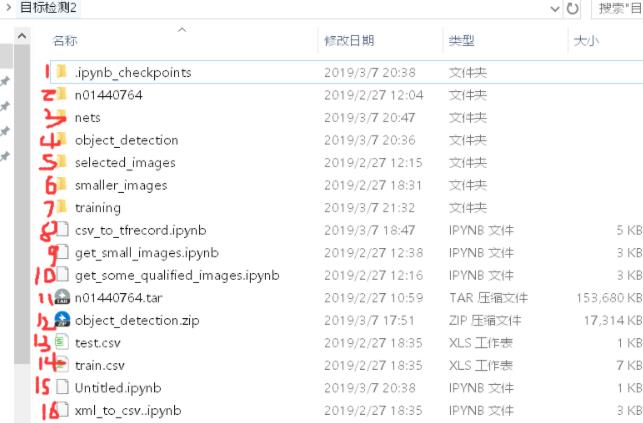
本文作者给读者演示的图片数据是来自ImageNet中的鲤鱼分类
链接:https://pan.baidu.com/s/17iI62gt9HyRbQ-Wr8h28jw 提取码:4swb
5.5 挑选图片
此数据集中大部分图片都较为清晰,但极少数图片像素点少不清晰。像素点少的图片不利于模型训练或模型测试,在目标检测2文件夹中cmd,打开jupyter notebook,新建重命名为:get_some_qualified_images,运行下一段代码后会在目标检测2文件夹下多出selected_images文件夹
import os
import random
from PIL import Image
import shutil

#获取1000张图片中随机选出数量为sample_number*2的一部分图片的路径
def get_some_imagePath(dirPath, sample_number):
    fileName_list = os.listdir(dirPath)
    all_filePath_list = [os.path.join(dirPath, fileName) for fileName in fileName_list]#绝对路径
    all_imagePath_list = [filePath for filePath in all_filePath_list if '.jpg' in filePath] #获得.jpg后缀的绝对路径
    some_filePath_list = random.sample(all_filePath_list, k=sample_number*2)#随机获取k个元素还是返回列表
    return some_filePath_list

#获取一部分像素足够,即长,宽都大于300的图片放入new_dirPath文件夹中
def get_some_qualified_images(dirPath, sample_number, new_dirPath):
    some_imagePath_list = get_some_imagePath(dirPath, sample_number)
    if not os.path.isdir(new_dirPath):
        os.mkdir(new_dirPath)
    i = 0
    for imagePath in some_imagePath_list:
        image = Image.open(imagePath)
        width, height = image.size
        if width > 300 and height > 300:
            i += 1
            new_imagePath = 'selected_images/%03d.jpg' %i
            shutil.copy(imagePath, new_imagePath)
        if i == sample_number:
            break

#获取数量为100的合格样本存放到selected_images文件夹中
get_some_qualified_images('n01440764', 100, 'selected_images')
5.6 缩小图片
选出了100张像素足够的图片存放在selected_images文件夹中,本章中用代码实现将像素过大的图片做缩小:新建文件get_small_images.ipynb,运行下段代码:
import os
from PIL import Image

def get_smaller_images(dirPath, new_dirPath): #参数自己传入与上文无关
    fileName_list = os.listdir(dirPath)
    filePath_list = [os.path.join(dirPath, fileName) for fileName in fileName_list]
    imagePath_list = [filePath for filePath in filePath_list if '.jpg' in filePath]
    if not os.path.isdir(new_dirPath):
        os.mkdir(new_dirPath)
    for imagePath in imagePath_list:
        image = Image.open(imagePath)
        width, height = image.size
        imageName = imagePath.split('\\\\')[-1]
        save_path = os.path.join(new_dirPath, imageName)
        if width >= 600 and height >= 600:
            minification = min(width, height) // 300 #此变量表示缩小倍数
            new_width = width // minification
            new_height = height // minification
            resized_image = image.resize((new_width, new_height), Image.ANTIALIAS)
            print('图片%s原来的宽%d,高%d, 图片缩小后宽%d,高%d' %(
                imageName, width, height, new_width, new_height))
            resized_image.save(save_path)
        else:
            image.save(save_path)

get_smaller_images('selected_images', 'smaller_images')
图片经过PIL库打开再保存,保持图片质量的情况下,能够缩小图片文件大小3倍左右。
5.7 图片打标签
LabelImg链接:https://pan.baidu.com/s/1YT_s0Ef95fOJAsiG69Bmkw 提取码:6epi
把压缩文件windows_v1.8.0.zip放到D盘根目录中,选择解压到当前文件夹。解压后D盘根目录下会有windows_v1.8.0文件夹,LabelImg软件在文件夹中。选择D盘根目录的原因:如果windows_v1.8.0文件夹路径中带有中文,打开LabelImg软件会闪退
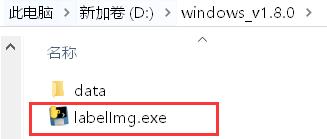
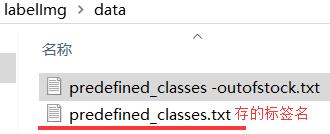
按W画框,voc格式为xml,ctrl+s保存,A和D上下张 ,ctrl+d复制
已经打标签好的文件夹smaller_images做成压缩文件smaller_images.zip,链接:https://pan.baidu.com/s/13-fRksSjUeEii54gClA3Pw 提取码:57lz
5.8 xml转csv,csv转tfrecord
目标检测2文件夹中新建代码文件xml_to_csv.ipynb,cmd——>运行jupyter notebook——>新建代码文件——>代码文件重命名,复制下面一段代码到代码文件xml_to_csv.ipynb并运行:
import os
import pandas as pd
import xml.etree.ElementTree as ET
from sklearn.model_selection import train_test_split

def xmlPath_list_to_df(xmlPath_list):
    xmlContent_list = []
    for xmlPath in xmlPath_list:
        tree = ET.parse(xmlPath)
        root = tree.getroot()
        for member in root.findall('object'):
            value = (root.find('filename').text,
                     int(root.find('size')[0].text),
                     int(root.find('size')[1].text),
                     member[0].text,
                     int(member[4][0].text),
                     int(member[4][1].text),
                     int(member[4][2].text),
                     int(member[4][3].text)
                     )
            xmlContent_list.append(value)
    column_name = ['filename', 'width', 'height', 'class', 'xmin', 'ymin', 'xmax', 'ymax']
    xmlContent_df = pd.DataFrame(xmlContent_list, columns=column_name)
    return xmlContent_df

def dirPath_to_csv(dirPath):
    fileName_list = os.listdir(dirPath)
   以上是关于Python1双系统安装/深度学习环境,目标检测,csv/excel/matplotlib,进程,文件/xml操作,百度人脸API,hal/aiohttp/restful/curl的主要内容,如果未能解决你的问题,请参考以下文章