Running Quagga on LXD to test OSPF (by quqi99)
Posted quqi99
tags:
篇首语:本文由小常识网(cha138.com)小编为大家整理,主要介绍了Running Quagga on LXD to test OSPF (by quqi99)相关的知识,希望对你有一定的参考价值。
作者:张华 发表于:2022-01-28
版权声明:可以任意转载,转载时请务必以超链接形式标明文章原始出处和作者信息及本版权声明
( http://blog.csdn.net/quqi99 )
前言
Quagga是一个开源的基于Zebra实现了RIP, OSPF, BGP的动态路由软件。它提供的CLI命令和Cisco ios类似 - https://blog.csdn.net/quqi99/article/details/9264373
网络测试需要机器来运行Quagga软路由,也需要机器来运行网络测试机,用裸机太麻烦,用虚机也麻烦,容器内的网络是隔离的还是用LXD容器吧 - https://blog.csdn.net/quqi99/article/details/52131486
注意,运行此测试,根目录至少得有5.5G硬盘空间.
sudo /snap/bin/lxc storage list
$ sudo du -h /var/snap/lxd/common/lxd/storage-pools/default |tail -n1
5.5G    /var/snap/lxd/common/lxd/storage-pools/default
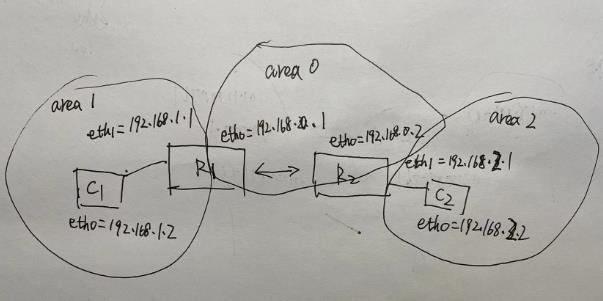
本测试实现的OSPF网络拓扑如下图所示(也可以使用processon画图) ,两个路由器R1和R2, 两个测试机C1和C1, 三个OSPF AREA (0, 1, 2), 最终的目的得192.168.1.2可以ping通192.168.2.2
Install LXD
sudo snap install lxd --classic
sudo /snap/bin/lxd init --auto
ip addr show lxdbr0
sudo /snap/bin/lxc profile show default
sudo /snap/bin/lxc remote add faster https://mirrors.cloud.tencent.com/ubuntu-cloud-images/releases/server --protocol simplestreams
sudo /snap/bin/lxc launch faster:20.04 R1
注:20220530更新 - 见:https://blog.csdn.net/quqi99/article/details/52131486
如果添加了下列配置, 之后不需要使用"sudo /snap/bin/lxc",直接使用lxc或lxd即可(前面不需要加sudo)
sudo usermod -aG $USER lxd
# MUST NOT use sudo, so must cd to home dir to run it
cd ~ && lxd init --auto
sudo chown -R $USER ~/.config/
export EDITOR=vim
Make LXC Template for Router and Client
wget https://github.com/Quagga/quagga/releases/download/quagga-1.2.4/quagga-1.2.4.tar.gz
wget https://c-ares.org/download/c-ares-1.18.1.tar.gz
/snap/bin/lxc file push ./quagga-1.2.4.tar.gz R1/root/
/snap/bin/lxc file push ./c-ares-1.18.1.tar.gz R1/root/
/snap/bin/lxc exec R1 -- /bin/bash
tar -xf quagga-1.2.4.tar.gz
tar -xf c-ares-1.18.1.tar.gz
apt install gawk libreadline8 libreadline-dev pkg-config binutils gcc make -y
cd /root/c-ares-1.18.1
./configure && make && make install
cd ../quagga-1.2.4
./configure --enable-vtysh --enable-user=root --enable-group=root --enable-vty-group=root
make && make install
cat /etc/services
cp /usr/local/etc/zebra.conf.sample /usr/local/etc/zebra.conf
cp /usr/local/etc/vtysh.conf.sample /usr/local/etc/vtysh.conf
cp /usr/local/etc/ospfd.conf.sample /usr/local/etc/ospfd.conf
cp /usr/local/lib/libzebra.so.1 /lib
cp /usr/local/lib/libospf* /lib/
groupadd quagga && useradd quagga -g quagga
zebra -d
apt install net-tools -y
exit
#sudo /snap/bin/lxc image export Quagga_Template . && sudo /snap/bin/lxd import <tarbal> --alias <alias>
sudo /snap/bin/lxc publish R1 --alias Quagga_Template --public --force

sudo /snap/bin/lxc launch Quagga_Template C1
sudo /snap/bin/lxc exec C1 -- /bin/bash
apt install net-tools -y
exit
sudo /snap/bin/lxc publish C1 --alias Client_Ubuntu2004 --public --force

sudo /snap/bin/lxc delete R1 --force
sudo /snap/bin/lxc delete C1 --force
Configure R1, R2, C1, C2
# Connect R1 and C1
sudo /snap/bin/lxc launch Quagga_Template R1
sudo /snap/bin/lxc launch Client_Ubuntu2004 C1
sudo /snap/bin/lxc network create C1R1 ipv6.address=none ipv4.address=192.168.1.1/24
sudo /snap/bin/lxc network attach C1R1 C1 eth0
sudo /snap/bin/lxc network attach C1R1 R1 eth1
sudo /snap/bin/lxc exec R1 -- /bin/bash
  ip addr add 192.168.1.1/24 dev eth1 && ip link set eth1 up && exit
sudo /snap/bin/lxc exec C1 -- /bin/bash
  ip addr add 192.168.1.2/24 dev eth0 && ip link set eth0 up
  route add default gw 192.168.1.1
  ping 192.168.1.1
  exit

# Connect R2 and C2
sudo /snap/bin/lxc launch Quagga_Template R2
sudo /snap/bin/lxc launch Client_Ubuntu2004 C2
sudo /snap/bin/lxc network create C2R2 ipv6.address=none ipv4.address=192.168.2.1/24
sudo /snap/bin/lxc network attach C2R2 C2 eth0
sudo /snap/bin/lxc network attach C2R2 R2 eth1
sudo /snap/bin/lxc exec R2 -- /bin/bash
  ip addr add 192.168.2.1/24 dev eth1 && ip link set eth1 up && exit
sudo /snap/bin/lxc exec C2 -- /bin/bash
  ip addr add 192.168.2.2/24 dev eth0 && ip link set eth0 up
  route add default gw 192.168.2.1
  ping 192.168.2.1
  exit

# Connect R1R2
sudo /snap/bin/lxc network create R1R2 ipv6.address=none ipv4.address=192.168.0.1/24
sudo /snap/bin/lxc network attach R1R2 R1 eth0
sudo /snap/bin/lxc network attach R1R2 R2 eth0
sudo /snap/bin/lxc exec R1 -- /bin/bash
  ip addr add 192.168.0.1/24 dev eth0 && ip link set eth0 up && exit
sudo /snap/bin/lxc exec R2 -- /bin/bash
  ip addr add 192.168.0.2/24 dev eth0 && ip link set eth0 up && exit

# Configure OSPF on R1
sudo /snap/bin/lxc exec R1 -- /bin/bash
cat << EOF | tee /usr/local/etc/ospfd.conf
! OSPF configuration file
hostname R1
password password
enable password password
router ospf
  ospf router-id 192.168.0.1
  network 192.168.0.0/24 area 0
  network 192.168.1.0/24 area 1
debug ospf event
log file /usr/local/etc/ospfd.log
EOF
zebra -d && ospfd -d && exit

# Configure OSPF on R2
sudo /snap/bin/lxc exec R2 -- /bin/bash
cat << EOF | tee /usr/local/etc/ospfd.conf
! OSPF configuration file
hostname R2
password password
enable password password
router ospf
  ospf router-id 192.168.0.2
  network 192.168.0.0/24 area 0
  network 192.168.2.0/24 area 2
debug ospf event
log file /usr/local/etc/ospfd.log
EOF
zebra -d && ospfd -d && exit
Test Result
# Test - C1 -> C2
$ sudo /snap/bin/lxc exec C1 -- /usr/bin/ping 192.168.2.2 -c1
PING 192.168.2.2 (192.168.2.2) 56(84) bytes of data.
64 bytes from 192.168.2.2: icmp_seq=1 ttl=62 time=0.204 ms
Some Debug Data
sudo /snap/bin/lxc exec R1 -- /bin/bash
vtysh
R1# show ip ospf neighbor
Neighbor ID     Pri State           Dead Time Address         Interface            RXmtL RqstL DBsmL
192.168.0.2       1 Full/Backup       37.551s 192.168.0.2     eth0:192.168.0.1         0     0     0

sudo /snap/bin/lxc exec R2 -- /bin/bash
vtysh
R2# show ip ospf neighbor
Neighbor ID     Pri State           Dead Time Address         Interface            RXmtL RqstL DBsmL
192.168.0.1       1 Full/DR           36.633s 192.168.0.1     eth0:192.168.0.2         0     0     0

R1# show ip ospf data
       OSPF Router with ID (192.168.0.1)
                Router Link States (Area 0.0.0.0)
Link ID         ADV Router      Age  Seq#       CkSum  Link count
192.168.0.1     192.168.0.1      815 0x80000004 0x722a 1
192.168.0.2     192.168.0.2      269 0x80000005 0x6e2a 1
                Net Link States (Area 0.0.0.0)
Link ID         ADV Router      Age  Seq#       CkSum
192.168.0.1     192.168.0.1      815 0x80000001 0x941b
                Summary Link States (Area 0.0.0.0)
Link ID         ADV Router      Age  Seq#       CkSum  Route
192.168.1.0     192.168.0.1      785 0x80000002 0xfe7e 192.168.1.0/24
192.168.2.0     192.168.0.2      129 0x80000002 0xed8d 192.168.2.0/24

R2# show ip ospf data
       OSPF Router with ID (192.168.0.2)
                Router Link States (Area 0.0.0.0)
Link ID         ADV Router      Age  Seq#       CkSum  Link count
192.168.0.1     192.168.0.1      881 0x80000004 0x722a 1
192.168.0.2     192.168.0.2      333 0x80000005 0x6e2a 1
                Net Link States (Area 0.0.0.0)
Link ID         ADV Router      Age  Seq#       CkSum
192.168.0.1     192.168.0.1      882 0x80000001 0x941b
                Summary Link States (Area 0.0.0.0)
Link ID         ADV Router      Age  Seq#       CkSum  Route
192.168.1.0     192.168.0.1      852 0x80000002 0xfe7e 192.168.1.0/24
192.168.2.0     192.168.0.2      193 0x80000002 0xed8d 192.168.2.0/24
                Router Link States (Area 0.0.0.2)
Link ID         ADV Router      Age  Seq#       CkSum  Link count
192.168.0.2     192.168.0.2      843 0x80000003 0x3dc6 1
                Summary Link States (Area 0.0.0.2)
Link ID         ADV Router      Age  Seq#       CkSum  Route
192.168.0.0     192.168.0.2      293 0x80000003 0x027a 192.168.0.0/24
192.168.1.0     192.168.0.2      871 0x80000001 0x5f14 192.168.1.0/24
Reference
[1] https://blog.csdn.net/salmonwilliam/article/details/108887355
以上是关于Running Quagga on LXD to test OSPF (by quqi99)的主要内容,如果未能解决你的问题,请参考以下文章