java与es8实战之五:SpringBoot应用中操作es8(带安全检查:https账号密码API Key)
Posted 程序员欣宸
tags:
篇首语:本文由小常识网(cha138.com)小编为大家整理,主要介绍了java与es8实战之五:SpringBoot应用中操作es8(带安全检查:https账号密码API Key)相关的知识,希望对你有一定的参考价值。
欢迎访问我的GitHub
这里分类和汇总了欣宸的全部原创(含配套源码):https://github.com/zq2599/blog_demos
本篇概览
- 本篇是《java与es8实战》系列的第五篇,总体目标明确:实战在SpringBoot应用中操作elasticsearch8,今天的重点是SpringBoot应用连接带有安全检查的elasticsearch8服务端
- 连接需要安全检查的elasticsearch8是为了更接近真实环境,首先,连接是基于自签证书的https协议,其次,认证方式有两种
- 第一种是账号密码
- 第二种是es服务端授权的API Key
- 以上两种认证方式,在今天的实战中都会尝试,再加上前文《java与es8实战之四:SpringBoot应用中操作es8(无安全检查)》,可以小小的梳理一下SpringBoot应用连接es8的方式了,如下所示,直连、证书+账号密码、证书+API key等三种

- 今天的实战总体目标可以拆解为两个子任务
- 在SpringBoot中连接elasticsearch8
- 在SpringBoot中使用elasticsearch8官方的Java API Client
- 接下来直接开始
部署elasticsearch集群(需要安全检查)
- 关于快速部署elasticsearch集群(需要安全检查),可以参考《docker-compose快速部署elasticsearch-8.x集群+kibana》
创建API Key
- 除了账号密码,ES还提供了一种安全的访问方式:API Key,java应用持有es签发的API Key也能顺利发送指令到es,接下来咱们先生成API Key,再在应用中使用此API Key
- 《docker-compose快速部署elasticsearch-8.x集群+kibana》一文中,的咱们将自签证书从容器中复制出来了,现在在证书所在目录执行以下命令,注意参数expiration代表这个ApiKey的有效期,我这里随意设置为10天
curl -X POST "https://localhost:9200/_security/api_key?pretty" \\
--cacert es01.crt \\
-u elastic:123456 \\
-H 'Content-Type: application/json' \\
-d'

  "name": "my-api-key-10d",
  "expiration": "10d"

'
- 会收到以下响应,其中的encoded字段就是API Key
  "id" : "eUV1V4EBucGIxpberGuJ",
  "name" : "my-api-key-10d",
  "expiration" : 1655893738633,
  "api_key" : "YyhSTh9ETz2LKBk3-Iy2ew",
  "encoded" : "ZVVWMVY0RUJ1Y0dJeHBiZXJHdUo6WXloU1RoOUVUejJMS0JrMy1JeTJldw=="
Java应用连接elasticsearch的核心套路
- 不论是直连,还是带安全检查的连接,亦或是与SpringBoot的集成使之更方便易用,都紧紧围绕着一个不变的核心套路,该套路由两部分组成,掌握了它们就能在各种条件下成功连接es
- 首先,是builder pattern,连接es有关的代码,各种对象都是其builder对象的build方法创建的,建议您提前阅读《java与es8实战之一》一文,看完后,满屏的builder代码可以从丑变成美…
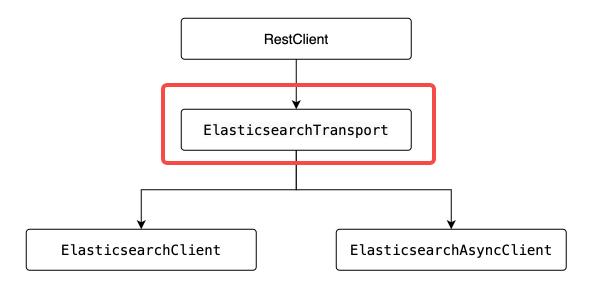
- 其次,就是java应用能向es发请求的关键:ElasticsearchClient对象,该对象的创建是有套路的,如下图,先创建RestClient,再基于RestClient创建ElasticsearchTransport,最后基于ElasticsearchTransport创建ElasticsearchClient,这是个固定的套路,咱们后面的操作都是基于此的,可能会加一点东西,但不会改变流程和图中的对象

- 准备完毕,开始写代码
新建子工程
-
为了便于管理依赖库版本和源码,《java与es8实战》系列的所有代码都以子工程的形式存放在父工程elasticsearch-tutorials中
-
《java与es8实战之二:实战前的准备工作》一文说明了创建父工程的详细过程
-
在父工程elasticsearch-tutorials中新建名为crud-with-security的子工程,其pom.xml内容如下
<?xml version="1.0" encoding="UTF-8"?>

<project xmlns="http://maven.apache.org/POM/4.0.0" xmlns:xsi="http://www.w3.org/2001/XMLSchema-instance"
         xsi:schemaLocation="http://maven.apache.org/POM/4.0.0 http://maven.apache.org/xsd/maven-4.0.0.xsd">
    <!-- 请改为自己项目的parent坐标 -->
    <parent>
        <artifactId>elasticsearch-tutorials</artifactId>
        <groupId>com.bolingcavalry</groupId>
        <version>1.0-SNAPSHOT</version>
        <relativePath>../pom.xml</relativePath>
    </parent>
    <modelVersion>4.0.0</modelVersion>
    <groupId>com.bolingcavalry</groupId>
    <!-- 请改为自己项目的artifactId -->
    <artifactId>crud-with-security</artifactId>
    <packaging>jar</packaging>
    <!-- 请改为自己项目的name -->
    <name>crud-with-security</name>
    <version>1.0-SNAPSHOT</version>
    <url>https://github.com/zq2599</url>

    <!--不用spring-boot-starter-parent作为parent时的配置-->
    <dependencyManagement>
        <dependencies>
            <dependency>
                <groupId>org.springframework.boot</groupId>
                <artifactId>spring-boot-dependencies</artifactId>

                <version>$springboot.version</version>
                <type>pom</type>
                <scope>import</scope>
            </dependency>
        </dependencies>
    </dependencyManagement>

    <dependencies>
        <dependency>
            <groupId>org.springframework.boot</groupId>
            <artifactId>spring-boot-starter-actuator</artifactId>
        </dependency>

        <!-- 不加这个,configuration类中,IDEA总会添加一些提示 -->
        <dependency>
            <groupId>org.springframework.boot</groupId>
            <artifactId>spring-boot-configuration-processor</artifactId>
            <optional>true</optional>
        </dependency>

        <dependency>
            <groupId>org.projectlombok</groupId>
            <artifactId>lombok</artifactId>
        </dependency>

        <dependency>
            <groupId>org.springframework.boot</groupId>
            <artifactId>spring-boot-starter-web</artifactId>
        </dependency>

        <dependency>
            <groupId>org.springframework.boot</groupId>
            <artifactId>spring-boot-starter-test</artifactId>
            <scope>test</scope>

            <!-- exclude junit 4 -->
            <exclusions>
                <exclusion>
                    <groupId>junit</groupId>
                    <artifactId>junit</artifactId>
                </exclusion>
            </exclusions>

        </dependency>

        <!-- junit 5 -->
        <dependency>
            <groupId>org.junit.jupiter</groupId>
            <artifactId>junit-jupiter-api</artifactId>
            <scope>test</scope>
        </dependency>

        <dependency>
            <groupId>org.junit.jupiter</groupId>
            <artifactId>junit-jupiter-engine</artifactId>
            <scope>test</scope>
        </dependency>

        <!-- elasticsearch引入依赖  start -->
        <dependency>
            <groupId>co.elastic.clients</groupId>
            <artifactId>elasticsearch-java</artifactId>
        </dependency>

        <dependency>
            <groupId>com.fasterxml.jackson.core</groupId>
            <artifactId>jackson-databind</artifactId>
        </dependency>

        <!-- 使用spring boot Maven插件时需要添加该依赖 -->
        <dependency>
            <groupId>jakarta.json</groupId>
            <artifactId>jakarta.json-api</artifactId>
        </dependency>

        <dependency>
            <groupId>org.springframework.boot</groupId>
            <artifactId>spring-boot-starter-web</artifactId>
        </dependency>
    </dependencies>

    <build>
        <plugins>
            <!-- 需要此插件,在执行mvn test命令时才会执行单元测试 -->
            <plugin>
                <groupId>org.apache.maven.plugins</groupId>
                <artifactId>maven-surefire-plugin</artifactId>
                <version>3.0.0-M4</version>
                <configuration>
                    <skipTests>false</skipTests>
                </configuration>
            </plugin>

            <plugin>
                <groupId>org.springframework.boot</groupId>
                <artifactId>spring-boot-maven-plugin</artifactId>
                <configuration>
                    <excludes>
                        <exclude>
                            <groupId>org.projectlombok</groupId>
                            <artifactId>lombok</artifactId>
                        </exclude>
                    </excludes>
                </configuration>
            </plugin>
        </plugins>

        <resources>
            <resource>
                <directory>src/main/resources</directory>
                <includes>
                    <include>**/*.*</include>
                </includes>
            </resource>
        </resources>
    </build>
</project>
配置文件
- 为了成功连接es,需要两个配置文件:SpringBoot常规的配置application.yml和es的自签证书
- 首先是application.yml,如下所示,因为本篇要验证两种授权方式,所以账号、密码、apiKey全部填写在配置文件中,如下所示
elasticsearch:
  username: elastic
  passwd: 123456
  apikey: ZVVWMVY0RUJ1Y0dJeHBiZXJHdUo6WXloU1RoOUVUejJMS0JrMy1JeTJldw==
  # 多个IP逗号隔开
  hosts: 127.0.0.1:9200
- 接下来是es的自签证书,这是SpringBoot应用在向es8发起https请求时需要用到的,在《docker-compose快速部署elasticsearch-8.x集群+kibana》一文中已经将其成功从容器中复制出来,现在请将其放在application.yml文件所在位置,如下图
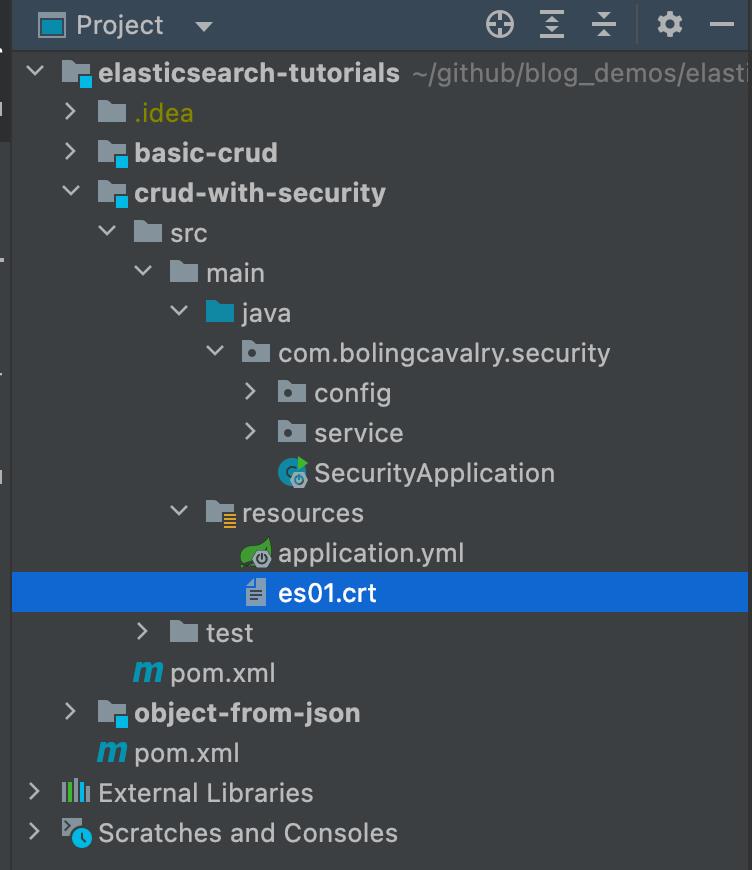
编码:启动类
- SpringBoot启动类,平淡无奇的那种
@SpringBootApplication
public class SecurityApplication
    public static void main(String[] args)
        SpringApplication.run(SecurityApplication.class, args);
编码:配置文件
-
接下来是全文的重点:通过Config类向Spring环境注册服务bean,这里有这两处要注意的地方
-
第一个要注意的地方:向Spring环境注册的服务bean一共有两个,它们都是ElasticsearchClient类型,一个基于账号密码认证,另一个基于apiKey认证
-
第二个要注意的地方:SpringBoot向es服务端发起的是https请求,这就要求在建立连接的时候使用正确的证书,也就是刚才咱们从容器中复制出来再放入application.yml所在目录的es01.crt文件,使用证书的操作发生在创建ElasticsearchTransport对象的时候,属于前面总结的套路步骤中的一步,如下图红框所示
- 配置类的详细代码如下,有几处需要注意的地方稍后会说明
package com.bolingcavalry.security.config;

import co.elastic.clients.elasticsearch.ElasticsearchClient;
import co.elastic.clients.json.jackson.JacksonJsonpMapper;
import co.elastic.clients.transport.ElasticsearchTransport;
import co.elastic.clients.transport.rest_client.RestClientTransport;
import lombok.Setter;
import lombok.extern.slf4j.Slf4j;
import org.apache.http.Header;
import org.apache.http.HttpHost;
import org.apache.http.auth.AuthScope;
import org.apache.http.auth.UsernamePasswordCredentials;
import org.apache.http.client.CredentialsProvider;
import org.apache.http.conn.ssl.NoopHostnameVerifier;
import org.apache.http.impl.client.BasicCredentialsProvider;
import org.apache.http.impl.nio.client.HttpAsyncClientBuilder;
import org.apache.http.message.BasicHeader;
import org.apache.http.ssl.SSLContextBuilder;
import org.apache.http.ssl.SSLContexts;
import org.elasticsearch.client.RestClient;
import org.elasticsearch.client.RestClientBuilder;
import org.elasticsearch.client.RestClientBuilder.HttpClientConfigCallback;
import org.springframework.boot.context.properties.ConfigurationProperties;
import org.springframework.context.annotation.Bean;
import org.springframework.context.annotation.Configuration;
import org.springframework.core.io.ClassPathResource;
import org.springframework.util.StringUtils;

import javax.net.ssl.SSLContext;
import java.io.IOException;
import java.io.InputStream;
import java.nio.file.Files;
import java.nio.file.Path;
import java.nio.file.Paths;
import java.security.KeyManagementException;
import java.security.KeyStore;
import java.security.KeyStoreException;
import java.security.NoSuchAlgorithmException;
import java.security.cert.Certificate;
import java.security.cert.CertificateException;
import java.security.cert.CertificateFactory;

@ConfigurationProperties(prefix = "elasticsearch") //配置的前缀
@Configuration
@Slf4j
public class ClientConfig

    @Setter
    private String hosts;

    @Setter
    private String username;

    @Setter
    private String passwd;

    @Setter
    private String apikey;

    /**
     * 解析配置的字符串,转为HttpHost对象数组
     * @return
     */
    private HttpHost[] toHttpHost()
        if (!StringUtils.hasLength(hosts))
            throw new RuntimeException("invalid elasticsearch configuration");


        String[] hostArray = hosts.split(",");
        HttpHost[] httpHosts = new HttpHost[hostArray.length];
        HttpHost httpHost;
        for (int i = 0; i < hostArray.length; i++)
            String[] strings = hostArray[i].split(":");
            httpHost = new HttpHost(strings[0], Integer.parseInt(strings[1]), "https");
            httpHosts[i] = httpHost;


        return httpHosts;


    @Bean
    public ElasticsearchClient clientByPasswd() throws Exception
        ElasticsearchTransport transport = getElasticsearchTransport(username, passwd, toHttpHost());
        return new ElasticsearchClient(transport);


    private static SSLContext buildSSLContext()
        ClassPathResource resource = new ClassPathResource("es01.crt");
        SSLContext sslContext = null;
        try
            CertificateFactory factory = CertificateFactory.getInstance("X.509");
            Certificate trustedCa;
            try (InputStream is = resource.getInputStream())
                trustedCa = factory.generateCertificate(is);

            KeyStore trustStore = KeyStore.getInstance("pkcs12");
            trustStore.load(null, null);
            trustStore.setCertificateEntry("ca", trustedCa);
            SSLContextBuilder sslContextBuilder = SSLContexts以上是关于java与es8实战之五:SpringBoot应用中操作es8(带安全检查:https账号密码API Key)的主要内容,如果未能解决你的问题,请参考以下文章