Android Notes|细数「十大布局」那些事儿
Posted HLQ_Struggle
tags:
篇首语:本文由小常识网(cha138.com)小编为大家整理,主要介绍了Android Notes|细数「十大布局」那些事儿相关的知识,希望对你有一定的参考价值。

最近的心情,最近的状态,似乎没法说个一二三四五。
做 android 好几年了,从单纯的 Android,到现在大杂烩,这个滋味儿,真的是百感交汇。
文章的内容类型从来都是 Notes,这次对老本行进行回顾下。
努力呀,万一一不小心优秀了呢?万一一不小心和鸡老大肩并肩了呢~
回顾 Android 布局
曾经无论面试也好,闲聊也罢,谈起 Android 布局,总是不假思索直接说出五大布局。而到现在 2020 年末了,依然还是曾经的五大布局吗?
这里简单的整理了一部分,按照个人使用频率排序:
- ConstraintLayout: 约束布局
- LinearLayout: 线性布局
- RelativeLayout: 相对定位布局
- FrameLayout: 帧布局
- CoordinatorLayout: 协调布局
- 百分比布局: PercentRelativeLayout、PercentFrameLayout
- GridLayout: 网格布局
- TableLayout: 表格布局
- AbsoluteLayout(已弃用): 绝对定位布局
- BlinkLayout(私有类): 布灵布灵闪动布局
这里说下我是怎么找的这些布局,方便和我一样小白举一反三。
引用 Flutter 一句话,万物皆为 Weight。而在 Android 中,直观而言,能看到的都是 View,而 View 也分不同的作用,例如 TextView、ImageView 等基础常用 View,仅仅为了展示或者间接响应用户操作。而基于 View 衍生出的 ViewGroup 则是通过包裹各种 View,最终呈现特有的效果。例如 LinearLayout 在原有 ViewGroup 基础上新增水平/垂直排列方式、RelativeLayout 在原基础上新增基于某个控件进行排列等。所以说直接在 Android API reference 搜索 ViewGroup,查看直接子类以及间接子类即可,如下所示:
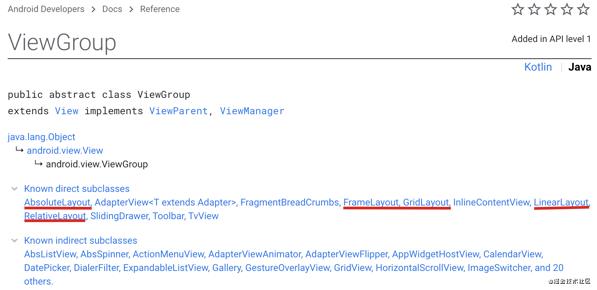
文末已附上对应的链接,欢迎各位大佬指点~
五个星星我认为是必须要掌握的,比较实战中出现评率很高了。一星简单了解,面试和面试官吹个水就好~
篇幅有限,就不一一举例了~
反正知道肯定要比什么都不知道要强很多的~
文中借用图片,文末均以附上地址链接~
一、ConstraintLayout ⭐️⭐️⭐️⭐️⭐️
- ConstraintLayout 通过各种约束进行排列子 View 的布局。
这个东西最牛掰的一点就是,支持可视化工具操作,及其方便。在下面的事例中也会多多少少体验一波~
使用方式:
- 添加 Maven 库
repositories
    google()
- 添加 ConstraintLayout 依赖
dependencies
    implementation "androidx.constraintlayout:constraintlayout:2.0.4"
当然如果你的 Android Studio 升级到最新版本,默认布局便是 ConstraintLayout,还是要去 build 中查看下版本。我也忘记是哪儿个版本设置默认根布局了。
当然,贴心的 Android Studio 也提供一键转化根布局功能,如下图:

1.相对定位 layout_constraintXXX
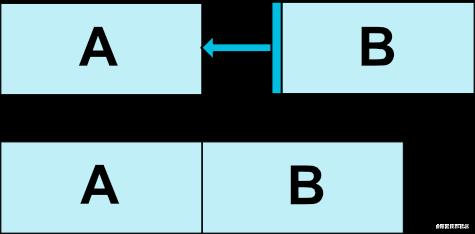
相对定位是在 ConstraintLayout 中创建布局基本构建块之一。这些约束允许一个 View 基于某个 View 进行定位,同样我们可以在水平方向以及垂直方向进行约束 View:
- 水平轴: 左,右,起点和终点
- 垂直轴: 顶部,底部和文本基线
如下,实现将 B 按钮定位在 A 按钮右侧:
<?xml version="1.0" encoding="utf-8"?>
<androidx.constraintlayout.widget.ConstraintLayout xmlns:android="http://schemas.android.com/apk/res/android"
    xmlns:app="http://schemas.android.com/apk/res-auto"
    xmlns:tools="http://schemas.android.com/tools"
    android:layout_width="match_parent"
    android:layout_height="match_parent"
    tools:context=".MainActivity">

    <Button
        android:id="@+id/buttonA"
        android:layout_width="wrap_content"
        android:layout_height="wrap_content"
        android:text="A"  />

    <Button
        android:id="@+id/buttonB"
        android:layout_width="wrap_content"
        android:layout_height="wrap_content"
        android:text="B"
        app:layout_constraintStart_toEndOf="@+id/buttonA"  />

</androidx.constraintlayout.widget.ConstraintLayout>
下面借用官方图,为了更好的理解下面的属性:

| 属性 | 作用 |
|---|---|
| layout_constraintLeft_toLeftOf | 当前 View 左侧对标目标 View 左侧 |
| layout_constraintLeft_toRightOf | 当前 View 左侧对标目标 View 右侧 |
| layout_constraintRight_toLeftOf | 当前 View 右侧对标目标 View 左侧 |
| layout_constraintRight_toRightOf | 当前 View 右侧对标目标 View 右侧 |
| layout_constraintTop_toTopOf | 当前 View 顶部对标目标 View 顶部 |
| layout_constraintTop_toBottomOf | 当前 View 顶部对标目标 View 底部 |
| layout_constraintBottom_toTopOf | 当前 View 底部对标目标 View 顶部 |
| layout_constraintBottom_toBottomOf | 当前 View 底部对标目标 View 底部 |
| layout_constraintBaseline_toBaselineOf | 当前 View 与目标 View 文字基线对齐 |
| layout_constraintStart_toEndOf | 当前 View 起点对标目标 View 终点 |
| layout_constraintStart_toStartOf | 当前 View 起点对标目标 View 起点 |
| layout_constraintEnd_toStartOf | 当前 View 终点对标目标 View 起点 |
| layout_constraintEnd_toEndOf | 当前 View 终点对标目标 View 终点 |
2.边距 Margins

| 属性 | 作用 |
|---|---|
| android:layout_marginStart | 当前 View 距离目标 View 左侧间距 |
| android:layout_marginEnd | 当前 View 距离目标 View 右侧间距 |
| android:layout_marginLeft | 当前 View 距离目标 View 左侧间距 |
| android:layout_marginTop | 当前 View 距离目标 View 顶部间距 |
| android:layout_marginRight | 当前 View 距离目标 View 右侧间距 |
| android:layout_marginBottom | 当前 View 距离目标 View 底部间距 |
3.目标 View 隐藏时,当前 View 边距 Margins
当目标 View 的可见性为 View.GONE 时,还可以使用以下属性设置当前 View 在前者 GONE 情况下的 margin。
| 属性 | 作用 |
|---|---|
| layout_goneMarginStart | 目标 View 隐藏时,当前 View 距离左侧间距 |
| layout_goneMarginEnd | 目标 View 隐藏时,当前 View 距离右侧间距 |
| layout_goneMarginLeft | 目标 View 隐藏时,当前 View 距离左侧间距 |
| layout_goneMarginTop | 目标 View 隐藏时,当前 View 距离顶部间距 |
| layout_goneMarginRight | 目标 View 隐藏时,当前 View 距离右侧间距 |
| layout_goneMarginBottom | 目标 View 隐藏时,当前 View 距离底部间距 |
如下效果:

默认 A、B 按钮 Margin 为 50dp,在 A 按钮隐藏状态下,B 按钮距离 A 的边距变为 30dp:
<?xml version="1.0" encoding="utf-8"?>
<androidx.constraintlayout.widget.ConstraintLayout xmlns:android="http://schemas.android.com/apk/res/android"
    xmlns:app="http://schemas.android.com/apk/res-auto"
    xmlns:tools="http://schemas.android.com/tools"
    android:layout_width="match_parent"
    android:layout_height="match_parent"
    tools:context=".MainActivity">

    <Button
        android:id="@+id/button"
        android:layout_width="wrap_content"
        android:layout_height="wrap_content"
        android:layout_margin="50dp"
        android:text="A"
        android:visibility="gone"
        app:layout_constraintStart_toStartOf="parent"
        app:layout_constraintTop_toTopOf="parent" />

    <Button
        android:id="@+id/button2"
        android:layout_width="wrap_content"
        android:layout_height="wrap_content"
        android:layout_margin="50dp"
        android:text="B"
        app:layout_constraintStart_toEndOf="@+id/button"
        app:layout_constraintTop_toTopOf="parent"
        app:layout_goneMarginStart="30dp" />

</androidx.constraintlayout.widget.ConstraintLayout>
4.居中定位和偏向比例
很多时候,我们需要的效果为居中,同时某些情况下也需要去设置比例,比如宽度百分比,下面直接上效果图:
[外链图片转存失败,源站可能有防盗链机制,建议将图片保存下来直接上传(img-s4DniE61-1607305113338)(https://p6-juejin.byteimg.com/tos-cn-i-k3u1fbpfcp/c54c8217af1c46eab864e47130655357~tplv-k3u1fbpfcp-watermark.image)]
代码如下:
<?xml version="1.0" encoding="utf-8"?>
<androidx.constraintlayout.widget.ConstraintLayout xmlns:android="http://schemas.android.com/apk/res/android"
    xmlns:app="http://schemas.android.com/apk/res-auto"
    xmlns:tools="http://schemas.android.com/tools"
    android:layout_width="match_parent"
    android:layout_height="match_parent"
    tools:context=".MainActivity">

    <ImageView
        android:layout_width="180dp"
        android:layout_height="180dp"
        android:scaleType="fitXY"
        android:src="@drawable/img"
        app:layout_constraintBottom_toBottomOf="parent"
        app:layout_constraintEnd_toEndOf="parent"
        app:layout_constraintHorizontal_bias="0.19"
        app:layout_constraintStart_toStartOf="parent"
        app:layout_constraintTop_toTopOf="parent"
        app:layout_constraintVertical_bias="0.16000003" />

</androidx.constraintlayout.widget.ConstraintLayout>
这里再次回顾下当前例子中关键内容:
| 属性 | 作用 |
|---|---|
| layout_constraintStart_toStartOf | 当取值为 parent 代表与父容器对齐 |
| layout_constraintEnd_toEndOf | |
| layout_constraintTop_toTopOf | |
| layout_constraintBottom_toBottomOf |
下面是各个组合方式对应的效果:
- start 和 end 组合,便是水平居中
- top 和 bottom 组合,便是垂直居中
- start、end、top、bottom 组合便是水平/垂直居中
| 属性 | 作用 |
|---|---|
| layout_constraintVertical_bias | 垂直方式占比 |
| layout_constraintHorizontal_bias | 水平方式占比 |
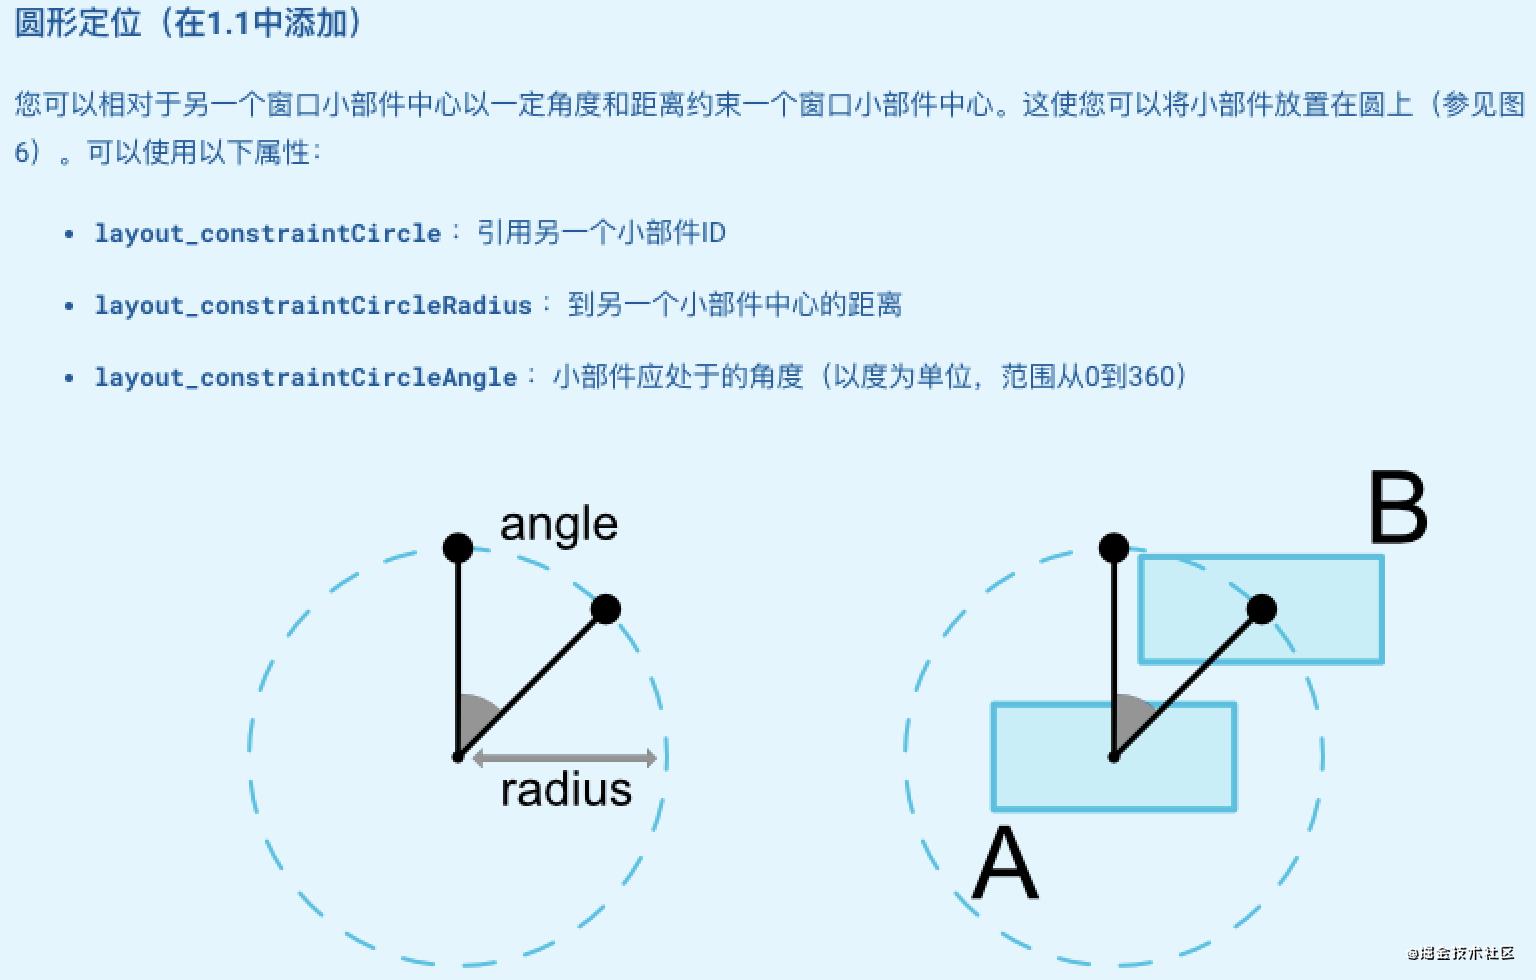
5.圆形定位
这里为了方便,我就直接截图了:
下面着手实现如下效果:
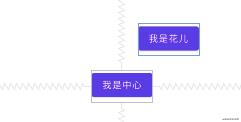
代码如下:
<?xml version="1.0" encoding="utf-8"?>
<androidx.constraintlayout.widget.ConstraintLayout xmlns:android="http://schemas.android.com/apk/res/android"
    xmlns:app="http://schemas.android.com/apk/res-auto"
    xmlns:tools="http://schemas.android.com/tools"
    android:layout_width="match_parent"
    android:layout_height="match_parent"
    tools:context=".MainActivity">

    <Button
        android:id="@+id/buttonA"
        android:layout_width="wrap_content"
        android:layout_height="wrap_content"
        android:text="我是中心"
        app:layout_constraintBottom_toBottomOf="parent"
        app:layout_constraintEnd_toEndOf="parent"
        app:layout_constraintStart_toStartOf="parent"
        app:layout_constraintTop_toTopOf="parent" />

    <Button
        android:id="@+id/buttonB"
        app:layout_constraintCircle="@id/buttonA"
        android:layout_width="wrap_content"
        android:layout_height="wrap_content"
        app:layout_constraintCircleAngle="45"
        app:layout_constraintCircleRadius="100dp"
        android:text="我是花儿" />

</androidx.constraintlayout.widget.ConstraintLayout>
| 属性 | 作用 |
|---|---|
| layout_constraintCircle | 指定圆心 View ID |
| layout_constraintCircleAngle | 设置当前 View 角度 |
| layout_constraintCircleRadius | 设置半径 |
6.尺寸限制
也可以为 ConstraintLayout 自身定义最小和最大大小:
| 属性 | 作用 |
|---|---|
| android:minWidth | 设置布局的最小宽度 |
| android:minHeight | 设置布局的最小高度 |
| android:maxWidth | 设置布局的最大宽度 |
| android:maxHeight | 设置布局的最大高度 |
当 ConstraintLayout 内部子 View 宽度/高度为 0dp,则同等于 match_parent。
7.尺寸百分比
这个其实我蛮喜欢的,类似百分比布局,爽的很。
使用这块需要注意:
- 设置宽度/高度百分比时,需要先将对应的宽/高设置为 0dp;
- 默认值应设置为百分比 app:layout_constraintWidth_default=“percent” 或 app:layout_constraintHeight_default=“percent” ;(这点感觉没啥用,不信你看下面)
- layout_constraintWidth_percent 或者 layout_constraintHeight_percent 属性设置为介于 0 和 1 之间的值;
下面着手实现如下效果:
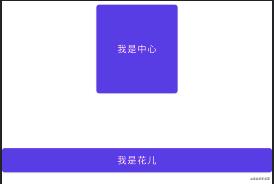
第一个 View 宽高占比为:0.3:0.2,第二个 View 宽度占比为 1:
<?xml version="1.0" encoding="utf-8"?>
<androidx.constraintlayout.widget.ConstraintLayout xmlns:android="http://schemas.android.com/apk/res/android"
    xmlns:app="http://schemas.android.com/apk/res-auto"
    xmlns:tools="http://schemas.android.com/tools"
    android:layout_width="match_parent"
    android:layout_height="match_parent"
    tools:context=".MainActivity">

    <Button
        android:id="@+id/buttonA"
        android:layout_width="0dp"
        android:layout_height="0dp"
        android:text="我是中心"
        app:layout_constraintEnd_toEndOf="parent"
        app:layout_constraintHeight_percent="0.2"
        app:layout_constraintWidth_percent="0.3"
        app:layout_constraintStart_toStartOf="parent"  />

    <Button
        android:id="@+id/buttonB"
        android:layout_width="0dp"
        android:layout_height="wrap_content"
        android:text="我是花儿"
        app:layout_constraintBottom_toBottomOf="parent"
        app:layout_constraintStart_toStartOf="parent"
        app:layout_constraintTop_toTopOf="parent"
        app:layout_constraintVertical_bias="0.32"
        app:layout_constraintWidth_percent="1" />

</androidx.constraintlayout.widget.ConstraintLayout>
| 属性 | 作用 |
|---|---|
| layout_constraintHeight_percent | 高度占比 |
| layout_constraintWidth_percent | 宽度占比 |
作为一枚不折不扣的程序员而言,能省事儿绝对省事儿,上面宽高还得写两次,能不能一次搞定呢?
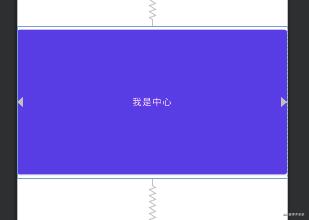
下面实现一个宽高比为 16:9 :
<Button
    android:id="@+id/buttonA"
    android:layout_width="0dp"
    android:layout_height="0dp"
    android:text="我是中心"
    app:layout_constraintBottom_toBottomOf="parent"
    app:layout_constraintDimensionRatio="16:9"
    app:layout_constraintEnd_toEndOf="parent"
    app:layout_constraintStart_toStartOf="parent"
    app:layout_constraintTop_toTopOf="parent" />
效果如下:
8.链式
这个效果也是蛮不错的,有些类似前端的 Flex,感觉还是不错的。
设置属性 layout_constraintHorizontal_chainStyle 或 layout_constraintVertical_chainStyle 在链的第一个元素上时,链的行为将根据指定的样式而改变(默认为 CHAIN_SPREAD )。
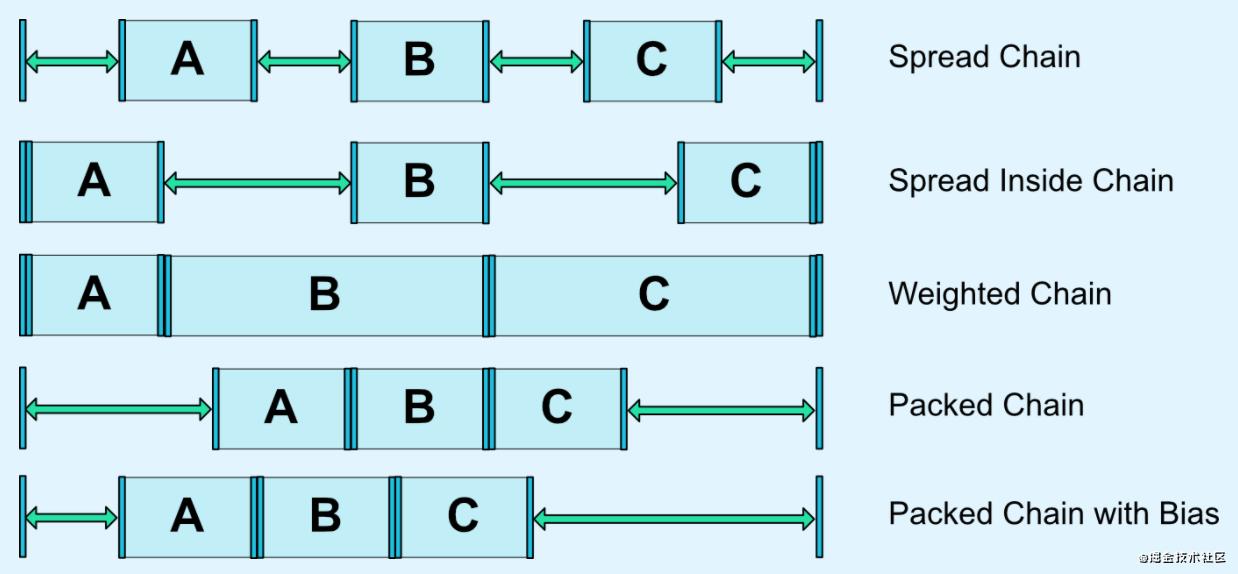
演示图如下:
[外链图片转存失败,源站可能有防盗链机制,建议将图片保存下来直接上传(img-xPOChQJB-1607305113342)(https://p3-juejin.byteimg.com/tos-cn-i-k3u1fbpfcp/96ac4517fa63420883e536a5f6d00f8a~tplv-k3u1fbpfcp-watermark.image)]
代码如下:
<?xml version="1.0" encoding="utf-8"?>
<androidx.constraintlayout.widget.ConstraintLayout xmlns:android="http://schemas.android.com/apk/res/android"
    xmlns:app="http://schemas.android.com/apk/res-auto"
    xmlns:tools="http://schemas.android.com/tools"
    android:layout_width="match_parent"
    android:layout_height="130dp">

    <Button
        android:id="@+id/button2"
        android:layout_width="wrap_content"
        android:layout_height="wrap_content"
        android:text="B"
        app:layout_constraintEnd_toStartOf="@+id/button3"
        app:layout_constraintHorizontal_bias="0.5"
        app:layout_constraintStart_toEndOf="@+id/button1" />

    <Button
        android:id="@+id/button3"
        android:layout_width="wrap_content"
        android:layout_height="wrap_content"
        android:text="C"
        app:layout_constraintEnd_toEndOf="parent"
        app:layout_constraintHorizontal_bias="0.5"
        app:layout_constraintStart_toEndOf="@+id/button2" />

    <Button
        android:id="@+id/button1"
        android:layout_width="wrap_content"
        android:layout_height="wrap_content"
        android:text="A"
        app:layout_constraintEnd_toStartOf="@+id/button2"
        app:layout_constraintHorizontal_bias="0.5"
        app:layout_constraintHorizontal_chainStyle="spread_inside"
        app:layout_constraintStart_toStartOf="parent" />

</androidx.constraintlayout.widget.ConstraintLayout>
9.辅助对象 Guideline
据官方所言,此为 ConstraintLayout 辅助工具,默认为 View.GONE。
使用方式主要分为两种情况:
- 百分比定位: layout_constraintGuide_percent
- 绝对定位: layout_constraintGuide_begin / layout_constraintGuide_end
最后我们可以通过 orientation 去设置当前辅助线的显示方式,水平/垂直。
我个人蛮喜欢百分比方式,先来个效果:

如何确保图片在每种机型上都位于屏幕百分之 15 高度的位置呢?通过辅助线百分比分分钟的事儿。
<?xml version="1.0" encoding="utf-8"?>
<androidx.constraintlayout.widget.ConstraintLayout xmlns:android="http://schemas.android.com/apk/res/android"
    xmlns:app="http://schemas.android.com/apk/res-auto"
    xmlns:tools="http://schemas.android.com/tools"
    android:layout_width="match_parent"
    android:layout_height="match_parent">

    <ImageView
        android:layout_width="0dp"
        android:layout_height="0dp"
        android:scaleType="fitXY"
        android:src="@drawable/img"
        app:layout_constraintDimensionRatio="16:9"
        app:layout_constraintEnd_toEndOf="parent"
        app:layout_constraintTop_toTopOf="@+id/guideline4" />

    <androidx.constraintlayout.widget.Guideline
        android:id="@+id/guideline4"
        android:layout_width="wrap_content"
        android:layout_height="wrap_content"
        android:orientation="horizontal"
        app:layout_constraintGuide_percent="0.15" />

</androidx.constraintlayout.widget.ConstraintLayout>
而关于绝对定位更好理解啦。这里直接录制效果图咯,大家注意观察点击 Icon 后代码以及效果变化:
[外链图片转存失败,源站可能有防盗链机制,建议将图片保存下来直接上传(img-C4LZLV2M-1607305113343)(https://p9-juejin.byteimg.com/tos-cn-i-k3u1fbpfcp/5c2d211078254adea2af7301209ea12e~tplv-k3u1fbpfcp-watermark.image)]
番外:了解约束布局性能优势
文末已附上链接地址,这里只对个人感兴趣的部分做出节选。
借助 Google 翻译学习,配合自己理解,如错误,欢迎指正~
针对传统布局以及约束布局的优势,这里以下面效果为例,简单进行对比:
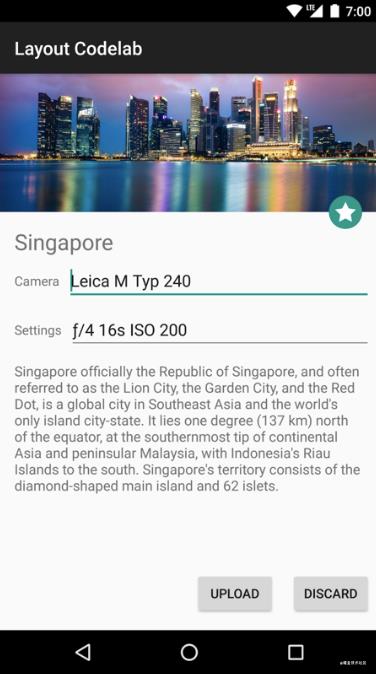
传统布局绘制层级:
<RelativeLayout>
  <ImageView />
  <ImageView />
  <RelativeLayout>
    <TextView />
    <LinearLayout>
      <TextView />
      <RelativeLayout>
        <EditText />
      </RelativeLayout>
    </LinearLayout>
    <LinearLayout>
      <TextView />
      <RelativeLayout>
        <EditText />
      </RelativeLayout>
    </LinearLayout>
    <TextView />
  </RelativeLayout>
  <LinearLayout >
    <Button />
    <Button />
  </LinearLayout>
</RelativeLayout>
约束布局绘制层级:
<android.support.constraint.ConstraintLayout>
  <ImageView />
  <ImageView />
  <TextView />
  <EditText />
  <TextView />
  <TextView />
  <EditText />
  <Button />
  <Button />
  <TextView />
</android.support.constraint.ConstraintLayout>
直观上从两种方案绘制层级相比,明显约束布局优势更大。至少相比传统 RelativeLayout 少绘制几个 ViewGroup。
这里从官方博文中可以得知 Android 绘制视图过程包括如下三个阶段:
-
测量(Measure)
- 系统从视图树自顶向下遍历,以确定每个 ViewGroup 和 View 元素大小。而测量 ViewGroup 时,还将测量其子集 View。
-
布局(Layout)
- 从上到下的遍历,通过在测量阶段确定的大小来确定子 View 的位置。
-
绘制(Draw)
- 系统执行的一个自上而下的遍历,对于视图树中的每个对象,都会创建一个 Canvas 对象,已将绘图命令发送 GPU。这些命令包括 ViewGroup 和 View 大小、位置,这是系统在前两个阶段中确定的内容。
所以,我们可以得出一个概念,绘制层级越深,消耗越大。反之,消耗则低,性能越高。
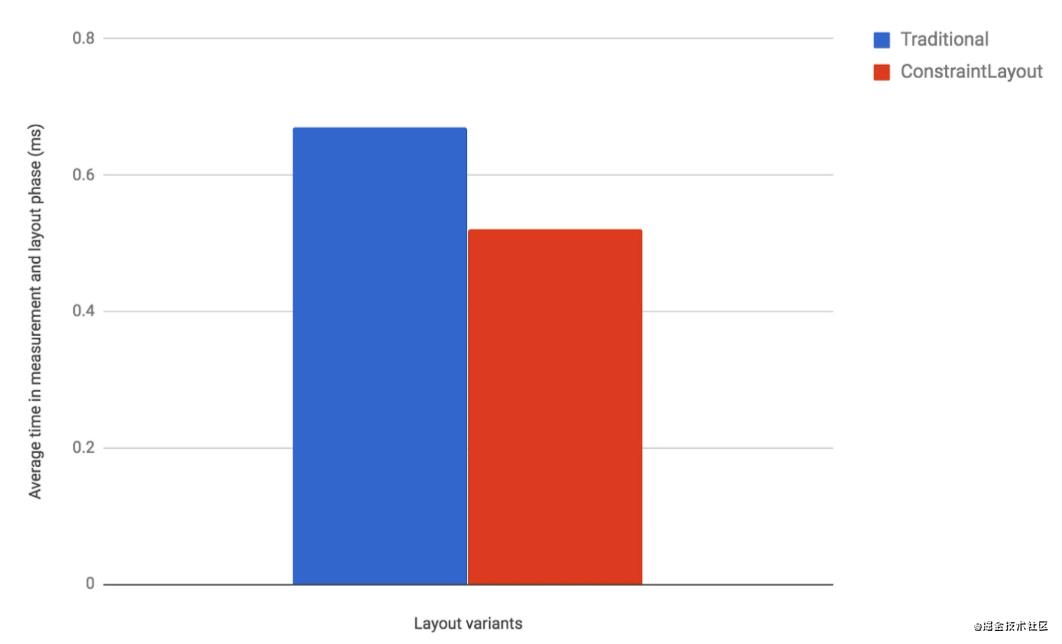
测量结果:ConstraintLayout更快。
ConstraintLayout 在测量/布局阶段的性能比 RelativeLayout 好约 40%:
二、LinearLayout ⭐️⭐️⭐️⭐️
- LinearLayout 是行内以水平方式/垂直方式排列的布局容器。
常用属性一览:
| 属性 | 作用 |
|---|---|
| android:orientation | 行内排列方式(horizontal/vertical),默认水平排列 |
| android:gravity | 行内 View 对齐方式 |
| android:weightSum | 行内可设置的最大占比权重 |
| android:layout_weight | 当前 View 占比权重 |
| android:baselineAligned | 父容器布局是否对齐子 View 基线 |
| android:baselineAlignedChildIndex | 指定基线对齐的子 View |
来个简单的效果:

<?xml version="1.0" encoding="utf-8"?>
<LinearLayout xmlns:android="http://schemas.android.com/apk/res/android"
    xmlns:app="http://schemas.android.com/apk/res-auto"
    xmlns:tools="http://schemas.android.com/tools"
    android:layout_width="match_parent"
    android:layout_height="wrap_content"
    android:baselineAligned="true"
    android:measureWithLargestChild="true"
    android:padding="15dp"
    android:weightSum="1"
    tools:context=".MainActivity">

    <Button
        android:layout_width="wrap_content"
        android:layout_height="wrap_content"
        android:layout_weight="0.5"
        android:text="取消" />

    <Button
        android:layout_width="wrap_content"
        android:layout_height="wrap_content"
        android:layout_weight="0.5"
        android:text="确定" />

</LinearLayout>
三、RelativeLayout ⭐️⭐️⭐️⭐️
- RelativeLayout 是一个以相对位置显示子视图的视图组。
常用属性:
| 属性 | 作用 |
|---|---|
| android:layout_alignParentTop | 当前 View 上边缘和父容器上边缘对齐 |
| android:layout_alignParentEnd | 当前 View 上边缘和父容器右边缘对齐 |
| android:layout_alignParentBottom | 当前 View 上边缘和父容器下边缘对齐 |
| android:layout_alignParentStart | 当前 View 上边缘和父容器左边缘对齐 |
| android:layout_centerHorizontal | 当前 View 基于父容器水平居中 |
| android:layout_centerVertical | 当前 View 基于父容器垂直居中 |
| android:layout_centerInParent | 当前 View 基于父容器水平居中并垂直居中 |
| android:layout_alignTop | 当前 View 位于目标 View 顶部 |
| android:layout_toEndOf | 当前 View 位于目标 View 右侧 |
| android:layout_below | 当前 View 位于目标 View 底部 |
| android:layout_toStartOf | 当前 View 位于目标 View 左侧 |
着手实现如下效果:

<?xml version="1.0" encoding="utf-8"?>
<RelativeLayout xmlns:android="http://schemas.android.com/apk/res/android"
    android:layout_width="match_parent"
    android:layout_height="130dp"
    android:padding="15dp">

    <ImageView
        android:id="@+id/ivAvatar"
        android:layout_width="100dp"
        android:layout_height="100dp"
        android:layout_alignParentStart="true"
        android:layout_alignParentTop="true"
        android:layout_alignParentBottom="true"
        android:scaleType="fitXY"
        android:src="@drawable/img" />

    <TextView
        android:id="@+id/tvNickname"
        android:layout_width="wrap_content"
        android:layout_height="wrap_content"
        android:layout_marginStart="12dp"
        android:layout_toEndOf="@id/ivAvatar"
        android:text="昵称:HLQ_Struggle" />

    <TextView
        android:id="@+id/tvLevel"
        android:layout_width="wrap_content"
        android:layout_height="wrap_content"
        android:layout_below="@id/tvNickname"
        android:layout_marginStart="12dp"
        android:layout_marginTop="15dp"
        android:layout_toEndOf="@id/ivAvatar"
        android:text="等级:V1" />

    <TextView
        android:layout_width="wrap_content"
        android:layout_height="wrap_content"
        android:layout_below="@id/tvLevel"
        android:layout_alignParentBottom="true"
        android:layout_marginStart="12dp"
        android:layout_marginTop="15dp"
        android:layout_toEndOf="@id/ivAvatar"
        android:text="性别:男" />

</RelativeLayout>
四、FrameLayout ⭐️⭐️⭐️⭐️
- FrameLayout 默认将控件层叠放置屏幕左上角。子 View 通过 android:layout_gravity 去设置自身显示位置。
比较重要的几个属性:
- android:layout_gravity: 子 View 对齐方式
- android:foreground: 前景图
- android:foregroundGravity: 前景图位置
下面开始实现如下效果:

<?xml version="1.0" encoding="utf-8"?>
<FrameLayout xmlns:android="http://schemas.android.com/apk/res/android"
    android:layout_width="match_parent"
    android:layout_height="wrap_content"
    android:foreground="@android:drawable/btn_star"
    android:foregroundGravity="right|bottom"
    android:padding="30dp">

    <TextView
        android:layout_width="wrap_content"
        android:layout_height="wrap_content"
        android:text="< 首页" />

    <TextView
        android:layout_width="wrap_content"
        android:layout_height="wrap_content"
        android:layout_gravity="right"
        android:text="更多" />

    <TextView
        android:layout_width="wrap_content"
        android:layout_height="wrap_content"
        android:layout_gravity="center"
        android:text="首页" />

</FrameLayout>
五、GridLayout ⭐️
- GridLayout 是以网格形式显示子级 View 元素的 ViewGroup。
先来看看关键属性:
- android:columnCount: 列数
- android:rowCount: 行数
GridLayout 子 View 属性:
- android:layout_column: 当前 View 从第几列开始显示
- android:layout_columnSpan: 当前 View 占据列数
- android:layout_row: 当前 View 从第几行开始显示
- android:layout_rowSpan: 当前 View 所占行数
- android:layout_gravity: 对齐方式
比较典型的例子就是计算器了吧:
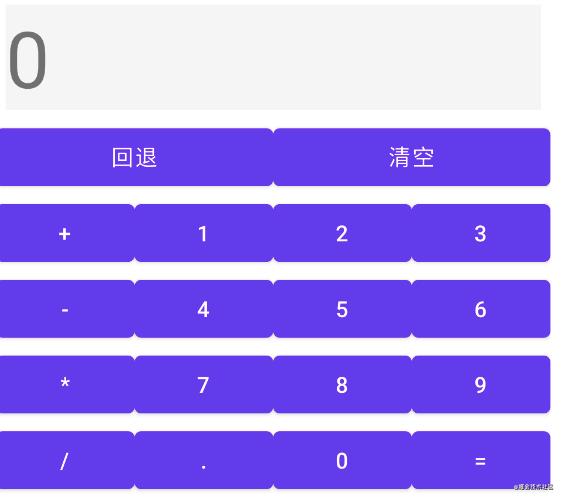
代码如下:
<?xml version="1.0" encoding="utf-8"?>
<GridLayout xmlns:android="http://schemas.android.com/apk/res/android"
    android:layout_width="wrap_content"
    android:layout_height="wrap_content"
    android:columnCount="4"
    android:rowCount="6">

    <TextView
        android:layout_columnSpan="4"
        android:layout_gravity="fill"
        android:layout_margin="6dp"
        android:background="#f5f5f5"
        android:text="0"
        android:textSize="50sp" />

    <Button
        android:layout_columnSpan="2"
        android:layout_gravity="fill"
        android:text="回退" />

    <Button
        android:layout_columnSpan="2"
        android:layout_gravity="fill"
        android:text="清空" />

    <Button android:text="+" />

    <Button android:text="1" />

    <Button android:text="2" />

    <Button android:text="3" />

    <Button android:text="-" />

    <Button android:text="4" />

    <Button android:text="5" />

    <Button android:text="6" />

    <Button android:text="*" />

    <Button android:text="7" />

    <Button android:text="8" />

    <Button android:text="9" />

    <Button android:text="/" />

    <Button
        android:layout_width="wrap_content"
        android:text="." />

    <Button android:text="0" />

    <Button android:text="=" />

</GridLayout>
六、TableLayout ⭐️
- TableLayout 是以行和列显示子级 View 元素的 ViewGroup。
来个效果实际说明:

TableLayout 行内 View 默认占据一行的宽度。如果想一行包含多列,则需要用 TableRow 包裹,如下部分代码:
<TableLayout
    android:layout_width="match_parent"
    android:layout_height="wrap_content" >

    <TextView
        android:text="9*9=81" />

    <TableRow>

        <TextView
            android:text="9*8=72" />

        <TextView
            android:text="8*8=64" />
    </TableRow>

    <TableRow>

        <TextView
            android:text="9*8=72" />

        <TextView
            android:text="8*8=64" />

        <TextView
            android:text="8*8=64" />
    </TableRow>

</TableLayout>
- android:stretchColumns: 设置某列宽度为剩余行宽度

<TableLayout
    android:layout_width="match_parent"
    android:layout_height="wrap_content"
    android:stretchColumns="0"> <!-- 第一列宽度为剩余行宽度 -->

    <TableRow>

        <Button
            android:text="我是第一列" />

        <Button
            android:text="我是第二列" />

    </TableRow>

</TableLayout>
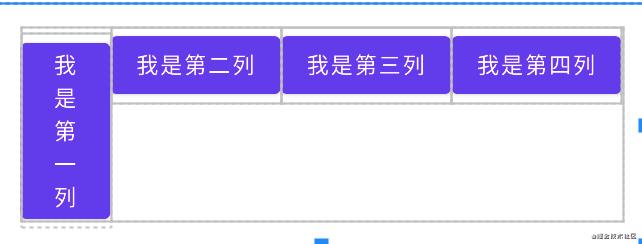
- android:collapseColumns: 隐藏某列

<TableLayout
    android:layout_width="match_parent"
    android:layout_height="wrap_content"
    android:collapseColumns="0,2">

    <TableRow>

        <Button
            android:text="我是第一列" />

        <Button
            android:text="我是第二列" />

        <Button
            android:text="我是第三列" />

        <Button
            android:text="我是第四列" />

    </TableRow>

</TableLayout>
- android:shrinkColumns: 收缩某列
<TableLayout
    android:layout_width="match_parent"
    android:layout_height="wrap_content"
    android:shrinkColumns="0">

    <!-- ... -->

</TableLayout>
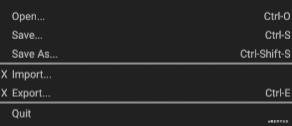
谷歌这里提供了一个不错的效果,感兴趣的可以自己尝试一下,如下:
七、AbsoluteLayout ⭐️
使用方式:
- 根据子级的 x/y 坐标确定自身位置。灵活性较差,后续不易维护。
且在 Api 30 中已弃用。
下面实现如下效果:
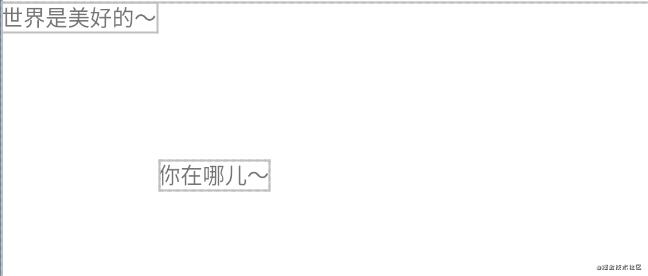
第二个 TextView 位于第一个 TextView x/y 轴距离分别为 100dp:
<AbsoluteLayout
    android:layout_width="0dp"
    android:layout_height="300dp"
    app:layout_constraintBottom_toBottomOf="parent"
    app:layout_constraintLeft_toLeftOf="parent"
    app:layout_constraintRight_toRightOf="parent"
    app:layout_constraintTop_toTopOf="parent">

    <TextView
        android:layout_width="wrap_content"
        android:layout_height="wrap_content"
        android:text="世界是美好的~" />

    <TextView
        android:layout_width="wrap_content"
        android:layout_height="wrap_content"
        android:layout_x="100dp"
        android:layout_y="100dp"
        android:text="你在哪儿~" />

</AbsoluteLayout>
八、BlinkLayout ⭐️
这个东西就比较神奇了,一闪一闪,布灵布灵。先来个效果:
作用就是每隔 500ms 执行一次绘制,呈现的效果就是布灵布灵一闪一闪的。
使用方式也是比较 easy:
<blink
    android:layout_width="wrap_content"
    android:layout_height="wrap_content">

    <TextView
        android:layout_width="wrap_content"
        android:layout_height="wrap_content"
        android:text="世界是美好的~" />

</blink>
源码相对比较少,下面贴一下,方便以后想看随时看👀 :
private static class BlinkLayout extends FrameLayout
    private static final int MESSAGE_BLINK = 0x42;
    private static final int BLINK_DELAY = 500;

    private boolean mBlink;
    private boolean mBlinkState;
    private final Handler mHandler;

    public BlinkLayout(Context context, AttributeSet attrs)
        super(context, attrs);
        mHandler = new Handler(new Handler.Callback()
            @Override
            public boolean handleMessage(Message msg)
                if (msg.what == MESSAGE_BLINK)
                    if (mBlink)
                        mBlinkState = !mBlinkState;
                        makeBlink();

                    invalidate();
                    return true;

                return false;

        );


    private void makeBlink()
        Message message = mHandler.obtainMessage(MESSAGE_BLINK);
        mHandler.sendMessageDelayed(message, BLINK_DELAY);


    /**
     * View 附加到 window 上的时候进行回调 适合初始化一些操作
     */
    @Override
    protected void onAttachedToWindow()
        super.onAttachedToWindow();

        mBlink = true;
        mBlinkState = true;

        makeBlink();


    /**
     * View 分离 window 的时候进行回调 适合销毁,重置一些操作
     */
    @Override
    protected void onDetachedFromWindow()
        super.onDetachedFromWindow();

        mBlink = false;
        mBlinkState = true;

        mHandler.removeMessages(MESSAGE_BLINK);


    /**
     * 分发子组件进行绘制
     * @param canvas
     */
    @Override
    protected void dispatchDraw(Canvas canvas)
        if (mBlinkState)
            super.dispatchDraw(canvas);
The end
永远不要停止探索。
很多时候,十分钟的探索会给你带来不一样的世界。
一起努力,一起期待,一起努力为了未来变得优秀吧~
如有笔误或者理解错误,欢迎交流~
Thanks
- Android API reference
- Build a Responsive UI with ConstraintLayout
- ConstraintLayout
- Build a Responsive UI with ConstraintLayout
- Guideline
- Understanding the performance benefits of ConstraintLayout
- LinearLayout
- 相对布局
- FrameLayout
- GridLayout
- 表格
- The curious BlinkLayout
- 每日一问:浅谈 onAttachedToWindow 和 onDetachedFromWindow
- ondraw() 和dispatchdraw()的区别
 CSDN 社区图书馆,开张营业!
 深读计划,写书评领图书福利~
以上是关于Android Notes|细数「十大布局」那些事儿的主要内容,如果未能解决你的问题,请参考以下文章