使用Expanded布局时报错The following assertion was thrown during performLayout
Posted 一叶飘舟
tags:
篇首语:本文由小常识网(cha138.com)小编为大家整理,主要介绍了使用Expanded布局时报错The following assertion was thrown during performLayout相关的知识,希望对你有一定的参考价值。
在使用Row和Column布局,在用了Expanded组件时报错如下:
I/flutter (14104): ══╡ EXCEPTION CAUGHT BY RENDERING LIBRARY ╞═════════════════════════════════════════════════════════
I/flutter (14104): The following assertion was thrown during performLayout():
I/flutter (14104): RenderFlex children have non-zero flex but incoming width constraints are unbounded.
I/flutter (14104): When a row is in a parent that does not provide a finite width constraint, for example if it is in a
I/flutter (14104): horizontal scrollable, it will try to shrink-wrap its children along the horizontal axis. Setting a
I/flutter (14104): flex on a child (e.g. using Expanded) indicates that the child is to expand to fill the remaining
I/flutter (14104): space in the horizontal direction.
I/flutter (14104): These two directives are mutually exclusive. If a parent is to shrink-wrap its child, the child
I/flutter (14104): cannot simultaneously expand to fit its parent.
I/flutter (14104): Consider setting mainAxisSize to MainAxisSize.min and using FlexFit.loose fits for the flexible
I/flutter (14104): children (using Flexible rather than Expanded). This will allow the flexible children to size
I/flutter (14104): themselves to less than the infinite remaining space they would otherwise be forced to take, and
I/flutter (14104): then will cause the RenderFlex to shrink-wrap the children rather than expanding to fit the maximum
I/flutter (14104): constraints provided by the parent.
I/flutter (14104): If this message did not help you determine the problem, consider using debugDumpRenderTree():
I/flutter (14104): https://flutter.dev/debugging/#rendering-layer
I/flutter (14104): http://api.flutter.dev/flutter/rendering/debugDumpRenderTree.html
I/flutter (14104): The affected RenderFlex is:
I/flutter (14104): RenderFlex#ad712 relayoutBoundary=up14 NEEDS-LAYOUT NEEDS-PAINT NEEDS-COMPOSITING-BITS-UPDATE(creator: Row ← Column ← Row ← Padding ← Semantics ← DefaultTextStyle ← AnimatedDefaultTextStyle ← _InkFeatures-[GlobalKey#e6eab ink renderer] ← NotificationListener<LayoutChangedNotification> ← CustomPaint ← _ShapeBorderPaint ← PhysicalShape ← ⋯, parentData: offset=Offset(0.0, 0.0); flex=null; fit=null (can use size), constraints: BoxConstraints(unconstrained), size:
MISSING, direction: horizontal, mainAxisAlignment: start, mainAxisSize: max, crossAxisAlignment:
center, textDirection: ltr, verticalDirection: down)
I/flutter (14104): The creator information is set to:
I/flutter (14104): Row ← Column ← Row ← Padding ← Semantics ← DefaultTextStyle ← AnimatedDefaultTextStyle ←
I/flutter (14104): _InkFeatures-[GlobalKey#e6eab ink renderer] ← NotificationListener<LayoutChangedNotification> ←
I/flutter (14104): CustomPaint ← _ShapeBorderPaint ← PhysicalShape ← ⋯
I/flutter (14104): The nearest ancestor providing an unbounded width constraint is: RenderFlex#63b6e relayoutBoundary=up12 NEEDS-LAYOUT NEEDS-PAINT NEEDS-COMPOSITING-BITS-UPDATE:
I/flutter (14104): creator: Row ← Padding ← Semantics ← DefaultTextStyle ← AnimatedDefaultTextStyle ←
I/flutter (14104): _InkFeatures-[GlobalKey#e6eab ink renderer] ← NotificationListener<LayoutChangedNotification> ←
I/flutter (14104): CustomPaint ← _ShapeBorderPaint ← PhysicalShape ← _MaterialInterior ← Material ← ⋯
I/flutter (14104): parentData: offset=Offset(0.0, 0.0) (can use size)
I/flutter (14104): constraints: BoxConstraints(w=361.4, 0.0<=h<=Infinity)
I/flutter (14104): size: MISSING
I/flutter (14104): direction: horizontal
I/flutter (14104): mainAxisAlignment: start
I/flutter (14104): mainAxisSize: max
I/flutter (14104): crossAxisAlignment: start
I/flutter (14104): textDirection: ltr
I/flutter (14104): verticalDirection: down
I/flutter (14104): See also: https://flutter.dev/layout/
I/flutter (14104): If none of the above helps enough to fix this problem, please don't hesitate to file a bug:
I/flutter (14104): https://github.com/flutter/flutter/issues/new?template=BUG.md
I/flutter (14104):
I/flutter (14104): Widget creation tracking is currently disabled. Enabling it enables improved error messages. It can
在报错时找到有效线索信息不多,因为结构创建和目前抛出来的错误还是有些差异,
但其中有一句是如下:
大小太过于灵活,当时我的代码是Row()组件内还套了Row()组件的结构,
在报错时找到有效线索信息不多,因为结构创建和目前抛出来的错误还是有些差异,
但其中有一句是如下:
大小太过于灵活,当时我的代码是Row()组件内还套了Row()组件的结构
从上方线索查找问题,这时候我就想到,我当时是直接在底层Row()组件中直接利用撑开组件Expanded,而上一层父组件或某个N父组件大小是特别灵活没有定大小是弹性的。
所以整体在flutter中无法计算大小来撑开布局,这时候我就把父组件上面的Row内也使用了Expanded组件撑开才得以不报错
PS:这里说明一下,你父层组件你是可以使用 外层包裹一个固定宽度组件方式来实现不报错,但局限了整体弹性布局业务考虑了!
以下是出问题的代码
class _SearchListState extends State<SearchList>
  @override
  Widget build(BuildContext context)
    return ListView.builder(
      itemCount: 1,
      itemBuilder: (BuildContext context, idx)
        return Container(
          child: Card(
            margin: EdgeInsets.only(bottom: 10), // 外边距
            elevation: 3, // 阴影大小
            child: Padding(
              padding: EdgeInsets.fromLTRB(5, 15, 5, 15),
              child: Row(
                crossAxisAlignment: CrossAxisAlignment.start,
                children: <Widget>[
                  // 此处没有进行Expanded组件撑开,所以里面嵌套的Row使用撑开组件会报错误
                  cardRigthWidget(),
                ],
              ),
            ),
          ),
        );
      ,
    );


  Widget cardRigthWidget()
    return Column(
      mainAxisAlignment: MainAxisAlignment.end,
      children: <Widget>[
        Row(
          children: <Widget>[
            Expanded(
              child: RichText(
                text: TextSpan(
                  text: '标题',
                  style: TextStyle(
                      color: Theme.of(context).primaryColor), // 设置默认文字样式
                  children: <TextSpan>[
                    TextSpan(text: 'title_mo_blockhain'),
                  ],
                ),
              ),
            ),
          ],
        ),
      ],
    );
最后修复的代码,就是在最顶层Row组件内在加上一个Expanded撑开组件即可,这样flutter里面才可以计算组件盒子大小
class _SearchListState extends State<SearchList>
  @override
  Widget build(BuildContext context)
    return ListView.builder(
      itemCount: 1,
      itemBuilder: (BuildContext context, idx)
        return Container(
          child: Card(
            margin: EdgeInsets.only(bottom: 10), // 外边距
            elevation: 3, // 阴影大小
            child: Padding(
              padding: EdgeInsets.fromLTRB(5, 15, 5, 15),
              child: Row(
                crossAxisAlignment: CrossAxisAlignment.start,
                children: <Widget>[
                  // 改造一下,父组件包裹Expanded撑开组件
                  Expanded(
                    child: cardRigthWidget(),
                  ),
                ],
              ),
            ),
          ),
        );
      ,
    );

  // 。。。。其它代码还是之前的
此时报错就顺序解决,渲染正常
总结:像flutter内不能像HTML一样写完全的flex弹性使用,多多少少还是有些坑点的,比如这次Row弹性组件内在套用了其它的Row,顶层必须先撑开计算,这样嵌套层的Row才能正常使用Expanded组件。
否则引起flutter计算组件不正确,直接抛出父组件一直是弹性无法正常计算宽度撑开。
弹性布局(Flex)
弹性布局允许子组件按照一定比例来分配父容器空间。弹性布局的概念在其它UI系统中也都存在,如 H5 中的弹性盒子布局,android中 的FlexboxLayout等。Flutter 中的弹性布局主要通过Flex和Expanded来配合实现。
Flex
Flex组件可以沿着水平或垂直方向排列子组件,如果你知道主轴方向,使用Row或Column会方便一些,因为Row和Column都继承自Flex,参数基本相同,所以能使用Flex的地方基本上都可以使用Row或Column。Flex本身功能是很强大的,它也可以和Expanded组件配合实现弹性布局。接下来我们只讨论Flex和弹性布局相关的属性(其它属性已经在介绍Row和Column时介绍过了)。
Flex(
  ...
  required this.direction, //弹性布局的方向, Row默认为水平方向,Column默认为垂直方向
  List<Widget> children = const <Widget>[],
)
Flex继承自MultiChildRenderObjectWidget,对应的RenderObject为RenderFlex,RenderFlex中实现了其布局算法。
Expanded
Expanded 只能作为 Flex 的孩子(否则会报错),它可以按比例“扩伸”Flex子组件所占用的空间。因为 Row和Column 都继承自 Flex,所以 Expanded 也可以作为它们的孩子。
const Expanded(
  int flex = 1,
  required Widget child,
)
flex参数为弹性系数,如果为 0 或null,则child是没有弹性的,即不会被扩伸占用的空间。如果大于0,所有的Expanded按照其 flex 的比例来分割主轴的全部空闲空间。下面我们看一个例子:
class FlexLayoutTestRoute extends StatelessWidget
  @override
  Widget build(BuildContext context)
    return Column(
      children: <Widget>[
        //Flex的两个子widget按1:2来占据水平空间
        Flex(
          direction: Axis.horizontal,
          children: <Widget>[
            Expanded(
              flex: 1,
              child: Container(
                height: 30.0,
                color: Colors.red,
              ),
            ),
            Expanded(
              flex: 2,
              child: Container(
                height: 30.0,
                color: Colors.green,
              ),
            ),
          ],
        ),
        Padding(
          padding: const EdgeInsets.only(top: 20.0),
          child: SizedBox(
            height: 100.0,
            //Flex的三个子widget,在垂直方向按2:1:1来占用100像素的空间
            child: Flex(
              direction: Axis.vertical,
              children: <Widget>[
                Expanded(
                  flex: 2,
                  child: Container(
                    height: 30.0,
                    color: Colors.red,
                  ),
                ),
                Spacer(
                  flex: 1,
                ),
                Expanded(
                  flex: 1,
                  child: Container(
                    height: 30.0,
                    color: Colors.green,
                  ),
                ),
              ],
            ),
          ),
        ),
      ],
    );
运行效果如图所示:

示例中的Spacer的功能是占用指定比例的空间,实际上它只是Expanded的一个包装类,Spacer的源码如下:
class Spacer extends StatelessWidget
  const Spacer(Key? key, this.flex = 1)
    : assert(flex != null),
      assert(flex > 0),
      super(key: key);

  final int flex;

  @override
  Widget build(BuildContext context)
    return Expanded(
      flex: flex,
      child: const SizedBox.shrink(),
    );
小结
弹性布局比较简单,唯一需要注意的就是Row、Column以及Flex的关系。
Expanded组件可以使Row、Column、Flex等子组件在其主轴方向上展开并填充可用空间(例如,Row在水平方向,Column在垂直方向)。如果多个子组件展开,可用空间会被其flex factor(表示扩展的速度、比例)分割。
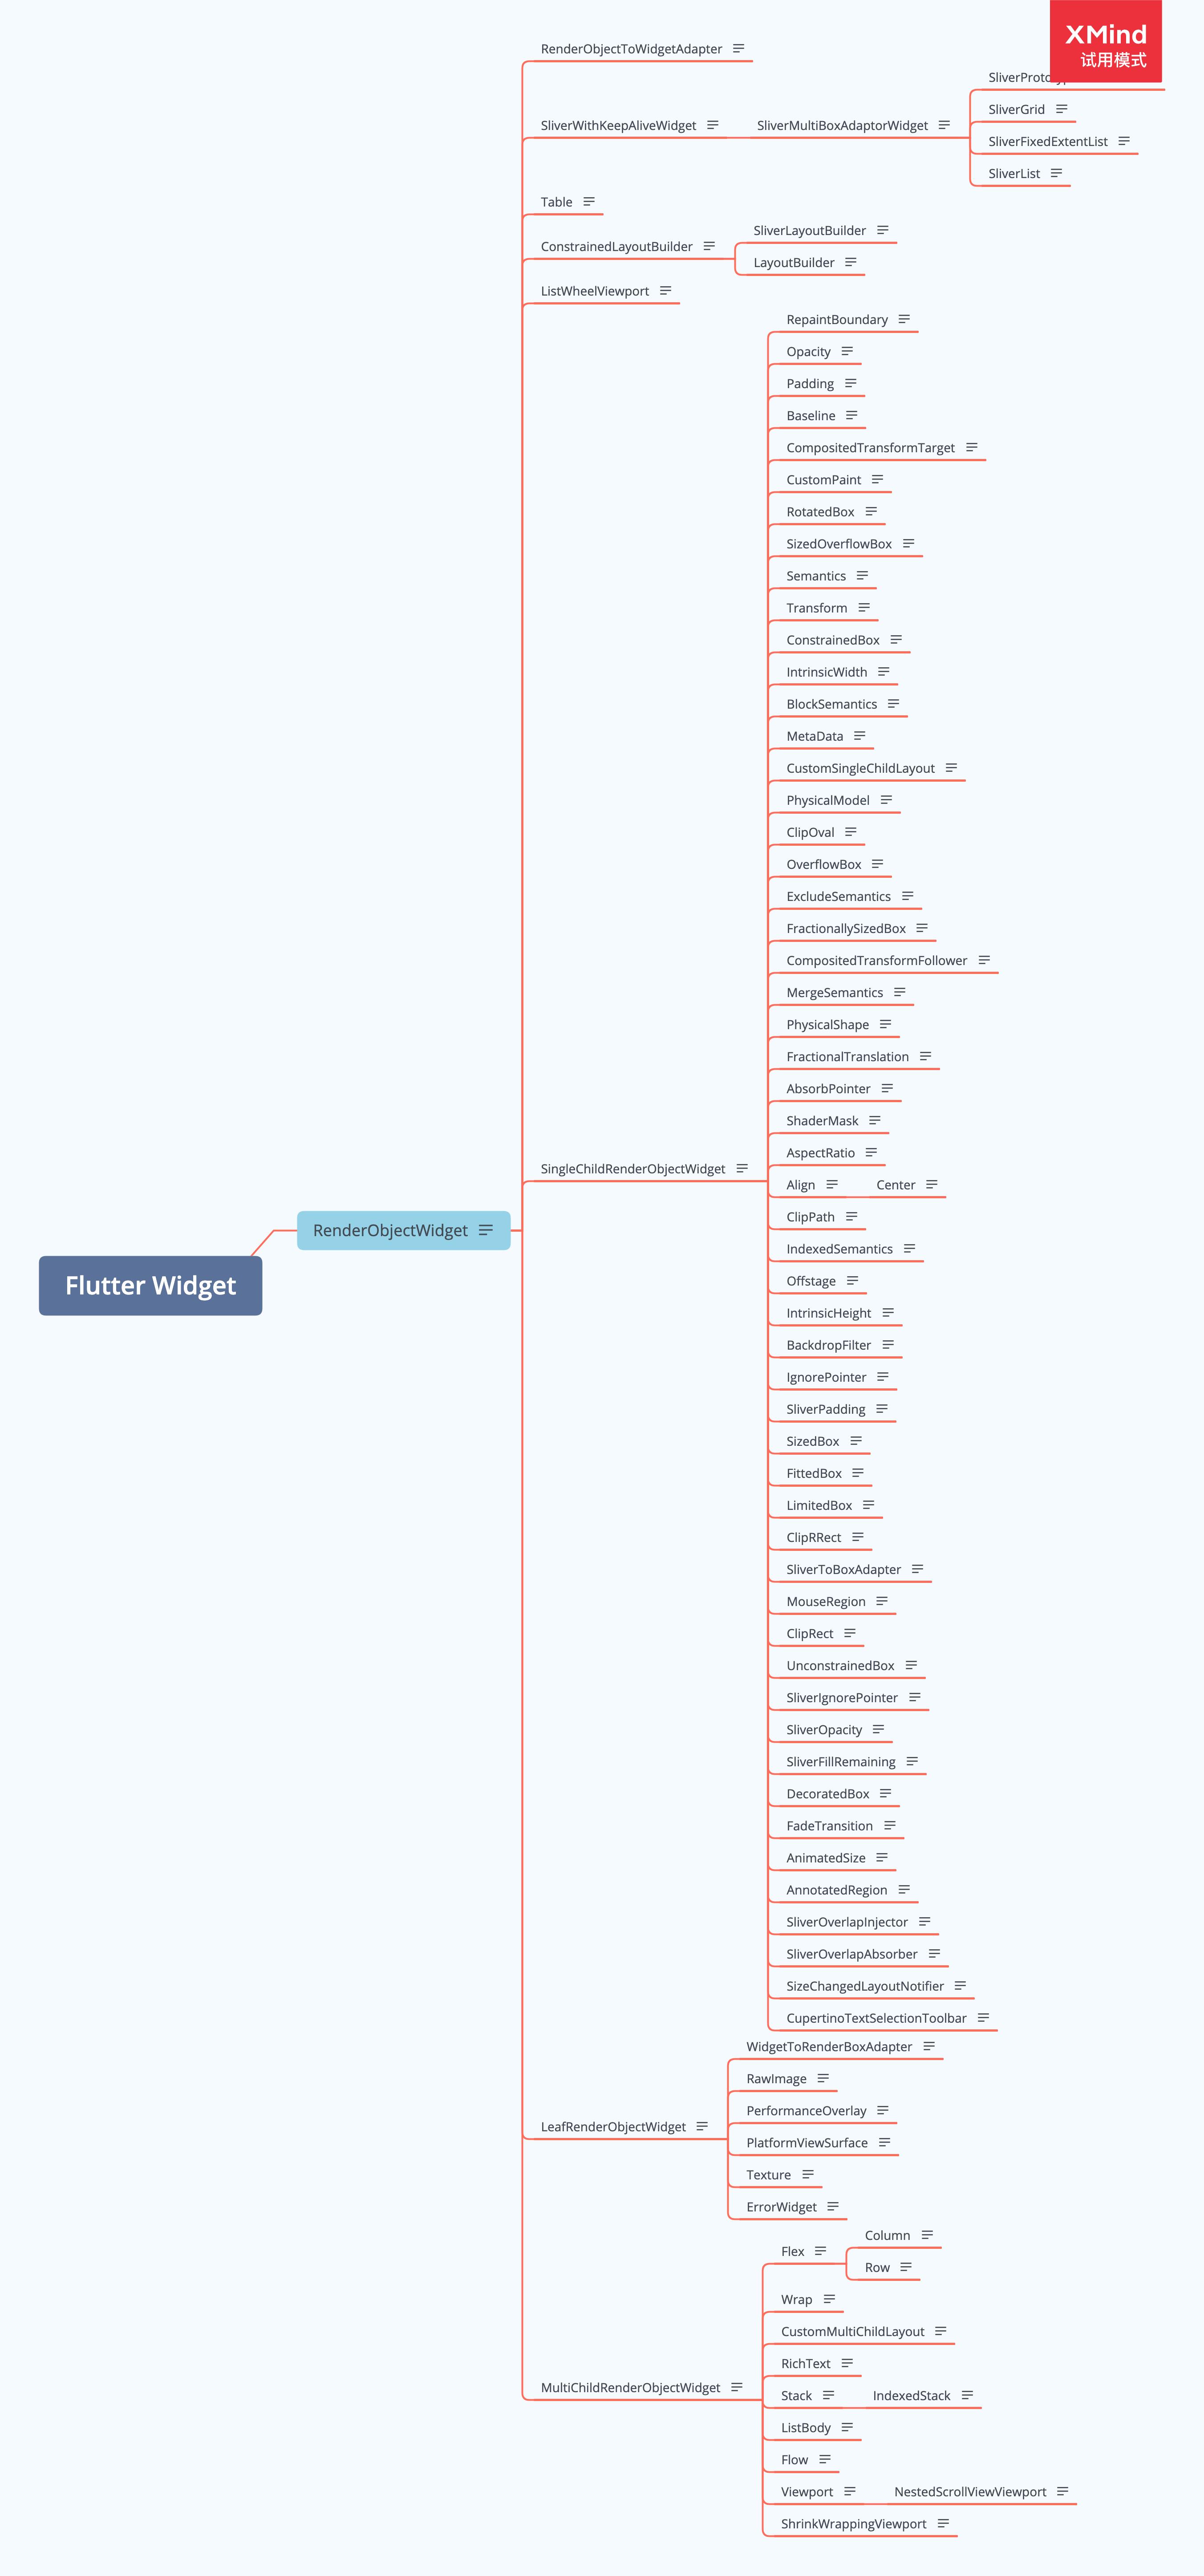
Expanded组件必须用在Row、Column、Flex内,并且从Expanded到封装它的Row、Column、Flex的路径必须只包括StatelessWidgets或StatefulWidgets组件(不能是其他类型的组件,像RenderObjectWidget,它是渲染对象,不再改变尺寸了,因此Expanded不能放进RenderObjectWidget)。
RenderObjectWidget
RenderObjectWidget为RenderObjectElement提供配置信息。
RenderObjectElement包装了RenderObject,RenderObject为应用程序提供真正的渲染。
RenderObjectWidget是个抽象类。
abstract class RenderObjectWidget extends Widget

 const RenderObjectWidget( Key key ) : super(key: key);

 /// RenderObjectWidgets always inflate to a [RenderObjectElement] subclass.
 @override
 RenderObjectElement createElement();

 /// 使用`RenderObjectWidget`信息,
 ///创建一个`RenderObjectWidget`表示的`RenderObject`实例。
 ///创建时机:
 ///`[RenderObjectElement.mount]`方法中使用`RenderObjectElement`创建。
///挂载时,调用关联的此`widget`创建其对应的`RenderObject`
 @protected
 RenderObject createRenderObject(BuildContext context);

 /// 复制此[RenderObjectWidget]描述的配置到给定的[RenderObject],
 ///此`RenderObject`类型将与此`RenderObjectWidget`的
///[createRenderObject]返回的`RenderObject`类型相同。
 /// 调用时机:[RenderObjectElement.update]
 @protected
 void updateRenderObject(BuildContext context, covariants RenderObject renderObject)

 ///此`widget`前一个关联的`RenderObject`已经从树中移除。
 ///此处的`RenderObject`是其的一个副本。
 @protected
 void didUnmountRenderObject(covariant RenderObject renderObject)
-
种类

也可以参考:Flutter Widgets 之 Expanded和Flexible_一叶飘舟的博客-CSDN博客
延伸:
Flutter报A RenderFlex overflowed错误(宽高度溢出)或者Flutter Widget不显示的解决办法(Expanded、Flexible)
我们在用Flutter写ui的时候,经常会遇见写完Widget后不显示,
例如如下代码:
代码很简单,实际上就是一个行控件里面放了一个Text和一个ListView。
import 'package:flutter/material.dart';

void main() => runApp(MyApp());

class MyApp extends StatelessWidget
  // This widget is the root of your application.
  @override
  Widget build(BuildContext context)
    return MaterialApp(
      title: 'Flutter Demo',
      theme: ThemeData(
        primarySwatch: Colors.blue,
      ),
      home: MyHomePage(title: 'Flutter Demo Home Page'),
    );


class MyHomePage extends StatelessWidget
  MyHomePage(Key key, this.title) : super(key: key);

  final String title;

  @override
  Widget build(BuildContext context)
    return Scaffold(
      appBar: AppBar(
        title: Text("Flutter"),
      ),
      body: Column(
        children: <Widget>[
          _titleWidget(),
          _listView(),
        ],
      ),
    );


_titleWidget()
  return Container(
    color: Colors.grey,
    alignment: Alignment.center,
    child: Text("标题"),
    height: 50,
  );


_listView()
  var datas = List.generate(100, (index)
    return "item $index + 1";
  );

  return ListView.builder(
    itemBuilder: (BuildContext context, int index)
      return Container(
        child: Text("$datas[index]"),
        height: 40,
        alignment: Alignment.center,
        decoration: BoxDecoration(
            border: Border(bottom: BorderSide(color: Colors.grey))),
      );
    ,
    itemCount: datas.length,
  );
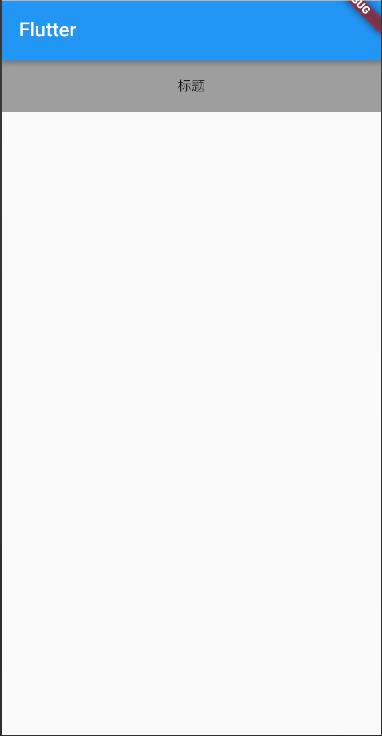
运行后效果图如下:

发现ListView没有显示出来,然后控制台给出错误提示如下
I/flutter (22718): ══╡ EXCEPTION CAUGHT BY RENDERING LIBRARY ╞═════════════════════════════════════════════════════════
I/flutter (22718): The following assertion was thrown during performResize():
I/flutter (22718): Vertical viewport was given unbounded height.
I/flutter (22718): Viewports expand in the scrolling direction to fill their container.In this case, a vertical
I/flutter (22718): viewport was given an unlimited amount of vertical space in which to expand. This situation
I/flutter (22718): typically happens when a scrollable widget is nested inside another scrollable widget.
I/flutter (22718): If this widget is always nested in a scrollable widget there is no need to use a viewport because
I/flutter (22718): there will always be enough vertical space for the children. In this case, consider using a Column
I/flutter (22718): instead. Otherwise, consider using the "shrinkWrap" property (or a ShrinkWrappingViewport) to size
I/flutter (22718): the height of the viewport to the sum of the heights of its children.
通常情况下是因为我们在Row或者是Column这种没有确定宽高度的Widget中使用了同样没有确定宽高度的子Widget导致的,例如ListView、Wrap、GridView等,Flutter不知道该用什么样的宽高来渲染widget,所以就会显示不出来。
解决办法如下:
1. 给定宽度或者高度
一般根据滚动方向来决定,本例中ListView是垂直滚动的,所以设置下高度就可以了。
如:
_listView()
  var datas = List.generate(100, (index)
    return "item $index + 1";
  );

  return Container(
    height: 300,
    child: ListView.builder(
      itemBuilder: (BuildContext context, int index)
        return Container(
          child: Text("$datas[index]"),
          height: 40,
          alignment: Alignment.center,
          decoration: BoxDecoration(
              border: Border(bottom: BorderSide(color: Colors.grey))),
        );
      ,
      itemCount: datas.length,
    ),
  );
这里我们给ListView外面套了一层Container,并指定其高度为300,运行效果如下:

可以看到,此时ListView已经显示出来了,但是,通常情况下,我们希望ListView占满剩下的所有高度,由于每个设备的屏幕高度肯定是有不一样的,所以,把高度写死肯定是不合适的。
2.使用ListView子控件的总高度来设置ListView的高度
了解了Flutter 列表控件ListView 后我们知道,shrinkWrap属性可以控制是否根据子widget的总长度来设置ListView的长度。
那这里我们既然不能把ListView的高度写死,那我们使用子widget的总长度来设置ListView的高度不就可以了吗?下面我们来试一下。
代码如下:
_listView()
  var datas = List.generate(100, (index)
    return "item $index + 1";
  );

  return ListView.builder(
     shrinkWrap: true,//使用子控件的总长度来设置ListView的长度(这里的长度为高度)
    itemBuilder: (BuildContext context, int index)
      return Container(
        child: Text("$datas[index]"),
        height: 40,
        alignment: Alignment.center,
        decoration: BoxDecoration(
            border: Border(bottom: BorderSide(color: Colors.grey))),
      );
    ,
    itemCount: datas.length,
  );
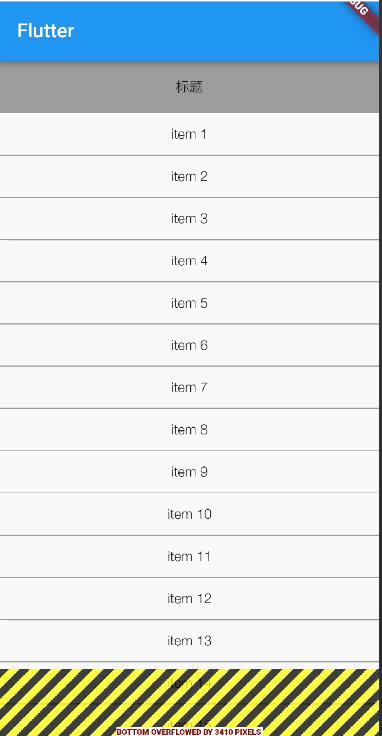
我们将shrinkWrap设置为true,再来看看运行效果。

运行后发现底部有黄色的区域,然后控制台报如下错误:
══╡ EXCEPTION CAUGHT BY RENDERING LIBRARY ╞═════════════════════════════════════════════════════════
The following message was thrown during layout:
A RenderFlex overflowed by 3410 pixels on the bottom.
The overflowing RenderFlex has an orientation of Axis.vertical.
The edge of the RenderFlex that is overflowing has been marked in the rendering with a yellow and
black striped pattern. This is usually caused by the contents being too big for the RenderFlex.
Consider applying a flex factor (e.g. using an Expanded widget) to force the children of the
RenderFlex to fit within the available space instead of being sized to their natural size.
This is considered an error condition because it indicates that there is content that cannot be
seen. If the content is legitimately bigger than the available space, consider clipping it with a
ClipRect widget before putting it in the flex, or using a scrollable container rather than a Flex,
like a ListView.
告诉我们底部溢出了,原因是屏幕没有这么多的高度来显示ListView,显然,shrinkWrap设置为true也是不好使的。
如果在Android原生中来处理这种布局的话,很简单,我们使用LinearLayout布局,Title给定高度,ListView权重为1,即ListView高度占满剩余高度即可。
那Flutter中有没有类似的布局呢?答案是肯定的,他就是Expanded控件
Expanded是一个用展开Row、Column、或者Flex子控件的一个Widget,用于填充可用空间。这个好像可以满足我们的需求,下面我们详细看看它。
Flutter Expanded
源码如下:
class Expanded extends Flexible
  /// Creates a widget that expands a child of a [Row], [Column], or [Flex]
  /// expand to fill the available space in the main axis.
  const Expanded(
    Key key,
    int flex = 1,
    @required Widget child,
  ) : super(key: key, flex: flex, fit: FlexFit.tight, child: child);
可以看到,Expanded继承自Flexible ,那我们直接看Flexible好了。
Flutter Flexible
Flexible源码如下:
  const Flexible(
    Key key,
    this.flex = 1,
    this.fit = FlexFit.loose,
    @required Widget child,
  ) : super(key: key, child: child);
可以看到,其构造方法很简单,Flexible比Expanded只多了一个fit 属性。
- flex:用于控制自身在主轴上占据的空间比,默认值为1,如果值为0,则表示子控件自己决定其大小,一般不会这么用。
- fit:用于控制如何将子控件放到可用空间中,有两个值,我反正是没看懂两个值的区别是什么,所以就不介绍了,还请指导的大佬指点一下,感激不尽。
实际上Flutter中的Flexible和Expanded中的flex就跟Android原生中的LinearLayout中的weight(权重)概念差不多了。
那下面我们来把上面的代码改一下:
_listView1()
  var datas = List.generate(100, (index)
    return "item $index + 1";
  );

  return Expanded(
    child: ListView.builder(
      itemBuilder: (BuildContext context, int index)
        return Container(
          child: Text("$datas[index]"),
          height: 40,
          alignment: Alignment.center,
          decoration: BoxDecoration(
              border: Border(bottom: BorderSide(color: Colors.grey))),
        );
      ,
      itemCount: datas.length,
    ),
  );
运行效果如下:

基本上就达到我的要求了。
下面我们再写一个ListView,并让他的flex值为2。
_listView2()
  var datas = List.generate(100, (index)
    return "item $index + 1";
  );

  return Flexible(
    flex: 2,
    child: ListView.builder(
      itemBuilder: (BuildContext context, int index)
        return Container(
          child: Text("$datas[index]"),
          height: 40,
          alignment: Alignment.center,
          decoration: BoxDecoration(
              border: Border(bottom: BorderSide(color: Colors.grey))),
        );
      ,
      itemCount: datas.length,
    ),
  );
下面是全部代码:
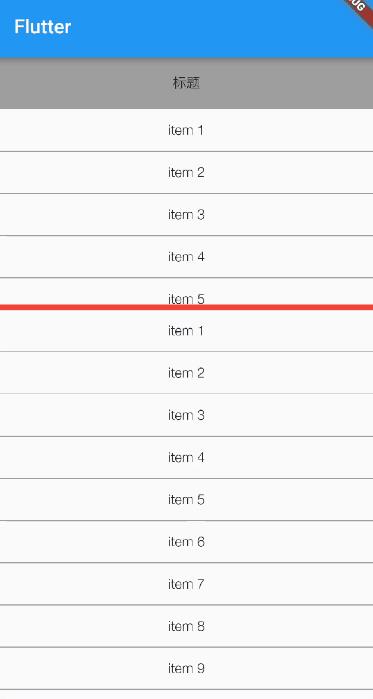
正常情况下ListView1的高度为主轴剩余空间的三分之一,ListView2高度为主轴剩余空间的三分之二,为了方便观看,我在两个列表之间加上了一个红色的分割线。
import 'package:flutter/material.dart';

void main() => runApp(MyApp());

class MyApp extends StatelessWidget
  // This widget is the root of your application.
  @override
  Widget build(BuildContext context)
    return MaterialApp(
      title: 'Flutter Demo',
      theme: ThemeData(
        primarySwatch: Colors.blue,
      ),
      home: MyHomePage(title: 'Flutter Demo Home Page'),
    );


class MyHomePage extends StatelessWidget
  MyHomePage(Key key, this.title) : super(key: key);

  final String title;

  @override
  Widget build(BuildContext context)
    return Scaffold(
      appBar: AppBar(
        title: Text("Flutter"),
      ),
      body: Column(
        children: <Widget>[
          _titleWidget(),
          _listView1(),
          Container(
            decoration: BoxDecoration(
              border: Border(
                bottom: BorderSide(
                  color: Colors.red,
                ),
              ),
            ),
          ), //红色分割线
          _listView2(),
        ],
      ),
    );


_titleWidget()
  return Container(
    color: Colors.grey,
    alignment: Alignment.center,
    child: Text("标题"),
    height: 50,
  );


_listView1()
  var datas = List.generate(100, (index)
    return "item $index + 1";
  );

  return Expanded(
    child: ListView.builder(
      itemBuilder: (BuildContext context, int index)
        return Container(
          child: Text("$datas[index]"),
          height: 40,
          alignment: Alignment.center,
          decoration: BoxDecoration(
              border: Border(bottom: BorderSide(color: Colors.grey))),
        );
      ,
      itemCount: datas.length,
    ),
  );


_listView2()
  var datas = List.generate(100, (index)
    return "item $index + 1";
  );

  return Flexible(
    flex: 2,
    child: ListView.builder(
      itemBuilder: (BuildContext context, int index)
        return Container(
          child: Text("$datas[index]"),
          height: 40,
          alignment: Alignment.center,
          decoration: BoxDecoration(
              border: Border(bottom: BorderSide(color: Colors.grey))),
        );
      ,
      itemCount: datas.length,
    ),
  );
运行效果:

可以看到,跟我们的预期一样。
实际上,我们可以简单的把Flutter中的Expanded和Flexible控件看作是Android原生的LinearLayout,他们的效果很相似。
以上是关于使用Expanded布局时报错The following assertion was thrown during performLayout的主要内容,如果未能解决你的问题,请参考以下文章
AS使用lombok注解报错:Annotation processors must be explicitly declared now. The following dependencies on
Oracle游标,在判断时报PLS-00103:Encountered the symbol "=" when expecting one of the following
sbt assembly编译打包时报: deduplicate: different file contents found in the following:
SVN提交时报错Error: Commit failed (details follow): Error: No such revision 194 的异常?
Oracle 11g RAC INS-06006 Passwordless SSH connectivity not set up between the following node(s) 解决方法
openfire 安装配置时出现The Openfire database schema does not appear to be installed. Follow the installati错