Terraform 学习总结—— 基于阿里云平台上的 Terraform 实战
Posted 科技D人生
tags:
篇首语:本文由小常识网(cha138.com)小编为大家整理,主要介绍了Terraform 学习总结—— 基于阿里云平台上的 Terraform 实战相关的知识,希望对你有一定的参考价值。
Terraform 是什么

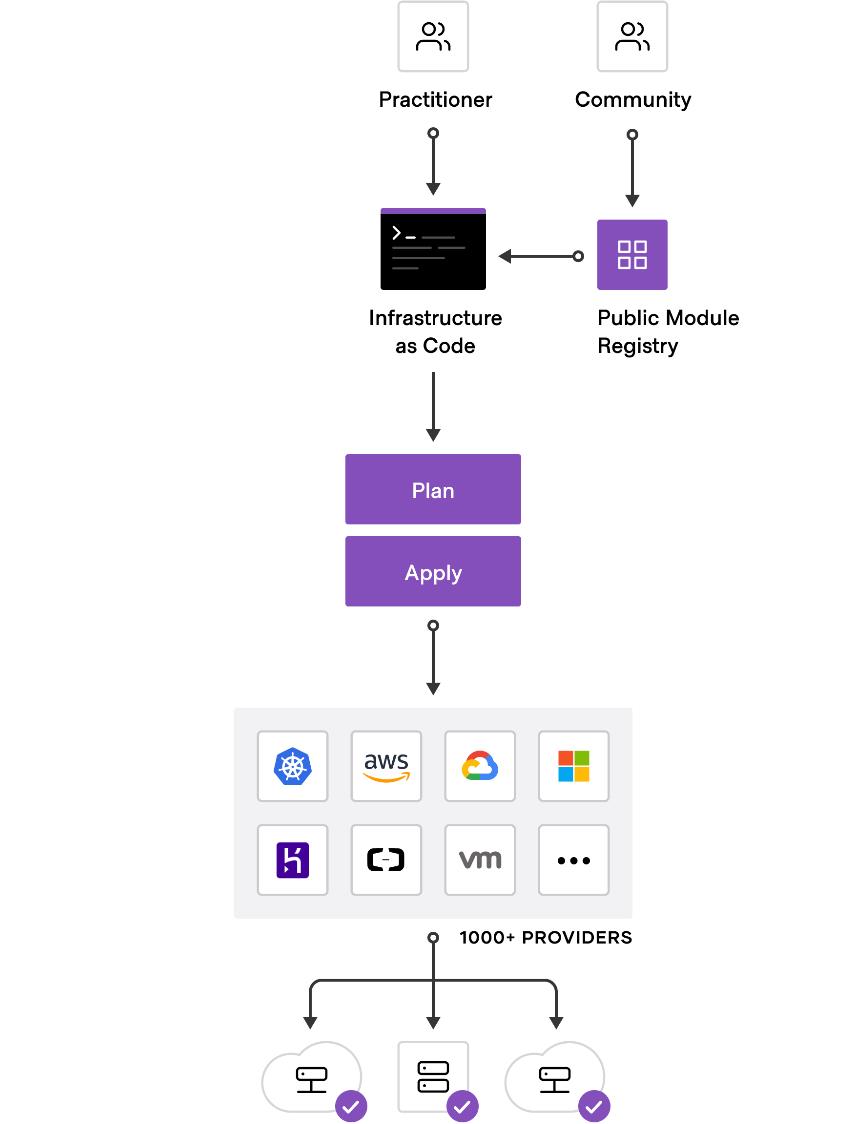
Terraform(https://www.terraform.io/)是 HashiCorp 旗下的一款开源(Go 语言开发)的 DevOps 基础架构资源管理运维工具,可以看下对应的 DevOps 工具链:

Terraform 可以安全高效的构建、更改和合并多个云厂商的各种服务资源,当前支持有阿里云、AWS、微软 Azure、Vmware、Google Cloud Platform 等多个云厂商云产品的资源创建。
Terraform 通过模板配置文件定义所有资源类型(有如主机,OS,存储类型,中间件,网络 VPC,SLB,DB,Cache 等)和资源的数量、规格类型、资源创建依赖关系,基于资源厂商的 OpenAPI 快速创建一键创建定义的资源列表,同时也支持资源的一键销毁。
顺便介绍一下 HashiCorp 这家公司的其他产品:
Vagrant Vagrant by HashiCorp
Consul HashiCorp Consul - Connect and Secure Any Service
Vault HashiCorp Vault - Manage Secrets & Protect Sensitive Data
Nomad HashiCorp Nomad Enterprise
Packer Packer by HashiCorp
Terraform 初体验
安装
在 CentOS 7 上面进行安装,如下:
sudo yum install -y yum-utils
sudo yum-config-manager --add-repo https://rpm.releases.hashicorp.com/RHEL/hashicorp.repo
sudo yum -y install terraform
验证版本信息:
[root@zhy ~]# terraform version
Terraform v1.0.2
on linux_amd64
获取命令行帮助
# 获取帮助信息,查看 Terraform 支持哪些子命令及参数
terraform -help

# 查看具体某个子命令的帮助信息
terraform -help plan

# 开启命令行补全
terraform -install-autocomplete
创建一台阿里云 ECS 实例
准备子账号,创建 RAM 子账户,子账户只能通过 OpenAPI 的形式访问云上的资源,而且不能赋予所有的权限,只赋予指定的权限,如 ECS、RDS、SLB 等具体的权限。推荐使用环境变量的方式存放身份认证信息:
export ALICLOUD_ACCESS_KEY="********"
export ALICLOUD_SECRET_KEY="*************"
export ALICLOUD_REGION="cn-shanghai"
下面是一段测试的代码 main.tf,其主要功能是在阿里云上创建 VPC、vSwitch、安全组、ECS 实例,最后输出 ECS 的外网 IP。代码如下:
resource "alicloud_vpc" "vpc"
    name       = "tf_test_foo"
    cidr_block = "172.16.0.0/12"


resource "alicloud_vswitch" "vsw"
    vpc_id            = alicloud_vpc.vpc.id
    cidr_block        = "172.16.0.0/21"
    availability_zone = "cn-shanghai-b"


resource "alicloud_security_group" "default"
    name = "default"
    vpc_id = alicloud_vpc.vpc.id


resource "alicloud_security_group_rule" "allow_all_tcp"
    type              = "ingress"
    ip_protocol       = "tcp"
    nic_type          = "intranet"
    policy            = "accept"
    port_range        = "1/65535"
    priority          = 1
    security_group_id = alicloud_security_group.default.id
    cidr_ip           = "0.0.0.0/0"


resource "alicloud_instance" "instance"
    availability_zone = "cn-shanghai-b"
    security_groups = alicloud_security_group.default.*.id
    instance_type        = "ecs.n2.small"
    system_disk_category = "cloud_efficiency"
    image_id             = "ubuntu_18_04_64_20G_alibase_20190624.vhd"
    instance_name        = "test_foo"
    vswitch_id = alicloud_vswitch.vsw.id
    internet_max_bandwidth_out = 1
    password = "yourPassword"


output "public_ip"
    value = alicloud_instance.instance.public_ip
我们通过一个 main.tf 文件(只需要是 .tf 文件)定义了 ECS(镜像、实例类型)、VPC(CIDR、VPC Name)、安全组等,通过 Terraform 对资源配置参数做解析,调用阿里云 OpenAPI 进行资源校验于创建,同时把整个资源创建状态化到一个 .tf.state 文件中,基于该文件则可以得知资源创建的所有信息,包括资源数量调整,规格调整,实例变更都依赖这种非常重要的文件。查看结果:
$ terraform show基础设施代码原则
我们通过代码完成了基础设施的创建,而且创建出来的资源就是按照我们声明文件中那样描述的那样。这其实就是基础设施即代码的一种技术实现。基础设施即代码是一种使用新的技术来构建和管理动态基础设施的方式。它把基础设施、工具和服务以及对基础设施的管理本身作为一个软件系统,采纳软件工程实践以结构化的安全的方式来管理对系统的变更。基础设施即代码有四项关键原则:
再生性:环境中的任何元素可以轻松复制。
一致性:无论何时,创建的环境各个元素的配置是完全相同的。
快速反馈:能够频繁、容易地进行变更,并快速知道变更是否正确。
可见性:所有对环境的变更应该容易理解、可审计、受版本控制。
Terraform 编程
如果在编写代码时,遇到什么问题,可以在官方网站寻找答案。官方网站是最好的学习资源,没有之一。文档链接为:https://www.terraform.io/language。接下来就看一个示例。变量定义:
# 列表的例子
variable "list_example"
  description = "An example of a list in Terraform"
  type = "list"
  default = [1, 2, 3]


# 字典的例子
variable "map_example"
  description = "An example of a map in Terraform"
  type = "map"
  default =
      key1 = "value1"
      key2 = "value2"
      key3 = "value3"


# 如果不指定类型,默认是字符串
variable "server_port"
  description = "The port the server will use for HTTP requests"
$ tree -L 1 .
.
├── madlibs
├── madlibs.tf
├── madlibs.zip
├── templates
├── terraform.tfstate
├── terraform.tfstate.backup
└── terraform.tfvars

2 directories, 5 files
看下 terraform.tfvars 文件的内容:
[root@blog ch03]# cat terraform.tfvars

words =
nouns      = ["army", "panther", "walnuts", "sandwich", "Zeus", "banana", "cat", "jellyfish", "jigsaw", "violin", "milk", "sun"]
adjectives = ["bitter", "sticky", "thundering", "abundant", "chubby", "grumpy"]
verbs      = ["run", "dance", "love", "respect", "kicked", "baked"]
adverbs    = ["delicately", "beautifully", "quickly", "truthfully", "wearily"]
numbers    = [42, 27, 101, 73, -5, 0]
及 madlibs.tf 文件的内容
[root@blog ch03]# cat madlibs.tf

terraform
    required_version = ">= 0.15"
    required_providers
      random =
         source  = "hashicorp/random"
        version = "~> 3.0"


      local =
         source  = "hashicorp/local"
        version = "~> 2.0"


      archive =
         source  = "hashicorp/archive"
        version = "~> 2.0"


variable "words"
    description = "A word pool to use for Mad Libs"
    type = object(
      nouns      = list(string),
      adjectives = list(string),
      verbs      = list(string),
      adverbs    = list(string),
      numbers    = list(number),
    )

    validation
      condition     = length(var.words["nouns"]) >= 10
      error_message = "At least 10 nouns must be supplied."


variable "num_files"
    type        = number
    description = "(optional) describe your variable"
    default     = 100


locals
   uppercase_words =  for k, v in var.words : k => [for s in v : upper(s)]


resource "random_shuffle" "random_nouns"
    count = var.num_files
    input = local.uppercase_words["nouns"]


resource "random_shuffle" "random_adjectives"
    count = var.num_files
    input = local.uppercase_words["adjectives"]


resource "random_shuffle" "random_verbs"
    count = var.num_files
    input = local.uppercase_words["verbs"]


resource "random_shuffle" "random_adverbs"
    count = var.num_files
    input = local.uppercase_words["adverbs"]


resource "random_shuffle" "random_numbers"
    count = var.num_files
    input = local.uppercase_words["numbers"]


locals
    templates = tolist(fileset(path.module, "templates/*.txt"))


resource "local_file" "mad_libs"
    count    = var.num_files
    filename = "madlibs/madlibs-$count.index.txt"
    content = templatefile(element(local.templates, count.index),

        nouns      = random_shuffle.random_nouns[count.index].result
        adjectives = random_shuffle.random_adjectives[count.index].result
        verbs      = random_shuffle.random_verbs[count.index].result
        adverbs    = random_shuffle.random_adverbs[count.index].result
        numbers    = random_shuffle.random_numbers[count.index].result
    )


data "archive_file" "mad_libs"
    depends_on = [
      local_file.mad_libs
    ]
    type        = "zip"
    source_dir  = "$path.module/madlibs"
    output_path = "$path.cwd/madlibs.zip"
如何引用变量的值?var.<VARIABLE_NAME>。注意:Terraform 不支持自定义函数。我们只能使用 Terraform 内置的大约 100 个函数进行编程。
Repeat Yourself vs. Don't Repeat Yourself (DRY)
在软件工程中,是不提倡 DRY 的。可是现实中,我们到处可以看到 Ctrl-C 及 Ctrl-V 的这样的编程范式(:P)。下面两个代码示例,哪个更好一点?

从上图来看,左边的代码结构是最优的,其符合 DRY 原则;而右边的代码结构则是符合 Ctrl-C、Ctrl-V 这种模式。针对上述两种场景,我们给出以下建议:
当我们的环境没有差异或差异比较小,建议使用左边的代码结构;
当我们的环境差异比较大的时候,就只能选择右边的代码结构了;
使用 workspace 以复用代码
对于同样的配置文件,workspace 功能允许我们可以有多个状态文件。这就意味着,我们不需要通过复制、粘贴代码,就可以实现多环节部署。每个 workspace 拥有自己的变量及环境信息。如下图所示:

我们之前就已经在使用 workspace 了,尽管我们并没有意识到这一点。当执行 terraform init 的时候,Terraform 就已经创建了一个默认的 workspace 并切换到该 workspace 下了。可以验证一下:
[root@blog ch03]# terraform workspace list
* default
多环境部署,接下来我们使用 Terraform 的 workspace 特性进行一个多环境的部署。一个例子:
[root@blog ch06]# tree .
.
├── environments
│   ├── dev.tfvars
│   └── prod.tfvars
├── main.tf
└── terraform.tfstate.d
  ├── dev
  │   ├── terraform.tfstate
  │   └── terraform.tfstate.backup
  └── prod
      └── terraform.tfstate

4 directories, 6 files看下代码(如何在什么都没有的情况下,进行代码的调试及验证):
[root@blog ch06]# cat main.tf

variable "region"
description = "My Test Region"
type        = string


output "myworkspace"
value =
  region = var.region
  workspace = terraform.workspace


[root@blog ch06]# cat environments/dev.tfvars
region = "cn-shanghai-dev"

[root@blog ch06]# cat environments/prod.tfvars
region = "cn-shanghai-prod"
我们切换到 dev 的 workspace 下面,然后执行代码:
[root@blog ch06]# terraform workspace select dev
Switched to workspace "dev".

[root@blog ch06]# terraform apply -var-file=./environments/dev.tfvars -auto-approve
No changes. Your infrastructure matches the configuration.

Terraform has compared your real infrastructure against your configuration and found no differences, so no changes are needed.

Apply complete! Resources: 0 added, 0 changed, 0 destroyed.

Outputs:

myworkspace =
 "region" = "cn-shanghai-dev"
 "workspace" = "dev"
切换到 prod 的 workspace 下面,然后验证代码:
[root@blog ch06]# terraform workspace select prod

Switched to workspace "prod".

[root@blog ch06]# terraform apply -var-file=./environments/prod.tfvars -auto-approve

No changes. Your infrastructure matches the configuration.

Terraform has compared your real infrastructure against your configuration and found no differences, so no changes are needed.

Apply complete! Resources: 0 added, 0 changed, 0 destroyed.

Outputs:

myworkspace =
 "region" = "cn-shanghai-prod"
 "workspace" = "prod"
当执行 destroy 的时候呢?也是同样的情况,需要指定变量文件:
[root@blog ch06]# terraform destroy -var-file=./environments/prod.tfvars -auto-approve

Changes to Outputs:
 - myworkspace =
     - region    = "cn-shanghai-prod"
     - workspace = "prod"
   -> null

You can apply this plan to save these new output values to the Terraform state, without changing any real infrastructure.

Destroy complete! Resources: 0 destroyed.
多使用 output 对代码进行调试。Terraform 的 output 很像其他编程语言中的:printf、print、echo 等函数,让我们把感兴趣的内容给打印出来,以便及时验证。
# 关于操作 workspace 的命令
## 查看当前有哪些 workspace
[root@blog ch06]# terraform workspace list
default
dev
* prod

## 创建一个名为 uat 的 workspace
[root@blog ch06]# terraform workspace new uat
Created and switched to workspace "uat"!

## 切换到名为 dev 的 workspace
[root@blog ch06]# terraform workspace select dev
Switched to workspace "dev".

## 删除名为 uat 的 workspace
[root@blog ch06]# terraform workspace delete uat
Deleted workspace "uat"!
多云部署
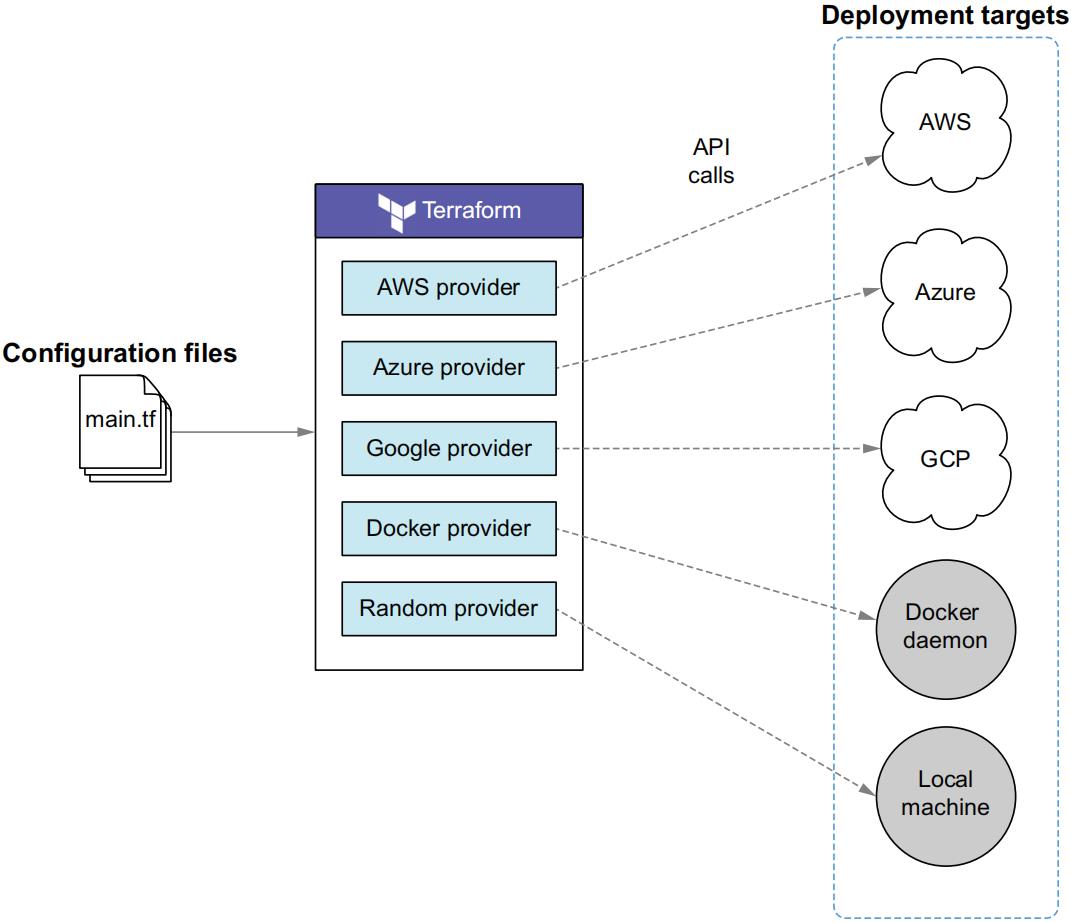
主要实现思路是:
在
providers.tf文件中,指定多个云厂商的 Provider;以模块的形式操作每个云厂商的云上资源;
接下来直接看代码结构:
[root@blog part1_hybridcloud-lb]# tree .
.
├── bootstrap.sh
├── main.tf
├── outputs.tf
├── providers.tf
└── versions.tf

0 directories, 5 files
我们看一下 providers.tf 文件(代码中要指定多个 Provider):
provider "aws"
 profile = "<profile>"
 region  = "us-west-2"


provider "azurerm"
 features


provider "google"
 project = "<project_id>"
 region  = "us-east1"


provider "docker"  #A
再看一下 main.tf 文件:
module "aws"
 source = "terraform-in-action/vm/cloud/modules/aws" #A
 environment =
   name             = "AWS" #B
   background_color = "orange" #B


module "azure"
 source = "terraform-in-action/vm/cloud/modules/azure" #A
 environment =
   name             = "Azure"
   background_color = "blue"


module "gcp"
 source     = "terraform-in-action/vm/cloud/modules/gcp" #A
 environment =
   name             = "GCP"
   background_color = "red"


module "loadbalancer"
 source = "terraform-in-action/vm/cloud/modules/loadbalancer" #A
 addresses = [
   module.aws.network_address, #C
   module.azure.network_address, #C
   module.gcp.network_address, #C
]
零宕机部署(Zero-downtime deployment ZDD)
本节介绍三种方案实现零宕机部署。
Terraform 的
create_before_destroy元属性蓝绿部署
与
Ansible联姻
设置生命周期
当没有做任何设置时,下图就是 Terraform 默认的行为。当一些属性(尤其是一些强制更新的属性,诸如:实例类型、镜像 ID、用户数据等)被修改时,再次执行 apply 时,之前已经存在的资源见会被销毁。
resource "aws_instance" "instance"
ami = var.ami

instance_type = var.instance_type

user_data = <<-EOF
    #!/bin/bash
    mkdir -p /var/www && cd /var/www
    echo "App v$var.version" >> index.html
    python3 -m http.server 80
    EOF
从下面的这副图就可以看出,从销毁到新的实例完全可用的这段时间,整体是不能对外使用的。

为了避免上述情况,生命周期元参数允许我们自定义资源生命周期。生命周期嵌套块存在于所有资源上。我们可以设置以下三个标志:
create_before_destroy (bool)——当设置为true时,旧的对象在被删除之前新的资源会创建出来。
prevent_destroy (bool)——设置为true时,Terraform 将拒绝任何会破坏与资源关联的基础结构对象并出现显式错误的计划。
ignore_changes (list of attribute names)——指定一个资源列表,Terraform 在执行计划时会忽略新的执行计划。
create_before_destroy
下面的代码中,设置了 create_before_destroy = true,
resource "aws_instance" "instance"
   ami = var.ami
   instance_type = "t3.micro"

   lifecycle
       create_before_destroy = true


   user_data = <<-EOF
       #!/bin/bash
       mkdir -p /var/www && cd /var/www
       echo "App v$var.version" >> index.html
       python3 -m http.server 80
   EOF
当执行上述代码时,流程图如下所示:
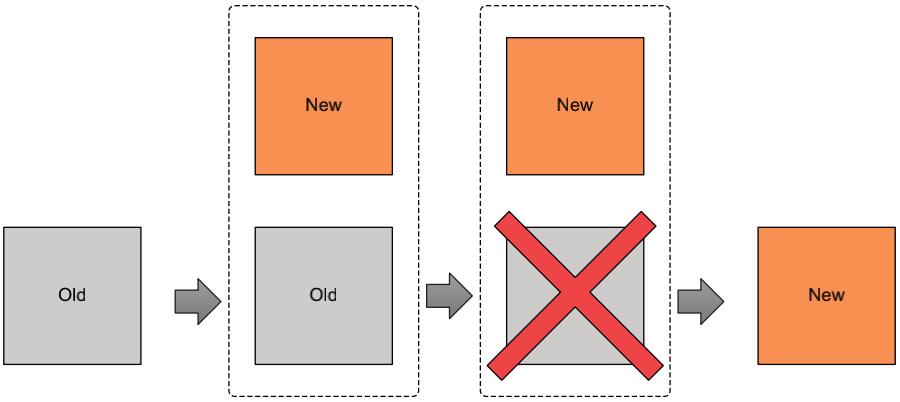
create_before_destroy 只对 managed resources 生效,像数据源就不生效。《Terraform Up and Running》的作者对该选项的看法:I do not use create_before_destroy as I have found it to be more trouble than it is worth.
蓝绿部署
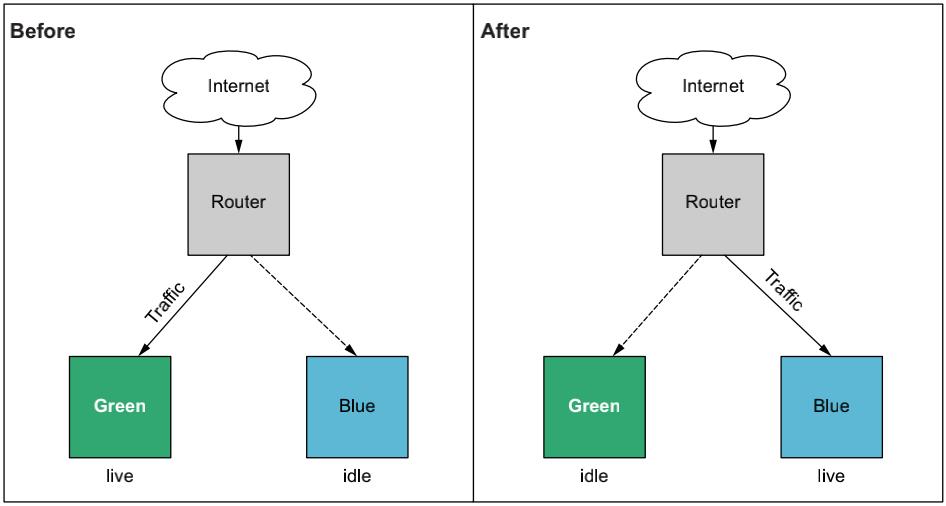
在蓝/绿部署期间,我们可以在两个生产环境之间切换:一个称为蓝色环境,另一个称为绿色环境。在任何给定时间,只有一个生产环境处于活动状态。路由器将流量定向到实时环境,可以是负载均衡器,也可以是 DNS 解析器。每当要部署到生产环境时,请先部署到空闲环境。然后,当我们准备就绪时,将路由器从指向实时服务器切换到指向空闲服务器——该服务器已在运行该软件的最新版本。此开关称为切换,可以手动或自动完成。当流量转换完成时,空闲服务器将成为新的实时服务器,以前的活动服务器现在是空闲服务器(如下图所示)。
接下来看一个例子,其流程图如下:

代码如下 green_blue.tf:
provider "aws"
   region = "us-west-2"


variable "production"
   default = "green" // 部署 Green 环境


module "base"
   source = "terraform-in-action/aws/bluegreen/modules/base"
   production = var.production


module "green"
   source = "terraform-in-action/aws/bluegreen/modules/autoscaling"
   app_version = "v1.0"
   label = "green"
   base = module.base


module "blue"
   source = "terraform-in-action/aws/bluegreen/modules/autoscaling"
   app_version = "v2.0"
   label = "blue"
   base = module.base


output "lb_dns_name"
   value = module.base.lb_dns_name
蓝绿环境割接当 Blue 环境全部启动之后,就可以进行蓝绿切换了。代码如下 green_blue.tf:
provider "aws"
   region = "us-west-2"


variable "production"
   default = "blue"


module "base"
   source = "terraform-in-action/aws/bluegreen/modules/base"
   production = var.production


module "green"
   source = "terraform-in-action/aws/bluegreen/modules/autoscaling"
   app_version = "v1.0"
   label = "green"
   base = module.base


module "blue"
   source = "terraform-in-action/aws/bluegreen/modules/autoscaling"
   app_version = "v2.0"
   label = "blue"
   base = module.base


output "lb_dns_name"
   value = module.base.lb_dns_name
Terraform 与 Ansible 联姻
我们需要冷静下来思考一个问题:"Terraform 是适合该工作的工具吗?在许多情况下,答案是否定的。对于 VM 上的应用程序部署,配置管理工具将会更适合。接下来,我们让专业的工具做其专业的事情。Terraform 专注于基础设施这一块,用于基础设施的快速交付。而对于上层的应用部署,Terraform 则有点不擅长了。
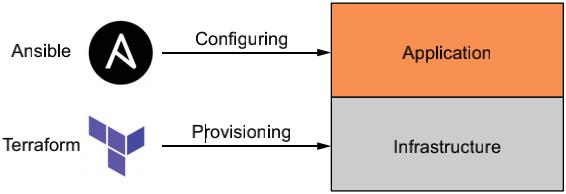
接下来,以 AWS 为例,Terraform 负责基础设施的创建,Ansible 负责创建其上的应用。流程图如下:
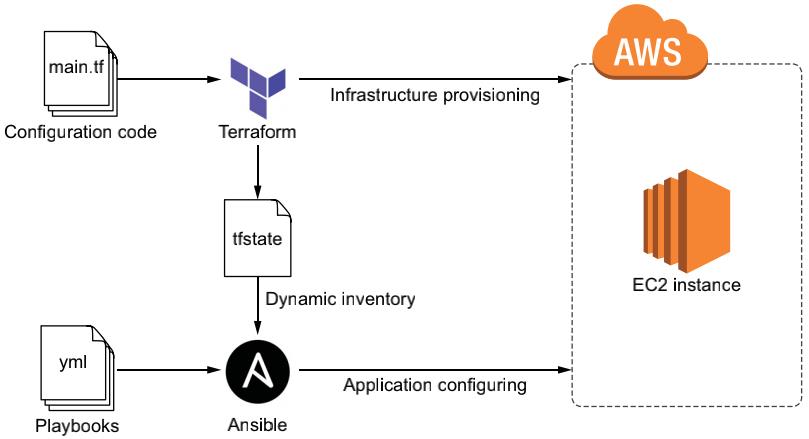
代码如下:
provider "aws"
 region  = "us-west-2"


resource "tls_private_key" "key"
 algorithm = "RSA"


resource "local_file" "private_key"
 filename          = "$path.module/ansible-key.pem"
 sensitive_content = tls_private_key.key.private_key_pem
 file_permission   = "0400"


resource "aws_key_pair" "key_pair"
 key_name   = "ansible-key"
 public_key = tls_private_key.key.public_key_openssh


data "aws_vpc" "default"
 default = true


resource "aws_security_group" "allow_ssh"
 vpc_id = data.aws_vpc.default.id

 ingress
   from_port   = 22
   to_port     = 22
   protocol    = "tcp"
   cidr_blocks = ["0.0.0.0/0"]


 ingress
   from_port   = 80
   to_port     = 80
   protocol    = "tcp"
   cidr_blocks = ["0.0.0.0/0"]


 egress
   from_port   = 0
   to_port     = 0
   protocol    = "-1"
   cidr_blocks = ["0.0.0.0/0"]


data "aws_ami" "ubuntu"
 most_recent = true

 filter
   name   = "name"
   values = ["ubuntu/images/hvm-ssd/ubuntu-focal-20.04-amd64-server-*"]


 owners = ["099720109477"]


resource "aws_instance" "ansible_server"
 ami                    = data.aws_ami.ubuntu.id
 instance_type          = "t3.micro"
 vpc_security_group_ids = [aws_security_group.allow_ssh.id]
 key_name               = aws_key_pair.key_pair.key_name

 tags =
   Name = "Ansible Server"


 provisioner "remote-exec"
   inline = [
     "sudo apt update -y",
     "sudo apt install -y software-properties-common",
     "sudo apt-add-repository --yes --update ppa:ansible/ansible",
     "sudo apt install -y ansible"
  ]

   connection
     type        = "ssh"
     user        = "ubuntu"
     host        = self.public_ip
     private_key = tls_private_key.key.private_key_pem


 provisioner "local-exec"
   command = "ansible-playbook -u ubuntu --key-file ansible-key.pem -T 300 -i '$self.public_ip,', app.yml"


output "public_ip"
value = aws_instance.ansible_server.public_ip


output "ansible_command"
   value = "ansible-playbook -u ubuntu --key-file ansible-key.pem -T 300 -i '$aws_instance.ansible_server.public_ip,', app.yml"
app.yml 的内容为:
---
- name: Install nginx
hosts: all
become: true
tasks:
- name: Install Nginx
  yum:
    name: nginx
    state: present

- name: Add index page
  template:
    src: index.html
    dest: /var/www/html/index.html

- name: Start Nginx
  service:
    name: nginx
    state: started
执行上述代码:
$ terraform init && terraform apply -auto-approve

...

aws_instance.ansible_server: Creation complete after 2m7s

[id=i-06774a7635d4581ac]

Apply complete! Resources: 5 added, 0 changed, 0 destroyed.

Outputs:

ansible_command = ansible-playbook -u ubuntu --key-file ansible-key.pem -T
300 -i '54.245.143.100,', app.yml
public_ip = 54.245.143.100
当要进行蓝绿割接的时候,只需要再次执行一下上述 ansible 命令即可:
$ ansible-playbook \\
-u ubuntu \\
--key-file ansible-key.pem \\
-T 300 \\
-i '54.245.143.100' app.yml
如何写一个 Provider
当现有的 Provider 不符合你的需求或根本就没有你想要的 Provider 时,该怎么办?该怎么办?该怎么办?那就是写一个出来呗。这样的话,我们就可以通过 Terraform 以基础设施即代码的形式来管理我们远端的 API。也就是说,只要存在一个 RESTful 形式的 API,理论上,我们就可以通过 Terraform 来管理它。接下来本节介绍如何写一个 Provider。我们先看一下 Terraform 的工作流程是怎么样的。
Terraform 与 Provider 如何交互
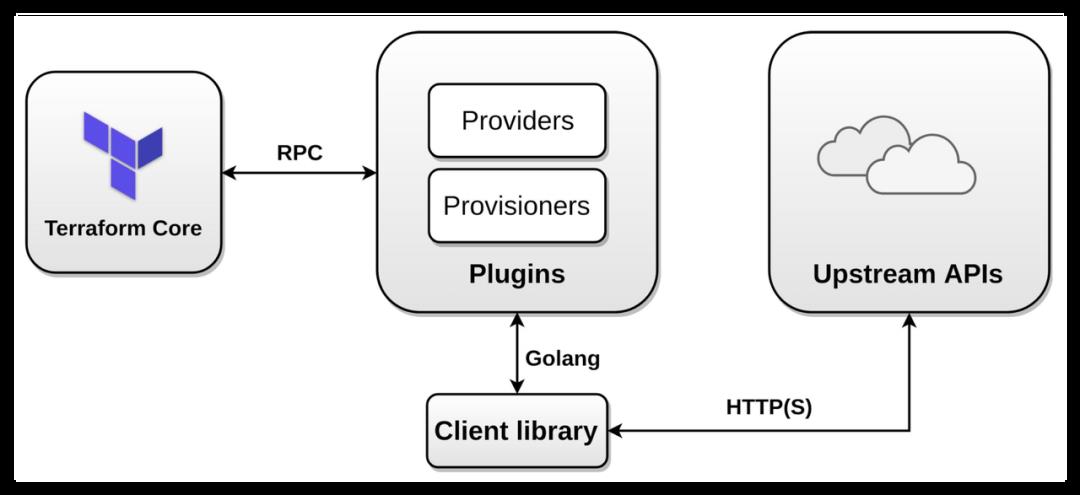
Terraform 官网也有非常详细的关于如何开发 Plugins 的文档,文档链接:https://www.terraform.io/plugin。这里有两点需要注意:
必须存在一个远端(或上游) API;(可以是任何语言编写的 API)
操作这个 API 的客户端 SDK;(Golang 客户端。因为 Provider 是 Go 写的,所有也要有一个 Go 客户端 SDK)
首先有一个 RESTful API
我们看一下代码的目录结构。代码来自《Terraform in Action》一书的第 11 章,我们对其进行了修改。代码中使用了 AWS 的 Lambda 函数式计算,在这里把相关代码删除了,使其可以运行在任何环境中。代码中使用了 ORM,是国人开发的一款 ORM 框架 jinzhu 。官网地址为:GORM - The fantastic ORM library for Golang, aims to be developer friendly.使用的 Web 框架为 go-gin,其官网地址为:Gin Web Framework (gin-gonic.com)接着看一下目录结构及代码:
➜ my-go-petstore git:(dev) ✗ tree
.
├── README.md
├── action
│ └── pets
│   ├── create.go
│   ├── delete.go
│   ├── get.go
│   ├── list.go
│   └── update.go
├── go.mod
├── go.sum
├── main.go
├── model
│ └── pet
│   ├── model.go
│   └── orm.go
└── terraform-petstore

4 directories, 12 files
代码规模比较小,是一个比较经典的 MVC 开发模型。先看一下模型的定义。
模型定义
// model/pet/model.go

package pet

type Pet struct
       ID   string `gorm:"primary_key" json:"id"`
       Name  string `json:"name"`
       Species string `json:"species"`
       Age   int  `json:"age"`
Service 定义
// model/pet/orm.go

package pet

import (
       "fmt"

       "github.com/jinzhu/gorm"
)

//Create creates a pet in the database
func Create(db *gorm.DB, pet *Pet) (string, error)
       err := db.Create(pet).Error
       if err != nil
               return "", err

       return pet.ID, nil


//FindById returns a pet with a given id, or nil if not found
func FindById(db *gorm.DB, id string) (*Pet, error)
       var pet Pet
       err := db.Find(&pet, &PetID: id).Error
       if err != nil
               return nil, err

       return &pet, nil


//FindByName returns a pet with a given name, or nil if not found
func FindByName(db *gorm.DB, name string) (*Pet, error)
       var pet Pet
       err := db.Find(&pet, &PetName: name).Error
       if err != nil
               return nil, err

       return &pet, nil


//List returns all Pets in database, with a given limit
func List(db *gorm.DB, limit uint) (*[]Pet, error)
       var pets []Pet
       err := db.Find(&pets).Limit(limit).Error
       if err != nil
               return nil, err

       return &pets, nil


//Update updates a pet in the database
func Update(db *gorm.DB, pet *Pet) error
       err := db.Save(pet).Error
       return err


//Delete deletes a pet in the database
func Delete(db *gorm.DB, id string) error
       pet, err := FindById(db, id)
       if err != nil
               fmt.Printf("1:%v", err)
               return err

       err = db.Delete(pet).Error
       fmt.Printf("2:%v", err)
       return err
控制器定义
-
Get(查看一个资源)
// action/pets/get.go

package pets

import (
       "github.com/jinzhu/gorm"
       "github.com/TyunTech/terraform-petstore/model/pet"
)

//GetPetRequest request struct
type GetPetRequest struct
       ID string


//GetPet returns a pet from database
func GetPet(db *gorm.DB, req *GetPetRequest) (*pet.Pet, error)
       p, err := pet.FindById(db, req.ID)
       res := p
       return res, err
-
List(查看所有资源)
// action/pets/list.go

package pets

import (
       "github.com/jinzhu/gorm"
       "github.com/TyunTech/terraform-petstore/model/pet"
)

//ListPetRequest request struct
type ListPetsRequest struct
       Limit uint


//ListPetResponse response struct
type ListPetsResponse struct
       Items *[]pet.Pet `json:"items"`


//ListPets returns a list of pets from database
func ListPets(db *gorm.DB, req *ListPetsRequest) (*ListPetsResponse, error)
       pets, err := pet.List(db, req.Limit)
       res := &ListPetsResponseItems: pets
       return res, err
-
Create(创建一个资源)
// action/pets/create.go

package pets

import (
       "github.com/google/uuid"
       "github.com/jinzhu/gorm"
       "github.com/TyunTech/terraform-petstore/model/pet"
)

//CreatePetRequest request struct
type CreatePetRequest struct
       Name  string `json:"name" binding:"required"`
       Species string `json:"species" binding:"required"`
       Age   int  `json:"age" binding:"required"`


//CreatePet creates a pet in database
func CreatePet(db *gorm.DB, req *CreatePetRequest) (*pet.Pet, error)
       uuid, _ := uuid.NewRandom()
       newPet := &pet.Pet
               ID:   uuid.String(),
               Name:  req.Name,
               Species: req.Species,
               Age:   req.Age,

       id, err := pet.Create(db, newPet)
       p, err := pet.FindById(db, id)
       res := p
       return res, err
-
Update(更新一个资源)
// action/pets/update.go

package pets

import (
       "fmt"

       "github.com/jinzhu/gorm"
       "github.com/TyunTech/terraform-petstore/model/pet"
)

//UpdatePetRequest request struct
type UpdatePetRequest struct
       ID   string
       Name  string `json:"name"`
       Species string `json:"species"`
       Age   int  `json:"age"`


//UpdatePet updates a pet from database
func UpdatePet(db *gorm.DB, req *UpdatePetRequest) (*pet.Pet, error)
       p, err := pet.FindById(db, req.ID)
       if err != nil
               return nil, err


       if len(req.Name) > 0
               p.Name = req.Name

       if req.Age > 0
               p.Age = req.Age

       if len(req.Species) > 0
               p.Species = req.Species

       fmt.Printf("requested: %v", p)
       err = pet.Update(db, p)
       if err != nil
               return nil, err

       p, err = pet.FindById(db, req.ID)
       fmt.Printf("new: %v", p)
       res := p
       return res, err
-
Delete(删除一个资源)
// action/pets/delete.go

package pets

import (
       "github.com/jinzhu/gorm"
       "github.com/TyunTech/terraform-petstore/model/pet"
)

//DeletePetRequest request struct
type DeletePetRequest struct
       ID string


//DeletePet deletes a pet from database
func DeletePet(db *gorm.DB, req *DeletePetRequest) (error)
       err := pet.Delete(db, req.ID)
       return err
-
main 入口
代码中,我们去掉了多余的注释及 AWS 的 Lambda 相关代码,使其可以运行在任何环境。
package main

import (
       "fmt"
       "net/http"
       "os"
       "strconv"

       "github.com/gin-gonic/gin"
       "github.com/jinzhu/gorm"
       _ "github.com/jinzhu/gorm/dialects/mysql"
       "github.com/TyunTech/terraform-petstore/action/pets"
       "github.com/TyunTech/terraform-petstore/model/pet"
)

var db *gorm.DB

func init()
       initializeRDSConn()
       validateRDS()


func initializeRDSConn()
       user := os.Getenv("rds_user")
       password := os.Getenv("rds_password")
       host := os.Getenv("rds_host")
       port := os.Getenv("rds_port")
       database := os.Getenv("rds_database")

       dsn := fmt.Sprintf("%s:%s@tcp(%s:%s)/%s", user, password, host, port, database)
       var err error
       db, err = gorm.Open("mysql", dsn)
       if err != nil
               fmt.Printf("%s", err)


func validateRDS()
       //If the pets table does not already exist, create it
       if !db.HasTable("pets")
               db.CreateTable(&pet.Pet)


func optionsPetHandler(c *gin.Context)
       c.Header("Access-Control-Allow-Origin", "*")
       c.Header("Access-Control-Allow-Methods", "GET, POST, DELETE")
       c.Header("Access-Control-Allow-Headers", "origin, content-type, accept")


func main()
       r := gin.Default()

       r.POST("/api/pets", createPetHandler)
       r.GET("/api/pets/:id", getPetHandler)
       r.GET("/api/pets", listPetsHandler)
       r.PATCH("/api/pets/:id", updatePetHandler)
       r.DELETE("/api/pets/:id", deletePetHandler)
       r.OPTIONS("/api/pets", optionsPetHandler)
       r.OPTIONS("/api/pets/:id", optionsPetHandler)

       r.Run(":8000")


func createPetHandler(c *gin.Context)
       c.Header("Access-Control-Allow-Origin", "*")
       var req pets.CreatePetRequest
       if err := c.ShouldBindJSON(&req); err != nil
               c.JSON(http.StatusBadRequest, gin.H"error": err.Error())
               return


       res, err := pets.CreatePet(db, &req)
       if err != nil
               c.JSON(http.StatusInternalServerError, gin.H"error": err.Error())
               return


       c.JSON(http.StatusOK, res)
       return


func listPetsHandler(c *gin.Context)
       c.Header("Access-Control-Allow-Origin", "*")
       limit := 10
       if c.Query("limit") != ""
               newLimit, err := strconv.Atoi(c.Query("limit"))
               if err != nil
                       limit = 10
               else
                       limit = newLimit


       if limit > 50
               limit = 50

       req := pets.ListPetsRequestLimit: uint(limit)
       res, _ := pets.ListPets(db, &req)
       c.JSON(http.StatusOK, res)


func getPetHandler(c *gin.Context)
       c.Header("Access-Control-Allow-Origin", "*")
       id := c.Param("id")
       req := pets.GetPetRequestID: id
       res, _ := pets.GetPet(db, &req)
       if res == nil
               c.JSON(http.StatusNotFound, res)
               return

       c.JSON(http.StatusOK, res)


func updatePetHandler(c *gin.Context)
       c.Header("Access-Control-Allow-Origin", "*")
       var req pets.UpdatePetRequest
       if err := c.ShouldBindJSON(&req); err != nil
               c.JSON(http.StatusBadRequest, gin.H"error": err.Error())
               return


       id := c.Param("id")
       req.ID = id
       res, err := pets.UpdatePet(db, &req)
       if err != nil
               c.JSON(http.StatusInternalServerError, gin.H"error": err.Error())
               return

       c.JSON(http.StatusOK, res)
       return


func deletePetHandler(c *gin.Context)
       c.Header("Access-Control-Allow-Origin", "*")
       id := c.Param("id")
       req := pets.DeletePetRequestID: id
       err := pets.DeletePet(db, &req)
       if err != nil
               c.Status(http.StatusNotFound)
               return

       c.Status(http.StatusOK)
下面两幅截图是代码改造前后的对比:

首先,准备代码中需要的数据库账号密码。这里以环境变量的形式提供:
export rds_user=pet
export rds_password=123456
export rds_host=127.0.0.1
export rds_port=3306
export rds_database=pets
接着就可以运行代码了:
➜ my-go-petstore git:(dev) ✗ go run .
[GIN-debug] [WARNING] Creating an Engine instance with the Logger and Recovery middleware already attached.

[GIN-debug] [WARNING] Running in "debug" mode. Switch to "release" mode in production.
- using env: export GIN_MODE=release
- using code: gin.SetMode(gin.ReleaseMode)

[GIN-debug] POST   /api/pets                 --> main.createPetHandler (3 handlers)
[GIN-debug] GET     /api/pets/:id             --> main.getPetHandler (3 handlers)
[GIN-debug] GET     /api/pets                 --> main.listPetsHandler (3 handlers)
[GIN-debug] PATCH   /api/pets/:id             --> main.updatePetHandler (3 handlers)
[GIN-debug] DELETE /api/pets/:id             --> main.deletePetHandler (3 handlers)
[GIN-debug] OPTIONS /api/pets                 --> main.optionsPetHandler (3 handlers)
[GIN-debug] OPTIONS /api/pets/:id             --> main.optionsPetHandler (3 handlers)
[GIN-debug] [WARNING] You trusted all proxies, this is NOT safe. We recommend you to set a value.
Please check https://pkg.go.dev/github.com/gin-gonic/gin#readme-don-t-trust-all-proxies for details.
[GIN-debug] Listening and serving HTTP on :8000
可以看到,服务运行在 8000 端口,我们通过 httpie 命令测试接口是否可用:
# 创建第一条测试数据

(venv37) ➜ my-go-petstore git:(dev) ✗ http POST :8000/api/pets name=Jerry species=mouse age:=1
HTTP/1.1 200 OK
Access-Control-Allow-Origin: *
Content-Length: 86
Content-Type: application/json; charset=utf-8
Date: Sun, 13 Mar 2022 03:44:22 GMT


   "age": 1,
   "id": "9b24b16d-8b09-47e2-9638-16775ccb8d8a",
   "name": "Jerry",
   "species": "mouse"


# 创建第二条测试数据
(venv37) ➜ my-go-petstore git:(dev) ✗ http POST :8000/api/pets name=Tommy species=cat age:=2

HTTP/1.1 200 OK
Access-Control-Allow-Origin: *
Content-Length: 84
Content-Type: application/json; charset=utf-8
Date: Sun, 13 Mar 2022 03:44:40 GMT


   "age": 2,
   "id": "81f04745-c17e-4f38-a3dd-b6e0741f207b",
   "name": "Tommy",
   "species": "cat"
查看数据:
(venv37) ➜ my-go-petstore git:(dev) ✗ http -b :8000/api/pets

   "items": [

           "age": 2,
           "id": "81f04745-c17e-4f38-a3dd-b6e0741f207b",
           "name": "Tommy",
           "species": "cat"
      ,

           "age": 1,
           "id": "9b24b16d-8b09-47e2-9638-16775ccb8d8a",
           "name": "Jerry",
           "species": "mouse"

  ]
到数据库中也查看一些数据:
mysql> use pets;
mysql> select * from pets;
+--------------------------------------+-------+---------+------+
| id                                   | name  | species | age  |
+--------------------------------------+-------+---------+------+
| 81f04745-c17e-4f38-a3dd-b6e0741f207b | Tommy | cat     |    2 |
| 9b24b16d-8b09-47e2-9638-16775ccb8d8a | Jerry | mouse   |    1 |
+--------------------------------------+-------+---------+------+
2 rows in set (0.00 sec)
总结一下,大致的流程是:

其次有一个 Client
什么是 Client 呢?其实就是用来操作 API 的,执行常见的 CRUD 操作。我们看一下代码结构:
(venv37) ➜ petstore-go-client git:(dev) tree .
.
├── README.md
├── examples
│   └── pets
│       └── main.go
├── go.mod
├── go.sum
├── openapi.md
├── openapi.yaml
├── pets.go
├── petstore.go
├── type_helpers.go
└── validations.go

2 directories, 10 files
Provider 的代码结构
Provider 的代码是按照标准的 CRUD 形式编码的,所以,我们按照套路进行编写即可。先看一下代码目录结构:
$ ls
dist example go.mod go.sum main.go Makefile petstore terraform-provider-petstore

$ tree .
.
├── dist
│   └── linux_amd64
│       └── terraform-provider-petstore
├── example
│   └── main.tf
├── go.mod
├── go.sum
├── main.go
├── Makefile
├── petstore
│   ├── provider.go
│   ├── provider_test.go
│   ├── resource_ps_pet.go
│   └── resource_ps_pet_test.go
└── terraform-provider-petstore

4 directories, 11 files
上述的几个关键文件的用途如下:
main.go:Provider 的入口点,主要是一些样板代码;
petstore/provider.go:包含了 Provider 的定义,资源映射及共享配置对象的初始化;
petstore/provider_test.go:Provider 的测试文件;
petstore/resource_ps_pet.go:用于定义管理 pet 资源的 CRUD 操作;
petstore/resource_ps_pet_test.go:pet 资源的测试文件;
看一下关键的四个函数。
Create
func resourcePSPetCreate(d *schema.ResourceData, meta interface) error
       conn := meta.(*sdk.Client)
       options := sdk.PetCreateOptions
               Name:    d.Get("name").(string),
               Species: d.Get("species").(string),
               Age:     d.Get("age").(int),


       pet, err := conn.Pets.Create(options)
       if err != nil
               return err


       d.SetId(pet.ID)
       resourcePSPetRead(d, meta)

       return nil
Read
func resourcePSPetRead(d *schema.ResourceData, meta interface) error
       conn := meta.(*sdk.Client)
       pet, err := conn.Pets.Read(d.Id())
       if err != nil
               return err


       d.Set("name", pet.Name)
       d.Set("species", pet.Species)
       d.Set("age", pet.Age)

       return nil
Update
func resourcePSPetUpdate(d *schema.ResourceData, meta interface) error
       conn := meta.(*sdk.Client)
       options := sdk.PetUpdateOptions

       if d.HasChange("name")
               options.Name = d.Get("name").(string)


       if d.HasChange("age")
               options.Age = d.Get("age").(int)


       conn.Pets.Update(d.Id(), options)
       return resourcePSPetRead(d, meta)
Delete
func resourcePSPetDelete(d *schema.ResourceData, meta interface) error
       conn := meta.(*sdk.Client)
       conn.Pets.Delete(d.Id())
       return nil
介绍了上述方法后,我们看看它们是在什么时候被调用的。如下图所示:

在上述所有的工作完成后,我们就可以构建 Provider 二进制文件,并与远端的 API 进行交互。如果在本地测试没有问题,接下来就可以把我们的自定义 Provider 发布到 Terraform 的 Registry 上面,供有需要的小伙伴使用。
发布自己的 Provider

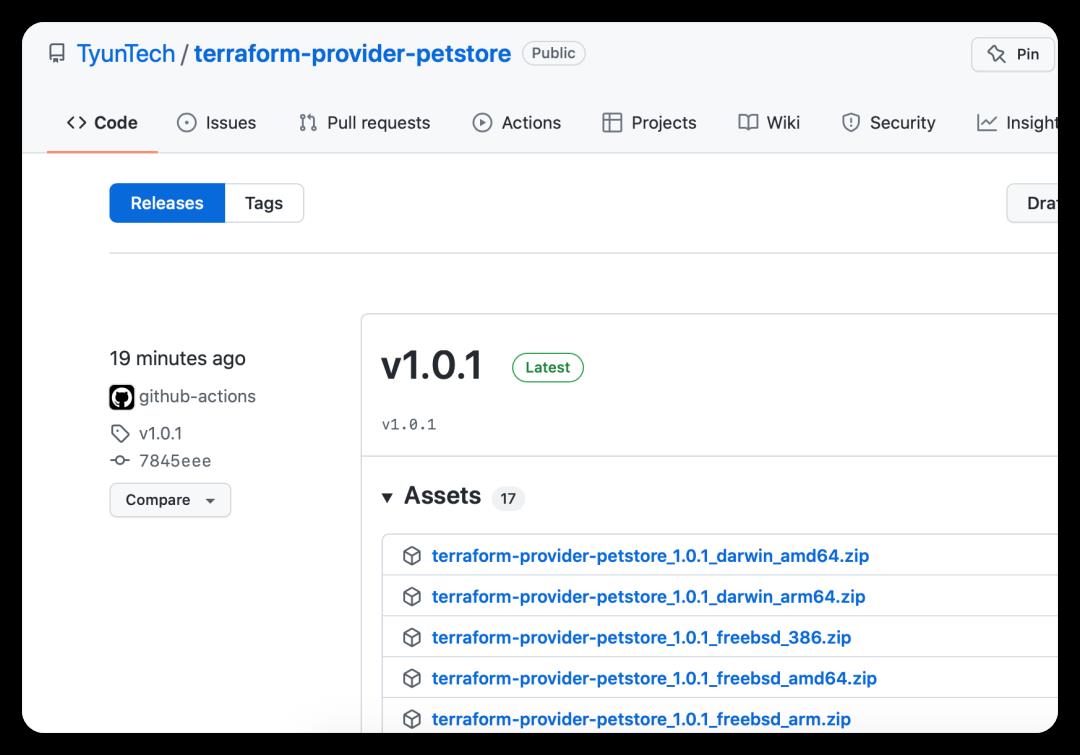
使用了 GitHub 的 Actions 进行代码的发布,截图如下:

大约十分钟可以发布完成,会生成相关平台的二进制代码,可以供不同的平台进行下载使用。
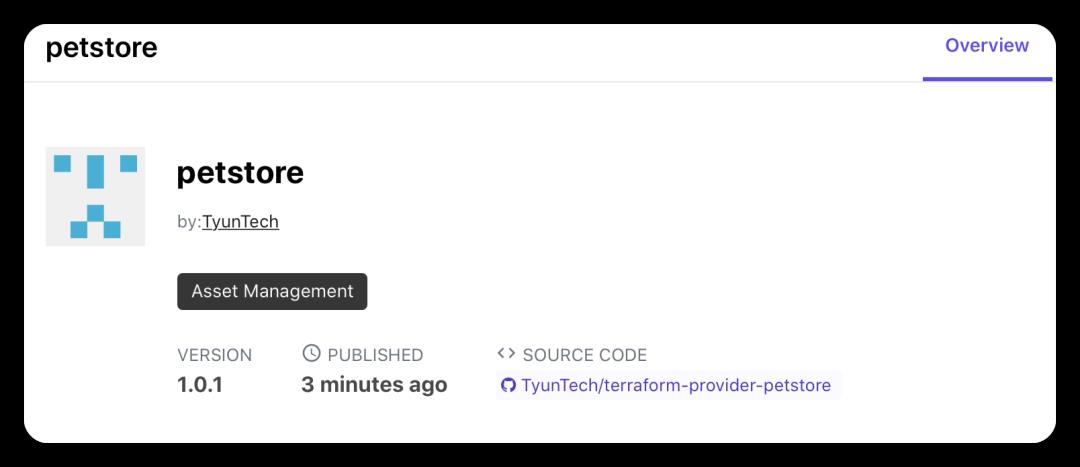
发布完成,在 Terraform 的 Registry 的界面会有如下的显示。
发布一个 Provider 时需要注意的几点:
-
每次发布时,需要自动构建出各种平台的二进制文件;主要使用
.goreleaser.yml文件实现,其代码如下:# Visit https://goreleaser.com for documentation on how to customize this # behavior. before: hooks: # this is just an example and not a requirement for provider building/publishing - go mod tidy builds: - env: # goreleaser does not work with CGO, it could also complicate # usage by users in CI/CD systems like Terraform Cloud where # they are unable to install libraries. - CGO_ENABLED=0 mod_timestamp: ' .CommitTimestamp ' flags: - -trimpath ldflags: - '-s -w -X main.version=.Version -X main.commit=.Commit' goos: - freebsd - windows - linux - darwin goarch: - amd64 - '386' - arm - arm64 ignore: - goos: darwin goarch: '386' binary: ' .ProjectName _v .Version ' archives: - format: zip name_template: ' .ProjectName _ .Version _ .Os _ .Arch ' checksum: name_template: ' .ProjectName _ .Version _SHA256SUMS' algorithm: sha256 signs: - artifacts: checksum args: # if you are using this is a GitHub action or some other automated pipeline, you # need to pass the batch flag to indicate its not interactive. - "--batch" - "--local-user" - " .Env.GPG_FINGERPRINT " # set this environment variable for your signing key - "--output" - "$signature" - "--detach-sign" - "$artifact" release: # Visit your project's GitHub Releases page to publish this release. draft: false changelog: skip: true -
这样我们每次提交代码时,Github 的 Actions 会自动构建我们的代码,根据 Tag 信息自动构建出 Release 文件;
-
生成 GPG 的公钥及私钥;相关命令如下:
# 生成 GPG 公私钥 $ gpg --full-generate-key # 查看 GPG 信息 gpg --list-secret-keys --keyid-format=long sec rsa4096/C15EAAAAAAAAAAAA 2022-04-06 [SC] # 需要关注此 ID:C15EAAAAAAAAAAAA 274425A57102378E4AAAAAAAAAAAAAAAAAAAAAAA uid [ultimate] Laven Liu <@gmail.com> ssb rsa4096/2BAAAAAAAAAAAAAA 2022-04-06 [E] # 查看 GPG 私钥 gpg --armor --export-secret-keys "C15EAAAAAAAAAAAA" # 查看 GPG 公钥 gpg --armor --export "C15EAAAAAAAAAAAA" -
配置 Github Actions,这一步主要是配置 GPG 的公私钥;
如何使用
在 Registry 的界面上,可以找到使用说明。如下图所示:
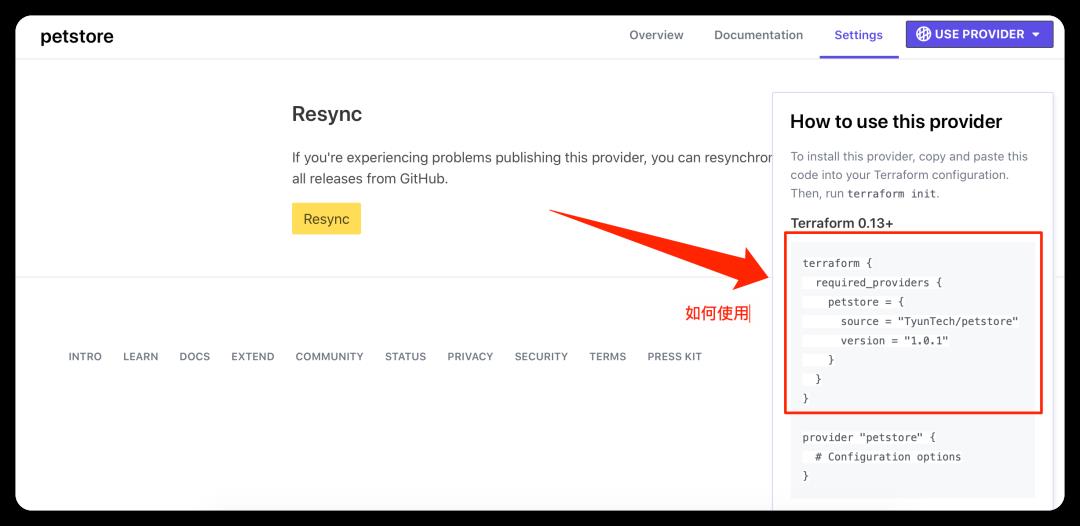
准备配置文件 main.tf:
terraform
required_providers
  petstore =
    source = "TyunTech/petstore"
    version = "1.0.1"


provider "petstore"
 address = "http://localhost:8000"


resource "petstore_pet" "my_pet"
 name    = "SnowBall"
 species = "cat"
 age     = 3
首先执行 terraform init 初始化:
(venv37) ➜ ch11 terraform init
......
Terraform has been successfully initialized!
接着执行 terraform apply,
(venv37) ➜ ch11 terraform apply -auto-approve

Terraform used the selected providers to generate the following execution plan. Resource
actions are indicated with the following symbols:
 + create

Terraform will perform the following actions:

 # petstore_pet.my_pet will be created
 + resource "petstore_pet" "my_pet"
     + age     = 3
     + id      = (known after apply)
     + name    = "SnowBall"
     + species = "cat"


Plan: 1 to add, 0 to change, 0 to destroy.
petstore_pet.my_pet: Creating...
petstore_pet.my_pet: Creation complete after 0s [id=96bcf678-231f-449a-baf1-a01d2c7ecb9b]

Apply complete! Resources: 1 added, 0 changed, 0 destroyed.
它真的创建资源了吗?我们到数据库中查看一下:
mysql> use pets
mysql> select * from pets;
+--------------------------------------+----------+---------+------+
| id                                   | name     | species | age  |
+--------------------------------------+----------+---------+------+
| 81f04745-c17e-4f38-a3dd-b6e0741f207b | Tommy    | cat     |    2 |
| 96bcf678-231f-449a-baf1-a01d2c7ecb9b | SnowBall | cat     |    3 | -- <- 创建了该记录
| 9b24b16d-8b09-47e2-9638-16775ccb8d8a | Jerry    | mouse   |    1 |
+--------------------------------------+----------+---------+------+
3 rows in set (0.00 sec)
修改一下 snowball 的年龄为 7 岁,然后再次执行,看看数据库中的数据会不会发生变化:
(venv37) ➜ ch11 terraform apply -auto-approve
petstore_pet.my_pet: Refreshing state... [id=96bcf678-231f-449a-baf1-a01d2c7ecb9b]

Terraform used the selected providers to generate the following execution plan. Resource
actions are indicated with the following symbols:
~ update in-place

Terraform will perform the following actions:

 # petstore_pet.my_pet will be updated in-place
~ resource "petstore_pet" "my_pet"
    ~ age     = 3 -> 7
      id      = "96bcf678-231f-449a-baf1-a01d2c7ecb9b"
      name    = "SnowBall"
       # (1 unchanged attribute hidden)


Plan: 0 to add, 1 to change, 0 to destroy.
petstore_pet.my_pet: Modifying... [id=96bcf678-231f-449a-baf1-a01d2c7ecb9b]
petstore_pet.my_pet: Modifications complete after 0s [id=96bcf678-231f-449a-baf1-a01d2c7ecb9b]

Apply complete! Resources: 0 added, 1 changed, 0 destroyed.
再次验证一下数据库:
mysql> select * from pets;
+--------------------------------------+----------+---------+------+
| id                                   | name     | species | age  |
+--------------------------------------+----------+---------+------+
| 81f04745-c17e-4f38-a3dd-b6e0741f207b | Tommy    | cat     |    2 |
| 9b24b16d-8b09-47e2-9638-16775ccb8d8a | Jerry    | mouse   |    1 |
| a159cd59-0a4f-4fdf-9ea7-fda2a59f5c9e | snowball | cat     |    7 |
+--------------------------------------+----------+---------+------+
3 rows in set (0.00 sec)
删除数据
(venv37) ➜ ch11 terraform destroy

petstore_pet.my_pet: Refreshing state... [id=a159cd59-0a4f-4fdf-9ea7-fda2a59f5c9e]

Terraform used the selected providers to generate the following execution plan. Resource
actions are indicated with the following symbols:
 - destroy

Terraform will perform the following actions:

 # petstore_pet.my_pet will be destroyed
 - resource "petstore_pet" "my_pet"
     - age     = 7 -> null
     - id      = "a159cd59-0a4f-4fdf-9ea7-fda2a59f5c9e" -> null
     - name    = "snowball" -> null
     - species = "cat" -> null


Plan: 0 to add, 0 to change, 1 to destroy.

Do you really want to destroy all resources?
Terraform will destroy all your managed infrastructure, as shown above.
There is no undo. Only 'yes' will be accepted to confirm.

Enter a value: yes # 输入 yes

petstore_pet.my_pet: Destroying... [id=a159cd59-0a4f-4fdf-9ea7-fda2a59f5c9e]
petstore_pet.my_pet: Destruction complete after 0s

Destroy complete! Resources: 1 destroyed.
验证一下数据库中的数据是否还存在:
mysql> select * from pets;
+--------------------------------------+-------+---------+------+
| id                                   | name  | species | age  |
+--------------------------------------+-------+---------+------+
| 81f04745-c17e-4f38-a3dd-b6e0741f207b | Tommy | cat     |    2 |
| 9b24b16d-8b09-47e2-9638-16775ccb8d8a | Jerry | mouse   |    1 |
+--------------------------------------+-------+---------+------+

2 rows in set (0.00 sec)
常用模块
random
resource "random_string" "random"
 length = 16


output "random"
   value =random_string.random.result


# 输出:
Outputs:

random = "BQa7LGq4RtDtCv)&"
local_file
resource "local_file" "myfile"
content = "This is my text"
filename = "../mytextfile.txt&以上是关于Terraform 学习总结—— 基于阿里云平台上的 Terraform 实战的主要内容,如果未能解决你的问题,请参考以下文章
Terraform 学习总结(10)—— 阿里云平台 Terraform 代码开发技巧总结
Terraform 学习总结(10)—— 阿里云平台 Terraform 代码开发技巧总结
Terraform 学习总结(10)—— 阿里云平台 Terraform 代码开发技巧总结
Terraform 学习总结—— 基于 AWS 云平台上的 Terraform 实战