SpringBoot RabbitMQ 入门学习(详细)
Posted 张学徒
tags:
篇首语:本文由小常识网(cha138.com)小编为大家整理,主要介绍了SpringBoot RabbitMQ 入门学习(详细)相关的知识,希望对你有一定的参考价值。
目录
安装 RabbitMQ
请看另一篇文章教程:Linux 安装 RabbitMQ
强烈建议你使用虚拟机的方式安装 RabbitMQ,来模拟
如果为了方便也可以直接 Windows 安装 RabbitMQ,百度搜索:Windows 安装 RabbitMQ
初始化 SpringBoot 项目
我们使用Spring initalizr初始化SpringBoot 项目,Spring initalizr
如果是 IDEA 旗舰版,有快捷创建的方式,点击新建即可创建,不需要这样。

导入依赖
pom.xml 文件中添加依赖
<!-- rabbitmq依赖 -->
<dependency>
    <groupId>org.springframework.boot</groupId>
    <artifactId>spring-boot-starter-amqp</artifactId>
</dependency>
添加配置
配置文件 application.yml
spring:
  #配置 rabbitMq 服务器
  rabbitmq:
    # 虚拟主机
    virtual-host: /
    #设置RabbitMQ的IP地址
    host: 192.168.43.171
    #设置rabbitmq服务器连接端口(应用访问端口号是5672,不是控制台端口号15672)
    port: 5672
    #设置rabbitmq服务器用户名  本地搭建对应的账户密码都是 guest
    username: admin
    #设置rabbitmq服务器密码
    password: 123456
virtual-host可以理解为每指定一个virtual-host就相当于设置了一个 RabbitMQ 服务器,不同的服务器是分离执行的,不同的virtual-host拥有的权限和其他配置也不同。可以在 RabbitMQ 后台界面的右上角可以看到有个 Virtual Host 标签,可以看到这个账号拥有的虚拟主机。
默认有个 guest 账号,账号名和密码都是guest
进入 RabbitMQ 后台管理界面(比如我的是 http://192.168.43.171:15672/),可以看到用户和其虚拟主机,如果安装到了本地则是 http://127.0.0.1:15672/

添加配置类 RabbitMqConfig
import org.springframework.context.annotation.Bean;
import org.springframework.context.annotation.Configuration;
import org.springframework.amqp.core.Queue;


/*** 声明一个队列 */
@Configuration
public class RabbitMqConfig

    /**
     * 创建一个名称为 hello 的队列
     */
    @Bean
    public Queue helloQueue()
        return new Queue("hello");


    /**
     * RabbitTemplate是RabbitMQ在与SpringAMQP整合的时,Spring提供的即时消息模板
     * RabbitTemplate提供了可靠性消息投递方法、回调监听消息接口ConfirmCallback、返回值确认接口ReturnCallback等等
     */
    @Bean
    public RabbitTemplate rabbitTemplate(CachingConnectionFactory connectionFactory)
        RabbitTemplate rabbitTemplate = new RabbitTemplate(connectionFactory);
        rabbitTemplate.setMessageConverter(jackson2JsonMessageConverter());
        return rabbitTemplate;


    /***默认RabbitMQ序列化方式是SerializerMessageConverter序列化器,这么我们使用Jackson2JsonMessageConverter序列化器。我们需要设置下,内容如下:*/
    @Bean
    public MessageConverter jackson2JsonMessageConverter()
        return new Jackson2JsonMessageConverter();
简单队列
RabbitMQ 的五种工作模式之最简单的:简单队列。
发送者
调用 send() 方法发送消息到名为 hello 的队列中。
import org.springframework.amqp.core.AmqpTemplate;
import org.springframework.beans.factory.annotation.Autowired;
import org.springframework.stereotype.Component;

import java.util.Date;

/*** 发送者 */
@Component
public class Sender

    @Autowired
    private AmqpTemplate rabbitTemplate;

    public void send()
        String context = "hello " + new Date();
        System.out.println("Sender: 发送消息 " + context);
        this.rabbitTemplate.convertAndSend("hello", context);
输入完你可能会注意到上面的
rabbitTemplate会有个Could not autowire. No beans of 'AmqpTemplate' type found.的报红波浪线提示,不用理会,不影响可以正常运行。
消费者
通过@RabbitListener注解定义该类对hello队列的监听,并用@RabbitHandler注解来指定对消息的处理方法。
import org.springframework.amqp.rabbit.annotation.RabbitHandler;
import org.springframework.amqp.rabbit.annotation.RabbitListener;
import org.springframework.stereotype.Component;

/*** 消费者*/
@Component
@RabbitListener(queuesToDeclare = @Queue("hello"))
public class Receiver

    @RabbitHandler
    public void process(String s)
        System.out.println("Receiver: 消费成功" + s);
注意到上面的
RabbitListener注解,其中queuesToDeclare它可以在队列存在的时候自动创建队列,不会出现reply-code=404, reply-text=NOT_FOUND - no exchange 'XXX' in vhost '/', class-id=50, method-id=的异常。
测试类
测试的 Controller
import com.example.rabbittest.component.Sender;
import org.springframework.beans.factory.annotation.Autowired;
import org.springframework.stereotype.Controller;
import org.springframework.web.bind.annotation.GetMapping;
import org.springframework.web.bind.annotation.ResponseBody;

@Controller
public class TestController

    @Autowired
    private Sender sender;

    @GetMapping("/")
    @ResponseBody
    public String testSend()
        // 发出一条消息
        sender.send();
        return "ok";
单元测试类
在 test 包下的测试类中写入如下代码,我的测试类名为下面的 RabbitTestApplicationTests
import com.example.rabbittest.component.Sender;
import org.junit.jupiter.api.Test;
import org.junit.runner.RunWith;
import org.springframework.beans.factory.annotation.Autowired;
import org.springframework.boot.test.context.SpringBootTest;
import org.springframework.test.context.junit4.SpringRunner;

@RunWith(SpringRunner.class)
@SpringBootTest(webEnvironment = SpringBootTest.WebEnvironment.RANDOM_PORT)
class RabbitTestApplicationTests

    @Autowired
    private Sender sender;

    @Test
    void contextLoads()
        // 发出一条消息
        sender.send();
但是不建议使用单元测试类对此进行测试,否则会有消息接收不到等问题,总之不建议使用(测试时找了好久这个问题o(╥﹏╥)o)
运行
运行 SpringBoot 项目,运行后打开浏览器进入 Rabbit 后台管理,进入 Connections 标签页,可以看到如下连接的信息

如果运行失败,要注意配置的 IP 地址. 端口和账号密码都要保持正确,检查一下,如果报错信息有 timeout 等信息,有可能是配置的 ip 有问题或者 RabbitMQ 服务没有开启
然后我们使用浏览器访问 localhost:8080 或者执行测试类中的 contextLoads 方法发送一条消息

可以看到消息被消费成功

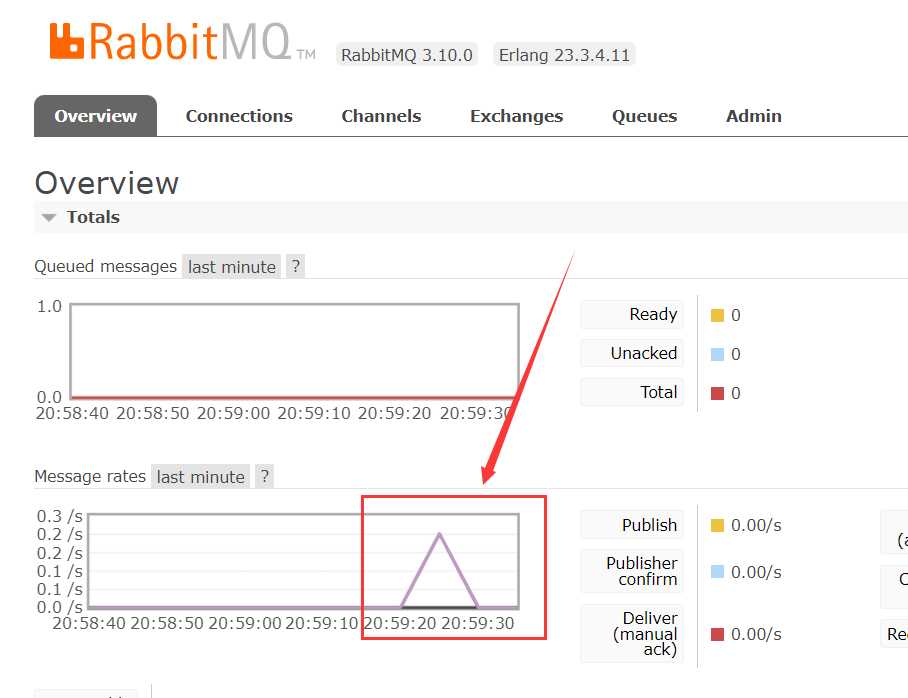
进入 RabbitMQ 后台查看一下,可以看到有一个消息波动(5 秒钟刷新一次,修改刷新速度在右上角的位置)
我们创建的队列 hello

路由(交换机)
在讲交换机之前,我们再创建一个 world 队列,先看看不使用交换机时的情况。
在 RabbitMqConfig 类里添加如下代码
@Bean
public Queue worldQueue()
    return new Queue("world");
新建一个 WorldReceiver 消费者类
import org.springframework.amqp.rabbit.annotation.Queue;
import org.springframework.amqp.rabbit.annotation.RabbitHandler;
import org.springframework.amqp.rabbit.annotation.RabbitListener;
import org.springframework.stereotype.Component;

@Component
@RabbitListener(queuesToDeclare = @Queue("world"))
public class WorldReceiver

    @RabbitHandler
    public void process(String s)
        System.out.println("Receiver: 消费成功 " + s);
新建一个 WorldSender 消息发送者类
import org.springframework.amqp.core.AmqpTemplate;
import org.springframework.beans.factory.annotation.Autowired;
import org.springframework.stereotype.Component;

import java.util.Date;

/*** 发送者 */
@Component
public class WorldSender

    @Autowired
    private AmqpTemplate rabbitTemplate;

    public void send()
        String context = "world " + new Date();
        System.out.println("WorldSender: 发送消息 " + context);
        this.rabbitTemplate.convertAndSend("world", context);
测试用的 Controller 修改为
@Controller
public class TestController

    @Autowired
    private Sender sender;
    @Autowired
    private WorldSender worldSender;

    @GetMapping("/")
    @ResponseBody
    public String testSend()
        sender.send();
        worldSender.send();
        return "ok";
重新运行 Application,然后再访问 localhost:8080,再去看看 RabbitMQ 后台的 Overview 和 Queues 标签页看看有什么变化。

这就就可以让两个消息通过不同队列到达消费者。如果有特别多的队列的话,还要指定不同的队列,那岂不是太麻烦了,我让他根据发送的消息自动的控制发送到不同的队列该怎么做?
傻瓜式:使用
if判断。但这样死板,甚至会很麻烦,项目大了可能会有很复杂的规则,使用
if判断将会非常笨重且麻烦了,且不好维护。
这时交换机就派出用场,交换机用来处理以太网数据帧(包) 达到交换转发的目的,用来交换消息。
有几种类型,下面是最常用的两种:
Direct:匹配投送Topic:规则投送
后面将对他们进行讲解
创建一个交换机(Exchange)
在 RabbitMqConfig 类中添加如下代码
    @Bean
    public DirectExchange exchange()
        return new DirectExchange("testexchange");
但这只是创建了,还未绑定交换机上,类如下图所示,只是加入了一个交换机

交换机与队列的绑定
在 RabbitMqConfig 类中添加以下代码,将路由键(routingKey)绑定到不同的队列上
/***将不同的路由键绑定到队列上*/
@Bean
public Binding bindingExchangeHello(Queue helloQueue, DirectExchange exchange)
    return BindingBuilder.bind(helloQueue).to(exchange).with("red");


@Bean
public Binding bindingExchangeWorld(Queue worldQueue, DirectExchange exchange)
    return BindingBuilder.bind(worldQueue).to(exchange).with("blue");


@Bean
public Binding bindingExchangeWorld2(Queue worldQueue, DirectExchange exchange)
    return BindingBuilder.bind(worldQueue).to(exchange).with("yellow");
这里绑定的分别是:
red> hello队列(hello)blue> world队列(world)yellow> world队列(world)

然后我们就可以将 WorldSender 类删除,对 Sender 类的 send 的方法进行修改一下,让他一次发送多个消息。
    public void send()
        String[] keys = "red", "yellow", "blue";
        for (int i = 0; i <= 9; i++)
            // 随机一个 key
            int random = (int) (Math.random() * 3);
            String key = keys[random];
            // 通过交换机进行发送数据
            System.out.printf("第 %d 个,发送消息:%s%n", i, key);
            this.rabbitTemplate.convertAndSend(
                    "testexchange",
                    key,
                    String.format("%s (第 %d 个内容)", key, i)
            );
rabbitTemplate.convertAndSend参数:
第一个参数指定需要使用的交换机。
第二个参数需要带上我们的路由键
rouding_key第三个则是发送的内容
测试的 Controller 重新改为如下
@Controller
public class TestController

    @Autowired
    private Sender sender;

    @GetMapping("/")
    @ResponseBody
    public String testSend()
        sender.send();
        return "ok";
访问 localhost:8080 测试一下
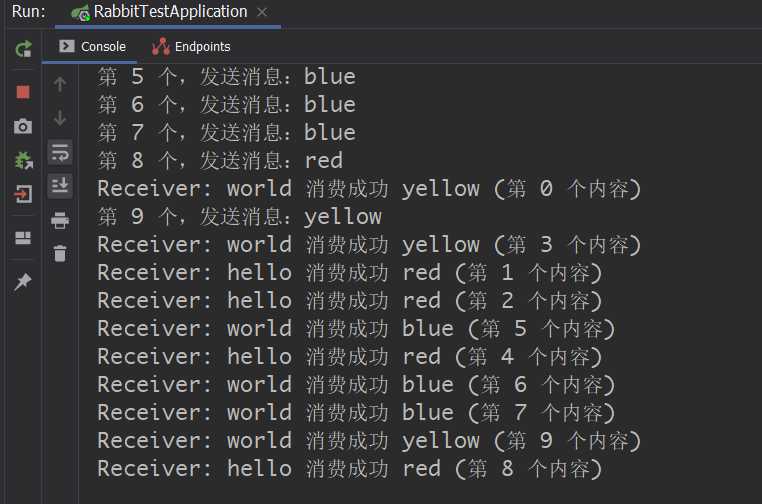
可以看到输出消息中,hello 和 world 的消费成功的内容是符合绑定的名称的。这样就不必考虑你要发送到哪个队列里了,他会自动的查找符合逻辑的队列,自动转发到这个队列里。
可以理解为:
DirectExchange类型的交换机通过绑定的名称来查找不同的队列
Topic Exchange
topic 类型常用的是通配符类型,这种类型的交换机用起来更加的灵活,相比于 direct ,能够适配更多的类型。
还是按照上面的例子,我们稍作修改,将原有的交换机注释掉,我们新建一个统配型交换机:mytopic。
将之前的 RabbitMqConfig 里的 exchange 方法改为如下代码,之前的 direct 版本的全注释掉,你也可以直接删除。
//    /*** 交换机 */
//    @Bean
//    public DirectExchange exchange()
//        return new DirectExchange("testexchange");
//
//
//    /***将不同的路由键绑定到队列上*/
//    @Bean
//    public Binding bindingExchangeHello(Queue helloQueue, DirectExchange exchange)
//        return BindingBuilder.bind(helloQueue).to(exchange).with("red");
//
//
//    @Bean
//    public Binding bindingExchangeWorld(Queue worldQueue, DirectExchange exchange)
//        return BindingBuilder.bind(worldQueue).to(exchange).with("blue");
//
//
//    @Bean
//    public Binding bindingExchangeWorld2(Queue worldQueue, DirectExchange exchange)
//        return BindingBuilder.bind(worldQueue).to(exchange).with("yellow");
//

    @Bean
    public TopicExchange exchange()
        return new TopicExchange("mytopic");


    @Bean
    public Binding bindingExchangeHello(Queue helloQueue, TopicExchange exchange)
        return BindingBuilder.bind(helloQueue).to(exchange).with("red.#");


    @Bean
    public Binding bindingExchangeWorld(Queue worldQueue, TopicExchange exchange)
        return BindingBuilder.bind(worldQueue).to(exchange).with("blue.blue");
给通配型交换机绑定规则
*用来通配任意一个词#用来通配多个词
两个
.之间就是一个词
根据这个规则我们可以知道我们的绑定的名称的规则:
red.*可以通配red.blue,不可以通配red.blue.yellowred.#上面两种情况都是可以通配的。
worldQueue 绑定则没有上面两个符号,则是:必须是red.blue 才可以通过
修改 Sender 类的 send 方法
    public void send()
        String[] keys = "red", "yellow", "blue";
        for (int i = 0; i <= 9; i++)
            // 随机一个 key
            int random = (int) (Math.random() * 3);
            String key = keys[random] + "." + keys[random];
            // 通过交换机进行发送数据
            System.out.printf("第 %d 个,发送消息:%s%n", i, key);
            this.rabbitTemplate.convertAndSend(
                    "mytopic",
                    key,
                    String.format("%s (第 %d 个内容)", key, i)
            );
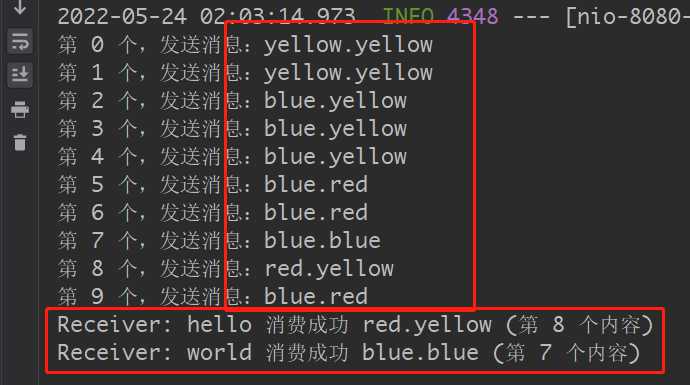
测试
访问 localhost:8080 查看输出,可以看到只有第 7 和第 8 个是符合规则的,hello 队列需要是名称第一个词为 red 的消息,world 队列需要是跟 blue.blue 一模一样名称的消息才符合。
可以理解为:
TopicExchange类型的交换机通过绑定时的规则来查找不同的队列
Headers Exchange 自定义规则
相较于上面两种类型。基本上来说,消息的 rouding_key 都是一个固定的值,而 handers 则是一种自定义规则匹配。这种模式使用最少,很少用,这里只作为知道即可。
Fanout Exchange 订阅模式
订阅模式就是我们熟悉的广播模式,可能学过计算机基础的都知道,在局域网内通过 ARP 获取目标地址的 MAC 地址,就是用的是广播,把这个包广播出去,所有的队列都会收到。
只要绑定了订阅交换机的所有队列都会收到发过来的包。
创建订阅交换机
注释掉或删除掉之前的 exchange bindingExchangeHello bindingExchangeWorld 方法,改为以下方法:
    @Bean
    public FanoutExchange exchange()
        // 订阅类型交换机
        return new FanoutExchange("myfanout");


    @Bean
    public Binding bindingExchangeHello(Queue helloQueue, FanoutExchange exchange)
        return BindingBuilder.bind(helloQueue).to(exchange);


    @Bean
    public Binding bindingExchangeWorld(Queue worldQueue, FanoutExchange exchange)
        return BindingBuilder.bind(worldQueue).to(exchange);
将 Sender 方法里的 mytopic 改为 myfanout ,如下:
this.rabbitTemplate.convertAnd以上是关于SpringBoot RabbitMQ 入门学习(详细)的主要内容,如果未能解决你的问题,请参考以下文章