Ubuntu安装部署Ceph J版本
Posted
tags:
篇首语:本文由小常识网(cha138.com)小编为大家整理,主要介绍了Ubuntu安装部署Ceph J版本相关的知识,希望对你有一定的参考价值。
安装Ubuntu系统安装步骤略过
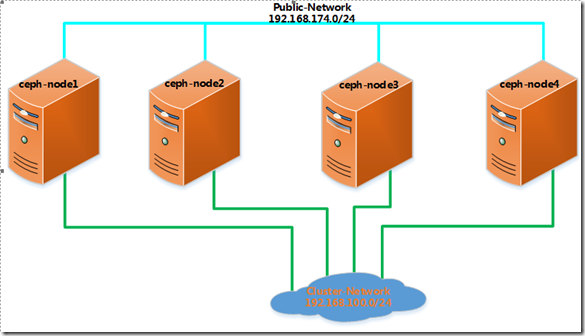
拓扑连接:
一、安装前准备工作
1、修改主机名;将主机名更改为上图中对应的主机名。
[[email protected] ~]# vim /etc/hostname
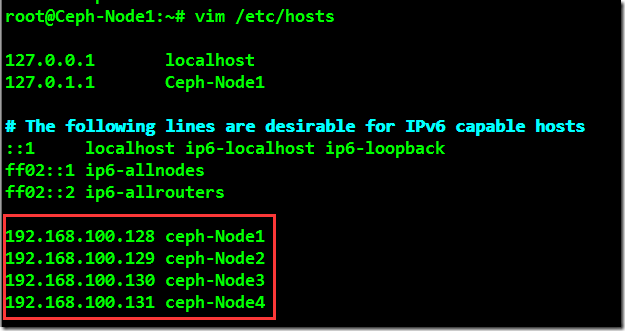
2、更新主机上的hosts文件,将主机名与如下IP进行解析。
192.168.100.128 ceph-node1
192.168.100.129 ceph-node2
192.168.100.130 ceph-node3
192.168.100.131 ceph-node4
[[email protected] ~]# vim /etc/hosts
3、生成root SSH密钥;将SSH密钥复制到ceph-node2和ceph-node3、ceph-node4之上。这样就能实现节点间免密登录。
[email protected]:~# ssh-keygen //一路回车即可
[email protected]:~# ssh-copy-id [email protected]
[email protected]:~# ssh-copy-id [email protected]
[email protected]:~# ssh-copy-id [email protected]
要实现所有节点免密登录,就需要在每个节点上都操作一遍。
4、所有节点安装并配置NTP
[email protected]:~# apt-get install ntp* -y
[email protected]:~# vim /etc/ntp.conf
[email protected]:~# /etc/init.d/ntp stop
[email protected]:~# ntpdate www.opencloud.vip
[email protected]:~# /etc/init.d/ntp start
5、替换所有节点Ubuntu国内源\添加国内Ceph安装源和更新apt
替换Ubuntu国内源:
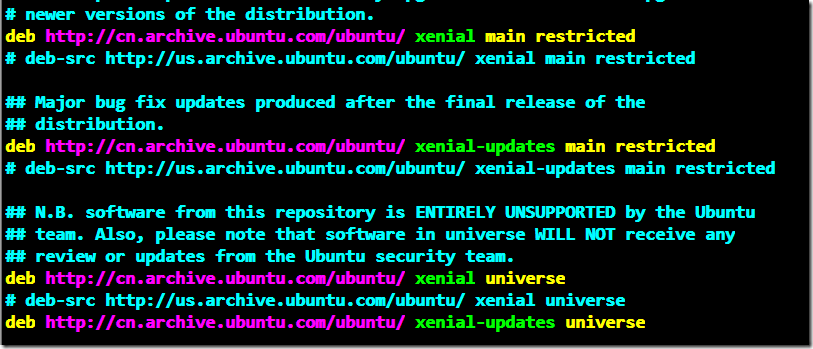
[email protected]:~# vim /etc/apt/sources.list //将原来的源替换为国内阿里云的源,只需将us改为cn即可。
添加Ubuntu Ceph国内安装源
[email protected]:/etc/apt# export CEPH_DEPLOY_REPO_URL=https://mirrors.aliyun.com/ceph/debian-jewel
[email protected]:/etc/apt# echo deb https://mirrors.aliyun.com/ceph/debian-jewel/ $(lsb_release -sc) main | sudo tee /etc/apt/sources.list.d/ceph.list
6、安装密钥
把密钥加入你系统的可信密钥列表内,以消除安全告警。对主要发行版(如 dumpling 、 emperor 、 firefly )和开发版(如 release-name-rc1 、 release-name-rc2 )应该用 release.asc 密钥
[email protected]:/etc/apt# export CEPH_DEPLOY_GPG_URL=https://mirrors.aliyun.com/ceph/keys/release.asc
[email protected]:/etc/apt# wget -q -O- ‘http://mirrors.aliyun.com/ceph/keys/release.asc‘ | sudo apt-key add -
7、更新
[email protected]:~# apt-get update //更新前必须要先安装密钥,否则无法更新。
二、开始安装Ceph
使用ceph-deploy工具在所有节点安装并配置Ceph;ceph-deploy是用来方便的配置管理Ceph存储集群。
1、在ceph-node1上安装ceph-deploy
[email protected]:~# apt-get install ceph-deploy –y
2、创建一个ceph 目录;并用ceph-deploy创建一个Ceph集群
[email protected]:~# mkdir /etc/ceph ; cd /etc/ceph
[email protected]:/etc/ceph# ceph-deploy new ceph-node1
3、通过ceph-deploy的子命令 new能部署一个默认的新集群,同时它能生成集群配置文件和密钥文件。
在/etc/ceph下用ls命令可以看见相关文件:
[email protected]:/etc/ceph# pwd
/etc/ceph
[email protected]:/etc/ceph# ls
4、使用ceph-deploy在所有节点上安装ceph
[email protected]:/etc/ceph# ceph-deploy install ceph-node1 ceph-node2 ceph-node3 ceph-node4
ceph-deploy工具首先会安装相关依赖包;注意:Ubuntu16.04 在安装过程中需要Python,如果节点没有Python会导致安装失败,解决办法:可以在每个节点先更新安装一下Python,(apt-get install python)在进行部署;等待命令执行成功;如果中途报错终止,可以重新执行上面命令继续安装。
安装完成后在所有节点上查看Ceph版本及健康情况:
[email protected]:~# ceph -v
ceph version 10.2.3 (ecc23778eb545d8dd55e2e4735b53cc93f92e65b)
5、在ceph-node1上创建一个Monitor
[email protected]:/etc/ceph# ceph-deploy mon create-initial
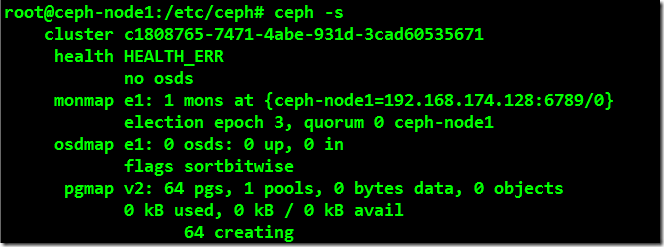
创建成功之后,可以查看一下Ceph的健康状况,通过ceph –s命令可以发现目前集群还不是正常的。
6、在Ceph-node1上创建OSD
(1)列出该节点上所有可用的磁盘
[email protected]:/etc/ceph# ceph-deploy disk list ceph-node1
选择上面列出的磁盘作为OSD,除操作系统磁盘除外,一般操作系统盘为sda。
(2)通过命令清除分区及磁盘内容
[email protected]:/etc/ceph# ceph-deploy disk zap ceph-node1:/dev/sdc ceph-node1:/dev/sdd ceph-node1:/dev/sde ceph-node1:/dev/sdf
(3)创建OSD;osd create命令会将选择的磁盘用XFS文件系统格式化磁盘,然后激活磁盘分区。
[email protected]:/etc/ceph# ceph-deploy osd create ceph-node1:/dev/sdc ceph-node1:/dev/sdd ceph-node1:/dev/sde ceph-node1:/dev/sdf
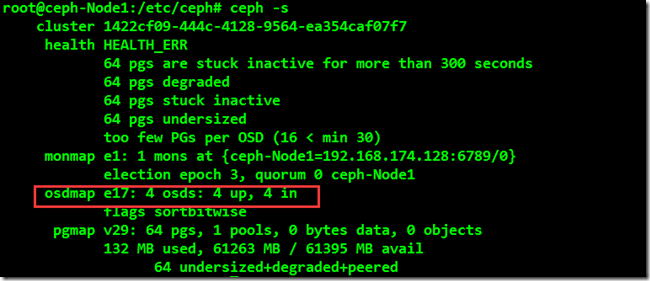
(4)创建OSD之后可以查看此时的集群的状态,这里主要看添加的OSD是否up;集群状态目前还是处于不正常的状态,还需要进一步配置才能使之正常。
[email protected]:/etc/ceph# ceph -s
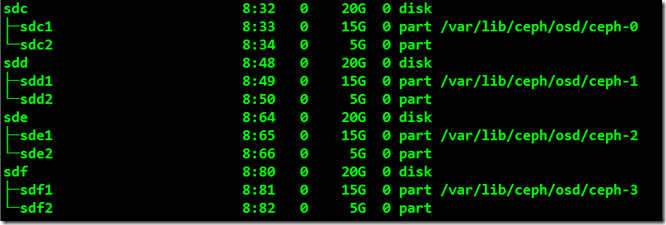
[email protected]:/etc/ceph# lsblk
三、扩展ceph集群
通过上面的安装过程,已经在ceph-node1节点上运行Ceph集群,目前它有1个Mon和4个OSD;接下将通过扩展集群的方式把剩下的所有节点全部加入Ceph集群,届时将会有3个Mon、16个OSD。
在一个Ceph集群中至少有一个Monitor集群才能运行,但为了集群的高可用,一般情况下Ceph集群中3至5个Monitor,因在Ceph集群中必须依赖多于奇数个的Monitor来形成仲裁,在集群中Ceph会使用Paxos算法来确保仲裁的一致性。
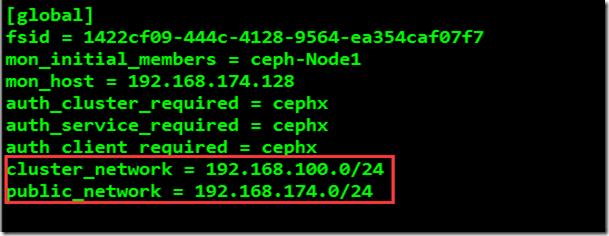
1、在ceph配置文件中添加Public和Cluster网络;使用vim对/etc/ceph/ceph.conf进行编辑
[email protected]:/etc/ceph# vim ceph.conf
2、再创建2个Monitor
[email protected]:/etc/ceph# ceph-deploy mon create ceph-node2 ceph-node3
将2个新的Monitor成功加入后,查看一下当前集群状态以及Monitor状态:
[email protected]:/etc/ceph# ceph -s
[email protected]:~# ceph mon stat
通过执行命令发行当前集群依然不是一个正常的状态,是因为除了node1节点配置了OSD其他节点磁盘均没有加入到ceph集群中,默认情况下数据会在集群中被复制三次,并放到不同节点上的不同OSD之上。
3、将剩余节点磁盘全部加入ceph集群
列出剩余节点所有可用磁盘:
[[email protected] ceph]# ceph-deploy disk list ceph-node2 ceph-node3 ceph-node4
清除节点磁盘分区及信息:
[email protected]:/etc/ceph# ceph-deploy disk zap ceph-node2:/dev/sdc ceph-node2:/dev/sdd ceph-node2:/dev/sde ceph-node2:/dev/sdf
[email protected]:/etc/ceph# ceph-deploy disk zap ceph-node3:/dev/sdc ceph-node3:/dev/sdd ceph-node3:/dev/sde ceph-node3:/dev/sdf
[email protected]:/etc/ceph# ceph-deploy disk zap ceph-node4:/dev/sdc ceph-node4:/dev/sdd ceph-node4:/dev/sde ceph-node4:/dev/sdf
将剩余节点磁盘创建OSD:
[email protected]:/etc/ceph# ceph-deploy osd create ceph-node2:/dev/sdc ceph-node2:/dev/sdd ceph-node2:/dev/sde ceph-node2:/dev/sdf
[email protected]:/etc/ceph# ceph-deploy osd create ceph-node3:/dev/sdc ceph-node3:/dev/sdd ceph-node3:/dev/sde ceph-node3:/dev/sdf
[email protected]:/etc/ceph# ceph-deploy osd create ceph-node4:/dev/sdc ceph-node4:/dev/sdd ceph-node4:/dev/sde ceph-node4:/dev/sdf
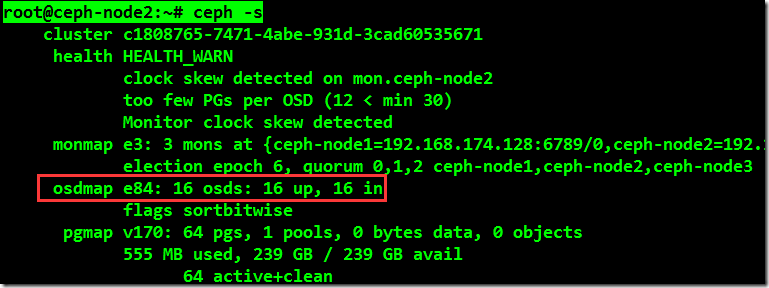
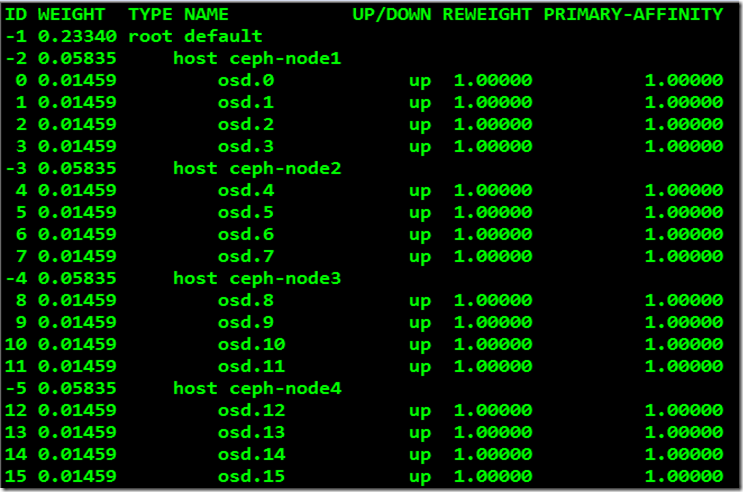
将其所有剩余节点磁盘全部成功加入ceph集群之后执行命令进行检查OSD数量及状态:
[email protected]:~# ceph –s
[email protected]:~# ceph osd tree
4、在对ceph集群添加了很多个OSD之后,还需要对pg_num和pgp_num值进行设定。这也就是为啥集群添加了多个OSD集群依然处于不正常状态的根本原因。在生产环境中可以使用公式进行精确的计算,公式如下:
[email protected]:~# ceph osd pool set rbd pg_num 256
[email protected]:~# ceph osd pool set rbd pgp_num 256
[email protected]:~# ceph –s
本文出自 “無詺IT小站” 博客,转载请与作者联系!
以上是关于Ubuntu安装部署Ceph J版本的主要内容,如果未能解决你的问题,请参考以下文章
