PyQt5中的信息打印,print 函数的重定向和再封装
Posted 蚂蚁小兵
tags:
篇首语:本文由小常识网(cha138.com)小编为大家整理,主要介绍了PyQt5中的信息打印,print 函数的重定向和再封装相关的知识,希望对你有一定的参考价值。
这节文章在PyQT5工程中方实现以下两个功能
- 一个PyQT5工程,会有很多子功能文件,每个子文件里面都有print()函数,将这些打印信息打印在UI上
- 而且UI上打印的信息都能定位到这行打印代码所在的文件和行数,这是十分有利于代码定位分析的
——————————————————————————————————————————- 最终想实现的就是如下图所示:
- 测试软件环境:
python3.8 x64
pycharm
pyqt5 5.16
防止copy 出错,源码我放在了Git上,有需自取
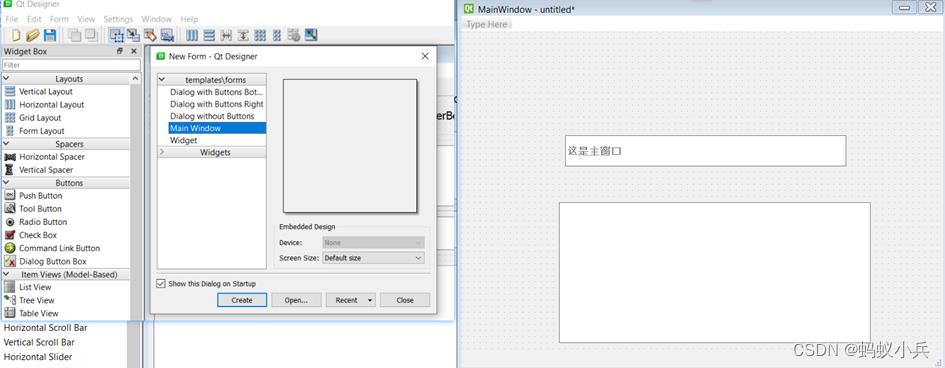
1,新建一个主窗口UI : main_ui.ui

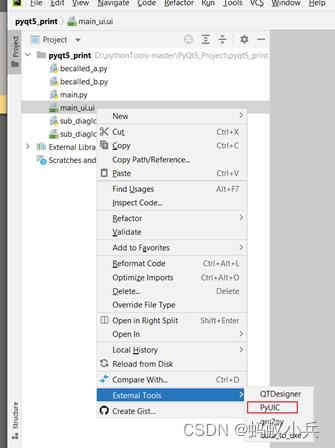
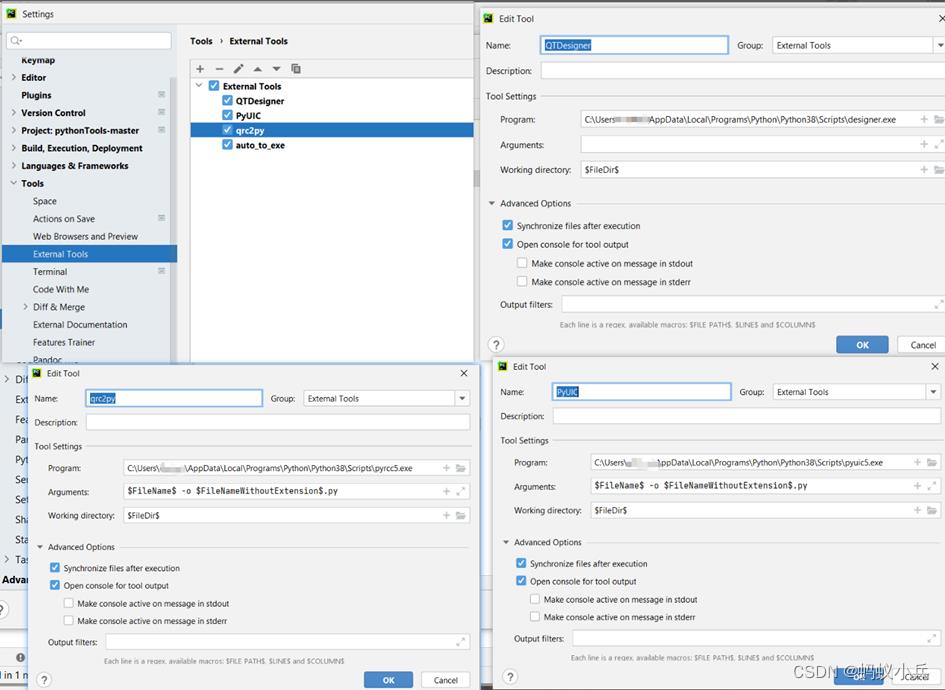
2,生成main_ui.py文件,这里如果没有外部工具,怎么添加外部工具,可以参考下一步骤

3,外部工具的设置

4 ,main_print.py 代码如下:
import sys
from PyQt5.QtWidgets import QMainWindow, QApplication
from PyQt5.QtGui import QTextCursor
from PyQt5.QtCore import QObject, pyqtSignal

from main_ui import Ui_MainWindow
from nprintf import nprintf

temp = sys.stdout
class Stream(QObject):
    newText = pyqtSignal(str)
    def write(self, text):
        self.newText.emit(str(text))
        # 实时刷新界面
        QApplication.processEvents()

class MainQt(QMainWindow,Ui_MainWindow):
    def __init__(self):
        super().__init__()
        self.setupUi(self)
        '''流重定向'''
        sys.stdout = Stream(newText=self.onUpdateEdit)
        self.pushButton.clicked.connect(self.print_test)

    def print_test(self):
        #self.textEdit.setText("adasdada")
        nprintf("这是文件main.py")
        from becalled_a import print_a
        from becalled_b import print_b
        print_a()
        print_b()
        '''关闭app事件响应'''
    def closeEvent(self, event):
        """Shuts down application on close."""
        # Return stdout to defaults.
        self.ms.close()
        sys.stdout = temp
        super().closeEvent(event)

    '''绑定输出流'''
    def onUpdateEdit(self, text):
        cursor = self.textEdit.textCursor()
        cursor.movePosition(QTextCursor.End)
        cursor.insertText(text)
        self.textEdit.setTextCursor(cursor)
        self.textEdit.ensureCursorVisible()

if __name__ == '__main__':
    import sys
    app = QApplication(sys.argv)
    mian_ui = MainQt()
    mian_ui.show()
    sys.exit(app.exec_())
5,这个代码有三点需要解释下,不然容易出错:
1) ,这里需要把self.textEdit,改成你新建的UI显示控件的名字
    '''绑定输出流'''
    def onUpdateEdit(self, text):
        cursor = self.textEdit.textCursor()
        cursor.movePosition(QTextCursor.End)
        cursor.insertText(text)
        self.textEdit.setTextCursor(cursor)
        self.textEdit.ensureCursorVisible()
2),这里导入了一个nprintf包,其中代码如下,主要是封装下了print函数,达到我们期望的结果
from inspect import getframeinfo, stack
import os
import time

def nprintf(*args ,  level = "INFO", end = " "):
    datatime = time.strftime("%Y-%m-%d %H:%M:%S", time.localtime())
    caller = getframeinfo(stack()[1][0])
    message = end.join(["".format(i) for i in args])
    str = " - [line:] - :\\n".format(datatime, os.path.split(caller.filename)[1], caller.lineno, level, message )
    print(str)
3),是测试打印的,并且在这里调用了其它文件becalled_a,becalled_b,并且这些文件中print函数,可以测试被用文件的的print()也能被打印到UI上
def print_test(self):
        #self.textEdit.setText("adasdada")
        nprintf("这是文件main.py")
        from becalled_a import print_a
        from becalled_b import print_b
        print_a()
        print_b()
| 感谢欣赏,如有帮助,点赞留香 |
以上是关于PyQt5中的信息打印,print 函数的重定向和再封装的主要内容,如果未能解决你的问题,请参考以下文章

