图文并茂,带你入坑本地缓存 Caffeine
Posted Java知音_
tags:
篇首语:本文由小常识网(cha138.com)小编为大家整理,主要介绍了图文并茂,带你入坑本地缓存 Caffeine相关的知识,希望对你有一定的参考价值。
点击关注公众号,实用技术文章及时了解
关于缓存的几种算法
关于缓存的设计在架构领域有非常多种类型,常见的缓存算法有FIFO,LRU,LFU,以及现在比较常用的W-TinyLFU算法。
FIFO 算法
这类算法通常会被应用于缓存队列中,当一个查询请求命中了某个元素之后,便会将它放入到队列中,后续的命中元素也是以此类推,直到队列满了之后,老的元素就会被弹出清除。具体流程如下图所示:

不足点:老元素如果某段时间没有访问就会被放置到队列尾部,即使重新访问也依然在队列尾部,当元素面临淘汰的时候,老元素(即使是热点元素)会被误删。
LRU算法
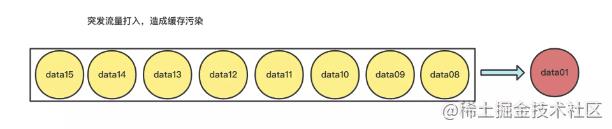
当缓存队列内部已经存在了一批元素之后,后期请求如果命中了队列中的某个元素,那么这个元素就会被前置到队列的头部,从而降低后期被清空的风险。

不足点:LRU算法存在着“缓存污染”的情况需要避免,当突然有一批非热点元素查询打入,大量的非热点数据就会被加载到缓存队列中,从而把真正的热点元素给“挤出去”。
所以为了避免这类缓存污染的问题,后来又出现了一种LFU的策略。
LFU算法
LFU策略就是会在实现缓存队列的基础上额外新增一个内存空间用于记录缓存中每个元素的访问次数,然后根据访问频率来判定哪些元素可以保留,哪些元素需要被删除。
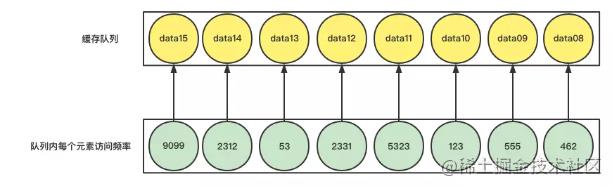
这类算法存在一个很大的弊端,就是需要耗费额外的空间来存储每个元素的访问频率,因此随着缓存元素的数目不断增大,计数器的个数也在不断地增大。
不足点
使用LFU算法也会存在某些程度上的“缓存污染”影响,例如当某天搞秒杀活动,突然一批数据被访问了上千万次,但是第二天这批数据就不再访问了,但是又由于之前秒杀活动导致这批数据的访问基数太过高,导致一直无法清空,所以会一直占用着本地缓存的空间。
W-TinyLFU算法
传统LFU一般使用key-value形式来记录每个key的频率,优点是数据结构非常简单,并且能跟缓存本身的数据结构复用,增加一个属性记录频率就行了,它的缺点也比较明显就是频率这个属性会占用很大的空间,但如果改用压缩方式存储频率呢? 频率占用空间肯定可以减少,但会引出另外一个问题:怎么从压缩后的数据里获得对应key的频率呢?
TinyLFU的解决方案是类似位图的方法,将key取hash值获得它的位下标,然后用这个下标来找频率,但位图只有0、1两个值,那频率明显可能会非常大,这要怎么处理呢? 另外使用位图需要预占非常大的空间,这个问题怎么解决呢?
TinyLFU根据最大数据量设置生成一个long数组,然后将频率值保存在其中的四个long的4个bit位中(4个bit位不会大于15),取频率值时则取四个中的最小一个。
Caffeine认为频率大于15已经很高了,是属于热数据,所以它只需要4个bit位来保存,long有8个字节64位,这样可以保存16个频率。取hash值的后左移两位,然后加上hash四次,这样可以利用到16个中的13个,利用率挺高的,或许有更好的算法能将16个都利用到。
SpringBoot内部使用Caffeine案例介绍
首先需要引入pom配置文件:
<dependencies>
    <dependency>
        <groupId>org.springframework.boot</groupId>
        <artifactId>spring-boot-starter-cache</artifactId>
    </dependency>
    <dependency>
        <groupId>org.springframework.boot</groupId>
        <artifactId>spring-boot-starter-web</artifactId>
    </dependency>
    <dependency>
        <groupId>com.github.ben-manes.caffeine</groupId>
        <artifactId>caffeine</artifactId>
        <version>2.6.2</version>
    </dependency>
</dependencies>
然后在SpringBoot结构的项目内部的application.properties配置文件中加入以下内容:
spring.cache.cache-names=userCache
spring.cache.caffeine.spec=initialCapacity=50,maximumSize=500,expireAfterWrite=10s
server.port=8080
下边是对应的启动类:
package org.idea.architect.framework.cache;
import org.springframework.boot.SpringApplication;
import org.springframework.boot.autoconfigure.SpringBootApplication;
import org.springframework.cache.annotation.EnableCaching;
/**
 * @Author idea
 * @Date created in 4:20 下午 2022/4/24
 */
@SpringBootApplication
@EnableCaching
public class CacheApplication
    public static void main(String[] args)
        SpringApplication.run(CacheApplication.class,args);
接着是对应的Config配置类:
package org.idea.architect.framework.cache.config;


import com.github.benmanes.caffeine.cache.CacheLoader;
import org.springframework.context.annotation.Bean;
import org.springframework.context.annotation.Configuration;


/**
 * @Author idea
 * @Date created in 4:23 下午 2022/4/24
 */
@Configuration
public class CacheConfig


    @Bean
    public CacheLoader<String,Object> cacheLoader()
        CacheLoader<String,Object> cacheLoader = new CacheLoader<String, Object>()
            @Override
            public Object load(String s) throws Exception
                return null;


            @Override
            public Object reload(String key, Object oldValue) throws Exception
                return oldValue;

        ;
        return cacheLoader;
然后可以通过构建一个简单的UserDao对象,内部设置好本地缓存的基本配置项。
package org.idea.architect.framework.cache.dao;
import com.github.benmanes.caffeine.cache.Cache;
import com.github.benmanes.caffeine.cache.Caffeine;
import org.springframework.cache.annotation.CacheEvict;
import org.springframework.cache.annotation.CachePut;
import org.springframework.cache.annotation.Cacheable;
import org.springframework.stereotype.Service;
import java.util.concurrent.TimeUnit;
import java.util.function.Function;
/**
 * @Author linhao
 * @Date created in 4:28 下午 2022/4/24
 */
@Service
public class UserDao
    private Cache<Long,User> userCache = Caffeine.newBuilder().maximumSize(10000).expireAfterWrite(100, TimeUnit.SECONDS).build();


    public User queryByUserIdV2(long userId)
        userCache.get(userId, new Function<Long, User>()
            @Override
            public User apply(Long aLong)
                System.out.println("用户本地缓存不存在,重新计算");
                return new User();

        );
        return userCache.getIfPresent(userId);

    public boolean insertUser(int userId)
        User user = new User();
        user.setId(userId);
        user.setTel("11111");
        userCache.put((long) userId, user);
        return true;

    /**
     * 查询用户id集合
     *
     * @return
     */
    @Cacheable(value = "userCache", key = "#userId", sync = true)
    public User queryByUserId(int userId)
        System.out.println("从数据库查询userId");
        User user = new User();
        user.setId(1001);
        user.setTel("18971823123");
        user.setUsername("idea");
        return user;

    /**
     * sync 用于同步的,在缓存失效(过期不存在等各种原因)的时候,如果多个线程同时访问被标注的方法
     * 则只允许一个线程通过去执行方法
     */
    @CachePut(value = "userCache", key = "#user.id")
    public void saveUser(User user)
        System.out.println("插入数据库一条用户记录");

    @CacheEvict(value = "userCache", key = "#userId")
    public void delUser(int userId)
        System.out.println("删除用户本地缓存");
解释一下UserDao内部所采用的各个注解的实际含义:
关于Caffeine的几个注解解释:
@Cacheable
每次执行查询之后,数据都会被存放在一个本地的Map集合中,然后第二次请求的时候,如果对应的key存在于本地缓存中,那么就不会处罚实际的查询方法。
@CachePut
每次出发带有CachePut注解的方法,都会将请求参数放入到本地缓存中,不过要注意内部的一个sync配置属性,当缓存在本地不存在的时候,请求便会进入到对应声明注解的方法体内部去执行,在多线程情况下有可能会存在多个线程并发请求对应的方法。这个时候可以通过使用sync属性去进行限制。
sync=true:并发访问下只能有一个线程将本地缓存进行更新。sync=false:并发更新本地缓存。
@CacheEvict
用于删除指定的缓存配置,删除的依据是对应的key属性。
User对象的基本属性如下所示:
package org.idea.architect.framework.cache.dao;
/**
 * @Author idea
 * @Date created in 4:30 下午 2022/4/24
 */
public class User
    private int id;
    private String username;
    private String tel;
    public int getId()
        return id;

    public void setId(int id)
        this.id = id;

    public String getUsername()
        return username;

    public void setUsername(String username)
        this.username = username;

    public String getTel()
        return tel;

    public void setTel(String tel)
        this.tel = tel;

    @Override
    public String toString()
        return "User" +
                "id=" + id +
                ", username='" + username + ''' +
                ", tel='" + tel + ''' +
                '';
然后是UserController这个控制器,内部包含了对于用户信息的基本api操作:
package org.idea.architect.framework.cache.controller;


import org.idea.architect.framework.cache.dao.User;
import org.idea.architect.framework.cache.dao.UserDao;
import org.springframework.web.bind.annotation.GetMapping;
import org.springframework.web.bind.annotation.RestController;


import javax.annotation.Resource;
import java.util.UUID;
import java.util.concurrent.ThreadLocalRandom;


/**
 * @Author idea
 * @Date created in 4:35 下午 2022/4/24
 */
@RestController
public class UserController


    @Resource
    private UserDao userDao;


    @GetMapping(value = "/queryUser")
    public String queryUser(int id)
        User user = userDao.queryByUserId(id);
        return user.toString();


    @GetMapping(value = "/insertUser")
    public String insertUser(int id)
        User user = new User();
        user.setId(id);
        user.setUsername(UUID.randomUUID().toString());
        user.setTel(String.valueOf(ThreadLocalRandom.current().nextInt()));
        userDao.saveUser(user);
        return "success";


    @GetMapping(value = "/delUser")
    public String delUser(int id)
        userDao.delUser(id);
        return "delete-success";


    @GetMapping(value = "/queryUser-02")
    public String queryUser_02(long userId)
        User user = userDao.queryByUserIdV2(userId);
        return user.toString();


    @GetMapping(value = "/insertUser-02")
    public String insertUser_02(int userId)
        try


        catch (Exception e)
            e.printStackTrace();

        userDao.insertUser(userId);
        return "success";
测试本地缓存是否有生效:
首先请求接口UserController#queryUser,请求地址如下:
http://localhost:8080/queryUser?id=1001首次会发现在控制台有相关的关键字输出:

然后第二次请求就会发现逻辑不会再次触发到UserDao的queryByUserId函数执行。
这是因为在UserDao的queryByUserId函数顶部加入了 @Cacheable注解。
关于单独操控Caffeine的几种案例
在项目代码里,难免会需要使用到单独操控Caffeine的情况,所以这里我列举了一些对caffeine的操控案例代码:
几种调整key过期策略的方式
expireAfterAccess 在访问之后指定多少秒过期
expireAfterWrite 在写入数据后指定多少秒过期
expireAfter 通过重写Expire接口,指定过期时间
expireAfterAccess 过期策略实现:
/**
 * 调整cache内部key过期时间
 *
 * @throws InterruptedException
 */
public static void testCacheExpireAfterAccess() throws InterruptedException
    Cache<String, Integer> cache = Caffeine.newBuilder()
            .maximumSize(1)
            .expireAfterAccess(1, TimeUnit.SECONDS)
            .build();
    cache.put("test", 1);
    System.out.println(cache.getIfPresent("test"));
    Thread.sleep(1000);
    System.out.println(cache.getIfPresent("test"));
expireAfterWrite 过期策略实现
/**
 * 调整cache内部key过期时间
 *
 * @throws InterruptedException
 */
public static void testCacheExpireAfterWrite() throws InterruptedException
    Cache<String, Integer> cache = Caffeine.newBuilder()
            .maximumSize(1)
            .expireAfterWrite(1, TimeUnit.SECONDS)
            .build();
    cache.put("test", 1);
    System.out.println(cache.getIfPresent("test"));
    Thread.sleep(1000);
    System.out.println(cache.getIfPresent("test"));
expireAfter 过期策略实现
/**
 * 重写cache内部的过期策略
 *
 * @throws InterruptedException
 */
public static void testCacheExpireAfter() throws InterruptedException
    long EXPIRE_TIME = 3;
    Cache<String, Integer> cache = Caffeine.newBuilder()
            .maximumSize(1)
            .expireAfter(new Expiry<String, Integer>()
                @Override
                public long expireAfterCreate(String key, Integer value, long l)
                    return TimeUnit.SECONDS.toNanos(EXPIRE_TIME);


                @Override
                public long expireAfterUpdate(String key, Integer value, long currentTime, long currentDuration)
                    return TimeUnit.SECONDS.toNanos(EXPIRE_TIME);


                @Override
                public long expireAfterRead(String key, Integer value, long currentTime, long currentDuration)
                    return TimeUnit.SECONDS.toNanos(EXPIRE_TIME);

            ).build();


    cache.put("test", 1);
    System.out.println(TimeUnit.SECONDS.toNanos(EXPIRE_TIME));
    System.out.println(cache.getIfPresent("test"));
    Thread.sleep(2000);
    System.out.println(cache.getIfPresent("test"));
另外caffeine内部还支持对过期的key进行监听回调功能:
/**
 * 从cache中移除某些key,同时注册移除key的回调监听器
 *
 * @throws InterruptedException
 */
public static void testCacheEviction() throws InterruptedException
    Cache<String, Integer> cache = Caffeine.newBuilder().maximumSize(10).removalListener(new RemovalListener<String, Integer>()
        @Override
        public void onRemoval(String key, Integer value, RemovalCause cause)
            System.out.println("remove key:" + key + ",value is:" + value);

    ).build();
    cache.put("key1", 1001);
    cache.put("key2", 1002);
    cache.put("key3", 1003);
    cache.put("key4", 1004);
    System.out.println(cache.getIfPresent("key1"));
    System.out.println("移除单个key");
    cache.invalidate("key1");
    Thread.sleep(2000);
    System.out.println("移除所有key");
    cache.invalidateAll();
    System.out.println(cache.getIfPresent("key1"));
caffeine还提供了缓存命中率相关信息的查看功能,这块的案例代码如下所示:
/**
 * 查看缓存的命中率
 */
public static void testCacheHitRate() throws InterruptedException
    Cache<String, Integer> cache = Caffeine.newBuilder().maximumSize(70).recordStats().build();
    for (int i = 0; i < 100; i++)
        cache.put("item-" + i, i);

    //这里需要睡眠一段时间,因为空间不足移除key是异步操作
    Thread.sleep(1000);
    //模拟随机访问本地缓存
    for (int j = 0; j < 100; j++)
        int i = new Random().nextInt(100);
        String key = "item-" + i;
        Integer result = cache.getIfPresent(key);
        if (result == null)
            System.err.println("缓存key" + key + "不存在");


    long hitCount = cache.stats().hitCount();
    double hitRate = cache.stats().hitRate();
    long evictionCount = cache.stats().evictionCount();
    double averageLoadPenalty = cache.stats().averageLoadPenalty();
    System.out.println("命中率:" + hitRate + ",缓存总数:" + hitCount + ",缓存逐出个数:" + evictionCount + ",加载新数值花费的平均时间:" + averageLoadPenalty);
相比于市面上常见的缓存组件来说,caffeine还是一款比较不错的组件,感兴趣的小伙伴们可以入坑试试。
推荐
PS:因为公众号平台更改了推送规则,如果不想错过内容,记得读完点一下“在看”,加个“星标”,这样每次新文章推送才会第一时间出现在你的订阅列表里。点“在看”支持我们吧!
以上是关于图文并茂,带你入坑本地缓存 Caffeine的主要内容,如果未能解决你的问题,请参考以下文章