如何做一个国产数据库 网络传输 nodejs做测试客户端
Posted qianbo_insist
tags:
篇首语:本文由小常识网(cha138.com)小编为大家整理,主要介绍了如何做一个国产数据库 网络传输 nodejs做测试客户端相关的知识,希望对你有一定的参考价值。
如何做一个国产数据库一
如何做一个国产数据库二
如何做一个国产数据库三
如何做一个国产数据库四
如何做一个国产数据库五
网络实战服务器
我们再四中说过使用tcp进行协议的链接,对我们所定义的协议如果有不清楚的,我们可以再看一下四,示例使用libuv进行服务器编程,uv是一个异步网络库。
除了协议,再次定义一下我们网络的数据结构
//客户端数据结构
typedef struct client_t
	//tcp client session
	uv_tcp_t tcp;
	//解析使用
	tcp_settings * config = NULL;
	//写入
	uv_write_t write_req;


	//设备id
	uint32_t   deviceid = 0;
	//读入的内容
	tcp_unit   *buffer_data = NULL;

	//需要写入的内容
	tcp_unit_w *buffer_data_w = NULL;

	//最长6字节包头
	char head[6];
	//已经接收的头部的长度
	int recvlen;

	//用户自定义数据指针 tcpserver
	void * data = NULL;

	//接收状态 接收头部,0 接收数据 1
	recv_status status = enum_head;

	//是否在线
	int is_online = enum_online;

	uv_timer_t  _timer;
	uv_thread_t _thread;


	int thread_run = 0;

	int time_init()
		if (config == NULL)
			return -1;
		uv_timer_init(config->uv_loop, &_timer);
		return 0;


	client_t()


	void clean()

		free_unit(&buffer_data);

	int headlen()
		return recvlen;

client_t;
工作队列数据结构
typedef struct thread_work
	thread_work(client_t* cli, tcp_unit * unit) :
		request(),
		client(cli),
		data(unit),
		error(false)
		//保存数据指针,传到处理线程
		request.data = this;

	uint32_t id =0;
	client_t* client = NULL;
	//把数据接过来进行处理
	tcp_unit * data = NULL;
	uv_work_t request;
	bool error;
thread_work;
根据我们所定义的协议,如何从包头中取出包体的长度?是第二个字节加上后面四个字节的网络字节序反转成h字节序,就成了包体长度,接下去就是获取包体的过程。
static uint32_t get_bodylen(tcp_settings * setting, char *head)

	//headlen_offset 是偏移量+1
	int len1 = *(head + 1);
	char *b = head + 2;
	return len1+ntohl(*(uint32_t*)b);
上一篇里面已经写了一个tcpserver,小有改动,将body里面的内容去除包头,因此tcpunit的数据结构修改了一下:
typedef struct tcp_unit

	//真实数据
	char * bodydata = NULL;
	//数据总长度bodylen + headlen
	int bodylen = 0;
	//接收到的数据长度
	int recvlen = 0;
	//头部长度
	int headlen = 0;
tcp_unit;
一切就绪,接下去就是定义一个真正的接收数据的server,从我们第四章里面的tcpserver继承下来:
class tcp_server1 :public tcp_server

	//所有客戶端,用四字节整形数作为hash key
	std::unordered_map<uint32_t, client_t*>  v_map_c;
	uv_mutex_t  _mutex_1;
public:
	tcp_server1()
	~tcp_server1()
protected:
	uint32_t getid(client_t* client)

		return 0;
		/*tcp_settings* cnf = client->config;
		char* idpos = &client->head[0] + cnf->idoffset;
		uint32_t deviceid = htonl(*((uint32_t*)idpos));
		///((deviceid >> 16) & 0xff00) | deviceid >> 24
		return deviceid;*/

public:


	int on_headers_complete(void* param)
		//client_t* pclient = (client_t*)param;

		printf("the header len is %d\\n", pclient->recvlen);
		//printf("the id is %04x\\n", getid(pclient));
		return 0;

	//该函数没有进入线程池
	int on_message_complete(void* param)
		client_t* pclient = (client_t*)param;
		tcp_unit* data = pclient->buffer_data;
		//char* buf = data->data;
		//int len = data->tlen;
		//printf("the total len is %d\\n", pclient->buffer_data->tlen);
		return 0;

	//该函数进入线程池
	int on_data(tcp_unit* data)
		//printf("the thread pid is %d\\n", _getpid());
#ifdef _DEBUG
		int hl = data->headlen;
		//printf("the hl is %d\\n", hl);
		//for (size_t i = hl; i < hl + 8; i++)
		//	printf("%02x ", (uint8_t)data->data[i]);
		//
		string test(data->bodydata, data->bodylen);
		printf("the data is %s\\n", test.c_str());
		//printf("the len is %d\\n", data->bodylen);
#endif


#if 0
		//给客户端回送信息

		tcp_unit_w* unitw = (tcp_unit_w*)malloc(sizeof(tcp_unit_w));
		unitw->delay = 0;
		unitw->data = (char*)malloc(sizeof(char) * 18);
		memcpy(unitw->data, buf, 18);
		unitw->len = 18;
		unitw->next = NULL;
		unitw->type = enum_sc;
		client_send(rb->id, unitw);
		//解析成为json发送到相应的接口
		string response;
		int timeout = 2; //2秒
						 //post是同步的

						 /*	bool ret = client.Post("http://127.0.0.1:9069/sensor_data/8052", buf, len, response, timeout);
						 if (ret == false)
						 printf("error!:%s\\n", client.geterror().c_str());

						 printf("response:%s\\n", response.c_str());*/
#endif
		return 0;


;
客户端定义
我们后面做sdk的时候,将会分别使用java,node,go,c++,等来做客户端链接,其中又属nodejs是最简单不过的,我们先使用nodejs来做一个客户端:
var net = require('net');
var HOST = '127.0.0.1';
var PORT = 8054;
var client = new net.Socket();


var step = 0.01;
function test_8053()
    const buftemp = Buffer.allocUnsafe(4 + 2 + 6 + 12);
    buftemp[0] = 0; //
    buftemp[1] = 1; //
    buftemp[2] = 0; //
    buftemp[3] = 1; //设备编号
    buftemp[4] = 1;//命令字
    buftemp[5] = 24;  //包体长度
    buftemp[6] = 0;// 正常待机,正常下锤探测,第一次首盘探测,过程反复探测,顶部到位反复探测,故障停机
    buftemp[7] = 0; //故障字
    buftemp[8] = 1; //警示字1
    buftemp[9] = 1;//警示字2
    buftemp[10] = 10; //电池电量
    buftemp[11] = 0;//备用
    step += 0.01;
    buftemp.writeFloatBE(12.90 +step , 12);
    buftemp.writeFloatBE(13.4 + step, 16);
    buftemp.writeFloatBE(34.5 +step, 20);
    client.write(buftemp);

    setTimeout(test_8053,5000);


//flv server, 4 bytes length,after is body
var xflag = 0x61;

function test_8054()
    const buftemp = Buffer.allocUnsafe(19);
    buftemp[0] = 0;
    buftemp[1] = 6;
    //网络字节序一般指大端
    buftemp.writeInt32BE(7, 2);
	buftemp.write("qianbo",6);
	buftemp.write("a:\\"b\\"",12);
	client.write(buftemp);
	setTimeout(test_8054, 1000);


function closesocket()
    // client.end();
    console.log("please close me");


client.connect(PORT, HOST, function ()

    console.log('CONNECTED TO: ' + HOST + ':' + PORT);
    // Write a message to the socket as soon as the client is connected, the server will receive it as message from the client

    else if (PORT == 8054)
        test_8054();
    //setTimeout(test_8053, 1000);
);

// Add a 'data' event handler for the client socket
// data is what the server sent to this socket
client.on('data', function (data)

    console.log(data);
    //client.destroy();
);

// Add a 'close' event handler for the client socket
client.on('close', function ()
    console.log('Connection closed');
);
结果:
如下图,我们启动服务器在端口8054等待客户端链接,连接后打印出connected,客户端发送数据后,我们显示出,数据库表名为:qianbo, 数据字段为一个json:a:“b”
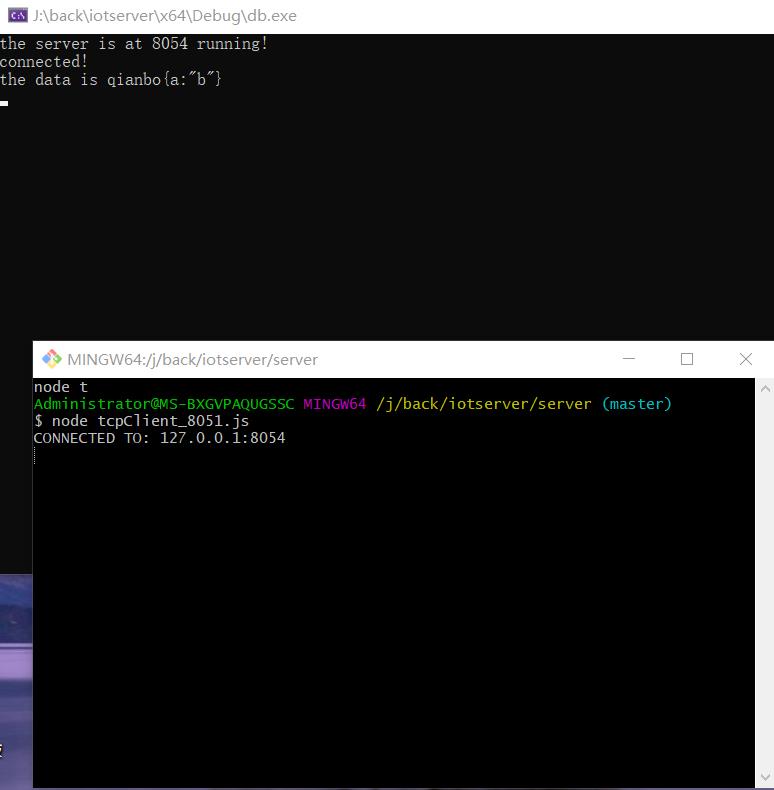
ok,目前位置,我们将数据传了过去,至于为什么nodejs里面第一个字节为全0,大家可以看我的协议定义,第二个字节长度为6,因为数据库名称长度为6,—>qianbo,.并且根据协议,nodejs的客户端为发布客户端,此次网络实战结束,后面会把接收到的数据存储,以供其他客户端订阅。待续。。。。。。。
以上是关于如何做一个国产数据库 网络传输 nodejs做测试客户端的主要内容,如果未能解决你的问题,请参考以下文章