跟着B站学习pytorch-p13 mnist手写数字图片分类问题
Posted bohu83
tags:
篇首语:本文由小常识网(cha138.com)小编为大家整理,主要介绍了跟着B站学习pytorch-p13 mnist手写数字图片分类问题相关的知识,希望对你有一定的参考价值。
一概述
上一节学习了逻辑回归,在这一节里, 我们将使用 PyTorch 来解决分类任务.
关于测试数据集MNIST:
MNIST 包含 0~9 的手写数字, 共有 60000 个训练集和 10000 个测试集. 数据的格式为单通道 28*28 的灰度图.
数据集很重要。我就是这里翻车了,最后有详细介绍。有数据的可以跳过。
二 读取数据
from pathlib import Path
import requests
from matplotlib import pyplot
import numpy as np

import pickle
import gzip
#加载数据
with gzip.open("./data/mnist.pkl.gz", "rb") as f:
        ((x_train, y_train), (x_valid, y_valid)) = pickle.load(f, encoding="latin-1")


# 数据集查看
print(x_train.shape)  # (60000, 28, 28)
print(y_train.shape)  # (60000,)
print(x_valid.shape)  # (10000, 28, 28)
print(y_valid.shape)  # (10000,)
print(type(x_train))  # <class 'numpy.ndarray'>

# x_train[i]是一个784维的向量,将其转换为28 * 28的二维矩阵显示出来,是图像形式
# imshow()可以传入二维矩阵(M,N) / 三维(M,N,3) /三维(M.N,4)
# 显示 第一张图片
pyplot.imshow(x_train[0].reshape((28, 28)), cmap="gray")
pyplot.show()


这个 例子,说明一个图对应的值,对于分类来说,是个概率,不是某一个具体的 值 ,10分类就有10个对应的概率值,其中 某个值最大 。

转换为tensor格式,才能进行建模训练
import torch
x_train,y_train,x_valid,y_valid = map(
    torch.tensor,(x_train,y_train,x_valid,y_valid)
)
print(type(x_train))
print(y_train.min())
print(y_train.max())
输出
<class 'torch.Tensor'>
tensor(0, dtype=torch.uint8)
tensor(9, dtype=torch.uint8)
torch.nn.functional 函数:
通常模型带有 学习的参数,使用nn.module,其他情况使用nn.functional更 简单些
这里有 两个错:
expected scalar type Byte but found Float
self must be a matrix
demo:
bs = 64 # batch_size
xb = torch.randn(64,784)# 一个batch大小的数据
yb = y_train[0:bs]


# ! 在定义权重参数是,不要忘记声明需要求导,即 requires_grad = True
weights = torch.randn([784,10],dtype=torch.float,requires_grad=True)
bias = torch.zeros(10,requires_grad=True)
torch.set_default_tensor_type(torch.DoubleTensor)

import torch.nn.functional as F

loss_func = F.cross_entropy # 使用定义好的交叉熵损失作为损失函数
# 前向传播的结果
def model(xb):
    return xb.mm(weights) + bias

print(loss_func(model(xb),yb)) # 交叉熵损失计算真实值和测试值
tensor(43.8886, dtype=torch.float32, grad_fn=<NllLossBackward0>)
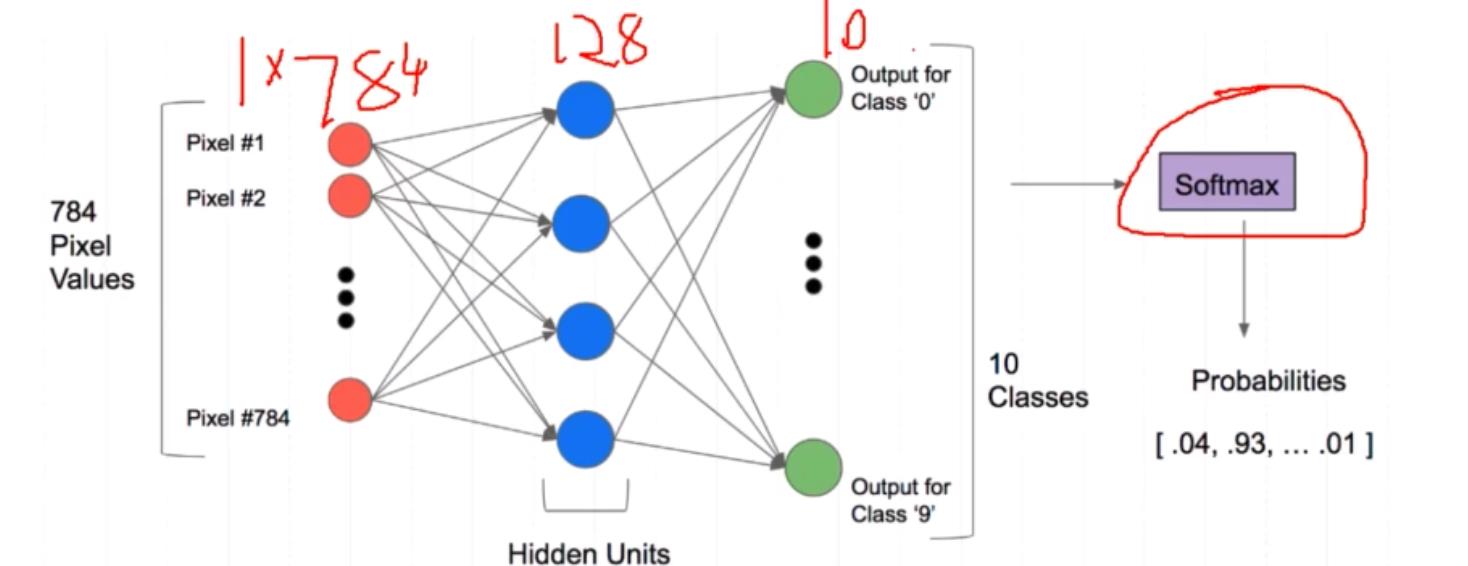
3 model 函数 构建 网络模型
必须继承nn.model,并且构造函数中使用nn.model的构造函数
无需写反向传播函数,nn.model利用autogurad自动实现反向传播
from torch import nn


class Mnist_NN(nn.Module):
    def __init__(self):
        super().__init__()
        # 定义用到的层
        self.hidden1 = nn.Linear(784, 128)
        self.hidden2 = nn.Linear(128, 64)
        self.out = nn.Linear(64, 10)

    # 前向传播: 用__init__()函数中定义好的层进行传播
    # x是输入的样本
    def forward(self, x):
        x = F.relu(self.hidden1(x))
        x = F.relu(self.hidden2(x))
        x = self.out(x)
        return x

net = Mnist_NN()
print(net) # 打印net能显示出定义模型的层和参数
输出:
Mnist_NN(
(hidden1): Linear(in_features=784, out_features=128, bias=True)
(hidden2): Linear(in_features=128, out_features=64, bias=True)
(out): Linear(in_features=64, out_features=10, bias=True)
)
使用TensorDataset和DataLoader读取数据
from torch.utils.data import TensorDataset
from torch.utils.data import DataLoader
train_ds = TensorDataset(x_train,y_train)

valid_ds = TensorDataset(x_valid,y_valid)

def get_data(train_ds,valid_ds,bs):  #按batch取数据
    return(
    DataLoader(train_ds,batch_size=bs,shuffle=True),  #训练集需要重新洗牌
    DataLoader(valid_ds,batch_size=bs*2),
    )
4训练
#训练方法
weights = torch.randn([784,10],dtype = torch.float,requires_grad = True)
bias = torch.zeros(10,requires_grad = True)
loss_func = F.cross_entropy  # cross_entropy交叉熵损失函数
def model(Xb):
    return Xb.mm(weights) + bias

def loss_batch(model,loss_func, xb, yb, opt = None): #计算损失
    loss = loss_func(model(xb), yb)

    if opt is not None:
      loss.backward()
      opt.step()    #优化器更新
      opt.zero_grad()  # 把模型中参数的梯度设为0
    #print(loss.item(), len(xb))
    return loss.item(), len(xb)  # loss的数据类型是Variable,loss.item()直接获得所对应的python数据类型
#fit方法做训练和测试
def fit(steps, model, loss_func, opt, train_dl, valid_dl):#steps迭代次数
    for step in range(steps):
        model.train()  #一般在训练模型时加上model.train(),这样会正常使用Batch Normalizatiuonhe Dropout (降低过拟合)
        for xb, yb in train_dl:
            loss_batch(model, loss_func, xb, yb, opt)

        model.eval()  ##测试模型时加上model.eval(),这样不会使用Batch Normalizatiuonhe Dropout
        with torch.no_grad():#测试集不必执行梯度下降
            losses, nums = zip(
                *[loss_batch(model, loss_func, xb, yb) for xb, yb in valid_dl]
            )
            val_loss = np.sum(np.multiply(losses, nums)) / np.sum(nums) #计算验证集损失
            print('当前step:' + str(step), '验证集损失:' + str(val_loss))#打印验证集损失
补充下fit参数 含义:
steps : 要循环多少次 -- 自己指定
model : 选用的哪个模型进行训练 -- 得有
loss_func : 计算损失的函数 -- 得有
opt : 反向传播优化器 -- 就是用什么方法来计算损失,这里用的是SGD
train_dl : 训练集
valid_dl : 标签
5 调用各函数实现模型
bs = 64  #mini-batch
from torch import optim

def get_model():
    model = Mnist_NN()
    return model,optim.SGD(model.parameters(),lr=0.001)
train_dl,valid_dl = get_data(train_ds,valid_ds,bs)#1.拿到数据
model,opt = get_model()#2.拿到模型和优化器
fit(25,model,loss_func,opt,train_dl,valid_dl)#执行

如果你出现这个这个结果,证明OK。
很不巧,我照着老师的视频敲了一边代码。报错。
RuntimeError: mat1 and mat2 shapes cannot be multiplied (1792x28 and 784x128)
意思是模型的参数维度不匹配。很奇怪,我就是对比视频,不断暂停下手动敲掉代码。又回看了两边视频,对比了代码。感觉没啥问题,还是不对。网上搜了下,除了有的大佬自己写的net,大部分都是一样的。折腾了一下午。我觉得是测试集出了问题。因为我是随便从网上找的测试集,不一定就是官网的哪个, http://deeplearning.net/data/mnist/ 这个已经打不开了。而且我的代码一开始就去掉了下载测试集,直接指定路径打开。
一番搜索找到一个地址:(mnist的各种版本数据转换npm,gz,pkl,zip_码龙社的博客-CSDN博客_mnist.pkl.gz)MNIST handwritten digit database, Yann LeCun, Corinna Cortes and Chris Burges
from pathlib import Path
import requests
from matplotlib import pyplot
from pathlib import Path
import torch
DATA_PATH = Path("data")
import torchvision
batch_size_train = 64
batch_size_test = 1000
import numpy
import gzip


import pickle
import gzip
#加载数据

# 数据读取
IMAGE_SIZE = 28
NUM_CHANNELS = 1
PIXEL_DEPTH = 255
NUM_LABELS = 10

# Extract the images

def extract_data(filename, num_images):
    """Extract the images into a 4D tensor [image index, y, x, channels].
    Values are rescaled from [0, 255] down to [-0.5, 0.5].
    """
    print('Extracting', filename)
    with gzip.open(filename) as bytestream:
        bytestream.read(16)
        buf = bytestream.read(IMAGE_SIZE * IMAGE_SIZE * num_images * NUM_CHANNELS)
        data = numpy.frombuffer(buf, dtype=numpy.uint8).astype(numpy.float32)
        data = (data - (PIXEL_DEPTH / 2.0)) / PIXEL_DEPTH
        data = data.reshape(num_images, IMAGE_SIZE, IMAGE_SIZE, NUM_CHANNELS)
        data = numpy.reshape(data, [num_images, -1])
    return data
def extract_labels(filename, num_images):
    """Extract the labels into a vector of int64 label IDs."""
    print('Extracting', filename)
    with gzip.open(filename) as bytestream:
        bytestream.read(8)
        buf = bytestream.read(1 * num_images)
        labels = numpy.frombuffer(buf, dtype=numpy.uint8).astype(numpy.int64)
        num_labels_data = len(labels)
        one_hot_encoding = numpy.zeros((num_labels_data,NUM_LABELS))
        one_hot_encoding[numpy.arange(num_labels_data),labels] = 1
        one_hot_encoding = numpy.reshape(one_hot_encoding, [-1, NUM_LABELS])
    return one_hot_encoding


import numpy as np
x_train = extract_data('./data/MNIST/raw/train-images-idx3-ubyte.gz', 60000)
y_train = extract_labels('./data/MNIST/raw/train-labels-idx1-ubyte.gz', 60000)
x_valid = extract_data('./data/MNIST/raw/t10k-images-idx3-ubyte.gz', 10000)
y_valid = extract_labels('./data/MNIST/raw/t10k-labels-idx1-ubyte.gz', 10000)
写了这么多,作用跟前面的一样
with gzip.open((PATH / FILENAME).as_posix(), "rb") as f:
        ((x_train, y_train), (x_valid, y_valid), _) = pickle.load(f, encoding="latin-1")
新手只看视频不够,出问题 不知道怎么 解决,还是动手验证下收获更多。
以上是关于跟着B站学习pytorch-p13 mnist手写数字图片分类问题的主要内容,如果未能解决你的问题,请参考以下文章