SSM框架
Posted 张比伯
tags:
篇首语:本文由小常识网(cha138.com)小编为大家整理,主要介绍了SSM框架相关的知识,希望对你有一定的参考价值。
SSM项目整合
一.环境准备
-
开发工具:idea2020.1
-
构建工具:maven3.8.4
-
spring框架5.2.18;JDK:1.8;数据库:mysql;连接池:德鲁伊
二.环境搭建
2.1 基本环境搭建
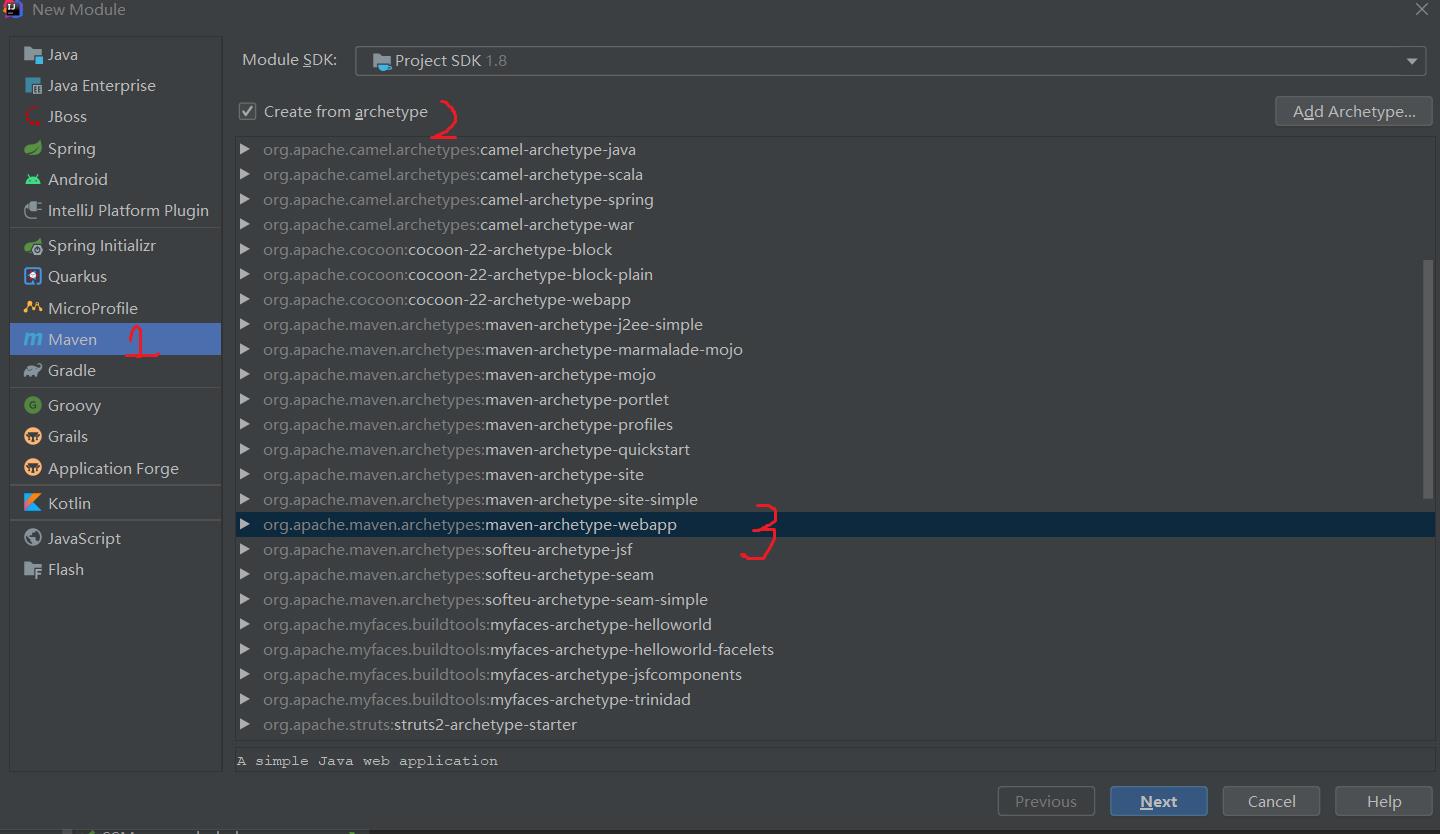
2.1.1构建model

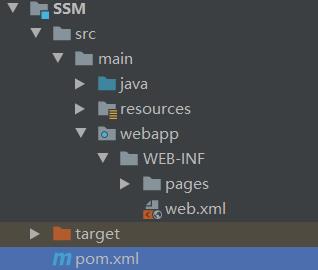
2.1.3创建基本目录

2.2 pom文件依赖包引入
<properties>
<project.build.sourceEncoding>UTF-8</project.build.sourceEncoding>
<maven.compiler.source>1.8</maven.compiler.source>
<maven.compiler.target>1.8</maven.compiler.target>
<spring.version>5.2.18.RELEASE</spring.version>
</properties>
<dependencies>
<!--测试依赖-->
<dependency>
<groupId>junit</groupId>
<artifactId>junit</artifactId>
<version>4.12</version>
<scope>test</scope>
</dependency>
<!--日志-->
<dependency>
<groupId>ch.qos.logback</groupId>
<artifactId>logback-classic</artifactId>
<version>1.2.3</version>
</dependency>
<!--解析JSON-->
<dependency>
<groupId>com.google.code.gson</groupId>
<artifactId>gson</artifactId>
<version>2.7</version>
</dependency>
<!--servlet-->
<dependency>
<groupId>javax.servlet</groupId>
<artifactId>javax.servlet-api</artifactId>
<version>3.1.0</version>
<!--作用范围是provided表示,打包的时候不会将jar包打入war包-->
<scope>provided</scope>
</dependency>
<dependency>
<groupId>javax.servlet.jsp</groupId>
<artifactId>jsp-api</artifactId>
<version>2.2</version>
<scope>provided</scope>
</dependency>
<dependency>
<groupId>javax.servlet</groupId>
<artifactId>jstl</artifactId>
<version>1.2</version>
</dependency>
<!--上传文件依赖jar包-->
<dependency>
<groupId>commons-fileupload</groupId>
<artifactId>commons-fileupload</artifactId>
<version>1.3.3</version>
</dependency>
<!--Spring依赖-->
<dependency>
<groupId>org.springframework</groupId>
<artifactId>spring-webmvc</artifactId>
<version>$spring.version</version>
</dependency>
<!--spring AOP和aspectj框架整合的模块-->
<dependency>
<groupId>org.springframework</groupId>
<artifactId>spring-aspects</artifactId>
<version>$spring.version</version>
</dependency>
<!--事务需要的-->
<dependency>
<groupId>org.springframework</groupId>
<artifactId>spring-tx</artifactId>
<version>$spring.version</version>
</dependency>
<!--链接数据库要用-->
<dependency>
<groupId>org.springframework</groupId>
<artifactId>spring-jdbc</artifactId>
<version>$spring.version</version>
</dependency>
<!-- mysql jdbc驱动包 -->
<dependency>
<groupId>mysql</groupId>
<artifactId>mysql-connector-java</artifactId>
<version>8.0.27</version>
</dependency>
<!--Druid数据库连接池 -->
<dependency>
<groupId>com.alibaba</groupId>
<artifactId>druid</artifactId>
<version>1.1.20</version>
</dependency>
<!-- mybatis框架包 -->
<dependency>
<groupId>org.mybatis</groupId>
<artifactId>mybatis</artifactId>
<version>3.5.2</version>
</dependency>
<!-- mybatis和spring整合依赖包 -->
<dependency>
<groupId>org.mybatis</groupId>
<artifactId>mybatis-spring</artifactId>
<version>2.0.2</version>
</dependency>
<!--分页依赖-->
<dependency>
<groupId>com.github.pagehelper</groupId>
<artifactId>pagehelper</artifactId>
<version>5.2.1</version>
</dependency>
</dependencies>
<build>
<!--资源插件,处理src/main/java目录的xml-->
<resources>
<resource>
<directory>src/main/java</directory> <!--所在的目录-->
<includes><!--包括properties和xml都会被扫描-->
<include>**/*.properties</include>
<include>**/*.xml</include>
</includes>
<filtering>true</filtering>
</resource>
<resource>
<directory>src/main/resources</directory> <!--所在的目录-->
<includes><!--包括properties和xml都会被扫描-->
<include>**/*.properties</include>
<include>**/*.xml</include>
</includes>
</resource>
</resources>
</build>2.3 编写配置文件
2.3.1编写spring配置文件
-
j将所有的配置文件都放在在src\\main\\resources目录下面,方便管理维护;
-
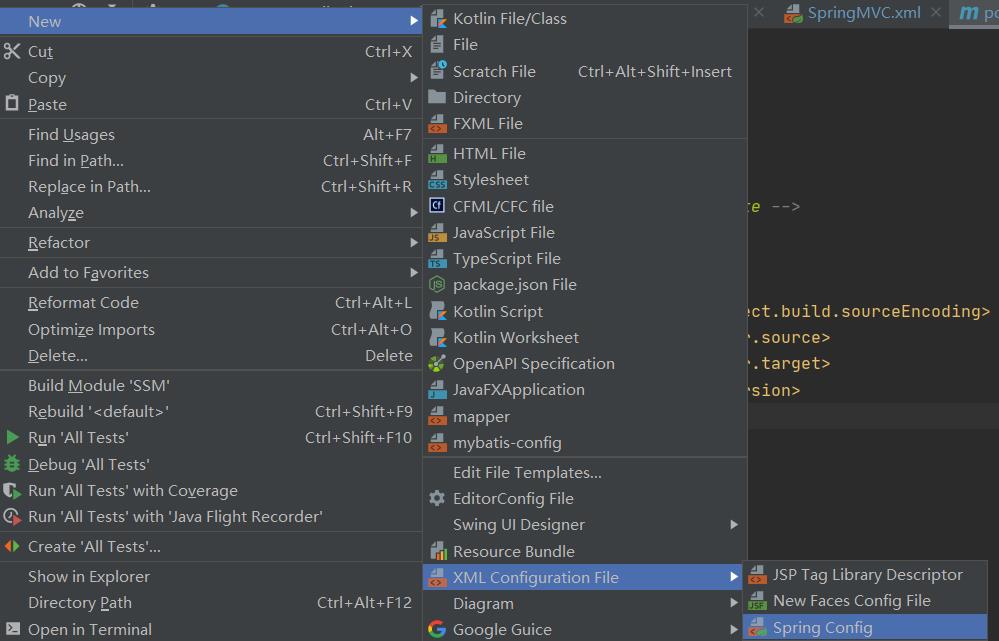
创建spring的xml配置文件applicationContext.xml

-
编写applicationContext.xml文件
<?xml version="1.0" encoding="UTF-8"?> <beans xmlns="http://www.springframework.org/schema/beans" xmlns:xsi="http://www.w3.org/2001/XMLSchema-instance" xmlns:context="http://www.springframework.org/schema/context" xmlns:tx="http://www.springframework.org/schema/tx" xsi:schemaLocation="http://www.springframework.org/schema/beans http://www.springframework.org/schema/beans/spring-beans.xsd http://www.springframework.org/schema/context http://www.springframework.org/schema/context/spring-context.xsd http://www.springframework.org/schema/tx https://www.springframework.org/schema/tx/spring-tx.xsd"> <!--开启扫描--> <context:component-scan base-package="com.yang"> <!--配置哪些注解不扫描 Controller用springMVC--> <context:exclude-filter type="annotation" expression="org.springframework.stereotype.Controller" /> </context:component-scan> <!--读取外部配置文件--> <context:property-placeholder location="classpath:jdbc.properties"/> <!--将Druid数据源交给Spring IOC容器来管理--> <bean id="dataSource" class="com.alibaba.druid.pool.DruidDataSource"> <property name="username" value="$prop.username"/> <property name="password" value="$prop.password"/> <property name="url" value="$prop.url"/> <property name="driverClassName" value="$prop.driverClassName"/> <property name="initialSize" value="$prop.initialSize"/> <property name="maxActive" value="$prop.maxActive"/> </bean> <!--SqlSessionFactory 会话工厂交给spring容器管理--> <bean id="sqlSessionFactory" class="org.mybatis.spring.SqlSessionFactoryBean"> <property name="dataSource" ref="dataSource"/> <!-- 加载数据环境 --> <!-- 绑定mybatis配置文件 --> <property name="configLocation" value="classpath:mybatis-config.xml"/> <!-- 几乎所有的东西都能在这里面配,完全不需要mybatis的核心配置 根据个人喜好,个人感觉分开一点维护比较容易 --> </bean> <bean class="org.mybatis.spring.mapper.MapperScannerConfigurer"> <property name="basePackage" value="com.yang.mapper"></property> </bean> <!-- 事务管理器 --> <bean id="transactionManager" class="org.springframework.jdbc.datasource.DataSourceTransactionManager"> <property name="dataSource" ref="dataSource" /> </bean> <tx:annotation-driven transaction-manager="transactionManager"/> </beans>
2.3.2编写jdbc.properties文件
prop.username=用户名
prop.password=密码
prop.url=jdbc:mysql://localhost:3306/数据库名
#driverClassName
prop.driverClassName=com.mysql.cj.jdbc.Driver
#初始化连接数
prop.initialSize=10
#最小连接数
prop.minIdle=5
#最大连接数
prop.maxActive=20
#最大等待时间
prop.maxWait=5000
2.3.3配置springMVC文件
<?xml version="1.0" encoding="UTF-8"?>
<beans xmlns="http://www.springframework.org/schema/beans"
xmlns:xsi="http://www.w3.org/2001/XMLSchema-instance"
xmlns:context="http://www.springframework.org/schema/context"
xmlns:mvc="http://www.springframework.org/schema/mvc"
xsi:schemaLocation="http://www.springframework.org/schema/beans http://www.springframework.org/schema/beans/spring-beans.xsd
http://www.springframework.org/schema/context http://www.springframework.org/schema/context/spring-context.xsd
http://www.springframework.org/schema/mvc https://www.springframework.org/schema/mvc/spring-mvc.xsd">
<!--开启注解扫描,只扫描Controller注解,直接指定到controller,否则会无法添加事务-->
<context:component-scan base-package="com.yang.controller" />
<!--配置的视图解析器对象;这里使用jsp;也可以使用其他的视图解析器-->
<bean id="internalResourceViewResolver" class="org.springframework.web.servlet.view.InternalResourceViewResolver">
<property name="prefix" value="/WEB-INF/pages/"/>
<!--也可以放开下面这一行; 就只能解析jsp了;-->
<!--<property name="suffix" value=".jsp"/>-->
<property name="contentType" >
<value>text/html; charset=UTF-8</value>
</property>
</bean>
<!--MVC注解驱动,如果不加这个驱动所有的都会交给默认的请求去处理了,只能访问静态资源,而其他跳 转功能等无法使用所以default-servlet-handler标签要和annotation-driven一起使用-->
<mvc:annotation-driven/>
<!--开启静态资源扫描,由于设置了DispatcherServlet所以所有的请求都会交给DispatcherServlet去处理,而当它处理不了的时候,就需要交给默认的servlet处理
web阶段是由于Tomcat中设置为默认servlet,而mvc中设置为DispatcherServlet,起冲突时,就地原则,就使用DispatcherServlet,所以需要在开启该标签,当DispatcherServlet处理不了时,交给默认的去处理,若也处理不了就404了-->
<mvc:default-servlet-handler/>
<!--文件上传解析类 id必须是multipartResolver-->
<bean id="multipartResolver" class="org.springframework.web.multipart.commons.CommonsMultipartResolver"></bean>
<!--视图控制器,当视图只配置一个跳转页面的时候可以用 path路径,view-name映射路径-->
<mvc:view-controller path="/in" view-name="index.jsp"/>
<mvc:view-controller path="/" view-name="in.html"/>
</beans>2.3.4编写mybatis配置文件
<?xml version="1.0" encoding="UTF-8" ?>
<!DOCTYPE configuration
PUBLIC "-//mybatis.org//DTD Config 3.0//EN"
"http://mybatis.org/dtd/mybatis-3-config.dtd">
<configuration>
<!--设置日志-->
<settings>
<setting name="logImpl" value="STDOUT_LOGGING"/>
</settings>
<!--配置插件,分页查询-->
<plugins>
<plugin interceptor="com.github.pagehelper.PageInterceptor"/>
</plugins>
</configuration>2.3.5配置web.xml文件
<!DOCTYPE web-app PUBLIC
"-//Sun Microsystems, Inc.//DTD Web Application 2.3//EN"
"http://java.sun.com/dtd/web-app_2_3.dtd" >
<web-app>
<display-name>Archetype Created Web Application</display-name>
<!--加载applicationContext文件-->
<!-- 加载全局初始化参数,让服务器启动就加载spring配置文件-->
<context-param>
<param-name>contextConfigLocation</param-name>
<param-value>classpath:applicationContext.xml</param-value>
</context-param>
<!--配置spring监听器-->
<listener>
<listener-class>org.springframework.web.context.ContextLoaderListener</listener-class>
</listener>
<!--设置字符编码-->
<filter>
<filter-name>CharacterEncodingFilter</filter-name>
<filter-class>org.springframework.web.filter.CharacterEncodingFilter</filter-class>
<!--设置请求编码utf-8编码-->
<init-param>
<param-name>encoding</param-name>
<param-value>UTF-8</param-value>
</init-param>
<!--设置响应编码为utf-8-->
<init-param>
<param-name>ForceEncoding</param-name>
<param-value>true</param-value>
</init-param>
</filter>
<filter-mapping>
<filter-name>CharacterEncodingFilter</filter-name>
<url-pattern>/*</url-pattern>
</filter-mapping>
<!--配置HiddenHttpMethodFilter以使用put和delete请求-->
<filter>
<filter-name>HiddenHttpMethodFilter</filter-name>
<filter-class>org.springframework.web.filter.HiddenHttpMethodFilter</filter-class>
</filter>
<filter-mapping>
<filter-name>HiddenHttpMethodFilter</filter-name>
<url-pattern>/*</url-pattern>
</filter-mapping>
<!--配置springMVC前段控制器,对浏览器请求统一处理-->
<servlet>
<servlet-name>SpringMVC</servlet-name>
<servlet-class>org.springframework.web.servlet.DispatcherServlet</servlet-class>
<!--配置springMVC的配置文件的位置和名称-->
<init-param>
<param-name>contextConfigLocation</param-name>
<param-value>classpath:SpringMVC.xml</param-value>
</init-param>
<!--将初始化时间提前到服务器启动时间-->
<load-on-startup>1</load-on-startup>
</servlet>
<servlet-mapping>
<servlet-name>SpringMVC</servlet-name>
<!--/的意思就是接受除了.jsp以外的所有请求;/*表示所有包括.jsp-->
<url-pattern>/*</url-pattern>
</servlet-mapping>
</web-app>到这里基本的框架就搭好了,接下来就是业务代码的编写了
三.业务代码
3.1编写前端
<!DOCTYPE html>
<html lang="en">
<head>
    <meta charset="UTF-8">
    <title>Title</title>
</head>
<body>
<h1>你好</h1>
<a href="user/2">查询</a><br/>
<hr/>
<form action="user" method="post">
    用户名<input type="text" name="username" /><br/>
    密码<input type="text" name="password" /><br/>
    <input type="submit" value="添加用户" /><br/>
</form><hr/>
<form action="user/20" method="post">
    <input type="hidden" name="_method" value="delete">
    <input type="submit" value="删除用户" /><br/>
</form><hr/>
</body>
</html>
3.2后端代码
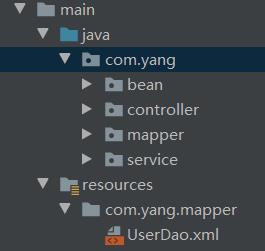
3.2.1基本结构

-
一般要将dao接口和mapper文件放在同一目录下才行;但为了方便管理将其放在resource目录下面
3.2.2 Controller
/**
* (User)表控制层
*
* @author makejava
* @since 2021-12-27 14:38:49
*/
@RestController
@RequestMapping("user")
public class UserController
/**
* 服务对象
*/
@Resource
private UserService userService;
/*
* 分页查询
* @return 查询结果
*/
@GetMapping
public List<User> queryByPage()
//使用分页查询插件,下面的参数分别是页数和每页展示数量
PageHelper.startPage(2,2);
return userService.queryByPage();
/**
* 通过主键查询单条数据
*
* @param id 主键
* @return 单条数据
*/
@GetMapping("id")
public ResponseEntity<User> queryById(@PathVariable("id") Integer id)
return ResponseEntity.ok(this.userService.queryById(id));
/**
* 新增数据
*
* @param user 实体
* @return 新增结果
*/
@PostMapping
public ResponseEntity<User> add(User user)
return ResponseEntity.ok(this.userService.insert(user));
/**
* 编辑数据
*
* @param user 实体
* @return 编辑结果
*/
@PutMapping
public ResponseEntity<User> edit(User user)
return ResponseEntity.ok(this.userService.update(user));
/**
* 删除数据
*
* @param id 主键
* @return 删除是否成功
*/
@DeleteMapping
public ResponseEntity<Boolean> deleteById(Integer id)
return ResponseEntity.ok(this.userService.deleteById(id));
3.2.3 Service和serviceImpl
/**
 * (User)表服务接口
 *
 * @author makejava
 * @since 2021-12-27 14:39:23
 */
public interface UserService

    /**
     * 分页查询
     * @return
     */
    List<User> queryByPage();

    /**
     * 通过ID查询单条数据
     *
     * @param id 主键
     * @return 实例对象
     */
    User queryById(Integer id);

     /**
     * 新增数据
     *
     * @param user 实例对象
     * @return 实例对象
     */
    User insert(User user);

    /**
     * 修改数据
     *
     * @param user 实例对象
     * @return 实例对象
     */
    User update(User user);

    /**
     * 通过主键删除数据
     *
     * @param id 主键
     * @return 是否成功
     */
    boolean deleteById(Integer id);
serviceImpl
/**
 * (User)表服务实现类
 *
 * @author makejava
 * @since 2021-12-27 14:39:24
 */
@Service("userService")
public class UserServiceImpl implements UserService
    @Resource
    private UserDao userDao;

    @Override
    public List<User> queryByPage()
        return userDao.queryPage();


    /**
     * 通过ID查询单条数据
     *
     * @param id 主键
     * @return 实例对象
     */
    @Override
    public User queryById(Integer id)
        return this.userDao.queryById(id);


    /**
     * 新增数据
     *
     * @param user 实例对象
     * @return 实例对象
     */
    @Override
    @Transactional(rollbackFor=Exception.class)
    public User insert(User user)
        userDao.insert(user);
        int i = 12/0;
        return user;


    /**
     * 修改数据
     *
     * @param user 实例对象
     * @return 实例对象
     */
    @Override
    public User update(User user)
        this.userDao.update(user);
        return this.queryById(user.getId());


    /**
     * 通过主键删除数据
     *
     * @param id 主键
     * @return 是否成功
     */
    @Override
    public boolean deleteById(Integer id)
        return this.userDao.deleteById(id) > 0;
3.2.4 dao接口
/**
 * (User)表数据库访问层
 *
 * @author makejava
 * @since 2021-12-27 14:40:01
 */
public interface UserDao

    /**
     * 通过ID查询单条数据
     *
     * @param id 主键
     * @return 实例对象
     */
    User queryById(Integer id);

    /**
     * 查询指定行数据
     *
     * @param user     查询条件
     * @param pageable 分页对象
     * @return 对象列表
     */
    List<User> queryAllByLimit(User user, @Param("pageable") Pageable pageable);

    /**
     * 统计总行数
     *
     * @param user 查询条件
     * @return 总行数
     */
    long count(User user);

    /**
     * 新增数据
     *
     * @param user 实例对象
     * @return 影响行数
     */
    int insert(User user);

    /**
     * 批量新增数据(MyBatis原生foreach方法)
     *
     * @param entities List<User> 实例对象列表
     * @return 影响行数
     */
    int insertBatch(@Param("entities") List<User> entities);

    /**
     * 修改数据
     *
     * @param user 实例对象
     * @return 影响行数
     */
    int update(User user);

    /**
     * 通过主键删除数据
     *
     * @param id 主键
     * @return 影响行数
     */
    int deleteById(Integer id);

    List<User> queryPage();
3.2.5 mapper文件
<?xml version="1.0" encoding="UTF-8"?>
<!DOCTYPE mapper PUBLIC "-//mybatis.org//DTD Mapper 3.0//EN" "http://mybatis.org/dtd/mybatis-3-mapper.dtd">
<mapper namespace="com.yang.mapper.UserDao">
<resultMap type="com.yang.bean.User" id="UserMap">
<result property="id" column="id" jdbcType="INTEGER"/>
<result property="username" column="username" jdbcType="VARCHAR"/>
<result property="password" column="password" jdbcType="VARCHAR"/>
<result property="email" column="email" jdbcType="VARCHAR"/>
</resultMap>
<!--分页查询 返回类型还可以是user,mybatis会自动把查到的对象封装到集合中-->
<select id="queryPage" resultMap="UserMap">
select
id, username, password, email
from user
</select>
<!--查询单个-->
<select id="queryById" resultMap="UserMap">
select
id, username, password, email
from user
where id = #id
</select>
<!--查询指定行数据-->
<select id="queryAllByLimit" resultMap="UserMap">
select
id, username, password, email
from user
<where>
<if test="id != null">
and id = #id
</if>
<if test="username != null and username != ''">
and username = #username
</if>
<if test="password != null and password != ''">
and password = #password
</if>
<if test="email != null and email != ''">
and email = #email
</if>
</where>
limit #pageable.offset, #pageable.pageSize
</select>
<!--统计总行数-->
<select id="count" resultType="java.lang.Long">
select count(1)
from user
<where>
<if test="id != null">
and id = #id
</if>
<if test="username != null and username != ''">
and username = #username
</if>
<if test="password != null and password != ''">
and password = #password
</if>
<if test="email != null and email != ''">
and email = #email
</if>
</where>
</select>
<!--新增所有列-->
<insert id="insert" keyProperty="id" useGeneratedKeys="true">
insert into user(username, password, email)
values (#username, #password, #email)
</insert>
<insert id="insertBatch" keyProperty="id" useGeneratedKeys="true">
insert into user(username, password, email)
values
<foreach collection="entities" item="entity" separator=",">
(#entity.username, #entity.password, #entity.email)
</foreach>
</insert>
<insert id="insertOrUpdateBatch" keyProperty="id" useGeneratedKeys="true">
insert into user(username, password, email)
values
<foreach collection="entities" item="entity" separator=",">
(#entity.username, #entity.password, #entity.email)
</foreach>
on duplicate key update
username = values(username),
password = values(password),
email = values(email)
</insert>
<!--通过主键修改数据-->
<update id="update">
update user
<set>
<if test="username != null and username != ''">
username = #username,
</if>
<if test="password != null and password != ''">
password = #password,
</if>
<if test="email != null and email != ''">
email = #email,
</if>
</set>
where id = #id
</update>
<!--通过主键删除-->
<delete id="deleteById">
delete from user where id = #id
</delete>
</mapper>四 测试
-
新建一个Tomcat服务,将包部署到Tomcat就可以测试啦
-
页面不好看自己优化吧
五 一些问题
-
pom文件中的依赖都要用到,少了会启动失败
-
mybatis和spring可以全部整合到一起;但是不方便维护
-
在MVC的扫描中只能扫描controller;否则会导致配置事务不起作用
 <!--扫描Controller-->
    <context:component-scan base-package="com.yang">
        <context:include-filter type="annotation"
                                expression="org.springframework.stereotype.Controller" />
        <!--下面这个是防止事务没起作用,spring.xml的父容器先于Servlet的子容器生效,将Service提前加载了。这里不用再进行加载装配;或者像上面的配置一样,直接指定只扫controller-->
        <context:exclude-filter type="annotation" expression="org.springframework.stereotype.Service" />
    </context:component-scan>
以上是关于SSM框架的主要内容,如果未能解决你的问题,请参考以下文章