两种 C++ 多线程编程方式,看完不懂打我...
Posted 阿基米东
tags:
篇首语:本文由小常识网(cha138.com)小编为大家整理,主要介绍了两种 C++ 多线程编程方式,看完不懂打我...相关的知识,希望对你有一定的参考价值。
多线程在实际编程中的重要性不言而喻,对 C++ 而言,当我们需要使用多线程时,有多种方案可供选择。比如 POSIX 线程 pthread、boost::thread 库、C++11 开始支持的 std::thread 库,以及其他一些第三方库 libdispatch(GCD)和 OpenMP 等等。
至于选择哪种多线程编程方案,需要根据你的实际项目、运行平台、团队协作等因素来考虑。一般而言,如果使用的是 Linux 操作系统,那么可以直接使用系统提供的 pthread 库编写多线程 C++ 程序;如果需要跨平台,则推荐使用 C++ 标准的 std::thread 库。
本文将分别介绍 pthread 和 std::thread 库的使用。
pthread
基于 POSIX 开发多线程程序需要包含头文件 <pthread.h>。
#include <pthread.h>
pthread 提供了一个 pthread_t 类型用来表示一个线程。由于 pthread 库不是 Linux 系统默认的库,因此编译时需要加上 -lpthread 选项以链接 pthread 库。
g++ main.cpp -lpthread
pthread 库提供了一系列 API 用于操作线程,常用的一些接口函数原型如下所示。
// 创建线程
int pthread_create(pthread_t *thread, const pthread_attr_t *attr,
                   void *(*start_routine)(void *), void *arg);

// 终止线程
void pthread_exit(void *retval);
int pthread_cancel(pthread_t thread);

// 线程连接和分离
int pthread_join(pthread_t thread, void **retval);
int pthread_detach(pthread_t thread);
关于这些接口的参数和使用说明,可以参考 Linux 多线程 这篇文章。
下面通过一个示例来演示在 C++ 中如何使用 pthread 接口实现多线程。
#include <iostream>
#include <pthread.h>

using namespace std;

// 定义线程数量
#define NUM_THREADS 10

// 线程函数实体
void *thread_entry(void* args)

    // 对传入的参数进行强制类型转换
    // 由无类型指针变为整形数指针,然后再读取
    int tid = *(int *)args;

    cout << tid << ": Hello thread!" << endl;

    pthread_exit(NULL);


int main(void)

    pthread_t tids[NUM_THREADS];
    int index[NUM_THREADS];

    // 创建线程
    for (int i=0; i<NUM_THREADS; i++)

        index[i] = i;
        pthread_create(&tids[i], NULL, thread_entry, (void *)&index[i]);


    // 等待线程完成
    for (int i=0; i<NUM_THREADS; i++)

        pthread_join(tids[i], NULL);


    pthread_exit(NULL);

    return 0;
执行下面命令编译程序,注意需要添加 -pthread 选项以链接 pthread 库。
g++ main.cpp -pthread
运行结果:
0: Hello thread!
5: Hello thread!
1: Hello thread!
9: Hello thread!
8: Hello thread!
2: Hello thread!
7: Hello thread!
4: Hello thread!
6: Hello thread!
3: Hello thread!
你看到的顺序和这里的结果可能不一样,不过没关系,这正是多线程运行的效果。
std::thread
C++11 中加入了 <thread> 头文件,此头文件主要声明了 std::thread 线程类。std::thread 类对线程进行了封装,定义了一些表示线程的类、用于互斥访问的类与方法等。
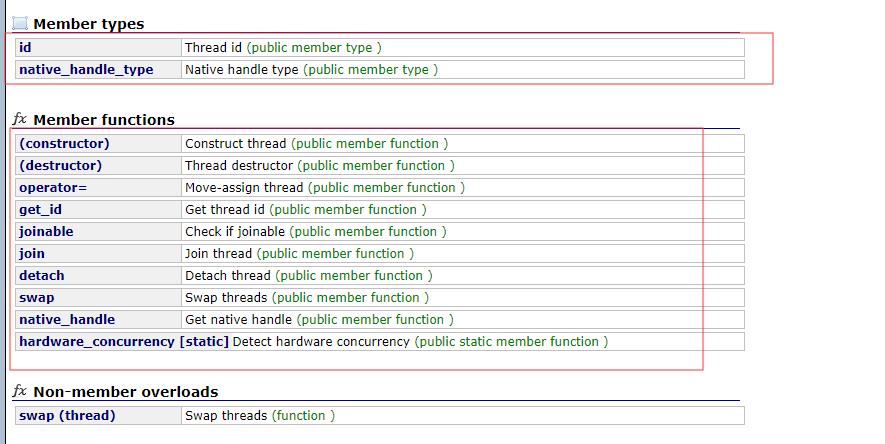
查看 C++ Reference 手册,std::thread 类有以下成员:

其中,成员属性说明如下:
std::thread::id表示线程 ID,定义了在运行时操作系统内唯一能够标识该线程的标识符,同时其值还能指示所标识的线程的状态。native_handle_type是连接 thread 类和操作系统 SDK API 之间的桥梁,如在 Linux g++(libstdc++)里,native_handle_type其实就是 pthread 里面的pthread_t类型。
成员函数的说明如下:
get_id:获取线程 ID,返回一个类型为std::thread::id的对象。joinable:检查线程是否可被 join。检查 thread 对象是否标识一个活动(active)的可行性线程。缺省构造的 thread 对象、已经完成 join 的 thread 对象、已经 detach 的 thread 对象都不是 joinable 的。join:调用该函数会阻塞当前线程。阻塞调用者(caller)所在的线程直至被 join 的std::thread对象标识的线程执行结束。detach:将当前线程对象所代表的执行实例与该线程对象分离,使得线程的执行可以单独进行。一旦线程执行完毕,它所分配的资源将会被释放。swap:交换两个线程对象所代表的底层句柄。native_handle:该函数返回与std::thread具体实现相关的线程句柄。当 thread 类的功能不能满足我们的要求的时候(比如改变某个线程的优先级),可以通过 thread 类实例的native_handle()返回值作为参数来调用相关的 pthread 函数达到目的。hardware_concurrency:静态成员函数,返回当前计算机最大的硬件并发线程数目。基本上可以视为处理器的核心数目。
示例:使用 std::thread 创建多个线程并传递参数
#include <iostream>
#include <thread>

using namespace std;

static const int nt=10;

void Hello(int num)

    cout << num << ": Hello thread!" << endl;


int main(void)

    thread t[nt];

    // 创建线程
    for (int i=0; i<nt; i++)
        t[i] = thread(Hello, i);


    // 等待线程完成
    for (int i=0; i<nt; i++)
        t[i].join();


    return 0;
可以看到,使用 std::thread 创建线程、传递参数,比使用 pthread 库接口方便多了!
执行 g++ main.cpp -pthread && ./a.out 编译运行以上程序,输出结果如下:
0: Hello thread!
4: Hello thread!
3: Hello thread!
5: Hello thread!
6: Hello thread!
7: Hello thread!
8: Hello thread!
9: Hello thread!
2: Hello thread!
1: Hello thread!
上述例子使用 join() 等待子线程结束,其实我们也可以使用 detach() 不等待子线程。
join() 表示主线程需要等待子线程结束方可执行下一步(串行),而 detach() 则表示让子线程放飞自我,独立于主线程并发执行,主线程后续代码段无需等待。
示例:使用 detach 实现多线程并发
#include <iostream>
#include <thread>

using namespace std;

static const int nt=10;

void Hello(int num)

    cout << num << ": Hello thread!" << endl;


int main(void)

    thread t[nt];

    for (int i=0; i<nt; i++)
        t[i] = thread(Hello, i);
        t[i].detach();


    cout << "Main thread exit." << endl;

    return 0;
执行 g++ main.cpp -pthread && ./a.out 编译运行以上程序,输出结果如下:
0: Hello thread!
1: Hello thread!
3: Hello thread!
2: Hello thread!
4: Hello thread!
6: Hello thread!
8: Hello thread!
Main thread exit.
9: Hello thread!
可以看到,主线程比子线程先退出了。
点击 GetIoT.tech 学习更多 C++ 编程知识!

以上是关于两种 C++ 多线程编程方式,看完不懂打我...的主要内容,如果未能解决你的问题,请参考以下文章