自定义形状seekbar学习--方向盘view
Posted andylauren
tags:
篇首语:本文由小常识网(cha138.com)小编为大家整理,主要介绍了自定义形状seekbar学习--方向盘view相关的知识,希望对你有一定的参考价值。
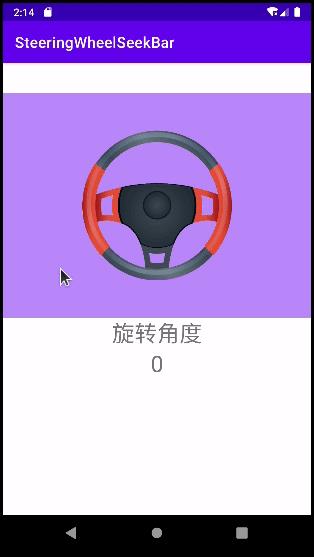
上一篇文章实现了档位的view例子,这一篇再来实现一个方向盘的view,主要实现一个需要跟手转动的图片,并且返回转动的角度,主要思路就是在重绘时进行前景的转动设置。
下面我根据我自己的工程讲解一下
先上一张我自己的类图

View控件主要有3个类,
SeekBarBackgroundView.java画背景类,可以设置背景,这个类里面什么也没做,只是继承了view,提供background的设置属性
SeekBarForegroundView.java画前景类,例子里显示了方向盘的图片,转动这个view达到方向盘转动的效果
SteeringWheelSeekBar.java触摸事件的处理,并提供对外接口
自定义属性
我们需要在前景view自定义一些属性,需要在values目录新建attr.xml文件
里面写上我们自定义的属性,这些属性可以在xml中使用,在代码中进行获取,处理
<resources>

    <declare-styleable name="SteeringWheelSeekBar">
        <attr name="foregroundSize" format="dimension" />
        <attr name="foreground" format="reference" />
    </declare-styleable>

</resources>
具体的格式和类型可以看这个文章,
Android中自定义属性attr.xml的格式详解 - kim_liu - 博客园
Android自定义控件——自定义属性_Vincent的专栏-CSDN博客_android 自定义控件属性
这个文章把常用的类型都举例了,使用处理方法在后面的代码中会介绍。
显示前景
前景就是一个简单的view,view可以设置大小和图片,在描画时进行旋转角度的设置。
在构造函数中将属性传入。
public SeekBarForegroundView(Context context, int foregroundSize, int foreground)
    super(context);
    this.foregroundSize = foregroundSize;
    this.foreground = foreground;
    init();
private void init()
    paint = new Paint();
    //设置抗锯齿,防止过多的失真
    paint.setAntiAlias(true);
    if (foreground != 0)
        bitmapPaint = BitmapFactory.decodeResource(this.getResources(), foreground);
        // 指定图片绘制区域(原图大小)
        src = new Rect(0, 0, bitmapPaint.getWidth(), bitmapPaint.getHeight());
        // 指定图片在屏幕上显示的区域(ballSize大小)
        dst = new Rect(0, 0, foregroundSize, foregroundSize);
初始化的时候对前景图片进行判断,如果是默认值,也就是0则不绘制图片。
在描画中判断如果没有前景图片则绘制一个纯色圆。
如果有前景色则设置旋转属性。
@Override
protected void onDraw(Canvas canvas)
    if (foreground == 0)
        canvas.drawCircle((float) getMeasuredWidth() / 2, (float) getMeasuredWidth() / 2, (float) getMeasuredWidth() / 2, paint);
     else
        // 旋转
        matrix.setRotate(deg, (float) foregroundSize / 2, (float) foregroundSize / 2);
        canvas.setMatrix(matrix);
        canvas.drawBitmap(bitmapPaint, src, dst, paint);
在提供一个给group view调用的角度设置函数。
/**
 * @param degrees 旋转角度
 */
public void setDegrees(float degrees)
    deg = degrees;
    postInvalidate();
ViewGroup代码
主要读取属性值,并实例两个view,还需要处理touch逻辑,并给应用通知角度。
在构造中读取属性值,并实例两个view。
public SteeringWheelSeekBar(Context context, AttributeSet attrs)
    super(context, attrs);
    this.context = context;
    TypedArray array =
            context.obtainStyledAttributes(attrs, R.styleable.SteeringWheelSeekBar);
    foregroundSize =
            array.getDimensionPixelSize(R.styleable.SteeringWheelSeekBar_foregroundSize, 90);
    foregroundId = array.getResourceId(R.styleable.SteeringWheelSeekBar_foreground, 0);
    array.recycle();
    init();


private void init()
    centerPoint = new PointF();
    pressPoint = new PointF();
    movePoint = new PointF();

    // 背景view
    SeekBarBackgroundView backgroundView = new SeekBarBackgroundView(context);
    backgroundView.setLayoutParams(new LayoutParams(ViewGroup.LayoutParams.MATCH_PARENT,
            ViewGroup.LayoutParams.MATCH_PARENT));
    addView(backgroundView);

    foregroundView = new SeekBarForegroundView(context, foregroundSize, foregroundId);
    addView(foregroundView);
处理touch事件
@Override
public boolean onTouchEvent(MotionEvent event)
    switch (event.getAction())
        case MotionEvent.ACTION_DOWN:
            float downX = event.getX();
            float downY = event.getY();
            pressPoint.set(downX, downY);
            return true;
        case MotionEvent.ACTION_MOVE:
            movePoint.set(event.getX(), event.getY());
            // 设置旋转角度
            foregroundView.setDegrees(deg + getRotationDegrees());
            // 当前角度
            float currentDegrees = deg + getRotationDegrees();
            if (lastDegrees != currentDegrees)
                lastDegrees = currentDegrees;
                if (listener != null)
                    listener.OnProgressChanged((int) currentDegrees);


            break;
        case MotionEvent.ACTION_UP:
            movePoint.set(event.getX(), event.getY());
            deg += getRotationDegrees();
            if (listener != null)
                listener.OnProgressChanged((int) deg);

            performClick();
            break;
        default:
            // 当手指移出View时,目前好像不会进入到这个case中
            Log.w("TAG", "onTouchEvent default: " + event.getX() + "," + event.getY());
            movePoint.set(event.getX(), event.getY());
            deg += getRotationDegrees();
            if (listener != null)
                listener.OnProgressChanged((int) deg);

            break;

    return super.onTouchEvent(event);
这里有一个地方需要用到数学知识,就是根据中心点坐标,按下点坐标和移动点坐标计算出旋转角度,并设置给前景view去描画。
设置旋转角度时需要设置顺时针旋转还是逆时针旋转,逆时针旋转为负角度,顺时针为正角度。
角度的计算通过高中知识,已知三边,计算夹角公式,cosA=(b平方+c平方-a平方)/2cb
double AB;  // 原点到按下点线段
double AC;  // 原点到移动点线段
double BC;  // 按下点到移动点线段
AB = Math.sqrt(Math.pow(pressPoint.x - centerPoint.x, 2) + Math.pow(pressPoint.y - centerPoint.y, 2));
AC = Math.sqrt(Math.pow(movePoint.x - centerPoint.x, 2) + Math.pow(movePoint.y - centerPoint.y, 2));
BC = Math.sqrt(Math.pow(movePoint.x - pressPoint.x, 2) + Math.pow(movePoint.y - pressPoint.y, 2));
double temp = (Math.pow(AB, 2) + Math.pow(AC, 2) - Math.pow(BC, 2)) / (2 * AC * AB);
而旋转方向通过移动点是否在中心点与按下点连线的上下方判断,但是在斜率的正负会影响大于小于的判断,所以需要先判断斜率,然后再判断上下方。
// 计算顺时针逆时针
// 由于原点x与按下点x大小影响斜率正负,斜率不同计算线段上下方算法不同,斜率不同判断逻辑相反
//        ------------->x
//        |  1   |   2
//        |      |
//        |------o------
//        |      |
//        ↓  4   |   3
//        y
// 计算移动点在AB线段上方还是下方
float yyy = (centerPoint.y - pressPoint.y) / (centerPoint.x - pressPoint.x) * movePoint.x + (pressPoint.y * centerPoint.x - centerPoint.y * pressPoint.x) / (centerPoint.x - pressPoint.x);
if (centerPoint.x < pressPoint.x)
    // 2象限 3象限
    if (yyy > movePoint.y)
        // 顺时针
        return -(float) (Math.acos(temp) * (180 / Math.PI));
     else
        // 逆时针
        return (float) (Math.acos(temp) * (180 / Math.PI));

 else
    // 1象限 4象限
    if (yyy > movePoint.y)
        // 顺时针
        return (float) (Math.acos(temp) * (180 / Math.PI));
     else
        // 逆时针
        return -(float) (Math.acos(temp) * (180 / Math.PI));
完整代码如下:
/**
 * @return 返回相对于按下点的旋转角度
 */
private float getRotationDegrees()
    double AB;  // 原点到按下点线段
    double AC;  // 原点到移动点线段
    double BC;  // 按下点到移动点线段
    AB = Math.sqrt(Math.pow(pressPoint.x - centerPoint.x, 2) + Math.pow(pressPoint.y - centerPoint.y, 2));
    AC = Math.sqrt(Math.pow(movePoint.x - centerPoint.x, 2) + Math.pow(movePoint.y - centerPoint.y, 2));
    BC = Math.sqrt(Math.pow(movePoint.x - pressPoint.x, 2) + Math.pow(movePoint.y - pressPoint.y, 2));
    double temp = (Math.pow(AB, 2) + Math.pow(AC, 2) - Math.pow(BC, 2)) / (2 * AC * AB);
    // 计算顺时针逆时针
    // 由于原点x与按下点x大小影响斜率正负,斜率不同计算线段上下方算法不同,斜率不同判断逻辑相反
    //        ------------->x
    //        |  1   |   2
    //        |      |
    //        |------o------
    //        |      |
    //        ↓  4   |   3
    //        y
    // 计算移动点在AB线段上方还是下方
    float yyy = (centerPoint.y - pressPoint.y) / (centerPoint.x - pressPoint.x) * movePoint.x + (pressPoint.y * centerPoint.x - centerPoint.y * pressPoint.x) / (centerPoint.x - pressPoint.x);
    if (centerPoint.x < pressPoint.x)
        // 2象限 3象限
        if (yyy > movePoint.y)
            // 顺时针
            return -(float) (Math.acos(temp) * (180 / Math.PI));
         else
            // 逆时针
            return (float) (Math.acos(temp) * (180 / Math.PI));

     else
        // 1象限 4象限
        if (yyy > movePoint.y)
            // 顺时针
            return (float) (Math.acos(temp) * (180 / Math.PI));
         else
            // 逆时针
            return -(float) (Math.acos(temp) * (180 / Math.PI));
然后就是设置一个listener给应用通知旋转角度。
// 设置最终档位监听
public void setListener(SteeringWheelSeekBar.OnProgressChangedListener listener)
    this.listener = listener;
这个listener在touch事件中去触发。
至此,我们就把所有需要的完成了,只需要写一个demo测试一下。
Xml如下
<?xml version="1.0" encoding="utf-8"?>
<FrameLayout xmlns:android="http://schemas.android.com/apk/res/android"
    xmlns:app="http://schemas.android.com/apk/res-auto"
    xmlns:tools="http://schemas.android.com/tools"
    android:layout_width="match_parent"
    android:layout_height="match_parent"
    tools:context=".MainActivity">

    <androidx.appcompat.widget.LinearLayoutCompat
        android:layout_width="match_parent"
        android:layout_height="match_parent"
        android:gravity="center_horizontal"
        android:orientation="vertical">


        <com.example.myseekbar.SteeringWheelSeekBar
            android:id="@+id/seek_bar"
            android:layout_width="600dp"
            android:layout_height="300dp"
            android:layout_marginTop="40dp"
            android:background="@color/purple_200"
            app:foregroundSize="200dp"
            app:foreground="@drawable/test6"/>

        <TextView
            android:layout_width="wrap_content"
            android:layout_height="wrap_content"
            android:gravity="center"
            android:text="旋转角度"
            android:textSize="30sp" />

        <TextView
            android:id="@+id/seek_bar_progress"
            android:layout_width="wrap_content"
            android:layout_height="wrap_content"
            android:gravity="center"
            android:text="0"
            android:textSize="30sp" />

    </androidx.appcompat.widget.LinearLayoutCompat>
</FrameLayout>
Mainactivity如下
package com.example.myseekbar;

import androidx.appcompat.app.AppCompatActivity;

import android.os.Bundle;
import android.widget.TextView;

public class MainActivity extends AppCompatActivity

    @Override
    protected void onCreate(Bundle savedInstanceState)
        super.onCreate(savedInstanceState);
        setContentView(R.layout.activity_main);

        final TextView textView = findViewById(R.id.seek_bar_progress);

        SteeringWheelSeekBar seekBar = findViewById(R.id.seek_bar);
        seekBar.setListener(level -> textView.setText(String.valueOf(level)));
效果如下

这里只讲述了一些算法和逻辑,具体流程需要学习上面的博文,一些代码细节还需要自己研究源码,源码如下
希望通过这个代码的学习能够加深对自定义view的理解。
以上是关于自定义形状seekbar学习--方向盘view的主要内容,如果未能解决你的问题,请参考以下文章