4RocketMQ 源码解析之 网络通信 Netty
Posted carl-zhao
tags:
篇首语:本文由小常识网(cha138.com)小编为大家整理,主要介绍了4RocketMQ 源码解析之 网络通信 Netty相关的知识,希望对你有一定的参考价值。
RocketMQ 的架构图如下所示:
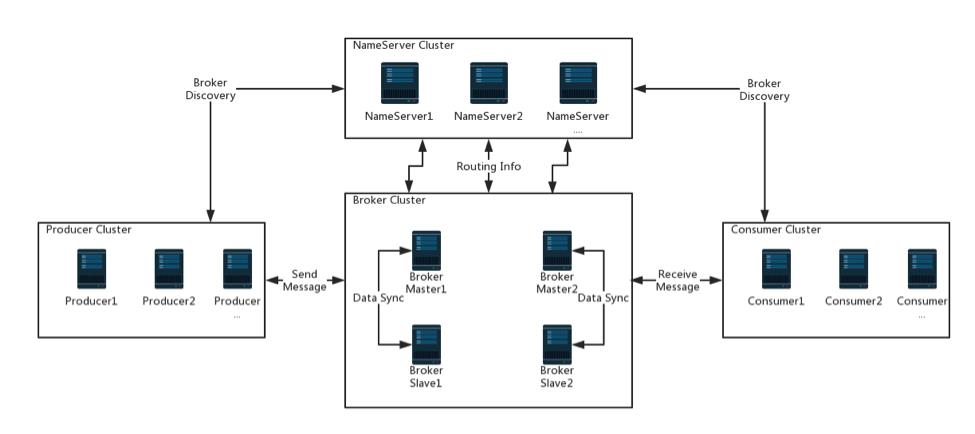
可以看到 RocketMQ 里面有消息发送方(Producer)、配置中心(NameServer)、消息存储中心(Broker) 以及消息消费方(Consumer)。而且它们之间也需要相互通信的,那么它们是怎么通信的呢?因为 RocketMQ 是通过 Java 语言编写的,对于网络通信它就选择了 Netty 并且通过自定义协议来完成各个角色之间的高效的网络通信。
1、为什么选择 Netty?
在网络编码领域,Netty 是 Java 的卓越框架。它封装了 Java NIO 操作的复杂性,使得开发者能够使用其提供的简易 API 就能够开发出高效的网络程序。
- 设计:统一的 API ,支持多种传输类型,阻塞和非阻塞的简单,简单而强大的线程模型,真正的无连接数据报套接字支持。链接逻辑组件以支持复用
- 易于使用:详实的 javadoc 和大量的示例集,不需要超过 JDK 1.6 的依赖
- 性能:拥有比 Java 核心 API 更高的吞吐量以及更低的延迟,得益于池化和复用,拥有更低的资源消耗,最少的内存复制
- 健壮性:不会因为慢速、快速或者超载的连接而导致 OutOfMemoryError。消除在高速网络中 NIO 应用程序常见的不公平读/写比率
- 安全性:完整的 SSL/TLS 以及 StartTLS 支持,可用于受限环境下,如 Applet 和 OSGI
- 社区驱动:发布快速而频繁
很多公司包含:Apple、Twitter、Facebook、Google 都在使用 Netty,并且很多流行的开源项目也在使用 Netty如:Vert.x 、Apache Cassandra 和 Elasticsearch,它们所有的核心代码都是利用了 Netty 强大的网络抽象。
2、Netty 使用 Demo
要编写 Netty 服务端以及客户端通信特别简单。下面我们来写一个简单的 Demo。
2.1 Netty Server
编写 Server 端业务处理类,因为需要响应客户端传入的信息,所以需要实现 ChannelInboundHandler 接口。作为一个简单的 hello world 程序,我们可以继承 ChannelInboundHandlerAdapter 它提供了 ChannelInboundHandler 的默认实现,我们只需要重写需要关注的方法就行了。
EchoServerHandler
@ChannelHandler.Sharable
public class EchoServerHandler extends ChannelInboundHandlerAdapter

    @Override
    public void channelRead(ChannelHandlerContext ctx, Object msg) throws Exception
        // 将接收到的消息写给发送者,而不冲刷出站消息
        ByteBuf in = (ByteBuf) msg;
        System.out.println("Server received : " + in.toString(CharsetUtil.UTF_8));
        ctx.write(in);


    @Override
    public void channelReadComplete(ChannelHandlerContext ctx) throws Exception
        // 将未决消息冲刷到远程节点,并且关闭该 Channel
        ctx.writeAndFlush(Unpooled.EMPTY_BUFFER).addListener(ChannelFutureListener.CLOSE);


    @Override
    public void exceptionCaught(ChannelHandlerContext ctx, Throwable cause) throws Exception
        // 打印异常堆栈
        cause.printStackTrace();
        // 关闭该 Channel
        ctx.close();
下面就需要创建引导服务器,绑定服务器并且监听并且接收传入连接请求的端口,配置 Channel ,用来将传入的入站消息通知给 EchoServerHandler 实例。
EchoServer.java
public class EchoServer

    private final int port;

    public EchoServer(int port)
        this.port = port;


    public static void main(String[] args) throws Exception
        new EchoServer(8080).start();


    public void start() throws Exception
        final EchoServerHandler serverHandler = new EchoServerHandler();
        EventLoopGroup boss = new NioEventLoopGroup();
        EventLoopGroup worker = new NioEventLoopGroup();
        try
            ServerBootstrap bootstrap = new ServerBootstrap();
            bootstrap.group(boss, worker)
                        .channel(NioserverSocketChannel.class)
                        .localAddress(new InetSocketAddress(port))
                        .childHandler(new ChannelInitializer<SocketChannel>()
                            @Override
                            protected void initChannel(SocketChannel socketChannel) throws Exception
                                socketChannel.pipeline().addLast(serverHandler);

                        );
            ChannelFuture future = bootstrap.bind().sync();
            future.channel().closeFuture().sync();
         finally
            boss.shutdownGracefully().sync();
            worker.shutdownGracefully().sync();
上面的服务主要做了以下几件事:
- main() 方法引导了服务器,引导过程中所需要以下步骤
- 创建一个 ServerBootstrap 的实例用于引导和绑定服务
- 创建两个 EventLoopGroup 实例,boss 用于接收请求,而 worker 用于真正的请求处理
- 指定服务器绑定到本地的 InetSocketAddress
- 使用一个 EventLoopGroup 的实例初始化每一个新的 Channel
- 调用 ServerBootstrap.bind() 方法绑定服务器
这个时候服务器已经初始化好了,可以 接收客户端发送过来的请求了。
2.2 Netty Client
首先编码客户端处理类,客户端处理类需要发送一个或者多个消息到服务器。并且在发送消息之后接收服务器发回的响应,最后关闭连接。
EchoClientHandler.java
@ChannelHandler.Sharable
public class EchoClientHandler extends ChannelInboundHandlerAdapter

    @Override
    public void channelActive(ChannelHandlerContext ctx) throws Exception
        // 当被通知 Channel 活跃的时候,发送消息
        ctx.writeAndFlush(Unpooled.copiedBuffer("Hello RocketMQ!", CharsetUtil.UTF_8));


    @Override
    public void channelRead(ChannelHandlerContext ctx, Object msg) throws Exception
        // 打印服务端响应的信息
        ByteBuf in = (ByteBuf) msg;
        System.out.println("Client received : " + in.toString(CharsetUtil.UTF_8));


    @Override
    public void exceptionCaught(ChannelHandlerContext ctx, Throwable cause) throws Exception
        // 打印异常,并关闭 Channel
        cause.printStackTrace();
        ctx.close();
下面我们就需要编写客户端引导类,用于连接服务端并且与服务端进行通信。
EchoClient.java
public class EchoClient

    private final String host;

    private final int prot;

    public EchoClient(String host, int prot)
        this.host = host;
        this.prot = prot;


    public static void main(String[] args) throws Exception
        new EchoClient("localhost", 8080).start();


    public void start() throws Exception
        EventLoopGroup group = new NioEventLoopGroup();
        try
            Bootstrap bootstrap = new Bootstrap();
            bootstrap.group(group)
                        .channel(NioSocketChannel.class)
                        .remoteAddress(new InetSocketAddress(host, prot))
                        .handler(new ChannelInitializer<SocketChannel>()
                            @Override
                            protected void initChannel(SocketChannel ch) throws Exception
                                ch.pipeline().addLast(new EchoClientHandler());

                        );
            ChannelFuture future = bootstrap.connect().sync();
            future.channel().closeFuture().sync();
         finally
            group.shutdownGracefully().sync();
以上代码做的事如下:
- 创建一个 Bootstrap 实例以初始化客户端
- 创建一个 EventLoopGroup 实例处理创建新的连接以及处理入站和出站数据
- 为连接服务器创建一个 InetSocketAddress 实例
- 当连接被建立时,一个 EchoClientHandler 实例会被安装到 ChannelPipeline 中
- 一切设置完成后,调用 Bootstrap.connect() 方法连接到远程节点
下面我们就可以测试程序的正确性了。
2.3 Test
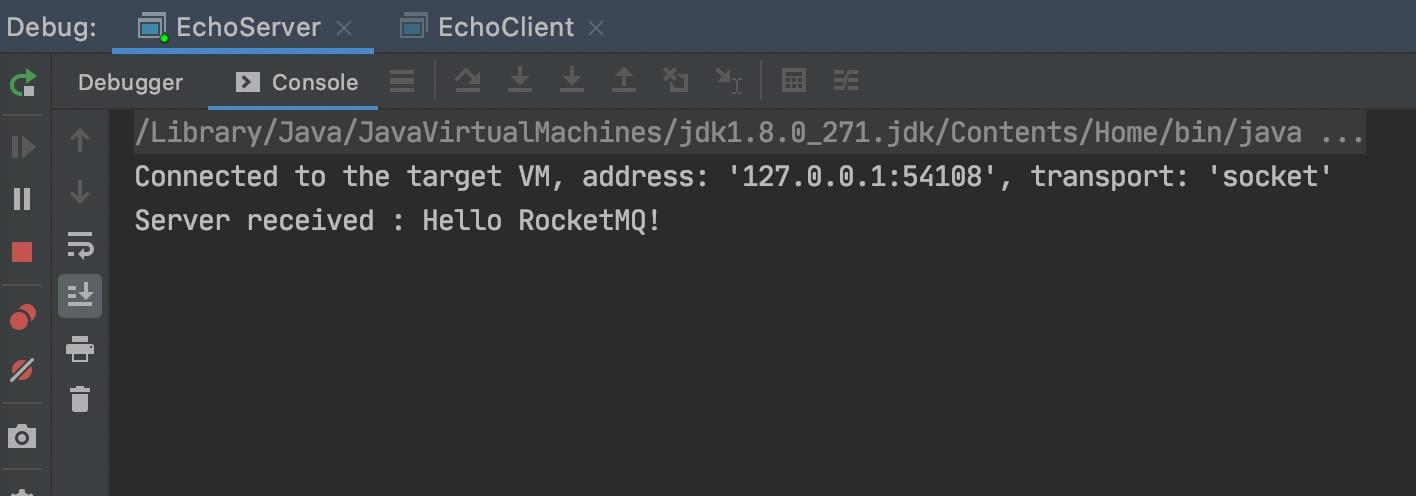
运行服务端引导类 EchoServer,然后运行客户端引导类 EchoClient。此时在服务端的控制台打印以下结果:
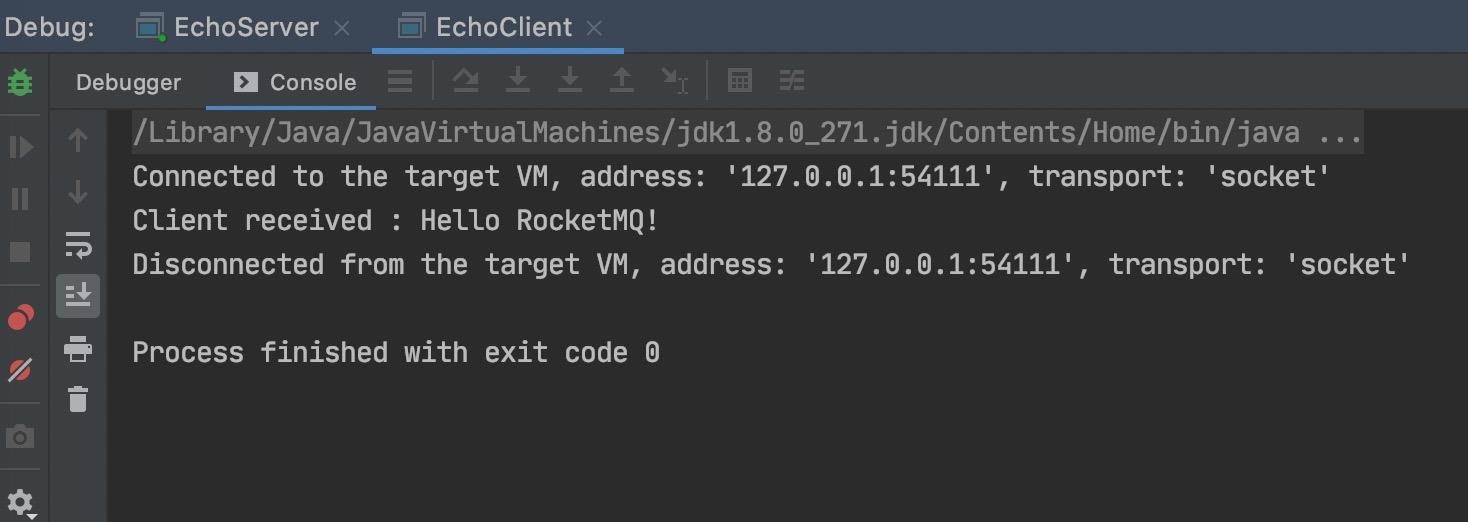
接着在客户端的控制台打印以下结果:
3、RocketMQ 中的 Netty
在 RocketMQ 对于网络通信抽象成了 RemotingService,它的类继承结构如下:
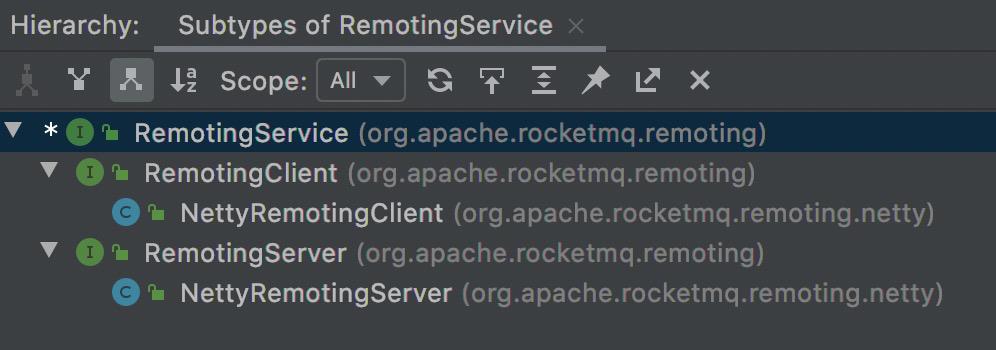
这个类负责客户端、服务端的启动、关闭并且扩展类 RPCHook。
public interface RemotingService
    void start();

    void shutdown();

    void registerRPCHook(RPCHook rpcHook);
3.1 RemotingServer
这个是远程服务的网络抽象,它提供了对于客户端请求的处理,以及对客户端的调用。
public interface RemotingServer extends RemotingService

	// 注册处理器,处理不同的请求
    void registerProcessor(final int requestCode, final NettyRequestProcessor processor,
        final ExecutorService executor);

	// 注册默认处理器,处理 NameServer 和 对Admin 自身操作
    void registerDefaultProcessor(final NettyRequestProcessor processor, final ExecutorService executor);

	// 本地监听端口
    int localListenPort();

	// 根据请求码获取处理类
    Pair<NettyRequestProcessor, ExecutorService> getProcessorPair(final int requestCode);

	// 同步调用远程服务
    RemotingCommand invokeSync(final Channel channel, final RemotingCommand request,
        final long timeoutMillis) throws InterruptedException, RemotingSendRequestException,
        RemotingTimeoutException;

	// 异常调用远程服务
    void invokeAsync(final Channel channel, final RemotingCommand request, final long timeoutMillis,
        final InvokeCallback invokeCallback) throws InterruptedException,
        RemotingTooMuchRequestException, RemotingTimeoutException, RemotingSendRequestException;

	// Oneway 模式调用
    void invokeOneway(final Channel channel, final RemotingCommand request, final long timeoutMillis)
        throws InterruptedException, RemotingTooMuchRequestException, RemotingTimeoutException,
        RemotingSendRequestException;
在 RemotingServer 的实现类NettyRemotingServer#start 方法中会通过 Netty 启动服务,类似于我们第二章节的 EchoServer#start 的启动。
3.2 RemotingClient
这个是客户端服务的网络抽象,它提供了对于远程服务的调用:包含 NameServer 以及 Broker。因为 Netty 网络通信是异常的,当调用其它服务处理的时候,需要把对应的 Channel 保存到本地。等到远程处理完毕之后从本地找到对应的调用然后进行处理,所以提供了一个 registerProcessor 当调用远程服务的时候把就请求注册到本地 Map 当中
public interface RemotingClient extends RemotingService

	// 更新 NameServer 列表地址
    void updateNameServerAddressList(final List<String> addrs);

	// 获取 NameServer 列表地址
    List<String> getNameServerAddressList();

	// 同步远程调用
    RemotingCommand invokeSync(final String addr, final RemotingCommand request,
        final long timeoutMillis) throws InterruptedException, RemotingConnectException,
        RemotingSendRequestException, RemotingTimeoutException;

	// 异步远程调用
    void invokeAsync(final String addr, final RemotingCommand request, final long timeoutMillis,
        final InvokeCallback invokeCallback) throws InterruptedException, RemotingConnectException,
        RemotingTooMuchRequestException, RemotingTimeoutException, RemotingSendRequestException;

	// Oneway 模式调用(不需要返回)
    void invokeOneway(final String addr, final RemotingCommand request, final long timeoutMillis)
        throws InterruptedException, RemotingConnectException, RemotingTooMuchRequestException,
        RemotingTimeoutException, RemotingSendRequestException;

	// 注册请求处理到本地,等待远程服务异步响应处理
    void registerProcessor(final int requestCode, final NettyRequestProcessor processor,
        final ExecutorService executor);

	// 设置异步回调线程池处理
    void setCallbackExecutor(final ExecutorService callbackExecutor);

	// 获取异步回调线程池处理
    ExecutorService getCallbackExecutor();

	// 是否可写
    boolean isChannelWritable(final String addr);
在 RemotingClient的实现类NettyRemotingClient#start 方法中会通过 Netty 启动服务,类似于我们第二章节的 EchoClient#start 的启动。
3.3 NettyRemotingAbstract
不管是 NettyRemotingServer 还是 NettyRemotingClient 它们都继承了 NettyRemotingAbstract 这个类。它主要提供了以下几个功能点:
processMessageReceived:处理消息,包含请求消息以及响应消息。invokeSyncImpl:同步调用网络请求invokeAsyncImpl:异步调用网络请求invokeOnewayImpl:Oneway 模式进行网络请求
下面我们来看一下对于消息请求的处理,它主要的逻辑就是根据请求码找到对应的 NettyRequestProcessor 处理类进行处理。处理完成之后然后把请求响应给请求方 Channel。
- 所有的请求码都在
org.apache.rocketmq.common.protocol.RequestCode类中,里面包含了 Producer、NameServer、Broker 以及 Consumer 之间的所有请求。具体代码我就不贴出来了,大家可以自行查看,后续我们在源码分析当中遇到场景在具体分析。 NettyRequestProcessor这个接口定义了不同的请求码的具体处理。
首先我们来看一下NettyRequestProcessor 这个接口的类体系结构:
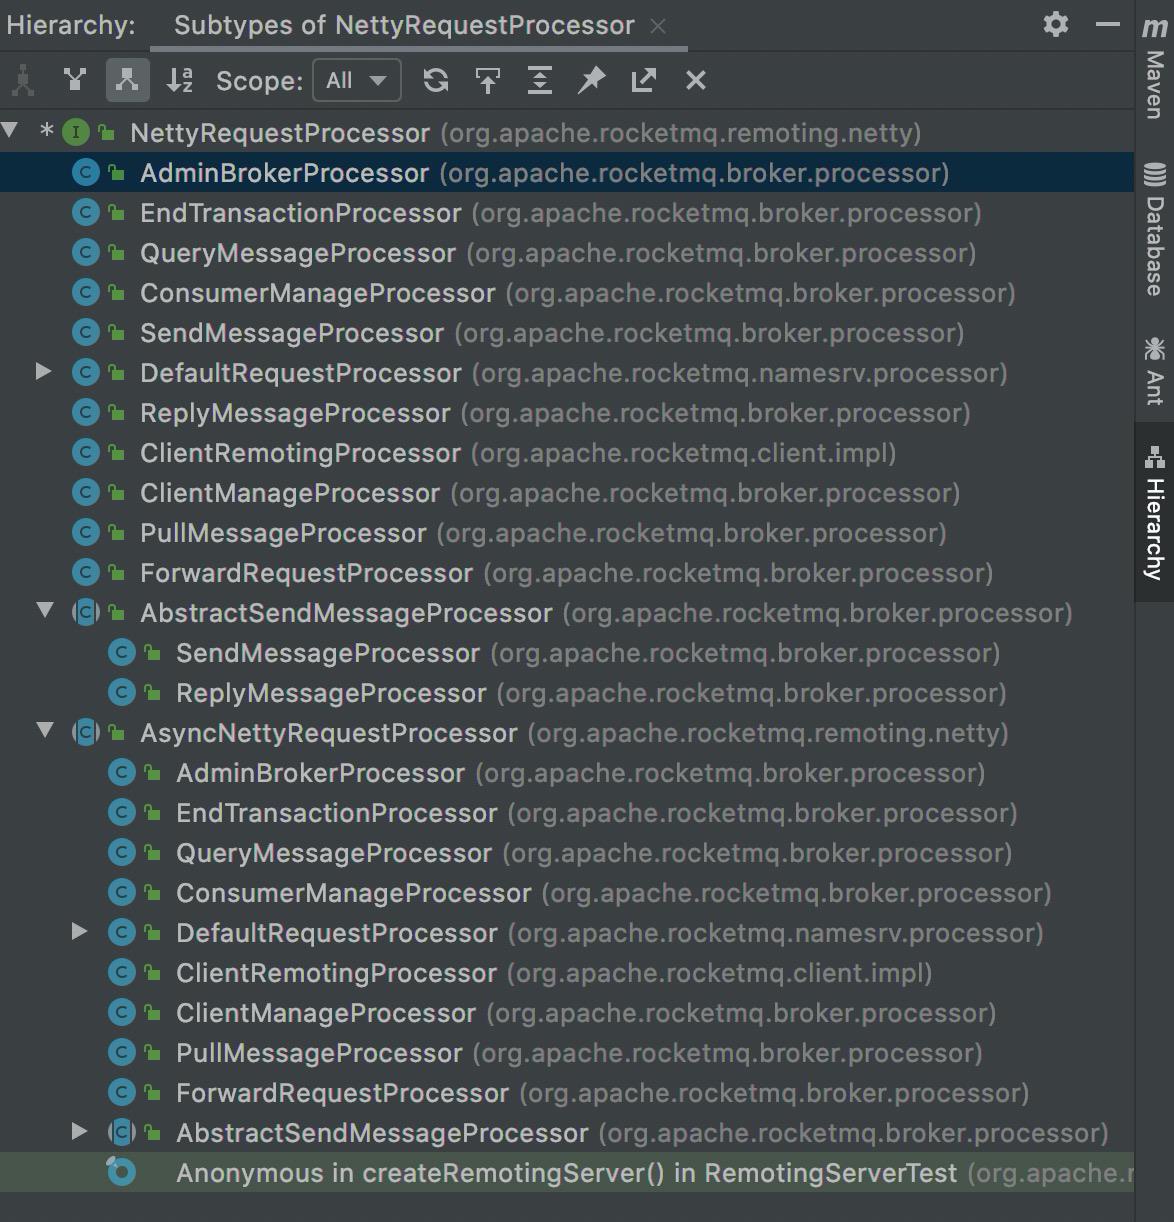
其实根据类名称都大体可以猜出这个处理类的具体作用了。
3.4 MQClientInstance
在 RocketMQ 中如果是需要主动发送消息的话,就会通过 MQClientInstance 进行网络请求。这个类里面比较核心的字段为:
MQClientAPIImpl mQClientAPIImpl:封装了与NameServer 的网络连接ConcurrentMap<String/* Broker Name */, HashMap<Long/* brokerId */, String/* address */>> brokerAddrTable:客户端(Producer或者Consumer) 在连接NameServer可以获取到Broker相关的信息
当然还有其它比较核心的字段,这里就不一一介绍了。我们只需要知道,不管是 Producer 或者 Consumer 都可以通过它建立与 NameServer 的连接获取到 Broker 保存到 NameServer 的元数据信息。
在 MQClientAPIImpl 类当中包含了 Producer 或者 Consumer 关心的核心功能:从 NameServer更新元数据信息、Producer发送消息到 Broker、Consumer 从 Broker拉取消息等。
在 MQClientAPIImpl 初始化的时候,还会注册一些默认需要的请求码的处理类到本地内存映射当中:
    public MQClientAPIImpl(final NettyClientConfig nettyClientConfig,
        final ClientRemotingProcessor clientRemotingProcessor,
        RPCHook rpcHook, final ClientConfig clientConfig)
        this.clientConfig = clientConfig;
        topAddressing = new TopAddressing(MixAll.getWSAddr(), clientConfig.getUnitName());
        this.remotingClient = new NettyRemotingClient(nettyClientConfig, null);
        this.clientRemotingProcessor = clientRemotingProcessor;

        this.remotingClient.registerRPCHook(rpcHook);
        // 检查事务消息状态
        this.remotingClient.registerProcessor(RequestCode.CHECK_TRANSACTION_STATE, this.clientRemotingProcessor, null);
        // 通知 Consumer ID 变更
        this.remotingClient.registerProcessor(RequestCode.NOTIFY_CONSUMER_IDS_CHANGED, this.clientRemotingProcessor, null);
        // 重置 Consumer 的 Offset
        this.remotingClient.registerProcessor(RequestCode.RESET_CONSUMER_CLIENT_OFFSET, this.clientRemotingProcessor, null);
        // 获取 Consumer 的客户端状态
        this.remotingClient.registerProcessor(RequestCode.GET_CONSUMER_STATUS_FROM_CLIENT, this.clientRemotingProcessor, null);
        // 获取 Consumer 的运行信息
        this.remotingClient.registerProcessor(RequestCode.GET_CONSUMER_RUNNING_INFO, this.clientRemotingProcessor, null);
        // 直接消费消息
        this.remotingClient.registerProcessor(RequestCode.CONSUME_MESSAGE_DIRECTLY, this.clientRemotingProcessor, null);
        // 发送应答消息给客户端
        this.remotingClient.registerProcessor(RequestCode.PUSH_REPLY_MESSAGE_TO_CLIENT, this.clientRemotingProcessor, null);
当然网络通信里面的细节还是很多的比如编码、解码、发送消息、接收消息以及其它的细节。
相信基于上面的分享,大家会 RocketMQ 的网络通信有了一个大体的映像。自己分析起来会更加顺畅。当然对于消息发送、消息接收、编/解码这种核心流程后续我会分析的。其它细节就需要大家自已多多分析了。
以上是关于4RocketMQ 源码解析之 网络通信 Netty的主要内容,如果未能解决你的问题,请参考以下文章