FFmpeg解封装解码音频和视频(分别使用OpenGL和OpenAL播放)
Posted grayondream
tags:
篇首语:本文由小常识网(cha138.com)小编为大家整理,主要介绍了FFmpeg解封装解码音频和视频(分别使用OpenGL和OpenAL播放)相关的知识,希望对你有一定的参考价值。
1 ffmpeg解码大致流程
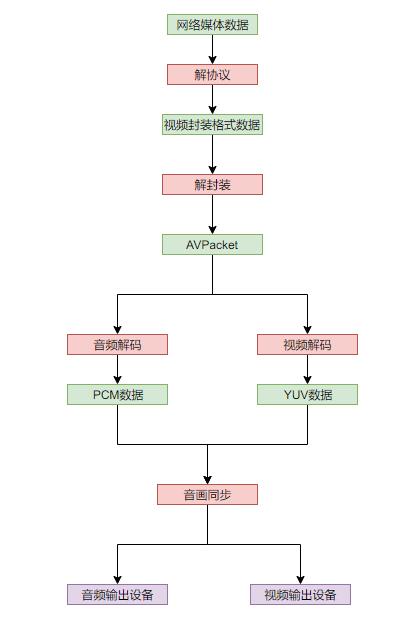
下图是ffmpeg解码播放音视频的基本流程:
- 首先是网络媒体解协议,解协议之后得到对应的媒体文件比如mp4,ts等,这些格式是媒体文件的封装格式,也就是将音频,视频,字幕等码流编码后打包到一起的格式;
- 之后就是对容器进行解封装,解封装能够分别得到对应的流的编码流,比如视频可能是h264码流,音频可能是aac码流,这些都是对应的流经过编码后的数据;
- 再然后就是需要将编码的流解码为裸流,视频的裸流一般为YUV或者RGB数据,而音频的裸流一般为PCM数据,这些数据也是播放时时真正用到的数据;
- 因为音频和视频文件大小差距比较大解码速度也不一样,一般音频比较小解码比较快,因此会存在二者不同步的情况。也就是说经过相同时间段得到的音频和视频不同步,如果将解码得到的数据立刻输送到播放设备就会出现任务说话口型不对等不同的问题,因此需要音画同步;
- 最后就是经过同步的数据送到对应的设备中播放。

2 解复用
2.1 解复用音频和视频
使用ffmpeg解复用相对比较简单,直接利用对应的api从文件中读取一个又一个packet然后写入到文件即可。下面代码解复用的基本流程是:
- 使用
avformat_open_input打开媒体文件,如果失败的话返回值小于0,ffmpeg中小于0的返回值都表示失败,可以使用相应的api比如av_strerror获取失败的信息; avformat_find_stream_info用于搜索文件中的码流,比如音频流,视频流,字幕流;av_dump_format就是将搜索到的信息输出到标准输出中,可以不适用,写上方便调试;av_find_best_stream用于查找当前媒体中对应的流,因为有些时候媒体中可能由多个字幕流或者音频流(看视频时选择不同的音轨或者字幕),当然也可以自己遍历pformat->streams搜寻自己需要的流;- 之后便是不断循环调研
av_read_frame获取对应的编码的流的数据,每个编码的流的数据存储在AVPacket中,解码的时候解码的就是这里的数据。 - 最后程序结束时需要记得释放相关的context。
下面的程序时解复用视频的内容,解复用音频的相同只是将av_find_best_stream(pformat, AVMEDIA_TYPE_VIDEO, -1, -1, NULL, 0)替换成av_find_best_stream(pformat, AVMEDIA_TYPE_AUDIO, -1, -1, NULL, 0)即可,字幕流同理。
#define AVERR_BREAK_RET_LT_ZERO(ret) if((ret) < 0) break;

//ffmpeg -i ../video/1.mp4 -codec copy -f h264 output.h264
int demux_video(const char *file, const char *ofile)
	AVFormatContext *pformat = nullptr;
	int ret = 0;
	AVPacket *packet = nullptr;
	FILE *fp = nullptr;
	do

		//open file format
		ret = avformat_open_input(&pformat, file, 0, NULL);
		AVERR_BREAK_RET_LT_ZERO(ret);

		ret = avformat_find_stream_info(pformat, NULL);
		AVERR_BREAK_RET_LT_ZERO(ret);

		av_dump_format(pformat, 0, file, 0);
		int videid = av_find_best_stream(pformat, AVMEDIA_TYPE_VIDEO, -1, -1, NULL, 0);
		AVERR_BREAK_RET_LT_ZERO(videid);

		fprintf(stderr, "video id is %d\\n", videid);

		fp = fopen(ofile, "wb");
		AVERR_BREAK_IF_TRUE(!fp);

		packet = av_packet_alloc();
		while (true)
			ret = av_read_frame(pformat, packet);
			AVERR_BREAK_RET_LT_ZERO(ret);
			if (packet->stream_index == videid)
				int writelen = fwrite(packet->data, 1, packet->size, fp);
				fprintf(stdout, "stream id is %d, read packet pts is %d, packet size is %d, write size is %d\\n", packet->stream_index, packet->pts, packet->size, writelen);


			av_packet_unref(packet);


	 while (false);

	if (ret < 0)
		char errorbuff[256] =  0 ;
		av_strerror(ret, errorbuff, 256);
		fprintf(stderr, "error message: %s", errorbuff);


	if (fp)
		fclose(fp);


	if (packet)
		av_packet_free(&packet);
		packet = nullptr;


	if (pformat)
		avformat_close_input(&pformat);
		pformat = nullptr;


	return 0;
利用上面的程序解复用出来的aac或者h264或者其他格式的码流是无法直接播放的,或者用命令ffmpeg -i ../video/1.mp4 -codec copy -f h264 output.h264和ffmpeg -i ..\\video\\1.mp4 -acodec aac output.aac生成对应的码流会发现自己解复用的数据大小和这里解复用得到的文件大小不同。具体原因可参考,简单的说来就是写入的是编码后的视频或者音频的裸流没有相关的header信息,导致无法播放。
- 使用FFMPEG类库分离出多媒体文件中的音频码流
- 使用FFMPEG类库分离出多媒体文件中的H.264码流
- 11.FFmpeg学习笔记 - 解复用分离aac码流
- 使用FFMPEG类库分离出多媒体文件中的H.264码流

现在对h264和aac的格式不是很熟悉后续熟悉了再研究些怎么写可播放的aac文件和264文件。
3 音视频解码与转码
得到解封装后的码流之后就需要对对应的编码数据进行解码,解码后就能得到视频数据的码流。有些时候解码出来的数据流并不能直接被被视频设备或者扬声器所使用的,因此需要将解码出来的数据进行转码。视频数据的话一般转码成YUV420P和对应的宽高,而音频数据一般转码为PCM数据。
3.1 视频解码转码
视频数据转码一般转码成YUV420P和对应的宽高,也就是进行缩放。视频解码和转码的基本流程之前需要堆视频容器进行解封装,解封装的流程和之前完全相同。额外需要做的工作就是打开解码器和将得到的编码的packet解码成frame数据,和最后的刷新帧缓冲。
int decode_transcode_video(const char *file, const char *ofile, int owidth, int oheigt)
    //省略代码....
    do

        //省略代码....
        fprintf(stderr, "video id is %d\\n", videid);
        param = pformat->streams[videid]->codecpar;
        ret = open_decoder(param, &pdecoderCtx);
        AVERR_BREAK_RET_LT_ZERO(ret);

        packet = av_packet_alloc();
        while (true)
            ret = av_read_frame(pformat, packet);
            AVERR_BREAK_RET_LT_ZERO(ret);
            if (packet->stream_index == videid)
                //decode video to yuv420p
                decode_video(packet, pdecoderCtx, owidth, oheigt, fp);


            av_packet_unref(packet);


     while (false);

    //flush the buffer
    packet->data = nullptr;
    packet->size = 0;
    decode_video(packet, pdecoderCtx, owidth, oheigt, fp);
    //省略代码....
    return 0;
打开解码器。打开解码器的过程比较简单,主要是将从stream中获取到的参数AVCodecParameters拷贝到解码器的context中,然后利用ffmpeg提供的API将解码器打开即可。
int open_decoder(AVCodecParameters *param, AVCodecContext ** pdecoderCtx)
	if (!param || !pdecoderCtx)
		return -1;


	AVCodec *pdecoder = avcodec_find_decoder(param->codec_id);
	if (!pdecoder)
		return -1;


	*pdecoderCtx = avcodec_alloc_context3(pdecoder);
	if (!(*pdecoderCtx))
		return -1;


	int ret = avcodec_parameters_to_context(*pdecoderCtx, param);
	if (ret < 0)
		return ret;


	ret = avcodec_open2(*pdecoderCtx, pdecoder, NULL);
	return ret;
解码帧数据。解码数据ffmpeg提供了比较好理解的接口avcodec_send_packet和avcodec_receive_frame从函数名上我们就能很容易明白其作用是什么。另外转码使用的是sws_scale进行转码,需要注意的是转码出来的frame的内存即pbuffer需要我们自己维护,ffmpeg提供了计算需要内存大小的函数av_image_get_buffer_size。其他需要注意的点是:
- 调用
avcodec_send_packet可能返回错误EAGAIN表示资源未准备好,因此需要重复将packet送入解码器直到环境准备好为止; - 一般来说
avcodec_receive_frame获取的是一帧的数据,但是有些时候会存在空帧之类的数据,因此需要while循环尝试取多帧。对于视频数据一般在刷新缓冲区时while会进入多次,一般都是一次。
int decode_video(AVPacket *packet, AVCodecContext *pdecoderCtx, int owidth, int oheight, FILE *fp)
	AVPixelFormat outFormat = AV_PIX_FMT_YUV420P;
	int ret = 0;
	AVFrame *pdecodeFrame = av_frame_alloc();
	AVFrame *ptranscodedFrame = av_frame_alloc();
	SwsContext *psws = nullptr;

	size_t size = av_image_get_buffer_size(outFormat, owidth, oheight, 1);
	uint8_t *pbuffer = (uint8_t *)malloc(size);
	static int count = 0;
	do

		ret = av_image_fill_arrays(ptranscodedFrame->data, ptranscodedFrame->linesize, pbuffer, outFormat, owidth, oheight, 1);
		AVERR_BREAK_RET_LT_ZERO(ret);

		while (AVERROR(EAGAIN) == (ret = avcodec_send_packet(pdecoderCtx, packet)))
		AVERR_BREAK_RET_LT_ZERO(ret);

		while (0 <= (ret = avcodec_receive_frame(pdecoderCtx, pdecodeFrame)))
			psws = sws_getCachedContext(psws, pdecoderCtx->width, pdecoderCtx->height, pdecoderCtx->pix_fmt, owidth, oheight, outFormat, SWS_BICUBIC, 0, 0, 0);
			AVERR_BREAK_IF_TRUE(!psws);
			ret = sws_scale(psws, pdecodeFrame->data, pdecodeFrame->linesize, 0, pdecodeFrame->height, ptranscodedFrame->data, ptranscodedFrame->linesize);
			AVERR_BREAK_RET_LT_ZERO(ret);
			fprintf(stderr, "%d, transcode frame %d : %d, %d into %d, %d\\n", count, pdecodeFrame->pts, pdecoderCtx->width, pdecoderCtx->height, owidth, oheight);

			fwrite(pbuffer, 1, size, fp);
			count++;

	 while (false);

	if (psws)
		sws_freeContext(psws);


	if (pdecodeFrame)
		av_frame_free(&pdecodeFrame);


	if (ptranscodedFrame)
		av_frame_free(&ptranscodedFrame);


	if (pbuffer)
		free(pbuffer);


	return ret;
在解码完成之后,ffmpeg的缓冲区内部可能在存在多帧数据,因此需要刷新缓冲区,刷新的方式就是将packet的数据指针和size设为0然后解码即可。
    packet->data = nullptr;
    packet->size = 0;
    decode_video(packet, pdecoderCtx, owidth, oheigt, fp);
解码转码完成之后,我们可以使用下面的命令对比下ffmpeg解码出来的数据大小和我们解码出来的数据大小的区别。
#通过提取yuv
ffmpeg -i ../video/1.mp4 -s 100x100 -pix_fmt yuv420p ./100x100_yuv420p_f.yuv
#播放yuv数据
 ffplay -pixel_format yuv420p -video_size 100x100  ./100x100_yuv420p.yuv
下面是ffmpeg解码(100x100_yuv420p_f.yuv)、程序解码(100x100_yuv420p.yuv)和未刷新缓冲区(100x100_yuv420p_unflush.yuv)的大小,可以看到未刷新的情况下少了刚好一帧30000bytes。

3.2 音频解码重采样
音频解码为了方便播放,一般会进行重采样。音频解码和重采样和视频的解码重采样过程类似,具体步骤不同之处是音频使用的是 SwrContext进行重采样。主体代码框架类似。
//省略代码...
		pswr = swr_alloc_set_opts(pswr, outLayout, oformat, orate, pdecoderCtx->channel_layout, pdecoderCtx->sample_fmt, pdecoderCtx->sample_rate, 0, 0);
		AVERR_BREAK_IF_TRUE(!pswr);

		ret = swr_init(pswr);
		AVERR_BREAK_RET_LT_ZERO(ret);

		packet = av_packet_alloc();
		while (true)
			ret = av_read_frame(pformat, packet);
			AVERR_BREAK_RET_LT_ZERO(ret);
			if (packet->stream_index == audioid)
				//decode video to yuv420p
				decode_audio(packet, pdecoderCtx, orate, outLayout, oformat, pswr, fp);


			av_packet_unref(packet);

//省略代码...
//刷新缓冲
解码和重采样的结构和视频类似。唯一需要注意的是音频处理采样前后的各种参数的转换:
av_rescale_rnd和swr_get_delay用来计算音频采样后的sample数量;av_samples_get_buffer_size用来计算整块缓冲区的大小也可以自己计算,具体大小为通道数×每个sample的字节数×sample数量;av_samples_alloc申请内存;swr_alloc_set_opts、swr_init分别对重采样的context创建和设置参数、初始化,swr_convert进行重采样;- 需要注意的是写的时候需要使用
swr_convert的返回值,该返回值返回的是真实的sample的数量,如果使用之前计算的sample数量会出现比较大的噪音。 swr_convert(pswr, ptranscodedFrame->data, dstnbSamples, NULL, 0)是为了刷新缓冲,详情见音频重采样swr_convert尾部丢帧的问题处理。
//ffplay -ar 44100 -channels 2 -f f32le -i .\\44100_2_s16_pcm.pcm
int decode_audio(AVPacket *packet, AVCodecContext *pdecoderCtx, int outRate, int outLayout, AVSampleFormat outFormat, SwrContext *pswr, FILE *fp)
	int ret = 0;
	AVFrame *pdecodeFrame = av_frame_alloc();
	AVFrame *ptranscodedFrame = av_frame_alloc();
	int outChanel = av_get_channel_layout_nb_channels(outLayout);
	static int count = 0;
	do

		//ret = avcodec_send_packet(pdecoderCtx, packet);
		while (AVERROR(EAGAIN) == (ret = avcodec_send_packet(pdecoderCtx, packet)))
		AVERR_BREAK_RET_LT_ZERO(ret);
		while (0 <= (ret = avcodec_receive_frame(pdecoderCtx, pdecodeFrame)))
			int dstnbSamples = av_rescale_rnd(swr_get_delay(pswr, pdecoderCtx->sample_rate) + pdecodeFrame->nb_samples, outRate, pdecodeFrame->sample_rate, AV_ROUND_UP);
			AVERR_BREAK_RET_LT_ZERO(dstnbSamples);

			//pbuffer = (uint8_t *)malloc(size * 2);
			//ret = av_samples_fill_arrays(ptranscodedFrame->data, ptranscodedFrame->linesize, pbuffer, outChanel, dstnbSamples, outFormat, 1);
			ret = av_samples_alloc(ptranscodedFrame->data, ptranscodedFrame->linesize, outChanel, dstnbSamples, outFormat, 0);
			AVERR_BREAK_RET_LT_ZERO(ret);

			ret = swr_convert(pswr, ptranscodedFrame->data, dstnbSamples, (const uint8_t **)pdecodeFrame->data, pdecodeFrame->nb_samples);
			AVERR_BREAK_RET_LT_ZERO(ret);

			count++;

			int writingSize = av_samples_get_buffer_size(ptranscodedFrame->linesize, outChanel, ret, outFormat, 1);
			//fwrite(pbuffer, 1, writingSize, fp);
			fwrite(ptranscodedFrame->data[0], 1, writingSize, fp);
			//刷新缓冲
			while (0 < (ret = swr_convert(pswr, ptranscodedFrame->data, dstnbSamples, NULL, 0)))
				writingSize = av_samples_get_buffer_size(ptranscodedFrame->linesize, outChanel, ret, outFormat, 1);
				fwrite(ptranscodedFrame->data[0], 1, writingSize, fp);


			av_freep(ptranscodedFrame->data);

	 while (false);

	av_freep(ptranscodedFrame->data);

	if (pdecodeFrame)
		av_frame_free(&pdecodeFrame);


	if (ptranscodedFrame)
		av_frame_free(&ptranscodedFrame);


	if (ret < 0)
		char errorbuff[256] =  0 ;
		av_strerror(ret, errorbuff, 256);
		//fprintf(stderr, "error message: %s\\n", errorbuff);


	return ret;
解码完成后可以使用下列命令测试下具体的数据对比。
#播放pcm数据
ffplay -ar 44100 -channels 2 -f s16le -i .\\44100_2_s16_pcm.pcm
#提取pcm数据
ffmpeg -i ../video/1.mp4 -f s16le -ac 2 -ar 44100 44100_2_s16_f.pcm
如果不刷新缓冲区音频文件就和ffmpeg解码出来的大小不一样。

4 播放音频和视频
4.1 使用opengl播放视频YUV数据
下面是主题框架,基本上和之前的解码YUV数据的流程相同,不同的是需要额外添加初始化OpenGL环境和创建OpenGL窗口的代码,即gl_window_initialize和gl_build_program两个函数,以及处理键盘事件的processKeyboard。另外需要提及的细节是变量声明中窗口大小和视频显示大小不一致,是采用ratio这个变量进行控制的,0.9表示视频显示大小是窗口大小的90%。
int gl_display_file(const char *infile)
	//省略代码...
	int winWidth = 640, winHeight = 480;
	double ratio = 0.9;
	int owidth = winWidth * ratio, oheight = winHeight * ratio;
	GLFWwindow *pwindow = nullptr;
	unsigned int sharedId = 0, VAO;
	GLuint texs[3] = 0;

	do

		ret = gl_window_initialize(&pwindow, winWidth, winHeight);
		AVERR_BREAK_RET_LT_ZERO(ret);

		ret = gl_build_program(pwindow, sharedId, VAO, &texs, ratio);
		AVERR_BREAK_RET_LT_ZERO(ret);

		//open file format
		//省略代码...
		while (true && !glfwWindowShouldClose(pwindow))
			processKeyboard(pwindow);
			ret = av_read_frame(pformat, packet);
			AVERR_BREAK_RET_LT_ZERO(ret);
			if (packet->stream_index == videid)
				//decode video to yuv420p and display it by opengl
				gl_display_frame(pwindow, sharedId,packet, pdecoderCtx, owidth, oheight, VAO, texs);


			av_packet_unref(packet);


	 while (以上是关于FFmpeg解封装解码音频和视频(分别使用OpenGL和OpenAL播放)的主要内容,如果未能解决你的问题,请参考以下文章