一篇玩转mybatis-plus框架的详细讲解(入门必备)
Posted 爪哇斗罗
tags:
篇首语:本文由小常识网(cha138.com)小编为大家整理,主要介绍了一篇玩转mybatis-plus框架的详细讲解(入门必备)相关的知识,希望对你有一定的参考价值。
🐼个人主页:爪哇斗罗
🐼博主介绍:一名打工人
🐼签名:圣人之道,为而不争。
🐼一起交流,一起进步,一起互动。


目录
8. LambdaQueryWrapper与LambdaUpdateWrapper
1. MybatisPlus简介与特性
1.1 简介
MybatisPlus作为MyBatis的一款增强工具,就是为了简化开发,为提高效率而生。同时还提供通用的Mapper与Service,无需写SQL的情况下对表进行增删改查,可以说是十分之优秀。
1.2 特性
在其官网上,我们可以了解到这款优秀框架的特性:

2. MybatisPlus的开发环境搭建
2.1 创建User表
user表SQL如下:
CREATE TABLE user (
    id BIGINT ( 20 ) NOT NULL COMMENT '主键ID',
    name VARCHAR ( 10 ) DEFAULT NULL COMMENT '姓名',
    age INT ( 11 ) DEFAULT NULL COMMENT '年龄',
    email VARCHAR ( 50 ) DEFAULT NULL COMMENT '邮箱',
    PRIMARY KEY ( id )
) ENGINE = INNODB DEFAULT CHARSET = utf8;
2.2 创建SpringBoot工程
请使用IDEA快速创建一个SpringBoot的工程,在pom.xml中导入以下依赖,实体类User.java请自行创建。
<dependency>
    <groupId>com.baomidou</groupId>
    <artifactId>mybatis-plus-boot-starter</artifactId>
    <version>3.2.0</version>
</dependency>

<dependency>
    <groupId>org.projectlombok</groupId>
    <artifactId>lombok</artifactId>
    <version>1.18.20</version>
</dependency>

<dependency>
    <groupId>mysql</groupId>
    <artifactId>mysql-connector-java</artifactId>
    <scope>runtime</scope>
</dependency>
2.3 配置application.yml
application.yml配置数据库连接以及mybatis日志打印:
spring:
  application:
    name: mybatisplus
  datasource:
    # 数据源
    type: com.zaxxer.hikari.HikariDataSource
    # 驱动类
    driver-class-name: com.mysql.cj.jdbc.Driver
    # 数据库连接
    url: jdbc:mysql://localhost:3306/my?characterEncoding=utf-8&useSSL=false&serverTimezone=UTC
    # 用户名
    username: root
    #密码
    password: root

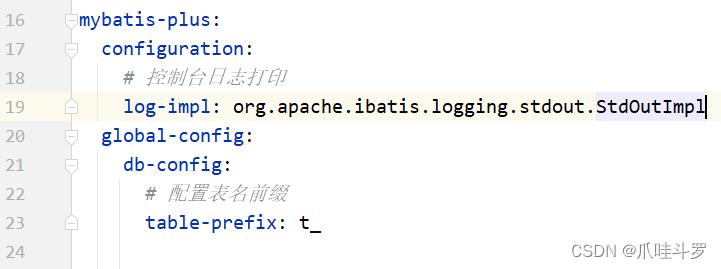
mybatis-plus:
  configuration:
    # 控制台日志打印
    log-impl: org.apache.ibatis.logging.stdout.StdOutImpl
2.4 创建UserMapper并扫描
package com.jektong.mybatisplus.mapper;

import com.baomidou.mybatisplus.core.mapper.BaseMapper;
import com.jektong.mybatisplus.pojo.User;
import org.springframework.stereotype.Repository;

/**
 * @author jektong
 * @date 2022年11月04日 1:14
 */
@Repository
public interface UserMapper extends BaseMapper<User>
主启动类进行Mapper的扫描将接口注入至容器中:

2.5 测试环境
package com.jektong.mybatisplus;

import com.jektong.mybatisplus.mapper.UserMapper;
import com.jektong.mybatisplus.pojo.User;
import org.junit.Test;
import org.junit.runner.RunWith;
import org.springframework.beans.factory.annotation.Autowired;
import org.springframework.boot.test.context.SpringBootTest;
import org.springframework.test.context.junit4.SpringRunner;

import java.util.List;

@RunWith(SpringRunner.class)
@SpringBootTest
public class MybatisplusApplicationTests

    @Autowired
    private UserMapper userMapper;

    @Test
    public void contextLoads()
        // 调用mybatisplus提供的共通查询方法
        List<User> users = userMapper.selectList(null);
        // 输出
        users.forEach(System.out::println);
测试结果:打印出SQL语句并输出数据。

3. 测试BaseMapper的增删改查
3.1 增加用户
添加用户时使用insert方法,ID自动生成使用的是雪花算法。
@Test
public void test02()
    // 创建用户对象
    User user = new User();
    user.setName("钱三");
    user.setAge(20);
    user.setEmail("qiansan@qq.com");
    userMapper.insert(user);
    System.out.println("添加的用户ID="+user.getId());
执行程序如下:

3.2 删除用户
根据ID进行单个删除:
@Test
public void testDeleteById()
    // 指定删除的ID
    userMapper.deleteById(1588548601091469313L);
    System.out.println("用户ID=1588548601091469313已被删除");
执行程序如下:

根据ID进行批量删除:
@Test
public void testDeleteByBatchId()
    // 指定删除的ID
    List<Integer> ids = new ArrayList<>();
    ids.add(1);
    ids.add(2);
    userMapper.deleteBatchIds(ids);
    System.out.println("用户ID=1,2已被删除");

构造Map条件进行删除:
@Test
public void testDeleteById()
    // 构建删除条件
    Map<String,Object> map = new HashMap();
    map.put("name","小张");
    map.put("age","22");
    userMapper.deleteByMap(map);
执行程序如下:

3.3 修改用户信息
通过updateById进行删除:
@Test
public void testUpdateByBatchId()
    // 指定修改的ID
    User user = new User();
    user.setId(4L);
    user.setAge(20);
    user.setName("za");
    userMapper.updateById(user);
    System.out.println("用户ID=4已被修改");
程序执行如下:
3.4 查询用户
查询用户,有以下这些查询的方法通过ID,批量传入ID,以及构建map条件进行查询数据。
不过对于复杂的条件查询,会根据条件构造器进行复杂的查询之后再说。

@Test
public void testSelectUser()
    userMapper.selectById(4l);
    // 查询全部
    List<User> users = userMapper.selectList(null);
    // map构建查询
    Map<String,Object> map = new HashMap();
    map.put("age","20");
    List<User> users1 = userMapper.selectByMap(map);
    // id批量查询
    Set<Long> ids = new HashSet<>();
    ids.add(4L);
    ids.add(3L);
    List<User> users2 = userMapper.selectBatchIds(ids);
    //分别输出
    users.forEach(System.out::println);
    users1.forEach(System.out::println);
    users2.forEach(System.out::println);
查询执行如下:

4. 通用Service接口测试
同样对于service层,也提供了通用service的增删改查的用法。首先建立UserService接口。此接口需要继承通用Service(IService)。
UserService.java
package com.jektong.mybatisplus.service;

import com.baomidou.mybatisplus.extension.service.IService;
import com.jektong.mybatisplus.pojo.User;

/**
 * @author jektong
 * @date 2022年11月06日 20:25
 */
public interface UserService extends IService<User>
建立它的实现类UserServiceImpl.java:
package com.jektong.mybatisplus.service.impl;

import com.baomidou.mybatisplus.extension.service.impl.ServiceImpl;
import com.jektong.mybatisplus.mapper.UserMapper;
import com.jektong.mybatisplus.pojo.User;
import com.jektong.mybatisplus.service.UserService;

/**
 * @author jektong
 * @date 2022年11月06日 20:36
 */
@Service
public class UserServiceImpl extends ServiceImpl<UserMapper, User> implements UserService
下面就来简单测试service中提供的方法,查询总记录数与批量插入。
@Test
public void testUser()
    // 查询总记录数
    int count = userService.count();
    System.out.println(count);
    // 批量插入
    List<User> userList = new ArrayList<>();
    User user1 = new User();
    user1.setName("ab");
    user1.setAge(23);
    user1.setEmail("ab@qq.com");
    userList.add(user1);
    User user2 = new User();
    user2.setName("abc");
    user2.setAge(23);
    user2.setEmail("abc@qq.com");
    userList.add(user2);
    userService.saveBatch(userList);
执行结果如下:

5. MybatisPlus的常用注解
5.1 @TableName
为解决实体类与表名不一致的情况下能够找到对应的数据库表,mybatisPlus提供了@TableName注解。

如果数据库表名都是按照统一的命名方式进行命名(比如tb_xxx),这时候无需在每个实体类上都加入此注解,只需在yml文件配置表名前缀即可。

5.2 @TabeId
mybatisPlus会将每个表的id默认认为是主键如果表的id与实体类的id不一致的情况下会导致错误。
假设数据库中表的主键为uid,实体类中的表的主键为id,此时使用@TabeId的value属性将两者保持一致即可。

我们知道,在添加对象数据时id是默认使用雪花算法来生成id的,现在如果想要实现自动递增需要使用type属性。
首先我们需要将表中的id的自动递增选项勾选。然后配置属性type自动递增即可。

全局配置主键生成策略
同样当我们对每个表的id都进行了@TabeId配置并想都想让其进行自动递增此时需要在配置文件中配置主键的自增策略。
mybatis-plus:
  configuration:
    # 控制台日志打印
    log-impl: org.apache.ibatis.logging.stdout.StdOutImpl
  global-config:
    db-config:
      # 配置表名前缀
      table-prefix: t_
      # 全局配置主键生成策略
      id-type: auto
5.3 @TabeFiled
与id处理一致,如果类中的字段名称与表中的字段名不一致的情况下使用@TabeFiled将两者进行对应。
当然,字段名不一致mybatisPlus有默认的对应方式,就是默认下划线会转换为驼峰命名法。
例如表中的姓名字段为user_name,类中的姓名字段为userName两者不会冲突。如果是name就必须使用@TabeFiled注解了。

5.4 @TableLogic
为了使删除的数据容易恢复,mybatisPlus提供了逻辑删除的方式。
在表中添加字段is_delete后,实体类也需要添加对应变量,并加上@TableLogic注解
@Data
// 配置此注解可以使实体类与表名保持一致
@TableName("t_user")
public class User

    @TableId(value = "uid")
    private Long id;

    private Integer age;

    @TableField("user_name")
    private String name;

    private String email;

    @TableLogic
    private Integer isDelete;
测试按照前面的方法再走一遍即可。
7. 条件构造器介绍
上面我们测试的是简单的增删改查,我们知道有的SQL查询需要复杂的查询条件。
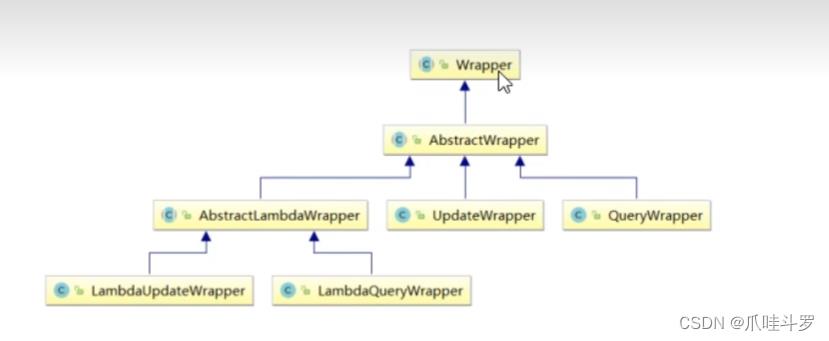
所以mybatisPlus给我们提供了Wrapper这个最顶端抽象类父类。它所包含的子类如下图所示:

- AbstractWrapper:用于查询条件的封装,封装where条件。
- QueryWrapper:查询条件封装。
- UpdateWrapper:修改条件封装
- LambdaUpdateWrapper:使用Lambda语法进行更新条件封装。
- LambdaQueryWrapper:使用Lambda语法进行查询条件的封装。
7.1 QueyWrapper查询条件组装
对于多条件的复杂查询我们可以通过构造QueryWrpper对象条件。
比如要查用户表中名字包含s,并且年龄在20到23之间,邮箱不为空的用户。
@Test
public void testQueryWrapperUser()
    // 构造查询条件
    QueryWrapper<User> queryWrapper = new QueryWrapper<>();
    // 查用户表中名字包含s,并且年龄在20到23之间,邮箱不为空的用户。
    queryWrapper.like("user_name", "s")
            .between("age", "20", "23")
            .isNotNull("email");
    List<User> users = userMapper.selectList(queryWrapper);
    users.forEach(System.out::println);
执行如下:

7.2 QueyWrapper组装排序条件
在上述例子中,我们将其加入年龄升序,id降序排序的条件。
@Test
public void testQueryWrapperUser()
    // 构造查询条件
    QueryWrapper<User> queryWrapper = new QueryWrapper<>();
    // 查用户表中名字包含s,并且年龄在20到23之间,邮箱不为空的用户。
    queryWrapper.like("user_name", "s")
            .between("age", "20", "23")
            .isNotNull("email")
            .orderByDesc("age")
            .orderByDesc("id");
    List<User> users = userMapper.selectList(queryWrapper);
    users.forEach(System.out::println);
执行如下:

7.3 QueryWrapper组装删除条件
与查询条件一致,使用QueryWrapper构造删除条件:删除邮箱为空的用户。
@Test
public void testQueryWrapperDelUser()
    // 构造删除条件
    QueryWrapper<User> queryWrapper = new QueryWrapper<>();
    // 删除邮箱为空的用户
    queryWrapper.isNull("email");
    int i = userMapper.delete(queryWrapper);
    System.out.println(i);
执行如下:

7.4 QueyWrapper组装修改条件
构造更新条件将邮箱为空的用户,年龄修改为45。
代码逻辑很简单主要就是在更新对象的时候使用update方法将更新的对象传入。
@Test
public void testQueryWrapperDelUser()
    // 构造更新条件 将邮箱为空的用户,年龄修改为45
    QueryWrapper<User> queryWrapper = new QueryWrapper<>();
    queryWrapper.isNull("email");
    User user = new User();
    user.setAge(45);
    int i = userMapper.update(user, queryWrapper);
    System.out.println(i);

7.5 UpdateWrapper组装修改条件
上面通过了QueryWrapper进行修改条件的封装,此外也可以通过UpdateWrapper进行修改条件的封装。
@Test
public void testUpdateWrapperDelUser()
    // 构造更新条件 将邮箱为空的用户,年龄修改为46
    UpdateWrapper<User> updateWrapper = new UpdateWrapper<>();
    updateWrapper.set("age",48).isNull("email");
    userMapper.update(null,updateWrapper);
请自行测试。
8. LambdaQueryWrapper与LambdaUpdateWrapper
在此之前,我们在构造查询或者修改条件的时候,都是直接去写表中的字段名,这样很容易出错,所以使用LambdaQueryWrapper与LambdaUpdateWrapper去直接调用对象字段即可。
将7.2使用LambdaQueryWrapper进行改造:
@Test
public void testQueryWrapperUser()
    // 构造查询条件
    LambdaQueryWrapper<User> lambdaQueryWrapper = new LambdaQueryWrapper<>();
    lambdaQueryWrapper.like(User::getName, "s")
            .between(User::getAge, "20", "23")
            .isNotNull(User::getEmail)
            .orderByDesc(User::getAge)
            .orderByDesc(User::getId);
    List<User> users = userMapper.selectList(lambdaQueryWrapper);
    users.forEach(System.out::println);
将7.5使用LambdaUpdateWrapper进行改造:
@Test
public void testUpdateWrapperDelUser()
    // 构造更新条件 将邮箱为空的用户,年龄修改为46
    LambdaUpdateWrapper<User> lambdaUpdateWrapper = new LambdaUpdateWrapper<>();
    lambdaUpdateWrapper.set(User::getAge,"78").isNull(User::getEmail);
    userMapper.update(null,lambdaUpdateWrapper);
9. LambdaQueryWrapper分页功能
9.1 配置分页插件
面对数据过多,页面展示数据有限,mybatisPlus提供了分页插件功能。首先需要进行配置类进行配置。
MybatisPlusConfig.java
package com.jektong.mybatisplus.config;

import com.baomidou.mybatisplus.annotation.DbType;
import com.baomidou.mybatisplus.extension.plugins.MybatisPlusInterceptor;
import com.baomidou.mybatisplus.extension.plugins.inner.PaginationInnerInterceptor;
import org.springframework.context.annotation.Bean;
import org.springframework.context.annotation.Configuration;

import javax.print.DocFlavor;

/**
 * @author jektong
 * @date 2022年11月11日 23:50
 */
@Configuration
public class MybatisPlusConfig

    @Bean
    public MybatisPlusInterceptor mybatisPlusInterceptor()
        MybatisPlusInterceptor interceptor = new MybatisPlusInterceptor();
        // 配置数据源:mysql
        interceptor.addInnerInterceptor(new PaginationInnerInterceptor(DbType.MYSQL));
        return interceptor;
配置完分页插件后通过Page对象来完成分页:
@Test
public void testPageUser()
    // 当前1页显示2条数据
    Page<User> pageUsers = new Page<>(1,2);
    // 查询数据
    userMapper.selectPage(pageUsers,null);
    System.out.println(pageUsers);
以上是关于一篇玩转mybatis-plus框架的详细讲解(入门必备)的主要内容,如果未能解决你的问题,请参考以下文章
