面试 反思Retrofit源码与设计 7 连问
Posted 涂程
tags:
篇首语:本文由小常识网(cha138.com)小编为大家整理,主要介绍了面试 反思Retrofit源码与设计 7 连问相关的知识,希望对你有一定的参考价值。
好文推荐:
作者:Jere_Chen
前言
在实际项目中往往是使用Retrofit来做网络请求工作。Retrofit采用RESTful风格,本质上只是对OkHttp进行封装,今天我们根据几个问题来进一步学习一下Retrofit的源码与设计思想。
1. 使用方法
直接看一下官方介绍的使用方法。
public final class SimpleService
  public static final String API_URL = "https://api.github.com";

  public static class Contributor
    public final String login;
    public final int contributions;

    public Contributor(String login, int contributions)
      this.login = login;
      this.contributions = contributions;


  public interface GitHub
    @GET("/repos/owner/repo/contributors")
    Call<List<Contributor>> contributors(@Path("owner") String owner, @Path("repo") String repo);


  public static void main(String... args) throws IOException
    // Create a very simple REST adapter which points the GitHub API.
    Retrofit retrofit =
        new Retrofit.Builder()
            .baseUrl(API_URL)
            .client(new OkHttpClient().newBuilder().connectTimeout(10, TimeUnit.SECONDS).build())
            .addConverterFactory(GsonConverterFactory.create())
            .build();

    // Create an instance of our GitHub API interface.
    GitHub github = retrofit.create(GitHub.class);

    // Create a call instance for looking up Retrofit contributors.
    Call<List<Contributor>> call = github.contributors("square", "retrofit");

    // Fetch and print a list of the contributors to the library.
    List<Contributor> contributors = call.execute().body();
    for (Contributor contributor : contributors)
      System.out.println(contributor.login + " (" + contributor.contributions + ")");
可以简单的概括成三步:
- 构建
retrofit实例。 - 构建
API接口实例。 - 执行请求,解析响应。
2. 流程解析
我们按照它的使用方法来分析一下它的流程。
2.1 构建 Retrofit 实例
从使用方法可以看出是使用建造者模式来构建实例。
Retrofit retrofit =
    new Retrofit.Builder()
        .baseUrl(API_URL)
        .client(new OkHttpClient().newBuilder().connectTimeout(10, TimeUnit.SECONDS).build())
        .addConverterFactory(GsonConverterFactory.create())
        .addCallAdapterFactory(RxJavaCallAdapterFactory.create())
        .build();
这一步就不具体展开了,看几个参数。
public static final class Builder
    //实际的请求调用,如 okhttp3.OkHttpClient
    private @Nullable okhttp3.Call.Factory callFactory;
    //基础URL,如:域名
    private @Nullable HttpUrl baseUrl;
    //数据转换器列表
    private final List<Converter.Factory> converterFactories = new ArrayList<>();
    //请求适配器列表
    private final List<CallAdapter.Factory> callAdapterFactories = new ArrayList<>();
2.2 构建 API 接口实例
按照官方的使用方法介绍,我们会将我们的API方法放在一个接口中,然后通过注解来设置请求参数。在使用时,通过retrofit.create(Class<T>)方法将这个接口实例化,然后调用其方法。 如:
public interface GitHub
    @GET("/repos/owner/repo/contributors")
    Call<List<Contributor>> contributors(@Path("owner") String owner, @Path("repo") String repo);


//实例化API接口
GitHub github = retrofit.create(GitHub.class);
//调用接口中某条API
Call<List<Contributor>> call = github.contributors("square", "retrofit");
看一下源码
public <T> T create(final Class<T> service)
    //验证 api service
    validateServiceInterface(service);
    return (T)
        //这里采用了动态代理模式, service 就是被代理类
        //todo 为什么要采用动态代理,有什么好处吗?用别的行不行?
        Proxy.newProxyInstance(
            service.getClassLoader(),
            new Class<?>[] service,
            new InvocationHandler()
              private final Object[] emptyArgs = new Object[0];

              @Override
              public @Nullable Object invoke(Object proxy, Method method, @Nullable Object[] args)
                  throws Throwable
                // If the method is a method from Object then defer to normal invocation.
                if (method.getDeclaringClass() == Object.class)
                  return method.invoke(this, args);

                args = args != null ? args : emptyArgs;
                Platform platform = Platform.get();
                //如果不是系统默认方法,通过loadServiceMethod()方法返回一个ServiceMethod,并调用invoke方法
                return platform.isDefaultMethod(method)
                    ? platform.invokeDefaultMethod(method, service, proxy, args)
                    : loadServiceMethod(method).invoke(args);

            );
做了两件事:
- 验证我们的API接口类。
- 利用动态代理在运行期间实例化API接口。
  private void validateServiceInterface(Class<?> service)
    //service 必须是 interface,否则抛出异常
    if (!service.isInterface())
      throw new IllegalArgumentException("API declarations must be interfaces.");


    ...省略代码...

    //是否立即验证API接口中的所有方法,由用户设置,默认为false
    if (validateEagerly)
      Platform platform = Platform.get();
      //遍历 service 中定义的所有方法
      for (Method method : service.getDeclaredMethods())
        //如果该方法不是系统默认方法且方法修饰符不是静态方法就执行loadServiceMethod方法
        if (!platform.isDefaultMethod(method) && !Modifier.isStatic(method.getModifiers()))
          //加载请求方法。
          loadServiceMethod(method);
从这我们也可以看出,我们的API方法必须方法接口中。如果开始验证接口,会遍历其声明的所有方法,过滤掉系统默认方法与静态方法,然后执行loadServiceMethod(method)。
扩充一下:
getMethods(): 返回由类或接口声明的以及从超类和超接口继承的所有公共方法。getDeclaredMethods(): 返回类声明的方法,包括 public, protected, default (package),但不包括继承的方法。所以,相对比于 getMethods 方法,getDeclaredMethods速度更快,尤其是在复杂的类中,如在Activity类中。
最终都是通过loadServiceMethod(method) 方法来加载一个ServiceMethod。
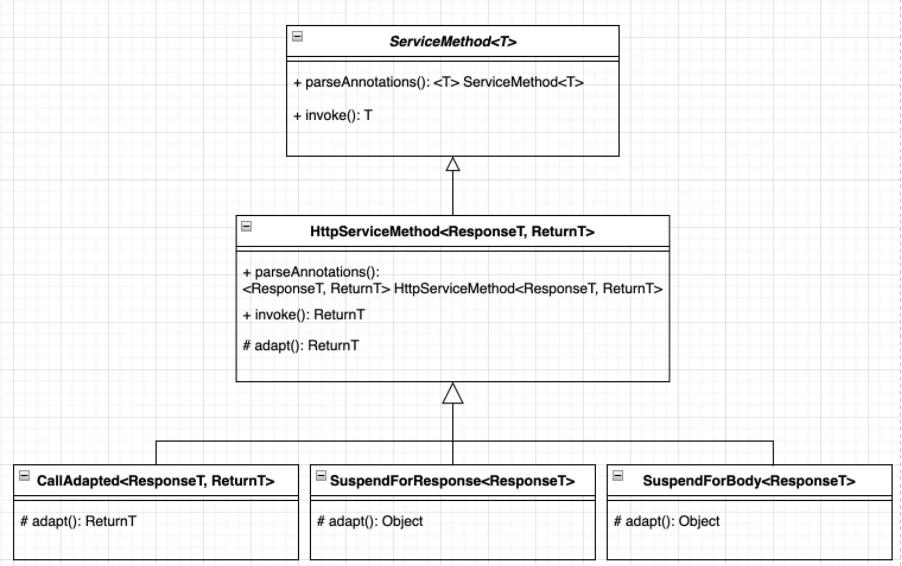
看一下HttpServiceMethod.parseAnnotations()方法,我将其简化了一下,如下:
HttpServiceMethod.java

  static <ResponseT, ReturnT> HttpServiceMethod<ResponseT, ReturnT> parseAnnotations(
      Retrofit retrofit, Method method, RequestFactory requestFactory)

    //获取方法的注解信息
    Annotation[] annotations = method.getAnnotations();
    //适配器类型,就是Retrofit.addCallAdapterFactory()添加的类型。
    Type adapterType;
    //方法的返回类型
    adapterType = method.getGenericReturnType();

    //实例化一个 CallAdapter 对象
    CallAdapter<ResponseT, ReturnT> callAdapter =
        createCallAdapter(retrofit, method, adapterType, annotations);
    //检查 responseType,如果不合格则抛出异常
    Type responseType = callAdapter.responseType();

    //实例化一个Converter对象,将 okhttp3.ResponseBody 转换成 ResponseT 类型
    Converter<ResponseBody, ResponseT> responseConverter =
        createResponseConverter(retrofit, method, responseType);

    okhttp3.Call.Factory callFactory = retrofit.callFactory;
    //不是kotlin挂起方法,返回 CallAdapted,其实也就是调用 callAdapter.adapter 方法
    return new CallAdapted<>(requestFactory, callFactory, responseConverter, callAdapter);
实例化了 ServiceMethod 后,调用invoke方法。
HttpServiceMethod.java

  @Override
  final @Nullable ReturnT invoke(Object[] args)
    //新建一个 OkHttpCall 请求
    Call<ResponseT> call = new OkHttpCall<>(requestFactory, args, callFactory, responseConverter);
    //然后调用 adapt 方法,CallAdapted 有重写 adapt 方法,然后调用 callAdapter.adapt(call) 方法
    return adapt(call, args);


  protected abstract @Nullable ReturnT adapt(Call<ResponseT> call, Object[] args);
从上述代码中可以看出,invoke方法就是实例化一个Call请求,然后调用adapter方法,在这里adapter是一个抽象方法,所以具体实现方法就需要看它的具体实现类CallAdapter。 这里的 CallAdapter 就是通过.addCallAdapterFactory()方法所添加的CallAdapter,以及根据平台默认提供的DefaultCallAdapterFactory中的CallAdapter,执行其adapter方法,最终返回Call<Object>。
2.3 执行请求,解析响应
在上一步中,我们对API接口进行了实例化,通过CallAdapter对请求进行适配,最终得到一个Call<Object>对象。
接着下一步,就是执行这个Call<Object>请求,最终得到我们想要的Object对象。
例如一开始使用方法中所介绍的:
//已经得到了Call<List<Contributor>>对象,执行call,得到List<Contributor>
List<Contributor> contributors = call.execute().body();
调用 execute 执行同步请求获取到Response,然后获取其请求体。
OkHttpCall.java

  @Override
  public Response<T> execute() throws IOException
    okhttp3.Call call;

    synchronized (this)
      //判断请求是否已经被执行,如果已被执行则抛出异常
      if (executed) throw new IllegalStateException("Already executed.");
      executed = true;
      //获取最原始的请求,通过createRawCall()创建okhttp3.Call
      call = getRawCall();


    if (canceled)
      call.cancel();

    //执行请求,并且解析响应,将okhttp3.response 转换成 retrofit2.response
    return parseResponse(call.execute());


  private okhttp3.Call createRawCall() throws IOException
    //构造原始请求
    okhttp3.Call call = callFactory.newCall(requestFactory.create(args));
    if (call == null)
      throw new NullPointerException("Call.Factory returned null.");

    return call;


  /**
   * 解析响应,就是就okhttp3.response 转换成 retrofit2.response
   */
  Response<T> parseResponse(okhttp3.Response rawResponse) throws IOException

    ...省略代码...

    try
      //利用converter转换成我们期望的类型
      T body = responseConverter.convert(catchingBody);
      return Response.success(body, rawResponse);
     catch (RuntimeException e)

  ...省略代码...
从源码中也可以看出,请求的实际工作还是通过okhttp来完成的,这边Retrofit就是负责请求与响应转换工作,将retrofit2.Call转换成okhttp3.Call,将okhttp3.response转换成retrofit2.response。
3. 为什么要引入CallAdapter与Converter?
如果你熟悉okHttp的话,你应该知道,当我们请求的时候,要先通过OkHttpClient.newCall(request)方法将request转换成Call对象,然后再执行这个Call对象拿到response。
但是Retrofit不光光只支持Call,他还可以将请求适配成Observable类型,方便与RxJava2结合起来一起使用。这就是通过CallAdapter来进行适配工作的,例如通过默认的DefaultCallAdapterFactory将请求转换成Call<Object>,通过RxJava2CallAdapter将请求转换成Observable<Object>。
回到okHttp,大部分业务情况下,我们在拿到响应体后都会将其进行反序列化成对象,方便调用。显然,Retrofit就考虑到了这一点,所以他默认提供了GsonConverterFactory,来帮助我们做这一步反序列化工作。这就是通过Converter来完成的,同时它也支持用户进行自定义。
4. CallAdapter 是如何工作的?
作为请求适配器,我们将CallAdapter工作流程分为三步:添加、匹配、工作。
添加
可以通过addCallAdapterFactory(CallAdapter.Factory)方法来添加请求适配器工厂类,添加成功后会被保存在callAdapterFactories列表中。另外,Retrofit会根据Platform来添加默认的请求适配器,例如:DefaultCallAdapterFactory等等,同样也加入到callAdapterFactories列表中。
匹配
思考一下:所有添加的请求适配器都会被保存在callAdapterFactories列表中,那在实际请求中是如何匹配出相对应的适配器的呢?
在HttpServiceMethod.parseAnnotations()方法中,我们有实例化一个CallAdapter对象。(具体流程就不再次展开了,请回头看 2.2 构建 API 接口实例 中所介绍内容。)
HttpServiceMethod.java

  static <ResponseT, ReturnT> HttpServiceMethod<ResponseT, ReturnT> parseAnnotations(
      Retrofit retrofit, Method method, RequestFactory requestFactory)

    //实例化一个 CallAdapter 对象
    CallAdapter<ResponseT, ReturnT> callAdapter =
        createCallAdapter(retrofit, method, adapterType, annotations);

  ···省略代码···

    //不是kotlin挂起方法,返回 CallAdapted,其实也就是调用 callAdapter.adapter 方法
    return new CallAdapted<>(requestFactory, callFactory, responseConverter, callAdapter);
匹配工作其实就在createCallAdapter()方法中,一步步走下来,最终到Retrofit.nextCallAdapter()方法中:
Retrofit.java

  public CallAdapter<?, ?> nextCallAdapter(
      @Nullable CallAdapter.Factory skipPast, Type returnType, Annotation[] annotations)

    int start = callAdapterFactories.indexOf(skipPast) + 1;
    for (int i = start, count = callAdapterFactories.size(); i < count; i++)
      //通过方法的返回值类型与注解信息来找到匹配的CallAdapter
      CallAdapter<?, ?> adapter = callAdapterFactories.get(i).get(returnType, annotations, this);
      if (adapter != null)
        return adapter;


  ···省略代码···

    //如果找不到匹配的CallAdapter,则抛出异常
    throw new IllegalArgumentException(builder.toString());
简单概括一下,就是通过方法的返回值类型与注解信息,遍历callAdapterFactories列表,找到匹配的CallAdapter,如果找不到则抛出IllegalArgumentException异常。
工作
找到匹配的CallAdapter后,剩下就是看看他是如何工作的。
如上一步匹配过程所介绍,在找到匹配的callAdapter后,会通过它来实例化一个CallAdapted对象。
  static final class CallAdapted<ResponseT, ReturnT> extends HttpServiceMethod<ResponseT, ReturnT>
    private final CallAdapter<ResponseT, ReturnT> callAdapter;

    CallAdapted(
        RequestFactory requestFactory,
        okhttp3.Call.Factory callFactory,
        Converter<ResponseBody, ResponseT> responseConverter,
        CallAdapter<ResponseT, ReturnT> callAdapter)
      //将responseConverter传给父类。
      super(requestFactory, callFactory, responseConverter);
      this.callAdapter = callAdapter;


    @Override
    protected ReturnT adapt(Call<ResponseT> call, Object[] args)
      return callAdapter.adapt(call);
CallAdapted很简单,就是继承了HttpServiceMethod,然后复写了adapt方法。也就是说,最终执行的,其实就是我们上一步匹配到的CallAdapter对象的adapt方法。
比如匹配到的是DefaultCallAdapterFactory中的CallAdapter,最终执行的就是其adapt方法,具体代码细节这边就不展示了,有兴趣同学请自行查阅。
另外,我这边展示的是不支持kotlin挂起函数的情况,当然即使是kotlin挂起函数,过程也是一样的,也是执行其子类的adapt方法。

5. Converter 是如何工作的?
作为数据转换器,我们同样将Converter工作流程分为三步:添加、匹配、工作。
添加
可以通过addConverterFactory(Converter.Factory)方法来添加数据装换器工厂类,
以上是关于面试 反思Retrofit源码与设计 7 连问的主要内容,如果未能解决你的问题,请参考以下文章