[Pytorch系列-68]:生成对抗网络GAN - 图像生成开源项目pytorch-CycleGAN-and-pix2pix - 使用预训练模型测试CycleGAN模型
Posted 文火冰糖的硅基工坊
tags:
篇首语:本文由小常识网(cha138.com)小编为大家整理,主要介绍了[Pytorch系列-68]:生成对抗网络GAN - 图像生成开源项目pytorch-CycleGAN-and-pix2pix - 使用预训练模型测试CycleGAN模型相关的知识,希望对你有一定的参考价值。
作者主页(文火冰糖的硅基工坊):文火冰糖(王文兵)的博客_文火冰糖的硅基工坊_CSDN博客
本文网址:https://blog.csdn.net/HiWangWenBing/article/details/122071545
目录
第1步:下载或克隆pytorch-CycleGAN-and-pix2pix所有代码
第1章 概述
1.1 代码架构与总体思路
1.2 本章基本思路
(1)选择命令行或jupter进行测试
(2)选择所需要硬盘空间小的数据进行测试
(3)熟悉pytorch-CycleGAN-and-pix2pix项目的使用
(4)熟悉CycleGAN的使用效果
第2章 测试步骤
第1步:下载或克隆pytorch-CycleGAN-and-pix2pix所有代码
如果已经完成,可以跳过此步骤。
(1)Linux 命令行方式:!git clone https://github.com/junyanz/pytorch-CycleGAN-and-pix2pix
(2)Windows浏览器下载:https://github.com/junyanz/pytorch-CycleGAN-and-pix2pix
备注:
-
可以把代码下载或拷贝到jupter的工作目录中,以便后续可以通过jupter运行代码。
第2步:切换当前目录
(1)运行方式
- Windows 命令行方式:
cd xxx
- jupter方式:
import os
os.chdir('pytorch-CycleGAN-and-pix2pix/')
第3步:安装依赖文件(可视化工具)
如果已经完成,可以跳过此步骤。
- Windows 命令行方式
pip install -r requirements.txt
- Jupter方式
!pip install -r requirements.txttorch>=0.4.1
torchvision>=0.2.1
dominate>=2.3.1
visdom>=0.1.8.3
第4步:下载CycleGAN数据集
(1)下载方式
- Linux 命令行方式
bash ./datasets/download_cyclegan_dataset horse2zebra- Jupter方式
!bash ./datasets/download_cyclegan_dataset horse2zebra- Windows浏览器方式
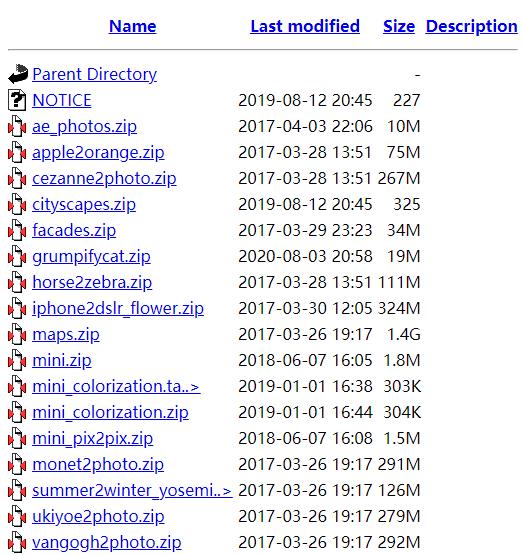
根据./datasets/download_cyclegan_dataset.sh的内容,获取数据集URL, 通过URL手工下载:
https://people.eecs.berkeley.edu/~taesung_park/CycleGAN/datasets/

备注:
- 这里选择horse2zebra:马到斑马的转换。
(2)数据集的存放路径
- 存放路径:pytorch-CycleGAN-and-pix2pix\\datasets
备注:必须同名,不能改名
(3)小型数据集
- summer2winter_yosemite:夏天转换成冬天
- horse2zebra:马到斑马的转换
- apple2orange:苹果到橙子的转换
- facades:建筑物的转换
- mini:min数据的马到斑马的转换
第5步:下载预训练模型
(1)下载方式
- Linux命令行方式
bash ./scripts/download_cyclegan_model horse2zebra- jupter方式
!bash ./scripts/download_cyclegan_model horse2zebra- Windows方式
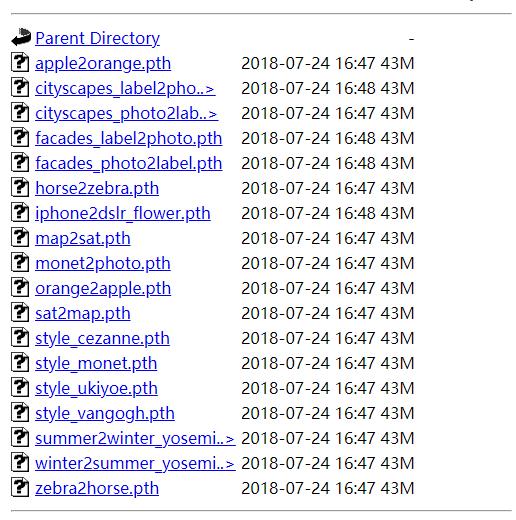
根据download_cyclegan_model.sh脚步的内容,获取链接:
http://efrosgans.eecs.berkeley.edu/cyclegan/pretrained_models/
(3)支持的模型

(2)存放路径
./checkpoints/NAME_pretrained/latest_net_G.pth
xxx为模型名称。
备注:
需要把模型的名称,改为latest_net_G.pth,并存放在NAME_pretrained目录中。
第6步:模型测试
(1)运行方式
- 命令行方式:
python test.py --dataroot datasets/horse2zebra/testA --name horse2zebra_pretrained --model test --no_dropout

python test.py --dataroot datasets/apple2orange/testA --name apple2orange_pretrained --model test --no_dropout

python test.py --dataroot datasets/summer2winter_yosemite/testA --name summer2winter_yosemite_pretrained --model test --no_dropout
- Jupter方式:
!python test.py --dataroot datasets/horse2zebra/testA --name horse2zebra_pretrained --model test --no_dropout

!python test.py --dataroot datasets/apple2orange/testA --name apple2orange_pretrained --model test --no_dropout

!python test.py --dataroot datasets/summer2winter_yosemite/testA --name summer2winter_yosemite_pretrained --model test --no_dropout
(2)主要参数
--dataroot ./datasets/horse2zebra: 指定数据集的路径-
--name horse2zebra :与预训练mode的名称 --model test :test 模型是CycleGAN的简化,去掉了不必要的网络,仅仅用于测试,无法进行模型训练。
(3)参数详解
(4)输出结果
\\pytorch-CycleGAN-and-pix2pix\\results\\horse2zebra_pretrained\\test_latest\\images
第7步:效果展示
(1)输入图片

(2)输出图片(2张独立的图片)

第1张:真实的输入图片(作为比较)
第2张:生成的输出图片(创作图片)
作者主页(文火冰糖的硅基工坊):文火冰糖(王文兵)的博客_文火冰糖的硅基工坊_CSDN博客
本文网址:https://blog.csdn.net/HiWangWenBing/article/details/122071545
以上是关于[Pytorch系列-68]:生成对抗网络GAN - 图像生成开源项目pytorch-CycleGAN-and-pix2pix - 使用预训练模型测试CycleGAN模型的主要内容,如果未能解决你的问题,请参考以下文章
 https://blog.csdn.net/HiWangWenBing/article/details/121940011