HTML5期末复习
Posted 未来、梦想
tags:
篇首语:本文由小常识网(cha138.com)小编为大家整理,主要介绍了HTML5期末复习相关的知识,希望对你有一定的参考价值。
html5考的内容比较多、也比较杂,这里重点选几种经典例子来展示。
加载JSON数据并分页
题目
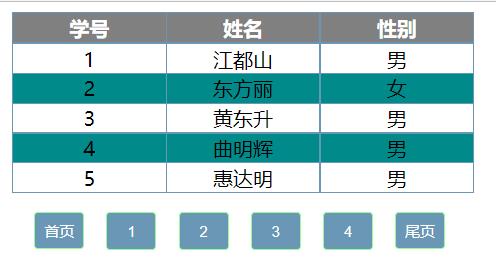
参照效果图设计一个可分页显示的表格,表格数据由json文件提供。
涉及到的颜色值可自行设定,但需要有一定的区分度,不可都用一种颜色。
素材提供了index.html文件,考生在此文件上补充内容完成整个页面效果。
样式表需要写在独立的样式表文件中,命名为“index.css”。
要考虑标题行、奇数行、偶数行、鼠标所在行的效果,其中标题行效果需加粗字体。
脚本可直接写在html文件中。

解答
首先,我们先把基本的HTML框架搭建出来。
<!doctype html>
<html>
<head>
	<meta charset="utf-8">
	<title>加载JSON数据并分页</title>
</head>
<body>
	<table>
		<tr">
			<td>学号</td>
			<td>姓名</td>
			<td>性别</td>
		</tr>
		<table></table>
	</table>
	<div>
		<button>首页</button>
		<button>1</button>
		<button>2</button>
		<button>3</button>
		<button>4</button>
		<button>尾页</button>
	</div>
</body>
</html>
其次,我们给标签添加样式。
<table style="margin: 0 auto;">
	<tr style="background-color: gray;font-weight: bold;color: white;">
		<td>学号</td>
		<td>姓名</td>
		<td>性别</td>
	</tr>
	<table id="tbody"></table>
</table>
<div class="pageBar">
	<button onclick="first()">首页</button>
	<button onclick="first()">1</button>
	<button onclick="second()">2</button>
	<button onclick="third()">3</button>
	<button onclick="forth()">4</button>
	<button onclick="forth()">尾页</button>
</div>
</body>
完整的css样式表
table
	border-collapse:collapse;

tr,td
	border:1px solid #6B97B7;

td
	width: 120px;
	text-align: center;

#tbody
	margin: 0 auto;

.pageBar
	margin: 0 auto;
	width: 360px;
	height: 40px;
	margin-top: 10px;

.pageBar button
	margin-top: 5px;
	margin-left: 13px;
	background-color: #6B97B7;
	color: white;
	text-align: center;
	width: 40px;
	height: 30px;
	font-size: 10px;
	border-radius: 3px;
	border: 1px solid palegreen;

tr:nth-child(odd)
	background-color: white;

tr:nth-child(even)
	background-color: darkcyan;

tr:hover
	cursor: pointer;
	background-color: purple;

button:hover
	cursor: pointer;
	background-color: purple;
let startItem=0;
	$(init());///刚开始显示5条数据
	function init()
		$.getJSON('studata.json',function(data)
			let content=data.data;///加载JSON文件中的data数据
			$('#tbody').html("");//设置当前选择器的内容为空
			for(let i=0;i<5;i++)
				$('#tbody').append(
				    "<tr>"+
				    "<td>"+content[startItem+i].sid+"</td>"+
				    "<td>"+content[startItem+i].sname+"</td>"+
				    "<td>"+content[startItem+i].sex+"</td>"+
				    "</tr>"
				);

		)

	function first()startItem=0;init();
	function second()startItem=5;init();
	function third()startItem=10;init();
	function forth()startItem=15;init();
studata.json文件
	"code":1,
	"count":17,
	"data":[
		"sid":1,"sname":"江都山","sex":"男",
		"sid":2,"sname":"东方丽","sex":"女",
		"sid":3,"sname":"黄东升","sex":"男",
		"sid":4,"sname":"曲明辉","sex":"男",
		"sid":5,"sname":"惠达明","sex":"男",
		"sid":6,"sname":"齐琳琳","sex":"女",
		"sid":7,"sname":"华晓花","sex":"女",
		"sid":8,"sname":"裴俊杰","sex":"男",
		"sid":9,"sname":"南明元","sex":"男",
		"sid":10,"sname":"漆远洋","sex":"男",
		"sid":11,"sname":"薛蕊","sex":"女",
		"sid":12,"sname":"康凯瑞","sex":"男",
		"sid":13,"sname":"花军","sex":"男",
		"sid":14,"sname":"顾凯元","sex":"男",
		"sid":15,"sname":"洪月娇","sex":"女",
		"sid":16,"sname":"封文","sex":"男",
		"sid":17,"sname":"包国君","sex":"男"
		]
完整的HTML代码
<!doctype html>
<html>
<head>
	<meta charset="utf-8">
	<title>加载JSON数据并分页</title>
	<link rel="stylesheet" type="text/css" href="./index.css"></link>
	<script src="./jquery-1.12.4.min.js"></script>
</head>
<script>
	let startItem=0;
	$(init());///刚开始显示5条数据
	function init()
		$.getJSON('studata.json',function(data)
			let content=data.data;///加载JSON文件中的data数据
			$('#tbody').html("");//设置当前选择器的内容为空
			for(let i=0;i<5;i++)
				$('#tbody').append(
				    "<tr>"+
				    "<td>"+content[startItem+i].sid+"</td>"+
				    "<td>"+content[startItem+i].sname+"</td>"+
				    "<td>"+content[startItem+i].sex+"</td>"+
				    "</tr>"
				);

		)

	function first()startItem=0;init();
	function second()startItem=5;init();
	function third()startItem=10;init();
	function forth()startItem=15;init();
</script>
<body>
<table style="margin: 0 auto;">
	<tr style="background-color: gray;font-weight: bold;color: white;">
		<td>学号</td>
		<td>姓名</td>
		<td>性别</td>
	</tr>
	<table id="tbody"></table>
</table>
<div class="pageBar">
	<button onclick="first()">首页</button>
	<button onclick="first()">1</button>
	<button onclick="second()">2</button>
	<button onclick="third()">3</button>
	<button onclick="forth()">4</button>
	<button onclick="forth()">尾页</button>
</div>
</body>
</html>
最终样式
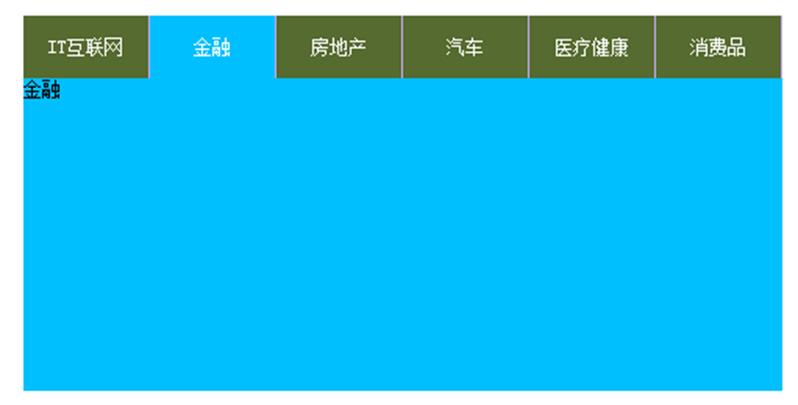
tab选项卡
题目
参照效果图设计一个选项卡,在页面中居中显示,效果中的颜色、尺寸、文字表述等信息均可自行设定。
样式表和脚本可写在独立的文件中,也可直接在HTML文件中编写。
内容部分无需详细设置,仅显示对应的选项卡标题即可。
解答
<!doctype html>
<html>
<head>
<meta charset="utf-8">
<title>tab选项卡</title>
<style type="text/css">
*
padding:0px;
ul li
line-height: 40px;
background-color: #0C0;
text-align: center;
float: left;
height: 40px;
width: 102px;
border-bottom: none;
color: #FFF;
cursor: pointer;
#bian li.bli
background-color: #09F;
#bian2 div
background-color: #09F;
height: 200px;
width: 612px;
float:left;
display:none;
ul
list-style-type: none;
#bian2 div.bdiv
display:block;
.mid
width: 612px;
margin:auto;
</style>
</head>
<body>
<ul class="mid" id="bian">
<li class="bli">IT互联网</li>
<li>金融</li>
<li>房地产</li>
<li>汽车</li>
<li>医疗健康</li>
<li>消费品</li>
</ul>
<div class="mid" id="bian2">
<div class="bdiv">IT互联网</div>
<div>金融</div>
<div