在 AI Studio中利用Paddle实现经典的AlexNet
Posted 卓晴
tags:
篇首语:本文由小常识网(cha138.com)小编为大家整理,主要介绍了在 AI Studio中利用Paddle实现经典的AlexNet相关的知识,希望对你有一定的参考价值。
简 介: 对于AlexNet的网络基本结构进行总结。由于这个网络在实现过程中所需要的计算力比较大。再次并未对其进行测试。
关键词: AlexNet,Paddle
§01 AlexNet
1.1 简介
AlexNet是2012年ImageNet竞赛冠军获得者Hinton和他的学生Alex Krizhevsky设计的,因此得名叫做AlexNet。
相比于LeNext,AlexNet增加了更多的是用于深度CNN网络的学习方法,这些方法之所以能够得以实施,依赖于:
(1)数据,一个包含许多特征的深度模型它需要大量的有标签的数据才能表现得比其他经典方法更好;
(2)硬件(算力),深度学习对计算资源要求很高,但是早期的硬件计算能力非常有限。
直到2012年,这两点都得到了很大程度的改善,这也就造就了AlexNet模型的横空出世。它首次证明了学习到的特征可以超越手工设计的特征,一举打破了困扰计算机视觉研究的瓶颈。
1.2 网络结构
AlexNet与LeNet的设计理念非常相似,但也有非常明显的区别:
- 第一:
AlexNet包含5层卷积、2层全连接隐藏层以及1层全连接输出层; - 第二:
AlexNet模型将sigmoid激活函数更改为了更为简单的ReLU激活函数; - 第三:
AlexNet通过丢弃法(Dropout)有效的控制了全连接层的模型复杂度,防止引入过多的参数; - 第四:
AlexNet引入了大量的图像增广,如翻转、裁剪以及颜色变化等,有效的增加了数据样本的数量,从而缓解了过拟合现象的发生。
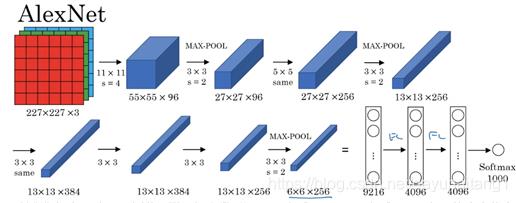
由于ImageNet数据集中的图像要比MINST数据集大许多,所以需要更大的卷积核来捕捉物体,因此:
- 第一层卷积核的窗口为
11×11 - 而第二层卷积核就减少到
5×5,之后就一直采用3×3。 - 此外,第一、第二和第五个卷积层之后都使用了窗口形状为
3×3、步幅为2的最大池化层。 - 最后就是一般的全连接层。
借用书中的图来表示一下

▲ 图1.2.1 AlexNet网络结构
输入图像大小:(batch_size,3,224,224)
第一层卷积:  (96,3,11,11) ,
  padding = 2,stride = 4
  输出大小:(batch_size,96,55,55)
  ReLU(), Local Response Normalization
  max pooling(3,stride = 2)
  输出大小:(batch_size,96,27,27)
第二层卷积: (256,96,5,5)
  padding = 2,stride = 1
  输出大小:(batch_size,256,27,27)
  ReLU(), Local Response Normalization
  max pooling(3,stride = 2)
  输出大小:(batch_size,256,13,13)
第三层卷积: (384,256,3,3)
  padding = 1,stride = 1
  输出大小:(batch_size,384,13,13)
  ReLU()
第四层卷积: (384,384,3,3)
  padding = 1,stride = 1
  输出大小:(batch_size,384,13,13)
  ReLU()
第五层卷积: (256,384,3,3)
  padding = 1,stride = 1
  输出大小:(batch_size,256,13,13)
  ReLU()
  max pooling(3,stride = 2)
  输出大小:(batch_size,256,6,6)
第六/七/八层全连接层
  (256*6*6,4096)   ReLU()  Dropout()
  输出大小:(batch_size,4096)
  (4096,4096)      ReLU()  Dropout()
  输出大小:(batch_size,4096)
  (4096,1000)
  输出大小:(batch_size,1000)
原论文中是采取了两块GPU进行交互,所以在图中有两条支路。AlexNet架构有6000万参数和650000个神经元,包含5层卷积网络,其中一些含有max pooling,还有3层全连接层,最后一层的节点数1000个,采用softmax分类
但是呢,你只要细心一点就会发现,第一层卷积层的224×224是有问题的,应该是227×227才对,这一点在吴恩达老师的视频中也被提到,所以正确的图应该是下面这个。
▲ 图1.2.2 AlexNet网络结构
1.3 代码实现
下面的代码来自于: paddle实现AlexNet ,记录在这里,用于之后进行分析和利用。
# -*- coding: utf-8 -*-
# @Time : 2020/1/21 11:18
# @Author : Zhao HL
# @File : alexnet-paddle.py
import os, sys
from PIL import Image
import numpy as np
import pandas as pd
import paddle
from paddle import fluid
from paddle.fluid.layers import data, conv2d, pool2d, flatten, fc, cross_entropy, accuracy, mean
from my_utils import process_show, draw_loss_acc

# region parameters
# region paths
Data_path = "./data/my_imagenet"
Data_csv_path = "./data/my_imagenet.csv"
Model_path = 'model/'
Model_file_tf = "model/alexnet_tf.ckpt"
Model_file_keras = "model/alexnet_keras.h5"
Model_file_torch = "model/alexnet_torch.pth"
Model_file_paddle = "model/alexnet_paddle.model"
# endregion

# region image parameter
Img_size = 227
Img_chs = 3
Label_size = 1
Label_class = 'n02091244': 'Ibizan hound',
               'n02114548': 'white wolf',
               'n02138441': 'meerkat',
               'n03584254': 'iPod',
               'n03075370': 'combination lock',
               'n09256479': 'coral reef',
               'n03980874': 'poncho',
               'n02174001': 'rhinoceros beetle',
               'n03770439': 'miniskirt',
               'n03773504': 'missile'
Labels_nums = len(Label_class)
# endregion

# region net parameter
Conv1_kernel_size = 11
Conv1_chs = 96
Conv2_kernel_size = 5
Conv2_chs = 256
Conv3_kernel_size = 3
Conv3_chs = 384
Conv4_kernel_size = 3
Conv4_chs = 384
Conv5_kernel_size = 3
Conv5_chs = 256
Flatten_size = 6 * 6 * 256
Fc1_size = 4096
Fc2_size = 4096
Fc3_size = Labels_nums
# endregion

# region hpyerparameter
Learning_rate = 1e-4
Batch_size = 32
Buffer_size = 256
Infer_size = 1
Epochs = 10
Train_num = 700
Train_batch_num = Train_num // Batch_size
Val_num = 100
Val_batch_num = Val_num // Batch_size
Test_num = 200
Test_batch_num = Test_num // Batch_size
# endregion
place = fluid.CUDAPlace(0) if fluid.cuda_places() else fluid.CPUPlace()
# endregion

class MyDataset():
    def __init__(self, root_path, batch_size, files_list=None,):
        self.root_path = root_path
        self.files_list = files_list if files_list else os.listdir(root_path)
        self.size = len(files_list)
        self.batch_size = batch_size

    def __len__(self):
        return self.size

    def dataset_reader(self):
        pass
        files_list = self.files_list if self.files_list is not None else os.listdir(self.root_path)

        def reader():
            np.random.shuffle(files_list)
            for file_name in files_list:
                label_str = file_name[:9]
                label = list(Label_class.keys()).index(label_str)
                img = Image.open(os.path.join(self.root_path, file_name))
                yield img, label
        return paddle.batch(paddle.reader.xmap_readers(self.transform, reader, 2, Buffer_size), batch_size=self.batch_size)

    def transform(self,sample):
        def Normalize(image, means, stds):
            for band in range(len(means)):
                image[:, :, band] = image[:, :, band] / 255.0
                image[:, :, band] = (image[:, :, band] - means[band]) / stds[band]
            image = np.transpose(image, [2, 1, 0])
            return image

        pass
        image, label = sample
        image = image.resize((Img_size, Img_size), Image.ANTIALIAS)
        image = Normalize(np.array(image).astype(np.float), [0.485, 0.456, 0.406], [0.229, 0.224, 0.225])
        return image, label

class AlexNet:
    def __init__(self, structShow=False):
        self.structShow = structShow
        self.image = data(shape=[Img_chs, Img_size, Img_size], dtype='float32', name='image')
        self.label = data(shape=[Label_size], dtype='int64', name='label')
        self.predict = self.get_alexNet()

    def get_alexNet(self):
        conv1 = conv2d(self.image, Conv1_chs, filter_size=Conv1_kernel_size, stride=4, padding=0, act='relu')
        pool1 = pool2d(conv1, 3, pool_stride=2, pool_type='max')

        conv2 = conv2d(pool1, Conv2_chs, filter_size=Conv2_kernel_size, padding=2, act='relu')
        pool2 = pool2d(conv2, 3, pool_stride=2, pool_type='max')

        conv3 = conv2d(pool2, Conv3_chs, filter_size=Conv3_kernel_size, padding=1, act='relu')
        conv4 = conv2d(conv3, Conv4_chs, filter_size=Conv4_kernel_size, padding=1, act='relu')
        conv5 = conv2d(conv4, Conv5_chs, filter_size=Conv5_kernel_size, padding=1, act='relu')
        pool3 = pool2d(conv5, 3, pool_stride=2, pool_type='max')

        flt = flatten(pool3, axis=1)
        fc1 = fc(flt, Fc1_size, act='relu')
        fc2 = fc(fc1, Fc2_size, act='relu')
        fc3 = fc(fc1, Fc3_size, act='softmax')

        if self.structShow:
            print(conv1.name, conv1.shape)
            print(pool1.name, pool1.shape)
            print(conv2.name, conv2.shape)
            print(pool2.name, pool2.shape)
            print(conv3.name, conv3.shape)
            print(conv4.name, conv4.shape)
            print(conv5.name, conv5.shape)
            print(pool3.name, pool3.shape)
          以上是关于在 AI Studio中利用Paddle实现经典的AlexNet的主要内容,如果未能解决你的问题,请参考以下文章