Android修行手册-和Button的邂逅以及实现selector选择器
Posted 芝麻粒儿
tags:
篇首语:本文由小常识网(cha138.com)小编为大家整理,主要介绍了Android修行手册-和Button的邂逅以及实现selector选择器相关的知识,希望对你有一定的参考价值。
你笑我为何拿上锤和盾,有你在,我不会受到伤害,只是,你不知道,会让我受伤的,是你。
Android修行手册-玩转TextView,想不到有这么多属性
【万字】熬夜修行Android Studio技巧到出神入化,快速涨薪【建议收藏】
Android修行手册之从头到尾学Kotlin【全】
点击跳转=>熬夜再战Android从青铜到王者-开发效率插件篇
点击跳转=>Unity粒子特效系列-龙卷风预制体做好了,unitypackage包直接用!
点击跳转=>姐姐喊我解锁套娃新技能:FairyGUI在Unity中实现List嵌套List/立体画廊等,玩出花儿来
点击跳转=>Unity新手必备5款宝藏插件–价值上千元白嫖最新版
爆肝万字C#基础入门大总结【建议收藏】
👉关于作者
众所周知,人生是一个漫长的流程,不断克服困难,不断反思前进的过程。在这个过程中会产生很多对于人生的质疑和思考,于是我决定将自己的思考,经验和故事全部分享出来,以此寻找共鸣 !!!
专注于Android/Unity和各种游戏开发技巧,以及各种资源分享(网站、工具、素材、源码、游戏等)
有什么需要欢迎私我,交流群让学习不再孤单。
👉前提
前两天我们刚学问TextView的属性详解,应该是最全的了,今天我们学学按钮(Button)这个控件。
这是小空坚持写的Android系列,欢迎品尝。
👉实践过程
😜初识
我们先创建一个基本的Button看看:
<?xml version="1.0" encoding="utf-8"?>
<RelativeLayout xmlns:android="http://schemas.android.com/apk/res/android"
    xmlns:app="http://schemas.android.com/apk/res-auto"
    xmlns:tools="http://schemas.android.com/tools"
    android:layout_width="match_parent"
    android:layout_height="match_parent"
    tools:context=".TextActivity">
    <Button
       android:id="@+id/mtBtn"
       android:layout_width="wrap_content"
       android:layout_height="wrap_content"
       android:text="这是按钮" />
    <Button
       android:layout_width="wrap_content"
       android:layout_height="wrap_content"
       android:layout_alignParentRight="true"
       android:text="this button" />
</RelativeLayout>
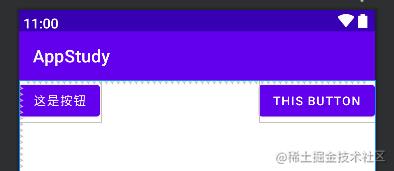
界面显示如下:

恩,汉字显示很正常,但是英文代码中不是小写吗,为什么显示是大写。
其实是属性textAllCaps在作怪。改成下面再看看是否正常了。
<Button
    android:id="@+id/mtBtn"
    android:layout_width="wrap_content"
    android:layout_height="wrap_content"
    android:layout_alignParentRight="true"
    android:textAllCaps="false"
    android:text="this button" />
😜事故
这时候又有朋友提问了:不对啊,除了英文你的颜色和我的也不一样啊,明明我也是和你写的一样的代码。

小空告诉你:其实这是应用主题导致的,默认创建的项目有个主题,当然你可以自定义。
在【AndroidManifest.xml】文件的【android:theme】属性设置,【Ctrl+左键】点进去后你就会发现里面是一些相关颜色定义。而且你要注意布局预览界面也有主题的选择,小心被坑。
主题我们先暂且放下,继续深入Button。
既然是按钮,那交互是必须的操作,怎么设置点击事件呢?
public class TextActivity extends AppCompatActivity
    @Override
    protected void onCreate(Bundle savedInstanceState)
        super.onCreate(savedInstanceState);
        setContentView(R.layout.activity_text);
        Button btn = findViewById(R.id.mtBtn);
        btn.setOnClickListener(view ->
            Toast.makeText(TextActivity.this, "点击了按钮", Toast.LENGTH_SHORT).show();
        );
运行后,点击按钮即可看见效果啦。
题外话:在App中,除了用户无意的频繁点击,有时候网路请求慢,用户也会有意的一直去点击,如果你不做处理,会重复的做处理,这必然是不合规的。所以就有了防止按钮多次点击的方案:
- 在点击事件中判断距离上一次点击的时间。
- 封装个点击事件里面同样是判断点击时间,只不过后续view的点击事件全部用这个。
- 写一个静态方法同样是判断点击时间,在系统的点击事件第一行就判断这个静态时间返回true或false
😜selector选择器
我们先按照上一节的shape方式创建两个shape背景
btn_selector_shape1.xml
<?xml version="1.0" encoding="utf-8"?>
<shape xmlns:android="http://schemas.android.com/apk/res/android"
    android:shape="rectangle">
    <!-- 圆角 -->
    <corners android:radius="5dp" />
    <!--填充颜色-->
    <solid android:color="#00ff00" />
</shape>
btn_selector_shape2.xml
<?xml version="1.0" encoding="utf-8"?>
<shape xmlns:android="http://schemas.android.com/apk/res/android"
    android:shape="rectangle">
    <!--圆角-->
    <corners android:radius="5dp" />
    <!--填充颜色-->
    <solid android:color="#0000ff" />
</shape>
接着我们在【res-drawable】右键创建个Drawable Resource File ,弹出框写文件名创建文件,设置默认【Root element】为selector。
btn_selector0.xml
<?xml version="1.0" encoding="utf-8"?>
<selector xmlns:android="http://schemas.android.com/apk/res/android">
    <item android:drawable="@drawable/btn_selector_shape1" android:state_pressed="true" />
    <item android:drawable="@drawable/btn_selector_shape2" android:state_window_focused="false" />
</selector>
布局中引用
<?xml version="1.0" encoding="utf-8"?>
<RelativeLayout xmlns:android="http://schemas.android.com/apk/res/android"
    xmlns:app="http://schemas.android.com/apk/res-auto"
    xmlns:tools="http://schemas.android.com/tools"
    android:layout_width="match_parent"
    android:layout_height="match_parent"
    android:background="@color/white"
    tools:context=".TextActivity">
    <Button
        android:layout_width="wrap_content"
        android:layout_height="wrap_content"
        android:layout_marginLeft="160dp"
        android:background="@drawable/btn_selector0"
        android:text="按下变色"
        android:textColor="@color/white" />
</RelativeLayout>
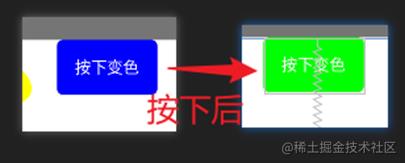
我们运行下看看


但是
我们回忆下,刚才是不是创建了三个文件,按钮少的情况下还好,自定义的按钮一多,这么多文件非常不容易管理,所以我们要用另外一种写法,将所有内容放到一个文件中。
我们在刚才的btn.selector0.xml中修改:
<?xml version="1.0" encoding="utf-8"?>
<selector xmlns:android="http://schemas.android.com/apk/res/android">
    <!--这是第一种方式,利用drwable引用文件-->
    <!--<item android:drawable="@drawable/btn_selector_shape1" android:state_pressed="true" />-->
    <!--<item android:drawable="@drawable/btn_selector_shape2" android:state_pressed="false" />-->
    <!--第二种方式如下-->
    <item android:state_pressed="false">
        <shape android:shape="rectangle">
            <!-- 圆角 -->
            <corners android:radius="5dp" />
            <!--填充颜色为白色-->
            <solid android:color="#0000ff" />
        </shape>
    </item>
    <!--单击时是一个带圆角,白色背景,绿色边框的矩形-->
    <item android:state_pressed="true">
        <shape android:shape="rectangle">
            <!--圆角-->
            <corners android:radius="5dp" />
            <!--填充颜色为白色-->
            <solid android:color="#00ff00" />
        </shape>
    </item>
</selector>
我们运行起来看看,哎,效果很正确啊
Selector的属性不止这两个哦:
- state_focused 布尔值,是否获得焦点
- state_window_focused 布尔值,是否获得窗口焦点
- state_enabled 布尔值,控件是否可用
- state_checkable 布尔值,控件可否被勾选
- state_checked 布尔值,控件是否被勾选
- state_selected 布尔值,控件是否被选择,针对有滚轮的情况
- state_pressed 布尔值,控件是否被按下
- state_active 布尔值,控件是否处于活动状态
- state_single和state_first和state_middle很少使用,知道就行。
👉其他
📢作者:小空和小芝中的小空
📢转载说明-务必注明来源:https://zhima.blog.csdn.net/
📢欢迎点赞👍收藏🌟留言📝
以上是关于Android修行手册-和Button的邂逅以及实现selector选择器的主要内容,如果未能解决你的问题,请参考以下文章