Android WebView开发:WebView独立进程解决方案
Posted 红日666
tags:
篇首语:本文由小常识网(cha138.com)小编为大家整理,主要介绍了Android WebView开发:WebView独立进程解决方案相关的知识,希望对你有一定的参考价值。
一、Android WebView开发(一):基础应用
二、Android WebView开发(二):WebView与Native交互
三、Android WebView开发(三):WebView性能优化
四、Android WebView开发(四):WebView独立进程解决方案
五、Android WebView开发(五):自定义WebView工具栏
附GitHub源码:WebViewExplore
一、WebView面临的问题:
1、WebView导致的内存泄漏问题,及后续引起的OOM问题。
2、android版本不同,采用了不同的内核,兼容性Crash。
3、WebView代码质量,WebView和Native版本不一致,导致Crash。
二、WebView独立进程的实现:
WebView独立进程的实现比较简单,只需要在AndroidManifest中找到对应的WebViewActivity,对其配置"android: process"属性即可。如下:
  <!--独立进程WebViewActivity-->
  <activity
      android:name=".SingleProcessActivity"
      android:configChanges="orientation|keyboardHidden|screenSize"
      android:process=":remoteWeb" />
我们可以通过 adb shell ps|grep com.hongri.webview 指令查看验证,添加独立进程前后的对进程的打印情况:

可以看到已经在主进程的基础上,新生成了一个remoteWeb独立进程。
有两个进程就必然会涉及到进程间的通信,所以最终涉及到的交互及通信包括:
前端与Native端、独立进程与主进程间的通信。
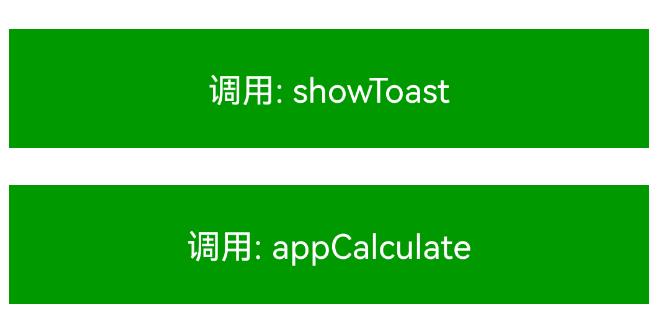
后面会通过下面的demo逐个介绍,如下图独立进程中的SingleProcessActivity页面加载了一个本地的html前端页面,页面包含两个按钮,点击后分别最终会调用主进程的showToast方法doCalculate方法,从而实现前端及进程间的交互。

1、前端与Native端的交互:
[可参考:二、WebView与Native的交互]
(1)、注册JS映射接口,并实现:
加载本地的一个remote_web.html文件:
public static final String CONTENT_SCHEME = "file:///android_asset/remote/remote_web.html";//允许js交互
webSettings.setjavascriptEnabled(true);
JsRemoteInterface remoteInterface = new JsRemoteInterface();
remoteInterface.setListener(this);
//注册JS交互接口
mWebView.addJavascriptInterface(remoteInterface, "webview");
mWebView.loadUrl(CONTENT_SCHEME);其中 JsRemoteInterface 为对应的前端交互映射类,源码如下:
/**
 * Create by zhongyao on 2021/12/14
 * Description: 前端交互映射类
 */
public class JsRemoteInterface

    private static final String TAG = "JsRemoteInterface";
    private final Handler mHandler = new Handler();
    private IRemoteListener listener;

    /**
     * 前端调用方法
     * @param cmd
     * @param param
     */
    @JavascriptInterface
    public void post(final String cmd, final String param)
        mHandler.post(new Runnable()
            @Override
            public void run()
                if (listener != null)
                    try
                        listener.post(cmd, param);
                     catch (RemoteException e)
                        e.printStackTrace();


        );


    public void setListener(IRemoteListener remoteListener)
        listener = remoteListener;
(2)、前端关键代码实现:
- remote_web.html:
</script>
<div class="item" style="font-size: 18px; color: #ffffff" onclick="callAppToast()">调用: showToast</div>
<div class="item" style="font-size: 18px; color: #ffffff" onclick="callCalculate()">调用: appCalculate</div>
<script src="remote_web.js" charset="utf-8"></script>
<script>
function callAppToast()
dj.post("showToast", message: "this is action from html");
function callCalculate()
dj.postWithCallback("appCalculate", firstNum: "1", secondNum: "2", function(res)
dj.post("showToast", message: JSON.stringify(res));
);
</script>- remote_web.js:
dj.post = function(cmd,para)
    if(dj.os.isios)
        var message = ;
        message.meta =
            cmd:cmd
        ;
        message.para = para || ;
        window.webview.post(message);
    else if(window.dj.os.isAndroid)
        window.webview.post(cmd,JSON.stringify(para));

;
dj.postWithCallback = function(cmd,para,callback,ud)
    var callbackname = dj.callbackname();
    dj.addCallback(callbackname,callback,ud);
    if(dj.os.isIOS)
        var message = ;
        message.meta  =
            cmd:cmd,
            callback:callbackname
        ;
        message.para = para;
        window.webview.post(message);
    else if(window.dj.os.isAndroid)
        para.callback = callbackname;
        window.webview.post(cmd,JSON.stringify(para));

;
2、独立进程与主进程的交互:
(1)、定义一个AIDL文件 CalculateInterface:
并将暴露给其他进程的方法在该文件中声明,如下图:

需要注意的是,该文件的包名需要跟java文件夹下的源码的主包名一致。
aidl文件源码如下,定义了上面描述的两个方法:
// CalculateInterface.aidl
package com.hongri.webview;

// Declare any non-default types here with import statements

interface CalculateInterface
   double doCalculate(double a, double b);
   void showToast();
(2)、主进程中定义一个远程服务RemoteService【可看做Server】:
此服务用来监听客户端的连接请求,并实现该AIDL接口,完整代码如下:
/**
 * @author hongri
 * @description 远程Service【Server】
 * 【此Service位于主进程中】
 */
public class RemoteService extends Service

    private static final String TAG = "RemoteService";

    @Override
    public IBinder onBind(Intent arg0)
        return mBinder;


    @Override
    public boolean onUnbind(Intent intent)
        return super.onUnbind(intent);


    @Override
    public void onCreate()
        super.onCreate();


    @Override
    public int onStartCommand(Intent intent, int flags, int startId)
        return super.onStartCommand(intent, flags, startId);


    @Override
    public void onDestroy()
        super.onDestroy();


    private final CalculateInterface.Stub mBinder = new CalculateInterface.Stub()
        /**
         * remoteWeb进程调用主进程的showToast方法,实现进程间的通信。
         * @throws RemoteException
         */
        @Override
        public void showToast() throws RemoteException
            Log.d(TAG, "showToast" + " processName:" + ProcessUtil.getProcessName(getApplicationContext()) + " isMainProcess:" + ProcessUtil.isMainProcess(getApplicationContext()));
            Handler handler = new Handler(Looper.getMainLooper());
            handler.post(new Runnable()
                @Override
                public void run()
                    Toast.makeText(getApplicationContext(), "remoteWeb进程调用了主进程的showToast方法", Toast.LENGTH_LONG).show();

            );


        /**
         * remoteWeb进程调用主进程的doCalculate方法,实现进程间通信。
         * @param a
         * @param b
         * @return
         * @throws RemoteException
         */
        @Override
        public double doCalculate(double a, double b) throws RemoteException
            Calculate calculate = new Calculate();
            final double result = calculate.calculateSum(a, b);
            Handler handler = new Handler(Looper.getMainLooper());
            handler.post(new Runnable()
                @Override
                public void run()
                    Toast.makeText(getApplicationContext(), "remoteWeb进程调用了主进程的doCalculate方法, 计算结果为:" + result, Toast.LENGTH_LONG).show();

            );
            return result;

    ;
(3)、在独立进程SingleProcessActivity中绑定远程服务RemoteService:
    /**
     * 绑定远程服务RemoteService
     */
    private void initService()
        Intent intent = new Intent();
        intent.setComponent(new ComponentName("com.hongri.webview", "com.hongri.webview.service.RemoteService"));
        bindService(intent, mConn, BIND_AUTO_CREATE);
(4)、绑定成功后,将服务端返回的Binder对象(service)转换成AIDL接口所属的类型(CalculateInterface):
    private CalculateInterface mRemoteService;

    private final ServiceConnection mConn = new ServiceConnection()
        @Override
        public void onServiceConnected(ComponentName name, IBinder service)
            Log.d(TAG, "onServiceConnected");
            //当Service绑定成功时,通过Binder获取到远程服务代理
            mRemoteService = CalculateInterface.Stub.asInterface(service);


        @Override
        public void onServiceDisconnected(ComponentName name)
            Log.d(TAG, "onServiceDisconnected");
            mRemoteService = null;

    ;
(5)、此时就可以根据前端post方法的调用,来根据 mRemoteService 实例针对性的调用主进程的showToast与doCalculate方法:
    @Override
    public void post(String cmd, String param) throws RemoteException
        Log.d(TAG, "当前进程name:" + ProcessUtil.getProcessName(this) + " 主进程:" + ProcessUtil.isMainProcess(this));
        dealWithPost(cmd, param);


    /**
     * 前端调用方法处理
     *
     * @param cmd
     * @param param
     * @throws RemoteException
     */
    private void dealWithPost(String cmd, String param) throws RemoteException
        if (mRemoteService == null)
            Log.e(TAG, "remote service proxy is null");
            return;

        switch (cmd)
            case "showToast":
                Log.d(TAG, "showToast");
                mRemoteService.showToast();
                break;
            case "appCalculate":
                Log.d(TAG, "appCalculate --> " + param);
                try
                    JSONObject jsonObject = new JSONObject(param);
                    double firstNum = Double.parseDouble(jsonObject.optString("firstNum"));
                    double secondNum = Double.parseDouble(jsonObject.optString("secondNum"));
                    double calculateResult = mRemoteService.doCalculate(firstNum, secondNum);
                    Log.d(TAG, "calculateResult:" + calculateResult);
                 catch (JSONException e)
                    e.printStackTrace();

                break;
            default:
                Log.d(TAG, "Native端暂未实现该方法");
                break;
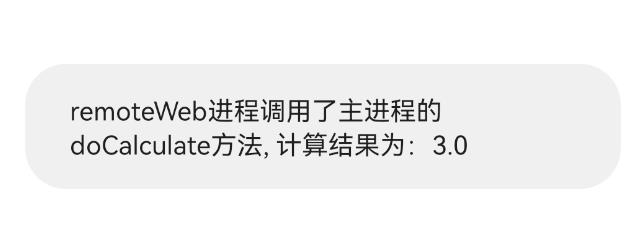
点击前端页面的doCalculate方法,调用结果如下:
表示最终实现了remoteWeb 独立进程与主进程之间的通信。
附GitHub源码:WebViewExplore
参考:
以上是关于Android WebView开发:WebView独立进程解决方案的主要内容,如果未能解决你的问题,请参考以下文章
Android WebView开发:自定义WebView工具框
Android WebView开发:WebView与Native交互