# 前后端国际化多语言配置
Posted MarlonBrando1998
tags:
篇首语:本文由小常识网(cha138.com)小编为大家整理,主要介绍了# 前后端国际化多语言配置相关的知识,希望对你有一定的参考价值。
前后端国际化多语言配置
前端(Vue ElementUI)
- 项目前端使用
Vue+Elementui
编写 i18n.js
- 在这个
js中引入ElementUI的多语言资源,引入本地的多语言资源
// I18n
import VueI18n from 'vue-i18n'
import Vue from 'vue'
import locale from 'element-ui/lib/locale'

// 引入 elementui 的多语言
import enLocale from 'element-ui/lib/locale/lang/en'
import zhLocale from 'element-ui/lib/locale/lang/zh-CN'

// 引入自己定义的 I18n 文件
import myI18nEn from './i18n-en-US.json'
import myI18nZh from './i18n-zh-CN.json'

// 注册 vue-i18n
Vue.use(VueI18n)

// 默认中文
const lang = 'zh'
const i18n = new VueI18n(
  locale: lang,
  messages:
    zh: Object.assign(zhLocale, myI18nZh),
    en: Object.assign(enLocale, myI18nEn)

)

locale.i18n((key, value) => i18n.t(key, value))
export default i18n
- 新建
i18n-en-US.jsoni18n-zh-CN.json文件,就是两个JSON文件 i18n-en-US.json
"test": "切换语言"
i18n-zh-CN.json
"test": "ChangeLanguage"
在main.js 中挂载 i18n
main.js
// 引入 Vue
import Vue from 'vue'

// I18n js
import i18n from './utils/i18n/I18n.js'

// 挂载 vue
new Vue(
  router,
  i18n,
  render: h => h(App)
).$mount('#app')
使用方式
<el-button size="mini" @click="changeLanguage">$t("test")</el-button>
<el-input :placeholder="$t('test')"></el-input>
切换全局的 i18n 语言
 <el-button size="mini" @click="changeLanguage">$t("test")</el-button>

// 切换语言
changeLanguage ()
    // 直接使用这个方法就可以切换
    this.$i18n.locale = this.$i18n.locale === 'en' ? 'zh' : 'en'
    // 保存到 Cookies 中方便后面发请求的时候拿到拼接到请求头中
    Cookies.set('language', this.$i18n.locale)
往后端的请求头中增加 language 参数
- 如下封装的发送请求的
js,从Cookie中拿到上面放进去的参数,当向后端请求的时候请求头部带上languange参数
// 1->common.js中引入axios
import axios from 'axios'
import QS from 'qs'
// 引入Cookie
import Cookies from 'js-cookie'

axios.defaults.timeout = 180000 // 超时时间

// 表单提交方式还是 JSON格式提交
var flag = true
// http request 拦截器
axios.interceptors.request.use(
  config =>
    // 注意使用的时候需要引入cookie方法,推荐js-cookie
    let token = Cookies.get('token')
    let language = Cookies.get('language') === undefined ? 'zh' : Cookies.get('language')
    // 登录接口不需要Token
    if (config.url.indexOf('/system/login') > 0 && config.url.indexOf('/system/loginlog') < 0)
      return config

    // 如果是post请求 请求体自动加上token
    if (config.method === 'post')
      if (token)
        console.log(config.headers)
        config.headers =
          'Content-Type': flag ? 'application/json' : 'application/x-www-form-urlencoded',
          // 后端生成的Token,携带Token后请求变成非简单请求
          Authorization: token,
          'language': language


     else if (config.method === 'get')
      config.headers =
      if (token)
        config.headers =
          'Content-Type': flag ? 'application/json' : 'application/x-www-form-urlencoded',
          Authorization: token,
          'language': language


    return config
  ,
  error =>
    // return Promise.reject(err)
    console.log(error)

)

// 2->对get请求传递过来的参数处理
function paramsToUrl (url, params)
  if (!params) return url
  for (var key in params)
    if (params[key] && params[key] !== 'undefined')
      if (url.indexOf('?') !== -1)
        url += '&' + '' + key + '=' + params[key] || '' + ''
       else
        url += '?' + '' + key + '=' + params[key] || '' + ''


  return url


// 3->在common.js中封装公用方法-----封装请求的方法
export function requireData (url, params, type, item, paramsType)
  // 请求参数是表单还是 json 格式
  flag = true
  if (paramsType)
    flag = paramsType

  if (!url) return false
  switch (item)
    case 'back':
      url = axios.defaults.baseM1URL + url
      break
    case 'before':
      url = axios.defaults.baseM2URL + url
      break
    case 'taskcenter':
      url = axios.defaults.baseM3URL + url
      break
    case 'core':
      url = axios.defaults.baseM4URL + url
      break

  if (type === 'get')
    url = paramsToUrl(url, params)
    return new Promise((resolve, reject) =>
      axios
        .get(url, params)
        .then(res =>
          resolve(res.data)
        )
        .catch(err =>
          reject(err)
        )
    )
   else if (type === 'post')
    // json格式请求头
    const headerJSON =
      'Content-Type': 'application/json'

    // FormData格式请求头
    const headerFormData =
      'Content-Type': 'application/x-www-form-urlencoded;charset=UTF-8'

    return new Promise((resolve, reject) =>
      axios.post(url, flag ? JSON.stringify(params) : QS.stringify(params),
        headers: flag ? headerJSON : headerFormData
      ).then(res =>
        resolve(res.data)
      ).catch(err =>
        reject(err.data)
      )
    )
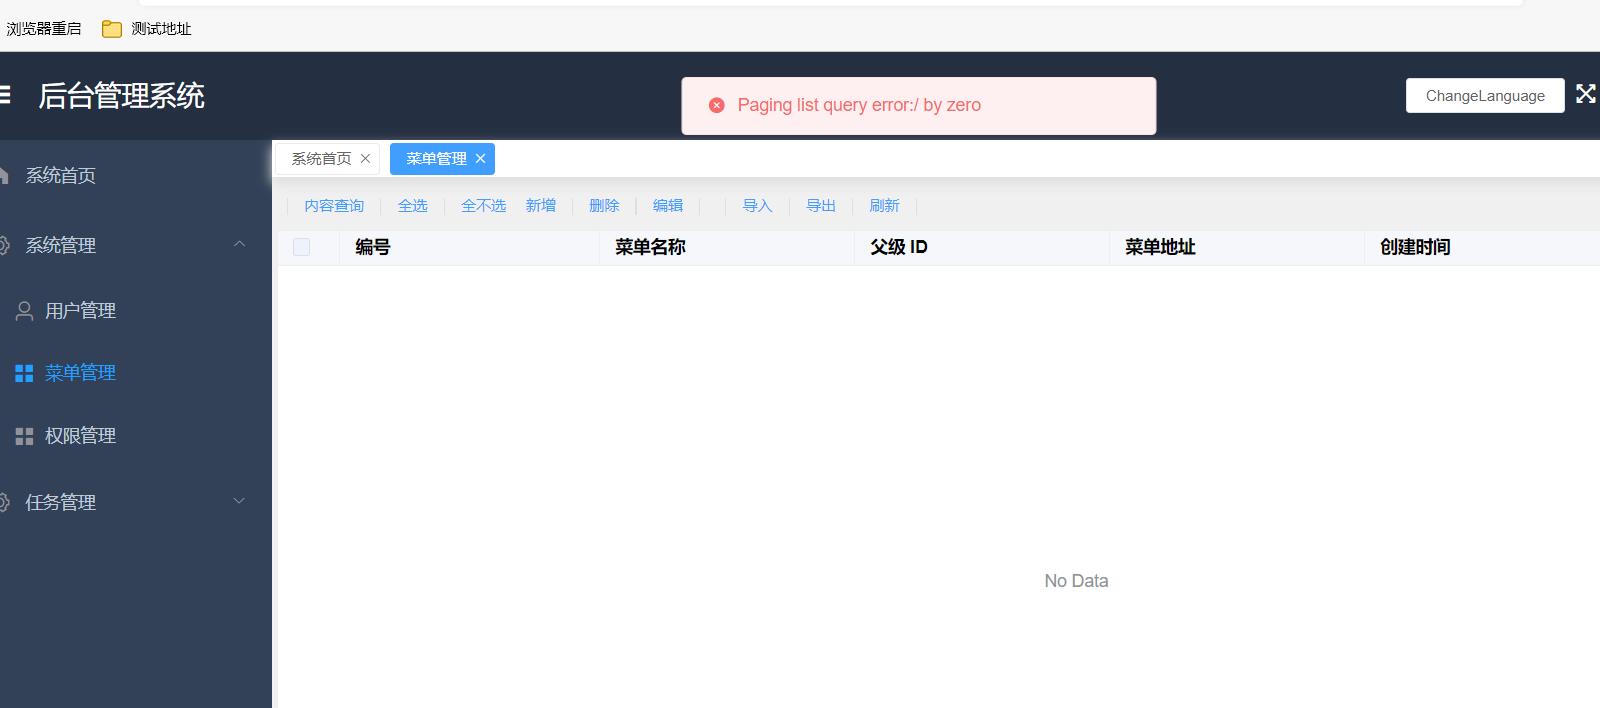
发送请求查看头部已经有 language 的参数

查看 Elementui 原生的多语言也生效了

- 前端完整代码见:https://gitee.com/Marlon_Brando/onlineshop_before/commit/2476b93e0cf982846293bcd8d6688da9d4661cbb
后端(SpringBoot MessageSource)
使用 Spring 国际化 MessageSource
Spring默认集成了多语言直接使用就行了,注意配置文件要放在resource下面不然需要配置
配置 MessageSource 可以不用配置 当多语言文件名称不是 messages开头时候必须配置
/**
  * 配置 MessageSource 其实这个可以不配置如果不配置请注意 message 多语言文件的位置
  *
  * @return
  */
@Bean
public ResourceBundleMessageSource messageSource()
    Locale.setDefault(Locale.CHINESE);
    ResourceBundleMessageSource source = new ResourceBundleMessageSource();
    source.setBasenames("messages");
    source.setUseCodeAsDefaultMessage(true);
    source.setDefaultEncoding("UTF-8");
    logger.info(LogConstant.LOG_SUCCESS_PREFIX + "I18n配置完成");
    return source;
自定义 LocaleResolver 从请求头中获取多语言参数配置到当前域中
@Configuration
public class I18nConfig implements WebMvcConfigurer

    private static final Logger logger = LoggerFactory.getLogger(I18nConfig.class);


    /**
     * 配置 MessageSource 其实这个可以不配置如果不配置请注意 message 多语言文件的位置
     *
     * @return
     */
    @Bean
    public ResourceBundleMessageSource messageSource()
        Locale.setDefault(Locale.CHINESE);
        ResourceBundleMessageSource source = new ResourceBundleMessageSource();
        source.setBasenames("messages");
        source.setUseCodeAsDefaultMessage(true);
        source.setDefaultEncoding("UTF-8");
        logger.info(LogConstant.LOG_SUCCESS_PREFIX + "I18n配置完成");
        return source;


    /**
     * 自定义国际化组件生效注册 LocaleResolver Bean
     *
     * @return
     */
    @Bean
    public LocaleResolver localeResolver()
        return new MyLocalResolver();


class MyLocalResolver implements LocaleResolver

    /**
     * 从请求中获取多语言参数,对当前域设置多语言环境
     *
     * @param request
     * @return
     */
    @Override
    public Locale resolveLocale(HttpServletRequest request)
        final String key = "language";
        String language = request.getHeader(key);
        Map<String, String> map = new HashMap<>(16);
        map.put("en", Locale.ENGLISH.getLanguage());
        map.put("zh", Locale.CHINESE.getLanguage());
        return new Locale(map.getOrDefault(language, "en"));


    @Override
    public void setLocale(HttpServletRequest request, HttpServletResponse httpServletResponse, Locale locale)
注意点
// Bean 的注册 localeResolver方法名必须是这个不然注册不上
@Bean
public LocaleResolver localeResolver()
使用
@Autowired
private MessageSource messageSource;

messageSource.getMessage("core.pageListError", null, LocaleContextHolder.getLocale()
完美完成

以上是关于# 前后端国际化多语言配置的主要内容,如果未能解决你的问题,请参考以下文章