《第一行代码》 第三版 - 第四章(笔记)
Posted 小柴的回忆
tags:
篇首语:本文由小常识网(cha138.com)小编为大家整理,主要介绍了《第一行代码》 第三版 - 第四章(笔记)相关的知识,希望对你有一定的参考价值。
软件也要拼脸蛋,UI开发的点点滴滴
1 常用控件
之后有空我将会一个一个的写出来,现在的话,我觉得菜鸟教程的很详细,可以阅读菜鸟教程来进行学习。
2.1 View与ViewGroup的概念
菜鸟教程的第二章都是View和ViewGroup的控件讲解。
TextView
Button
EditText
AlertDialog
ProgressBar
ImageView
2 布局
布局有7种布局:
相对布局
线性布局
约束布局
网格布局
帧布局
表格布局
绝对布局
2.1常用的布局:相对布局、线性布局和帧布局,另加一个约束布局
推荐优先使用约束布局,它是一个非常强大的布局,他可以实现相对布局和线性布局的所实现的页面布局
3.自定义控件
上面的所有基础控件都是 View的直接或间接之类,而所有布局都是ViewGroup的直接或间接之类,同时ViewGroup是一种特殊的View,可以包含多个View或ViewGroup
3.1引入布局
引入布局是自定义控件中最简单的一种,就是把其他的XML布局引入到主布局,但被引入的布局监听等用法和主布局的用法一样。主要的作用是复用布局,减少一样的布局代码
先写一个要引入的自定义布局XML: item_title.xml
这里使用的布局是约束布局,不了解的小伙伴可以在这了解↓
约束布局ConstraintLayout看这一篇就够了
<?xml version="1.0" encoding="utf-8"?>
<androidx.constraintlayout.widget.ConstraintLayout xmlns:android="http://schemas.android.com/apk/res/android"
    android:layout_width="match_parent"
    android:layout_height="wrap_content"
    android:background="#669999"
    xmlns:app="http://schemas.android.com/apk/res-auto">
    <ImageButton
        android:id="@+id/back"
        android:layout_width="wrap_content"
        android:layout_height="wrap_content"
        android:padding="12dp"
        android:src="@drawable/ic_back"
        android:background="@drawable/ic_kong"
        app:layout_constraintLeft_toLeftOf="parent"
        app:layout_constraintTop_toTopOf="parent"
        app:layout_constraintBottom_toBottomOf="parent"/>
    <TextView
        android:id="@+id/title"
        android:layout_width="0dp"
        android:layout_height="wrap_content"
        android:padding="12dp"
        android:textSize="16sp"
        android:textColor="#333333"
        android:textStyle="bold"
        android:text="这个是标题了啦"
        android:gravity="center"
        app:layout_constraintTop_toTopOf="parent"
        app:layout_constraintBottom_toBottomOf="parent"
        app:layout_constraintLeft_toRightOf="@id/back"
        app:layout_constraintRight_toLeftOf="@id/setting"/>
    <ImageButton
        android:id="@+id/setting"
        android:layout_width="wrap_content"
        android:layout_height="wrap_content"
        android:padding="12dp"
        android:src="@drawable/ic_setting"
        android:background="@drawable/ic_kong"
        app:layout_constraintRight_toRightOf="parent"
        app:layout_constraintTop_toTopOf="parent"
        app:layout_constraintBottom_toBottomOf="parent"/>
</androidx.constraintlayout.widget.ConstraintLayout>
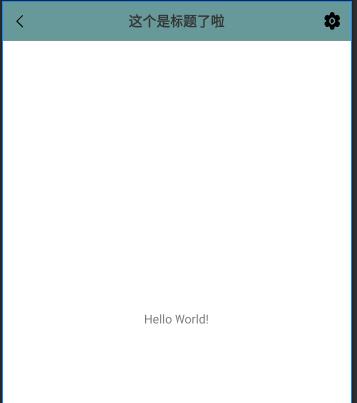
写好布局文件之后,我们在activity_main中通过引入布局
<?xml version="1.0" encoding="utf-8"?>
<androidx.constraintlayout.widget.ConstraintLayout xmlns:android="http://schemas.android.com/apk/res/android"
    xmlns:app="http://schemas.android.com/apk/res-auto"
    xmlns:tools="http://schemas.android.com/tools"
    android:layout_width="match_parent"
    android:layout_height="match_parent"
    tools:context=".MainActivity">
    <include layout="@layout/item_title" android:id="@+id/title"/>

    <TextView
        android:layout_width="wrap_content"
        android:layout_height="wrap_content"
        android:text="Hello World!"
        app:layout_constraintBottom_toBottomOf="parent"
        app:layout_constraintLeft_toLeftOf="parent"
        app:layout_constraintRight_toRightOf="parent"
        app:layout_constraintTop_toTopOf="parent" />

</androidx.constraintlayout.widget.ConstraintLayout>

Activity对其监听
 class MainActivity : AppCompatActivity()
    override fun onCreate(savedInstanceState: Bundle?)
        super.onCreate(savedInstanceState)
        setContentView(R.layout.activity_main)
        val img : ImageButton = findViewById(R.id.back)
        img.setOnClickListener
            Toast.makeText(this, "点击了返回", Toast.LENGTH_SHORT).show()

        val title : TextView = findViewById(R.id.title)
        title.setOnClickListener
            Toast.makeText(this, "点击了标题", Toast.LENGTH_SHORT).show()

        val setting : ImageButton = findViewById(R.id.setting)
        setting.setOnClickListener
            Toast.makeText(this, "点击了设置", Toast.LENGTH_SHORT).show()
3.2创建自定义控件
上面虽然减少了代码重复性的问题,但里面的事件处理逻辑也要一次次的写,所以最好的办法就是制作自定义控件,处理逻辑写在自定义控件里面
引入布局文件后,在init结构体中对需要的标题布局进行动态加载
LayoutInflater 的from()方法可以构建出一个LayoutInflater对象,再通过对象的inflate()方法动态加载一个布局文件,该方法有两个参数,第一个是布局文件的id,第二个是父布局。
然后再实现他们的处理逻辑。那这样以后只要我们将TitleLayout这个控件写在XML上面,我们运行,点击对应的控件,那就会触发里面的监听事件
class TitleLayout(context : Context, attrs : AttributeSet) : LinearLayout(context, attrs)
    init
        LayoutInflater.from(context).inflate(R.layout.item_title, this)
        val img: ImageButton = findViewById(R.id.back)
        img.setOnClickListener
            Toast.makeText(context, "点击了返回", Toast.LENGTH_SHORT).show()

        val title: TextView = findViewById(R.id.title)
        title.setOnClickListener
            Toast.makeText(context, "点击了标题", Toast.LENGTH_SHORT).show()

        val setting: ImageButton = findViewById(R.id.setting)
        setting.setOnClickListener
            Toast.makeText(context, "点击了设置", Toast.LENGTH_SHORT).show()
activity_main.xml的修改
<?xml version="1.0" encoding="utf-8"?>
<androidx.constraintlayout.widget.ConstraintLayout xmlns:android="http://schemas.android.com/apk/res/android"
    xmlns:app="http://schemas.android.com/apk/res-auto"
    xmlns:tools="http://schemas.android.com/tools"
    android:layout_width="match_parent"
    android:layout_height="match_parent"
    tools:context=".MainActivity">

    <com.example.mytitle.TitleLayout
        android:layout_width="match_parent"
        android:layout_height="wrap_content"
        app:layout_constraintTop_toTopOf="parent" />

</androidx.constraintlayout.widget.ConstraintLayout>
自定义控件是默认携带包名的。
一个小问题
在activity_main.xml中修改控件之后,就有人说了,为啥预览看不到呀,是不是我写错了,你没写错,你运行一次,之后预览就出现了,这个问题我暂时不知道是什么,懂的小伙伴可以在评论区说明一下或私信本人。
3.3强制转换
as是Kotlin中强制转换使用的关键字
context as Activity
4.ListView
ListView个人认为用的地方不多,更多是推荐使用RecyclerView,因为它能实现的布局,RecyclerView也能实现,RecyclerView能实现的布局,它不一定能实现,而且RecyclerView更加灵活,用法更多,更好使用。
所以此处讲解:略
5.强大的RecyclerView
RecyclerView单独写了一篇笔记,详情请看:
Android - 强大的RecyclerView
6.制作9-Path图片(.9图片)
所谓的9-Patch图片,就是将图片用两条"横线"与两条"竖线"分割成9个部分,上下切割的两条竖线包裹的部分,就是左右拉伸的内容,左右切割的两条线包裹的部分,就是上下拉伸的内容,其余部分是不会发生变化,这就是.9图片的原理,最后我们把这张图片作为背景图,那么他就会自适应你的控件大小,主动取拉伸中间部分
创建一张.9图片
找到一张图片,放入drawable中,然后右键图片,选择Create 9-Patch file,命名.9图片的名字,我们需要修改与原图不一样的名字,因为AS不允许有同样名字的文件,不同后缀也不行。
修改.9图片的拉伸位置
看到文件的上下和左右,各有两条线,移动至你只想要拉伸的那一部分即可,他们中间包裹着一个矩形,这个矩形的地方就是他可以拉伸的位置
7 定义常量的关键字const
只有在单例类,companion object 或顶层方法才可以使用const关键字
class Student(val name : String, val age : Int, val grade : Int)
	companion object
		const val TYPE_EXCELLENT = 4 //优秀
		const val TYPE_GOOD = 3 //良好
		const val TYPE_PASS = 2 //及格
		const val TYPE_FAIL = 1 //失败
8. 延迟初始化
当类中存在多个全局变量,但为了保证他们能满足Kotlin的空指针检查语法标准,你必须做出许多的非空判断保护,即便你确定他肯定不会为空。
当我们设置的全局变量在onCreate()方法中进行初始化,那么赋值就必须为null,同时类型声明还必须是MsgAdapter? ,即便在onCreate()初始化之后,才会调用onClick(),但onClick()中还是必须要进行判空处理。否则编译无法通过
所以现在有一个解决的办法,就是延迟初始化,延迟初始化使用的是lateinit关键字,告诉Kotlin编译,我会迟点对这些变量进行初始化,那么他们一开始定义就不需要赋值为null了
class MainActivity : AppCompatActivity(), View.OnClickListener
	//原写法
	private var adapter: MsgAdapter? = null
	//延迟初始化写法
	private lateinit var adapter1: MsgAdapter
	override fun onCreate(savedInstanceState: Bundle?)
		super.onCreate(savedInstanceState)
		setContentView(R.layout.activity_main)
		adapter = MsgAdapter(msgList)
		adapter1 = MsgAdapter(msgList)


	override fun onClick(v: View?)
		//原代码
		adapter?.notifyItemInserted(msgList.size - 1)
		//延迟后的使用,不需要?.
		adapter1.notifyItemInserted(msgList.size - 1)
当然了,用lateinit关键字也不是没有风险,因为adapter还可能在没初始化之前使用,那程序一定会崩溃
所以也有一种语法用于判断是否进行了初始化
::adapter.isInitialized //判断adapter是否已经初始化了
//加个!表示,若没初始化,那就进行初始化
if(!::adapter.isInitialized) 	 //判断adapter是否已经初始化
	adapter = MsgAdapter(msgList)
9. 密封类
密封类,可以帮你写出更规范和安全的代码
创建一个Result.kt文件
interface Result //无内容的接口
class Success(val msg: String) : Result //实现Result接口的成功类
class Failure(val error: Exception) : Result //实现Result接口的失败类
很简单的类,就是用于表示一个成功的结果和一个失败的结果
平时使用的方法,一定会有一个else,因为他会认定缺少条件分支,编译无法通过,但结果只有 成功或失败,不会走到else。而这直添加一个else 用于抛出一个异常,就是为了满足编译的要求。
但这样做会有一个潜在风险,而这是如果新增一个类去实现Result接口,用于执行 未知结果,那么getResultMsg方法忘记加对应条件的时候,我们会直接走else,从而直接报错
fun getResultMsg(result: Result) = when(result)
	is Success -> result.msg
	is Failure -> result.error.message
	else -> throw IllegalArgumentException()
这时候我们可以使用密封类
密封类是用sealed class关键字
我们将上面的Result接口,写成一个密封类
密封类是一个可以继承的类,所以继承的时候,需要在后面加个括号
sealed class Result
class Success(val msg: String) : Result()
class Failure(val error: Exception): Result()
这里我们没有在写else了,这是因为Kotlin会自动检查,该类是不是密封类的子类,如果是,那么会检查是否所有子类所对应的条件都写了处理逻辑,如果没有,那么就会在编译阶段报错,它要求你必须将每一个子类的所对应的条件都全部处理
fun getResultMsg(result: Result) = when(result)
	is Success -> result.msg
	is Failure -> "Error is $result.error.message"
//这时候我们创建一个未知类
sealed class Result
class Success(val msg : String): Result()
class Failure(val error: Exception): Result()
class Unknow(val unknow: String): Result()
//这时候如果上面的getResultMsg()方法不修改的话,会报错提示,需添加该条件
fun getResultMsg(result: Result) = when(result)
	is Success -> result.msg
	is Unknow -> result.unknow
	is Failure -> "Error is $result.error.message"
以上是关于《第一行代码》 第三版 - 第四章(笔记)的主要内容,如果未能解决你的问题,请参考以下文章