重学springboot系列番外篇之RestTemplate
Posted 大忽悠爱忽悠
tags:
篇首语:本文由小常识网(cha138.com)小编为大家整理,主要介绍了重学springboot系列番外篇之RestTemplate相关的知识,希望对你有一定的参考价值。
重学springboot系列番外篇之RestTemplate
基本介绍及配置使用
什么是 RestTemplate?
RestTemplate是执行HTTP请求的同步阻塞式的客户端,它在HTTP客户端库(例如JDK HttpURLConnection,Apache HttpComponents,okHttp等)基础封装了更加简单易用的模板方法API。也就是说RestTemplate是一个封装,底层的实现还是java应用开发中常用的一些HTTP客户端。但是相对于直接使用底层的HTTP客户端库,它的操作更加方便、快捷,能很大程度上提升我们的开发效率。
RestTemplate作为spring-web项目的一部分,在Spring 3.0版本开始被引入。RestTemplate类通过为HTTP方法(例如GET,POST,PUT,DELETE等)提供重载的方法,提供了一种非常方便的方法访问基于HTTP的Web服务。如果你的Web服务API基于标准的RESTful风格设计,使用效果将更加的完美
根据
Spring官方文档及源码中的介绍,RestTemplate在将来的版本中它可能会被弃用,因为他们已在Spring 5中引入了WebClient作为非阻塞式Reactive HTTP客户端。但是RestTemplate目前在Spring社区内还是很多项目的“重度依赖”,比如说Spring Cloud。另外,RestTemplate说白了是一个客户端API封装,和服务端相比,非阻塞Reactive编程的需求并没有那么高。
非Spring环境下使用RestTemplate
为了方便后续开发测试,首先介绍一个网站给大家。
JSONPlaceholder是一个提供免费的在线REST API的网站,我们在开发时可以使用它提供的url地址测试下网络请求以及请求参数。或者当我们程序需要获取一些模拟数据、模拟图片时也可以使用它。
RestTemplate是spring的一个rest客户端,在spring-web这个包下。这个包虽然叫做spring-web,但是它的RestTemplate可以脱离Spring 环境使用。
<dependency>
  <groupId>org.springframework</groupId>
  <artifactId>spring-web</artifactId>
  <version>5.2.6.RELEASE</version>
</dependency>
测试一下Hello world,使用RestTemplate发送一个GET请求,并把请求得到的JSON数据结果打印出来。
@Test
public void simpleTest()

    RestTemplate restTemplate = new RestTemplate();
    String url = "http://jsonplaceholder.typicode.com/posts/1";
    String str = restTemplate.getForObject(url, String.class);
    System.out.println(str);
服务端是JSONPlaceholder网站,帮我们提供的服务端API。需要注意的是:"http://jsonplaceholder.typicode.com/posts/1"服务URL,虽然URL里面有posts这个单词,但是它的英文含义是:帖子或者公告,而不是我们的HTTP Post协议。
所以说"http://jsonplaceholder.typicode.com/posts/1",请求的数据是:id为1的Post公告资源。打印结果如下:

Spring环境下使用RestTemplate
将maven坐标从spring-web换成spring-boot-starter-web
<dependency>
    <groupId>org.springframework.boot</groupId>
    <artifactId>spring-boot-starter-web</artifactId>
</dependency>
将RestTemplate配置初始化为一个Bean。这种初始化方法,是使用了JDK 自带的HttpURLConnection作为底层HTTP客户端实现。我们还可以把底层实现切换为Apache HttpComponents,okHttp等,我们后续章节会为大家介绍。
@Configuration
public class ContextConfig

    //默认使用JDK 自带的HttpURLConnection作为底层实现
    @Bean
    public RestTemplate restTemplate()
        RestTemplate restTemplate = new RestTemplate();
        return restTemplate;
在需要使用RestTemplate 的位置,注入并使用即可。
  @Resource //@AutoWired
  private RestTemplate restTemplate;
底层HTTP客户端库的切换
RestTemplate只是对其他的HTTP客户端的封装,其本身并没有实现HTTP相关的基础功能。其底层实现是可以配置切换的,我们本小节就带着大家来看一下RestTemplate底层实现,及如何实现底层基础HTTP库的切换。
源码分析
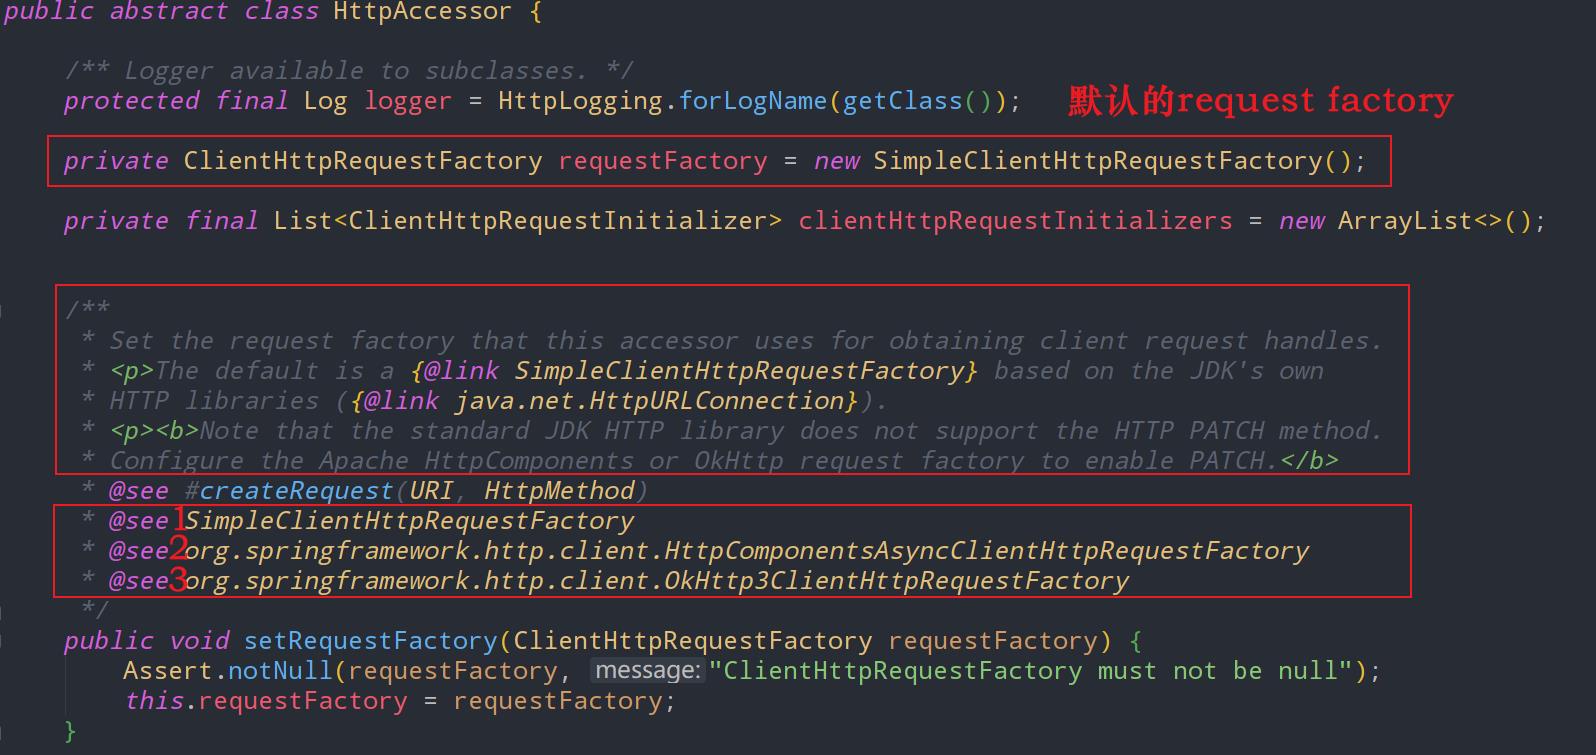
RestTemplate有一个非常重要的类叫做HttpAccessor,可以理解为用于HTTP接触访问的基础类。下图为源码:

从源码中我们可以分析出以下几点信息
- RestTemplate 支持至少三种HTTP客户端库。
SimpleClientHttpRequestFactory。对应的HTTP库是java JDK自带的HttpURLConnection。
HttpComponentsAsyncClientHttpRequestFactory。对应的HTTP库是Apache HttpComponents。
OkHttp3ClientHttpRequestFactory。对应的HTTP库是OkHttp
- java JDK自带的HttpURLConnection是默认的底层HTTP实现客户端
- SimpleClientHttpRequestFactory,即java JDK自带的HttpURLConnection不支持HTTP协议的Patch方法,如果希望使用Patch方法,需要将底层HTTP客户端实现切换为Apache HttpComponents 或 OkHttp
- 可以通过设置setRequestFactory方法,来切换RestTemplate的底层HTTP客户端实现类库。
底层实现切换方法
从开发人员的反馈,和网上的各种HTTP客户端性能以及易用程度评测来看,OkHttp 优于 Apache HttpComponents、Apache HttpComponents优于HttpURLConnection。所以我个人更建议大家将底层HTTP实现切换为okHTTP。
切换为okHTTP
首先通过maven坐标将okHTTP的包引入到项目中来
<dependency>
    <groupId>com.squareup.okhttp3</groupId>
    <artifactId>okhttp</artifactId>
    <version>4.7.2</version>
</dependency>
如果是spring 环境下通过如下方式使用OkHttp3ClientHttpRequestFactory初始化RestTemplate bean对象。
@Configuration
public class ContextConfig
    @Bean("OKHttp3")
    public RestTemplate OKHttp3RestTemplate()
        RestTemplate restTemplate = new RestTemplate(new OkHttp3ClientHttpRequestFactory());
        return restTemplate;
如果是非Spring环境,直接new RestTemplate(new OkHttp3ClientHttpRequestFactory()之后使用就可以了。
切换为Apache HttpComponents
与切换为okHTTP方法类似、不再赘述。
<dependency>
    <groupId>org.apache.httpcomponents</groupId>
    <artifactId>httpclient</artifactId>
    <version>4.5.12</version>
</dependency>
使用HttpComponentsClientHttpRequestFactory初始化RestTemplate bean对象
@Bean("httpClient")
public RestTemplate httpClientRestTemplate()
    RestTemplate restTemplate = new RestTemplate(new HttpComponentsClientHttpRequestFactory());
    return restTemplate;
设置超时时间
引入依赖之后,就来开始使用吧,任何一个Http的Api我们都可以设置请求的连接超时时间,请求超时时间,如果不设置的话,就可能会导致连接得不到释放,造成内存溢出。这个是我们需要重点注意的点,下面就来看看RestTemplate如何来设置超时时间呢?我们可以在SimpleClientHttpRequestFactory类中设置这两个时间,然后将factory传给RestTemplate实例,设置如下:
@Configuration
public class RestTemplateConfig
    /**
     * 服务器返回数据(response)的时间
     */
    private static final Integer READ_TIME_OUT = 6000;
    /**
     * 连接上服务器(握手成功)的时间
     */
    private static final Integer CONNECT_TIME_OUT = 6000;

    @Bean
    public RestTemplate restTemplate()
        ClientHttpRequestFactory requestFactory = new HttpComponentsClientHttpRequestFactory(httpClient());
        return new RestTemplate(requestFactory);


    @Bean
    public HttpClient httpClient()
       //默认证书有效
        SSLConnectionSocketFactory sslConnectionSocketFactory = SSLConnectionSocketFactory.getSocketFactory();
        SSLContext sslContext = null;
        try
            //信任所有的SSL证书
            sslContext = SSLContextBuilder.create().setProtocol(SSLConnectionSocketFactory.SSL)
                    .loadTrustMaterial((x, y) -> true).build();
         catch (Exception e)
            e.printStackTrace();

        if (sslContext != null)
            sslConnectionSocketFactory = new SSLConnectionSocketFactory(sslContext);

        // 支持HTTP、HTTPS
        Registry<ConnectionSocketFactory> registry = RegistryBuilder.<ConnectionSocketFactory>create()
                .register("http", PlainConnectionSocketFactory.getSocketFactory())
                .register("https", sslConnectionSocketFactory)
                .build();
        PoolingHttpClientConnectionManager connectionManager = new PoolingHttpClientConnectionManager(registry);
        connectionManager.setMaxTotal(200);
        connectionManager.setDefaultMaxPerRoute(100);
        connectionManager.setValidateAfterInactivity(2000);
        RequestConfig requestConfig = RequestConfig.custom()
                // 服务器返回数据(response)的时间,超时抛出read timeout
                .setSocketTimeout(READ_TIME_OUT)
                // 连接上服务器(握手成功)的时间,超时抛出connect timeout
                .setConnectTimeout(CONNECT_TIME_OUT)
                // 从连接池中获取连接的超时时间,超时抛出ConnectionPoolTimeoutException
                .setConnectionRequestTimeout(1000)
                .build();
        return HttpClientBuilder.create().setDefaultRequestConfig(requestConfig).setConnectionManager(connectionManager).build();
GET请求使用详解
RestTemplate可以发送HTTP GET请求,经常使用到的方法有两个:
- getForObject()
- getForEntity()
二者的主要区别在于,getForObject()返回值是HTTP协议的响应体。getForEntity()返回的是ResponseEntity,ResponseEntity是对HTTP响应的封装,除了包含响应体,还包含HTTP状态码、contentType、contentLength、Header等信息。
getForObject() 方法
以String的方式接受请求结果数据
在Spring环境下写一个单元测试用例,以String类型接收响应结果信息
@SpringBootTest
class ResttemplateWithSpringApplicationTests

   @Resource
   private RestTemplate restTemplate;

   @Test
   void testSimple()
      String url = "http://jsonplaceholder.typicode.com/posts/1";
      String str = restTemplate.getForObject(url, String.class);
      System.out.println(str);
getForObject第二个参数为返回值的类型,String.class以字符串的形式接受getForObject响应结果,

以POJO对象的方式接受结果数据
在Spring环境下写一个单元测试用例,以java POJO对象接收响应结果信息
@Test
public void testPoJO()
   String url = "http://jsonplaceholder.typicode.com/posts/1";
   PostDTO postDTO = restTemplate.getForObject(url, PostDTO.class);
   System.out.println(postDTO.toString());
输出打印结果如下:

POJO的定义如下,根据JSON String的数据格式定义。
@Data
public class PostDTO
    private int userId;
    private int id;
    private String title;
    private String body;
以数组的方式接收请求结果
访问http://jsonplaceholder.typicode.com/posts可以获得JSON数组方式的请求结果

下一步就是我们该如何接收,使用方法也很简单
@Test
public void testArrays()
   String url = "http://jsonplaceholder.typicode.com/posts";
   PostDTO[] postDTOs = restTemplate.getForObject(url, PostDTO[].class);
   System.out.println("数组长度:" + postDTOs.length);
请求的结果被以数组的方式正确接收,输出如下:
数组长度:100
使用占位符号传参的几种方式
以下的几个请求都是在访问"http://jsonplaceholder.typicode.com/posts/1",只是使用了占位符语法,这样在业务使用上更加灵活。
- 传参替换使用?来表示坑位,根据实际的传参顺序来填充,如下:
url = baseUrl+"?userName=?&userId=?";
  resultData = restTemplate.getForObject(url, ResultData.class, "张三2",2);
- 使用占位符的形式传递参数:
String url = "http://jsonplaceholder.typicode.com/1/2";
PostDTO postDTO = restTemplate.getForObject(url, PostDTO.class, "posts", 1);
- 另一种使用占位符的形式:
String url = "http://jsonplaceholder.typicode.com/type/id";
String type = "posts";
int id = 1;
PostDTO postDTO = restTemplate.getForObject(url, PostDTO.class, type, id);
- 我们也可以使用 map 装载参数:
使用xx来传递参数时,这个xx对应的就是map中的key
String url = "http://jsonplaceholder.typicode.com/type/id";
Map<String,Object> map = new HashMap<>();
map.put("type", "posts");
map.put("id", 1);
PostDTO  postDTO = restTemplate.getForObject(url, PostDTO.class, map);
getForObject()方法小结
/**
     方法一,直接将参数添加到url上面。
	 * Retrieve a representation by doing a GET on the specified URL.
	 * The response (if any) is converted and returned.
	 * <p>URI Template variables are expanded using the given URI variables, if any.
	 * @param url the URL  请求地址
	 * @param responseType the type of the return value  响应体的类型
	 * @param uriVariables the variables to expand the template 传入的参数
	 * @return the converted object
	 */
@Nullable
	<T> T getForObject(String url, Class<T> responseType, Object... uriVariables) throws RestClientException;
/**
     方法二,通过Map来提交参数。
	 * Retrieve a representation by doing a GET on the URI template.
	 * The response (if any) is converted and returned.
	 * <p>URI Template variables are expanded using the given map.
	 * @param url the URL
	 * @param responseType the type of the return value
	 * @param uriVariables the map containing variables for the URI template
	 * @return the converted object
	 */
	@Nullable
	<T> T getForObject(String url, Class<T> responseType, Map<String, ?> uriVariables) throws RestClientException;

	/**
	   方法三,用URI来请求。
	 * Retrieve a representation by doing a GET on the URL .
	 * The response (if any) is converted and returned.
	 * @param url the URL
	 * @param responseType the type of the return value
	 * @return the converted object
	 */
	@Nullable
	<T> T getForObject(URI url, Class<T> responseType) throws RestClientException;
@Test
    public void getForObjectTest()
        String baseUrl = "http://localhost:8081/testRestTemplateApp/getUser.do";
       //方法一: 直接拼接参数,推荐使用
	   String url =baseUrl+"?userName=张三1&userId=1";
        ResultData resultData = restTemplate.getForObject(url, ResultData.class);
        System.out.println("*****GET直接拼接参数查询返回结果=" + JSON.toJSONString(resultData));
        //方法一:传参替换,推荐使用
        url = baseUrl+"?userName=?&userId=?";
        resultData = restTemplate.getForObject(url, ResultData.class, "张三2",2);
        System.out.println("*****GET传参替换查询返回结果=" + JSON.toJSONString(resultData));
        //方法一:传参替换,使用String.format,推荐使用
        url = baseUrl + String.format("?userName=%s&userId=%s", "张三2",2);
        resultData = restTemplate.getForObject(url, ResultData.class);
        System.out.println("******GET使用String.format查询返回结果=" + JSON.toJSONString(resultData));
        //方法二:使用Map,不推荐使用
        url = baseUrl + "?userName=userName&userId=userId";
        Map<String, Object> paramMap = new HashMap<>();
        paramMap.put("userName", "张三1");
        paramMap.put("userId",1);
        resultData = restTemplate.getForObject(url, ResultData.class, paramMap);
        System.out.println("******GET使用Map查询返回结果=" + JSON.toJSONString(resultData));
        //方法三:使用URI,不推荐使用
        URI uri = URI.create(baseUrl+"?userName=%E5%BC%A0%E4%B8%891&userId=1");
        ResultData resultData1 = restTemplate.getForObject(uri, ResultData.class);
        System.out.println("******GET使用URI查询返回结果=" + JSON.toJSONString(resultData1));
- 当响应头是
application/json;charset=UTF-8格式的时候,返回的数据类型可以直接写String.class,如下
 String url ="http://localhost:8081/testRestTemplateApp/getUser.do?userName=张三1&userId=1";
        String resultData = restTemplate.getForObject(url, String.class);
- 不推荐直接使用方法三传入URI,原因主要有如下两点: 1. 传入的参数包含中文时必须要转码,直接传中文会报400的错误,2. 响应的结果必须要跟接口的返回值保持一致,不然回报406的错误
 //userName不能直接传入张三1,不然会报400的错误
	   URI uri = URI.create(baseUrl+"?userName=%E5%BC%A0%E4%B8%891&以上是关于重学springboot系列番外篇之RestTemplate的主要内容,如果未能解决你的问题,请参考以下文章
