负载均衡nginx
Posted 爱上linux
tags:
篇首语:本文由小常识网(cha138.com)小编为大家整理,主要介绍了负载均衡nginx相关的知识,希望对你有一定的参考价值。
1、编译nginx
[root@server1 mnt]# ls
nginx-1.18.0.tar.gz
[root@server1 mnt]# tar zxf nginx-1.18.0.tar.gz
[root@server1 mnt]# ls
nginx-1.18.0  nginx-1.18.0.tar.gz
[root@server1 mnt]# cd nginx-1.18.0/

源码编译:
[root@server1 nginx-1.18.0]# ./configure --help    /configure 表示脚本 ,可以查看帮助指定参数
编译需要指定路经,如果不指定路经,系统默认的第三方路经为:
[root@server1 nginx-1.18.0]# ls  /usr/local/
bin  etc  games  include  lib  lib64  libexec  sbin  share  src
[root@server1 nginx-1.18.0]# ./configure --prefix=/usr/local/nginx --with-http_ssl_module --with-http_stub_status_module(监控)   编译
checking for OS
 + Linux 3.10.0-957.el7.x86_64 x86_64
checking for C compiler ... not found

./configure: error: C compiler cc is not found     报错,需要安装gcc
[root@server1 nginx-1.18.0]# yum install gcc -y 安装gcc
[root@server1 nginx-1.18.0]# ./configure --prefix=/usr/local/nginx --with-http_ssl_module --with-http_stub_status_module  继续执行
提示却少PCRE库

[root@server1 nginx-1.18.0]# yum install -y pcre-devel 安装pcre-devel  -devel是默认格式
./configure --prefix=/usr/local/nginx --with-http_ssl_module --with-http_stub_status_module  继续执行
提示缺少openssl库

[root@server1 nginx-1.18.0]# yum install openssl-devel -y   安装openssl
[root@server1 nginx-1.18.0]# ./configure --prefix=/usr/local/nginx --with-http_ssl_module --with-http_stub_status_module 继续执行,执行成功不会再次报错了
[root@server1 nginx-1.18.0]# ll Makefile    执行成功后会生成Makefile文件,会把执行的参数写入这个文件,Makefile会指导后续的编译
-rw-r--r-- 1 root root 376 Dec  9 21:23 Makefile
[root@server1 nginx-1.18.0]# make   编译
[root@server1 nginx-1.18.0]# make install  安装,安装好后会自动创建/usr/local/nginx/ 安装目录
[root@server1 nginx]# cd /usr/local/nginx/  进入安装目录,切记后续在编辑配置时,必须进入/usr/local/nginx/ 目录里
[root@server1 nginx]# ls
conf  html  logs  sbin

为了方便nginx运行,直接定位到nginx命令的话,需要变更niginx环境变量
[root@server1 ~]# vim .bash_profile   变更当前用户的环境变量
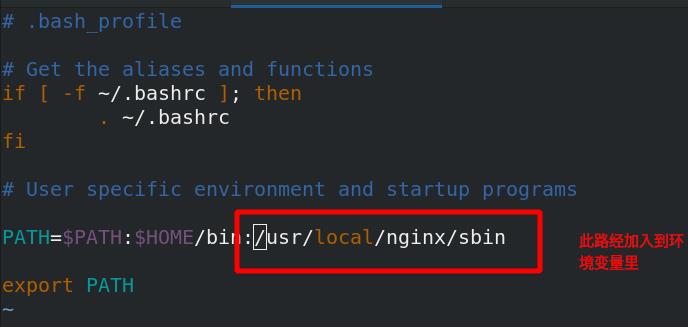
[root@server1 ~]# source .bash_profile  使当前环境变量生效
[root@server1 ~]# nginx   nginx就生效了
[root@server1 ~]# netstat -antlp 查看端口
nginx 80 端口已经打开

2、nginx编译优化
[root@server1 ~]# cd /usr/local/nginx/   进入安装目录
[root@server1 nginx]# ls
client_body_temp  fastcgi_temp  logs        sbin       uwsgi_temp
conf              html          proxy_temp  scgi_temp
[root@server1 nginx]# du -sh  NIGINX运行时安装目录大小5.8M,太大了
5.8M

方法一:
.[root@server1 nginx]# nginx -s stop    关闭nginx
[root@server1 nginx]# cd ..
[root@server1 local]# ls
bin  etc  games  include  lib  lib64  libexec  nginx  sbin  share  src
[root@server1 local]# rm -fr nginx/   删除nginx/
[root@server1 local]# cd /mnt/   进入源码
[root@server1 mnt]# cd nginx-1.18.0/
[root@server1 nginx-1.18.0]# ls
auto     CHANGES.ru  configure  html     Makefile  objs    src
CHANGES  conf        contrib    LICENSE  man       README
[root@server1 nginx-1.18.0]# make clean   清理缓存
rm -rf Makefile objs


方法二:
[root@server1 ~]# cd /mnt/
[root@server1 mnt]# ls
nginx-1.18.0  nginx-1.18.0.tar.gz
[root@server1 mnt]# rm -fr nginx-1.18.0   删除原来解压的
[root@server1 mnt]# tar zxf nginx-1.18.0.tar.gz   重新解压
[root@server1 nginx-1.18.0]# vim auto/cc/gcc   注释掉debug

[root@server1 nginx-1.18.0]# ./configure --prefix=/usr/local/nginx --with-http_ssl_module --with-http_stub_status_module 执行
[root@server1 nginx-1.18.0]# make  编译
[root@server1 nginx-1.18.0]# make install 安装

configure作用是生成makefile
 make作用是把原码生成二进制程序,
 makinstall是将编译好的程序拷贝到指定的路经已经其他配置文件
 [root@server1 nginx-1.18.0]# cd /usr/local/nginx/  进入安装目录
[root@server1 nginx]# ls
conf  html  logs  sbin
[root@server1 nginx]# du -sh   目录大小变成了1.9M
980K	.
3、 nginx 实现负载均衡
[root@server1 conf]# useradd -M -d /usr/local/nginx/ -s /sbin/nologin nginx 创建nginx用户
[root@server1 conf]# vim nginx.conf 编辑配置文件,更改用户
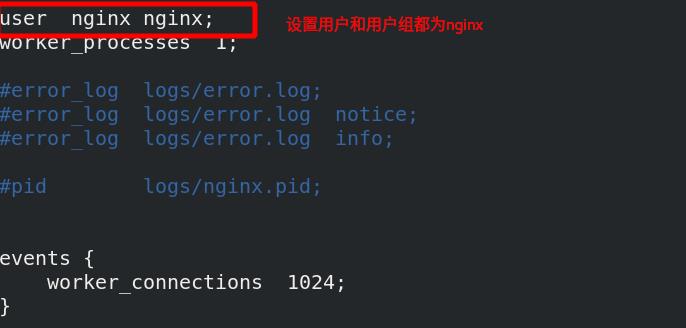
[root@server1 conf]# nginx -s reload 重载服务
[root@server1 conf]# ps aux 可以发现用户已经从nobady变成nginx

[root@server1 conf]# vim nginx.conf 编辑配置文件
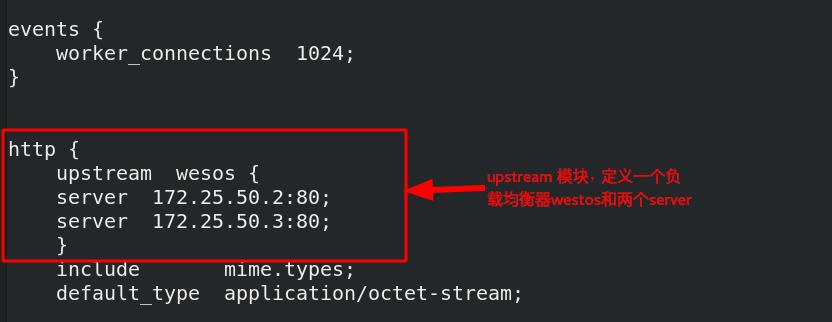
在配置文件最后添加

[root@server1 conf]# nginx -t  检测语法
nginx: the configuration file /usr/local/nginx/conf/nginx.conf syntax is ok
nginx: configuration file /usr/local/nginx/conf/nginx.conf test is successful
[root@server1 conf]# nginx -s reload  重载服务
[root@foundation50 isos]# vim /etc/hosts   添加解析

[root@foundation50 isos]# curl www.westos.org   已经实现负载均衡
server2
[root@foundation50 isos]# curl www.westos.org  已经实现负载均衡
server3
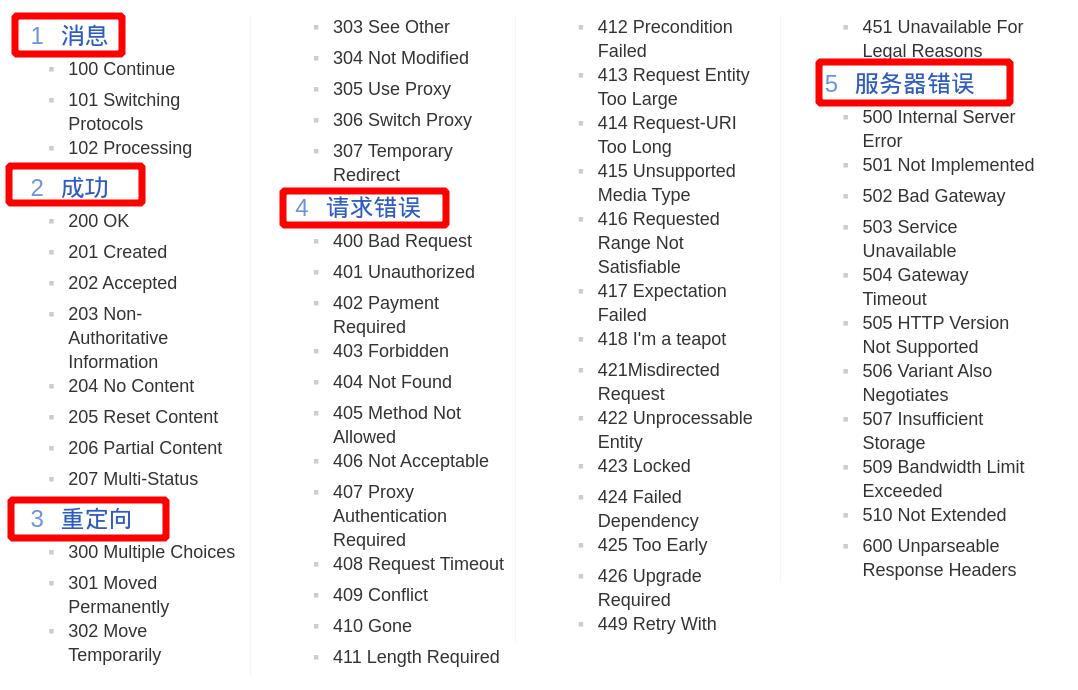
http状态码,根据报错信息判断错误
4、 nginx优化
[root@server1 conf]# vim nginx.conf 编辑配置文件
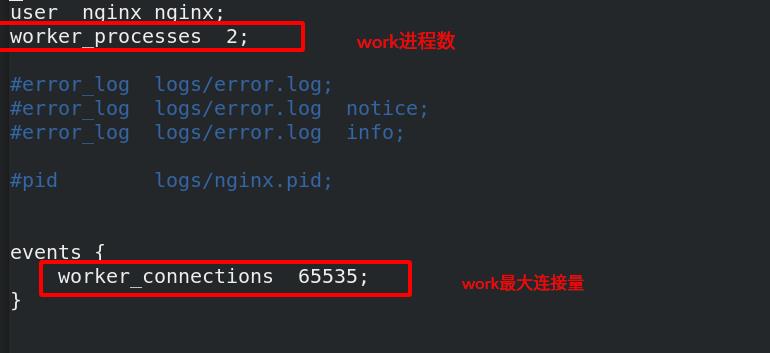
[root@server1 conf]# nginx -s reload 重载服务
注意:work processes 数跟cpu数相关,有多少个cpu我们就开多少个worker,但是有的主机配置不一样不知道开多少个
worker,就设置为自动,如下:
[root@server1 conf]# vim nginx.conf 编辑配置文件
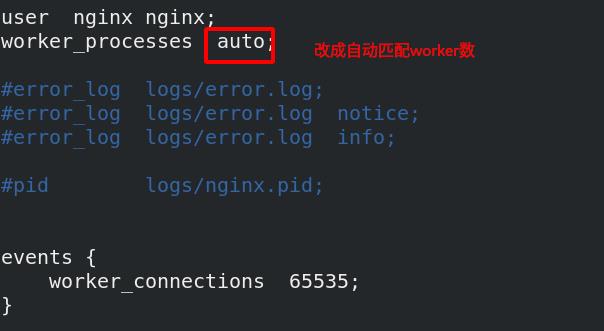
[root@server1 conf]# nginx -s reload  重载服务
[root@server1 conf]# ps ax  查看进程 ,自动生成两个worker

worker和cpu捆绑,减少cpu来回切换造成的损耗
[root@server1 conf]# vim nginx.conf 编辑配置文件
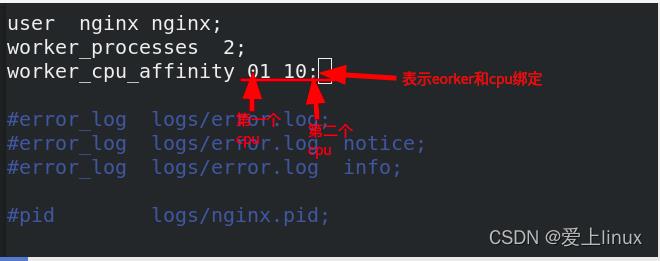
测试:
nginx 恢复原有配置时做宿主机做压力测试
原有配置:
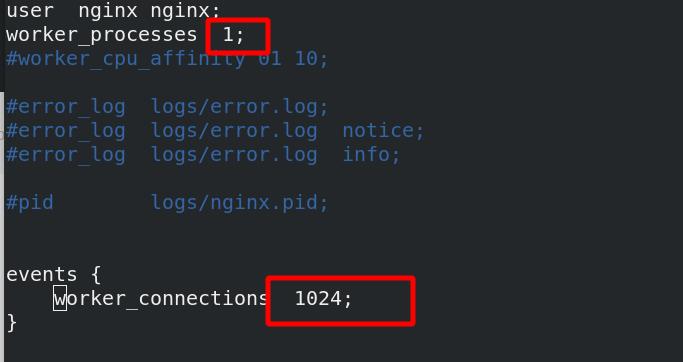
[root@server1 conf]# nginx -s reload
[root@foundation50 Desktop]# ab -c10 -n10000 http://www.westos.org/index.html  压力测试,-c10 表示10个并发 ,-n10000表示打10000的流量

做cpu和worker绑定后,宿主机做压力测试
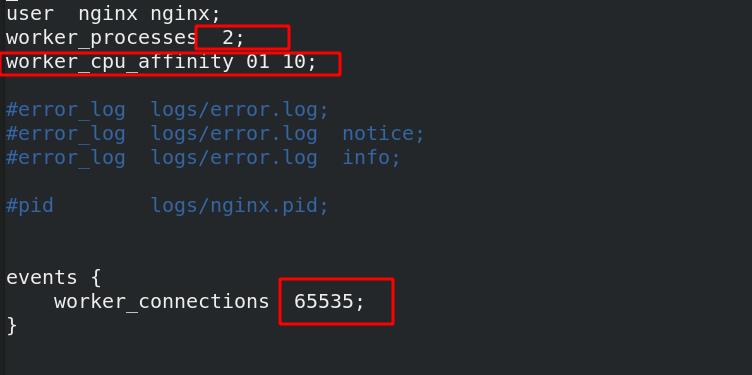
更改操作系统访问量65535
[root@server1 conf]# vim /etc/security/limits.conf  更改操作系统访问量65535,因为操作系统访问文件数一定要大于等于客户端访问数
[root@server1 conf]# nginx -s reload 重载服务

[root@foundation50 Desktop]# ab -c10 -n100000 http://www.westos.org/index.html 做压力测试
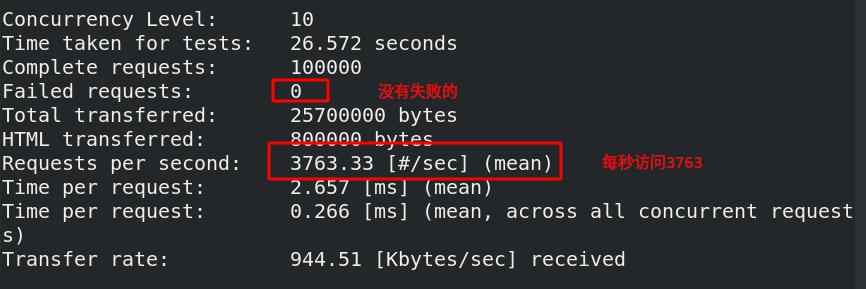
可以发现cpu和worker绑定后,比原有访问量大
5、 设置后端权重
[root@server1 conf]# vim nginx.conf 编辑配置文件

[root@server1 conf]# nginx -s reload  重载服务
[root@foundation50 Desktop]# curl www.westos.org   访问,发现nginx访问server2访问比serve1多
server2
[root@foundation50 Desktop]# curl www.westos.org
server3
[root@foundation50 Desktop]# curl www.westos.org
server2
[root@foundation50 Desktop]# curl www.westos.org
server2
6、 设置backup备机
作用:backup 参数是指当所有非备机server2、server3都宕机或者不可用的情况下,就只能使用带backup标准的备机。
[root@server1 conf]# vim nginx.conf 编辑配置文件
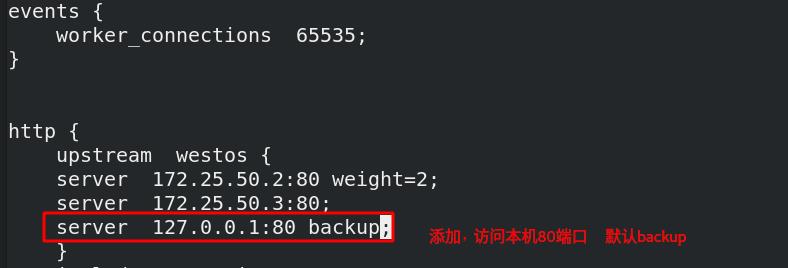
[root@server1 conf]# nginx -s reload 重载服务
测试:
[root@server2 ~]# systemctl stop httpd  停掉后端apache
[root@server3 ~]# systemctl stop httpd  停掉后端apache
[root@foundation50 Desktop]# curl www.westos.org  当后端都不可用的时候,再次访问www.westos.org,nginx调度器会解析backup备机,当前设置的是自己本机
<!DOCTYPE html>
<html>
<head>
<title>Welcome to nginx!</title>
<style>
    body
        width: 35em;
        margin: 0 auto;
        font-family: Tahoma, Verdana, Arial, sans-serif;

</style>
</head>
<body>
<h1>Welcome to nginx!</h1>
<p>If you see this page, the nginx web server is successfully installed and
working. Further configuration is required.</p>

<p>For online documentation and support please refer to
<a href="http://nginx.org/">nginx.org</a>.<br/>
Commercial support is available at
<a href="http://nginx.com/">nginx.com</a>.</p>

<p><em>Thank you for using nginx.</em></p>
</body>
</html>
7、nginx调度算法
ip_hash算法:
[root@server1 conf]# vim nginx.conf 编辑配置文件
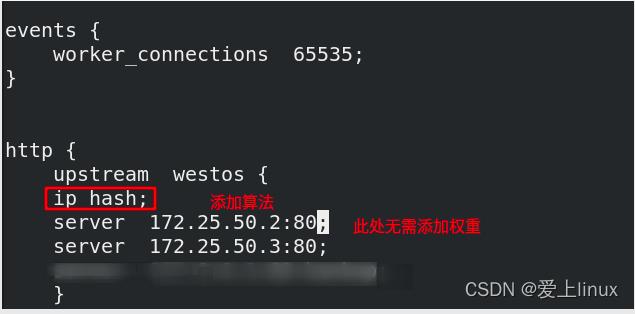
`[root@server1 conf]# nginx -s reload`  重载服务

测试:
[root@foundation50 Desktop]# curl www.westos.org  只要来源不变 访问就不会变,根据客户端地址来判断
server2
[root@foundation50 Desktop]# curl www.westos.org
server2
[root@foundation50 Desktop]# curl www.westos.org
手动下线某台机器
[root@server1 conf]# vim nginx.conf 编辑配置文件

[root@server1 conf]# nginx -s reload  重载服务
[root@foundation50 Desktop]# curl www.westos.org  访问,只能访问到serve3
server3
[root@foundation50 Desktop]# curl www.westos.org
server3
Sticky cookie 算法:
注意:数据走向 client ->dns->cdn->nginx 一般企业会搭建cdn缓存,其实cdn也是一个反向代理,访问后端,都是cdn去连接nginx,所以不管client如何变,只要经过cdn,都是cdn ip地址,不能做负载均衡,所以不能用ip_hash算法
Sticky cookie 算法
[root@server1 conf]# cd /mnt/
[root@server1 mnt]# cd nginx-1.18.0/
[root@server1 nginx-1.18.0]# make clean   清理缓存
rm -rf Makefile objs
[root@foundation50 lamp]# scp nginx-goodies-nginx-sticky-module-ng-08a395c66e42.zip server1:/mnt    将第三方软件拷贝到server1上
[root@server1 mnt]# yum install -y unzip  安装解压包
[root@server1 mnt]# unzip nginx-goodies-nginx-sticky-module-ng-08a395c66e42.zip   解压

[root@server1 mnt]# cd nginx-1.18.0/  进入到源码目录,重新编译
[root@server1 nginx-1.18.0]# ./configure --prefix=/usr/local/nginx --with-http_ssl_module --with-http_stub_status_module  --add-module=/mnt/nginx-goodies-nginx-sticky-module-ng-08a395c66e42   执行   --add-module表示添加一个模块,把第三方模块加入
[root@server1 nginx-1.18.0]# make && make install   编译及安装
[root@server1 nginx]# cd /usr/local/nginx/conf/  进入配置文件目录
[root@server1 conf]# vim nginx.conf ,编辑配置文件,添加算法
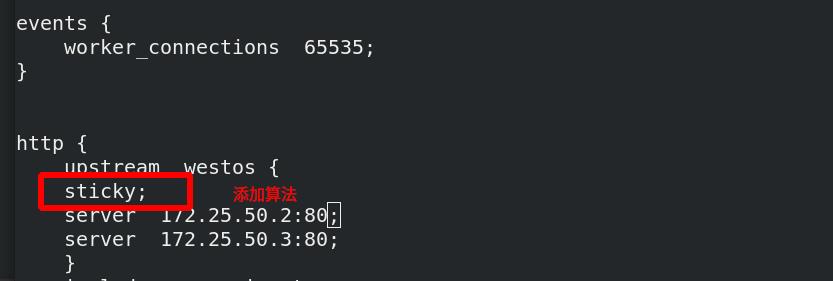
[root@server1 conf]# nginx -t  检测语法成功
nginx: the configuration file /usr/local/nginx/conf/nginx.conf syntax is ok
nginx: configuration file /usr/local/nginx/conf/nginx.conf test is successful
[root@server1 conf]# nginx  启动nginx

清理浏览器缓存

再次访问www.westos.org, cookie发生变化,所以调用到另一个后端server3上

注意:不能用curl命令去访问,因为不支持
以上是关于负载均衡nginx的主要内容,如果未能解决你的问题,请参考以下文章