基于6种监督学习(逻辑回归+决策树+随机森林+SVM+朴素贝叶斯+神经网络)的毒蘑菇分类
Posted 尤尔小屋的猫
tags:
篇首语:本文由小常识网(cha138.com)小编为大家整理,主要介绍了基于6种监督学习(逻辑回归+决策树+随机森林+SVM+朴素贝叶斯+神经网络)的毒蘑菇分类相关的知识,希望对你有一定的参考价值。
公众号:尤而小屋
作者:Peter
编辑:Peter
大家好,我是Peter~
本文是kaggle案例分享的第3篇,赛题的名称是:Mushroom Classification,Safe to eat or deadly poison?
数据来自UCI:https://archive.ics.uci.edu/ml/datasets/mushroom
kaggle源码地址:https://www.kaggle.com/nirajvermafcb/comparing-various-ml-models-roc-curve-comparison

排名
下面是kaggle上针对本题的排名。第一名侧重点是特征选择,没有用到本题的数据,我个人感觉跑偏了;第二名侧重点是基于贝叶斯理论的分类,能力有限,贝叶斯这块学习好了专门再说。
所以,选择了第三名的notebook源码来学习。作者将6种监督学习的方法在本数据集上的建模、模型评估等过程进行了比较。

数据集
这份数据集是UCI捐献给kaggle的。总样本数为8124,其中6513个样本做训练,1611个样本做测试;并且,其中可食用有4208样本,占51.8%;有毒的样本为3916,占48.2%。每个样本描述了蘑菇的22个属性,比如形状、气味等。
误食野生蘑菇中毒事件时有发生,且蘑菇形态千差万别,对于非专业人士,无法从外观、形态、颜色等方面区分有毒蘑菇与可食用蘑菇,没有一个简单的标准能够将有毒蘑菇和可食用蘑菇区分开来。要了解蘑菇是否可食用,必须采集具有不同特征属性的蘑菇是否有毒进行分析。
对蘑菇的22种特征属性进行分析,从而得到蘑菇可使用性模型,更好的预测出蘑菇是否可食用。
下面是UCI显示的具体数据信息:

属性特征的解释:

数据EDA
导入数据
import pandas as pd
import numpy as np

import plotly_express as px
from matplotlib import pyplot as plt
import seaborn as sns

# 忽略警告
import warnings
warnings.filterwarnings('ignore')

原始数据有8124条记录,23个属性;并且不存在缺失值

有无毒对比
统计有毒和无毒的数量对比:

可视化分析
菌盖颜色
首先我们讨论下菌盖的颜色:每种菌盖颜色的次数

fig = px.bar(cap,x="color",
             y="number",
             color="number",
             text="number",
             color_continuous_scale="rainbow")

# fig.update_layout(text_position="outside")
fig.show()

到底有毒的蘑菇是哪几种颜色较多了?统计有毒和无毒下的颜色分布:
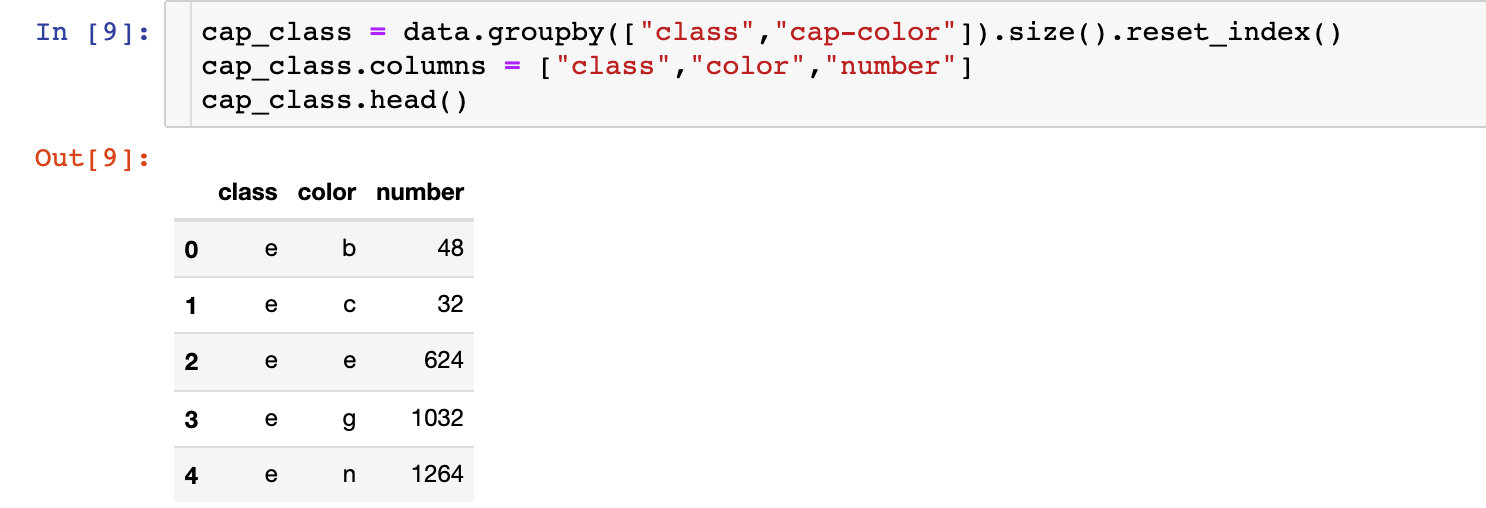
 fig = px.bar(cap_class,x="color",
              y="number",
              color="class",
              text="number",
              barmode="group",
             )

fig.show()

小结:颜色n、g、e在有毒p情况是比较多的。
菌的气味
统计每种气味的数量:
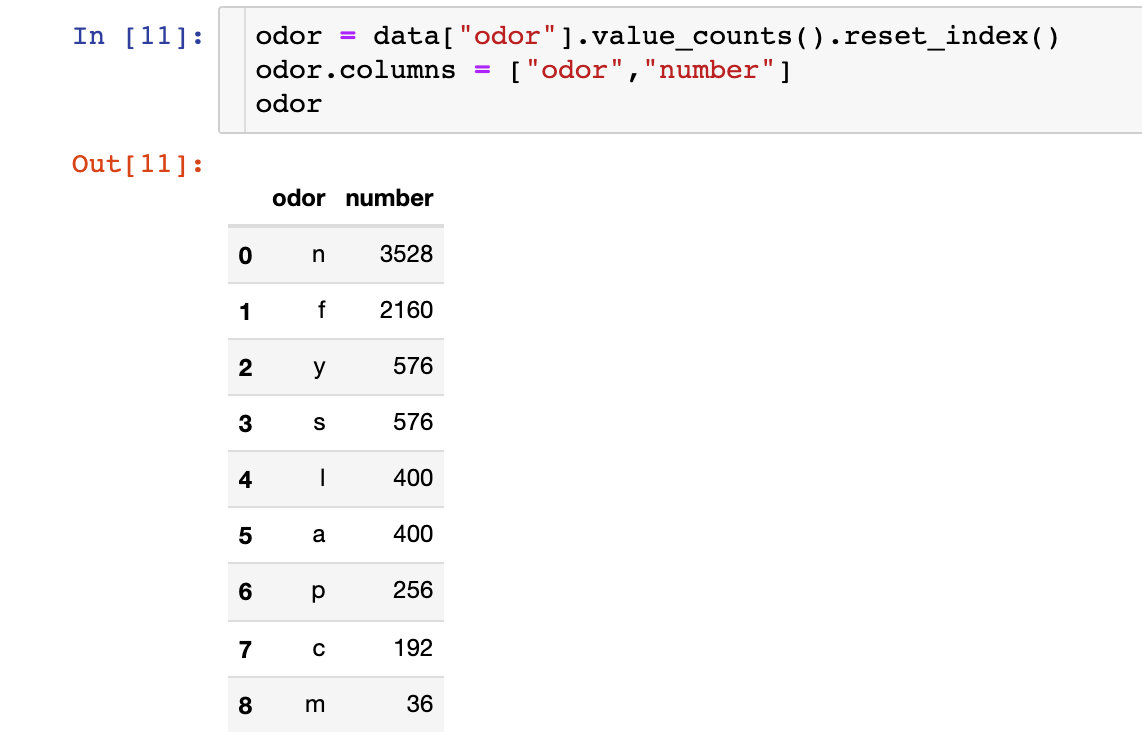
fig = px.bar(odor,
             x="odor",
             y="number",
             color="number",
             text="number",
             color_continuous_scale="rainbow")

fig.show()
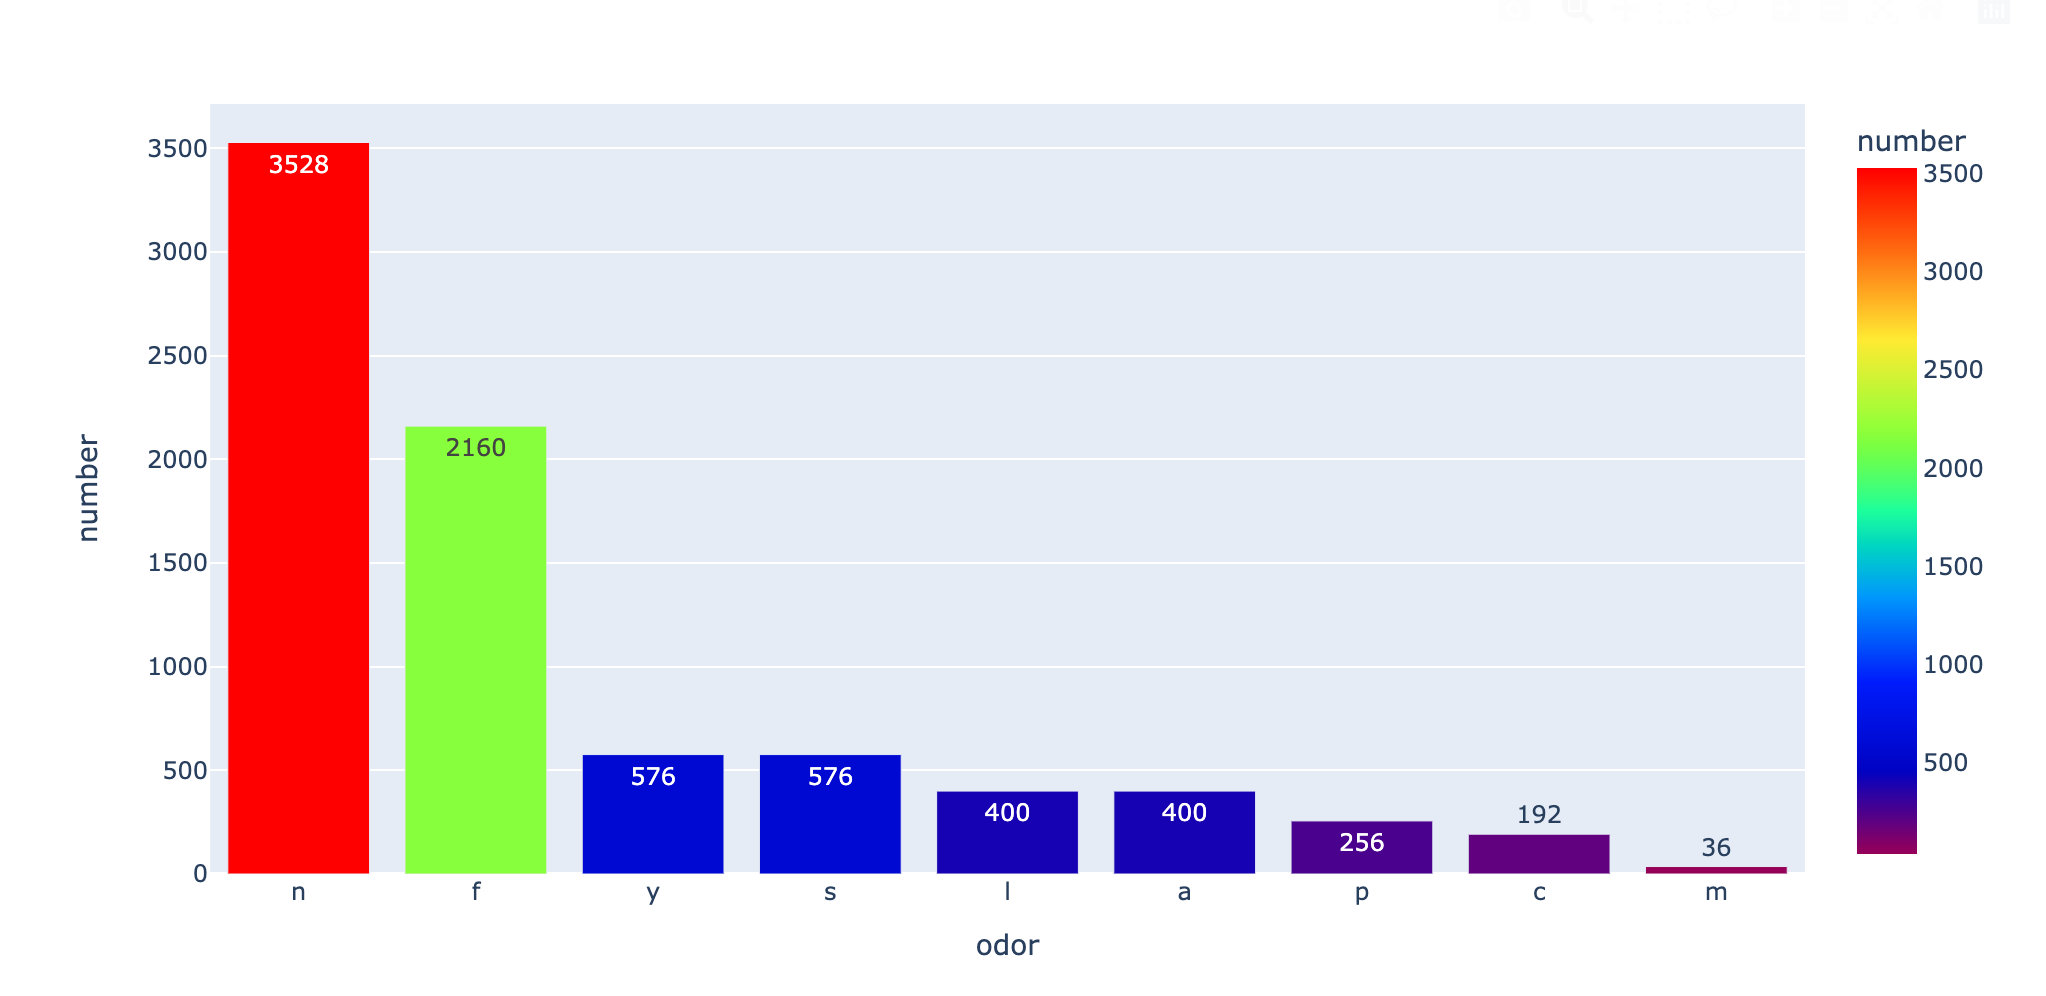
上面是针对整体数据的情况,下面分有毒和无毒来继续讨论:

 fig = px.bar(odor_class,
              x="odor",
              y="number",
              color="class",
              text="number",
              barmode="group",
             )

fig.show()

小结:从上面的两张图中,我们看出来:f这种气味是最容易造成有毒
特征相关性
将特征之间的相关性系数绘制成热力图,查看分布情况:
corr = data.corr()
sns.heatmap(corr)

plt.show()

特征工程
特征转换
原数据中的特征都是文本类型,我们将其转成数值型,方便后续分析:
1、转换前

2、实施转换
from sklearn.preprocessing import LabelEncoder  # 类型编码
labelencoder = LabelEncoder()

for col in data.columns:
    data[col] = labelencoder.fit_transform(data[col])

# 转换后
data.head()

3、查看部分属性的转换结果

数据分布
查看数据转换编码后的数据分布情况:

ax = sns.boxplot(x='class',
                 y='stalk-color-above-ring',
                 data=data)

ax = sns.stripplot(x="class",
                   y='stalk-color-above-ring',
                   data=data,
                   jitter=True,
                   edgecolor="gray")

plt.title("Class w.r.t stalkcolor above ring",fontsize=12)

plt.show()

分离特征和标签
X = data.iloc[:,1:23]  # 特征
y = data.iloc[:, 0]  # 标签
数据标准化
# 归一化(Normalization)、标准化(Standardization)

from sklearn.preprocessing import StandardScaler
scaler = StandardScaler()
X = scaler.fit_transform(X)
X

主成分分析PCA
PCA过程
原始数据中22个属性可能并不是特征都是有效数据,或者说某些属性本身就存在一定的关系,造成了特征属性的重叠。我们采用主成分分析,先找出关键的特征:
# 1、实施pca
from sklearn.decomposition import PCA
pca = PCA()
pca.fit_transform(X)

# 2、得到相关系数
covariance = pca.get_covariance()

# 3、得到每个变量对应的方差值
explained_variance=pca.explained_variance_
explained_variance

通过绘图来展示每个主成分的得分关系:
with plt.style.context("dark_background"):  # 背景
    plt.figure(figsize=(6,4))  # 大小

    plt.bar(range(22),  # 主成分个数
           explained_variance,  # 方差值
            alpha=0.5,  # 透明度
            align="center",
            label="individual explained variance"  # 标签
           )
    plt.ylabel('Explained variance ratio')  # 轴名称和图例
    plt.xlabel('Principal components')
    plt.legend(loc="best")
    plt.tight_layout()  # 自动调整子图参数
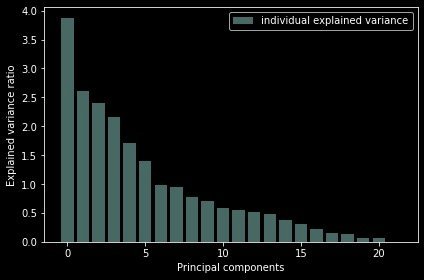
结论:从上面的图形中看出来最后的4个主成分方差之和很小;前面的17个占据了90%以上的方差,可作为主成分。
We can see that the last 4 components has less amount of variance of the data.The 1st 17 components retains more than 90% of the data.
2个主成分下的数据分布
然后我们利用基于2个属性的数据来实施K-means聚类:
1、2个主成分下的原始数据分布
N = data.values
pca = PCA(n_components=2)
x = pca.fit_transform(N)

plt.figure(figsize=(5,5))
plt.scatter(x[:,0],x[:,1])
plt.show()

2、实施聚类建模后的分布:
from sklearn.cluster import KMeans
km = KMeans(n_clusters=2,random_state=5)

N = data.values  # numpy数组形式
X_clustered = km.fit_predict(N)  # 建模结果0-1

label_color_map = 0:"g",  # 分类结果只有0和1,进行打标
                  1:"y"
label_color = [label_color_map[l] for l in X_clustered]

plt.figure(figsize=(5,5))
# x = pca.fit_transform(N)
plt.scatter(x[:,0],x[:,1], c=label_color)
plt.show()

基于17主成分下的建模
这个地方自己也没有看懂:总共是22个属性,上面选取了4个特征,为什么这里是基于17个主成分的分析??
先做了基于17个主成分的转换:
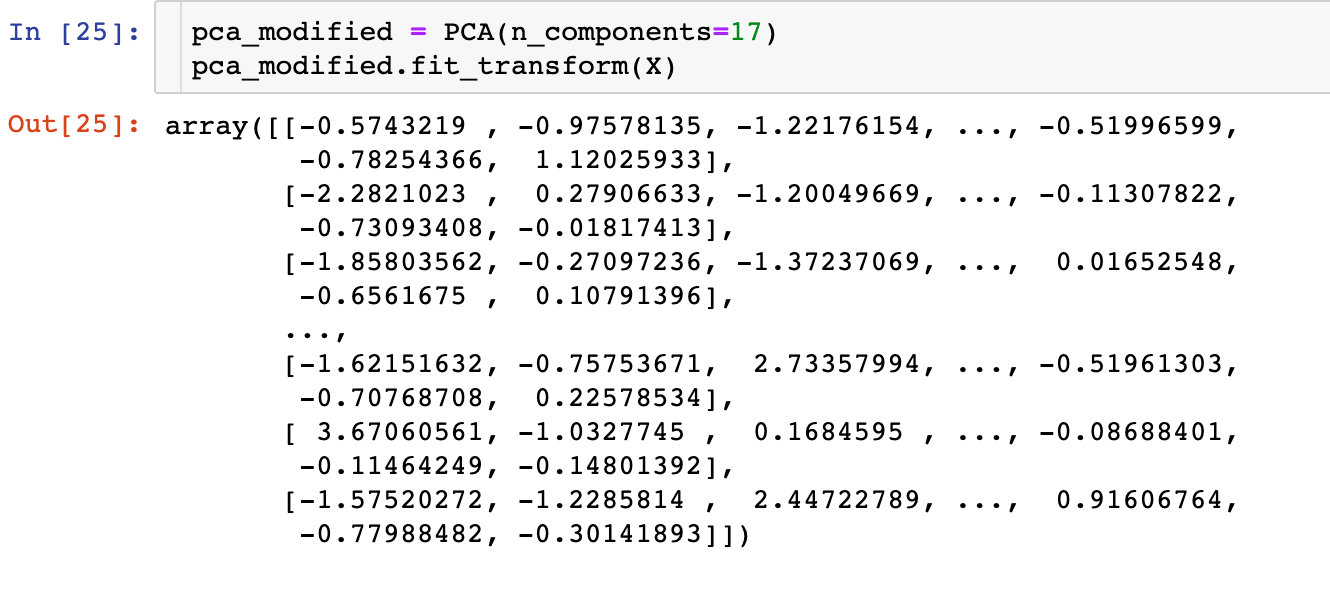
数据集的划分:训练集和测试集占比为8-2
from sklearn.model_selection import train_test_split
X_train, X_test, y_train, y_test = train_test_split(X, y, test_size=0.2, random_state=4)
下面开始是6种监督学习方法的具体过程:
模型1:逻辑回归
from sklearn.linear_model import LogisticRegression  # 逻辑回归(分类)
from sklearn.model_selection import cross_val_score  # 交叉验证得分
from sklearn import metrics  # 模型评价

# 建立模型
model_LR = LogisticRegression()
model_LR.fit(X_train, y_train)
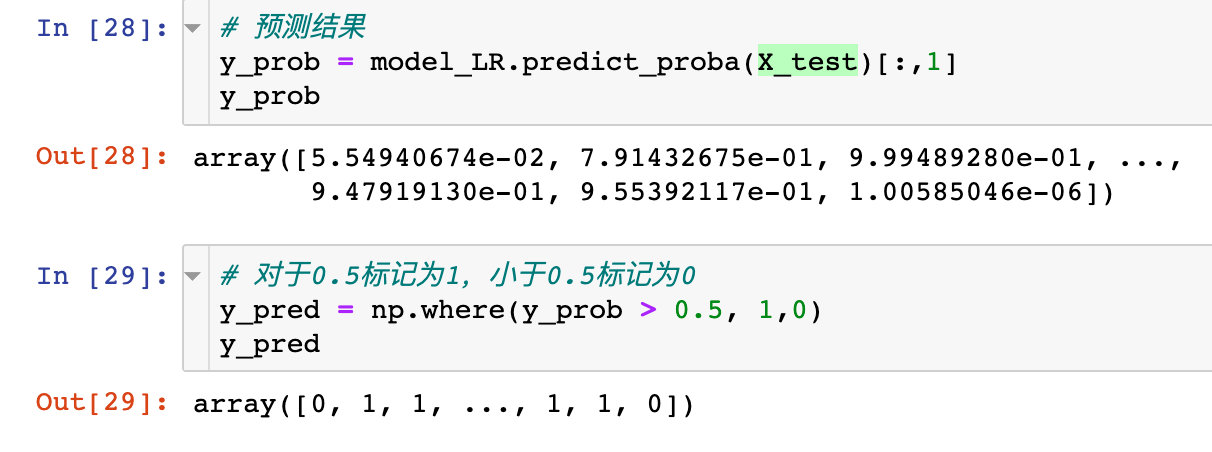
查看具体的预测效果:
model_LR.score(X_test,y_pred)

# 结果
1.0  # 效果很好
逻辑回归下的混淆矩阵:
confusion_matrix = metrics.confusion_matrix(y_test, y_pred)
confusion_matrix

# 结果
array([[815,  30],
       [ 36, 744]])
具体的auc值:
auc_roc = metrics.roc_auc_score(y_test, y_pred)  # 测试纸和预测值
auc_roc

# 结果
0.9591715976331362
真假阳性
from sklearn.metrics import roc_curve, auc
false_positive_rate, true_positive_rate,thresholds = roc_curve(y_test, y_prob)

roc_auc = auc(false_positive_rate,true_positive_rate)
roc_auc

# 结果
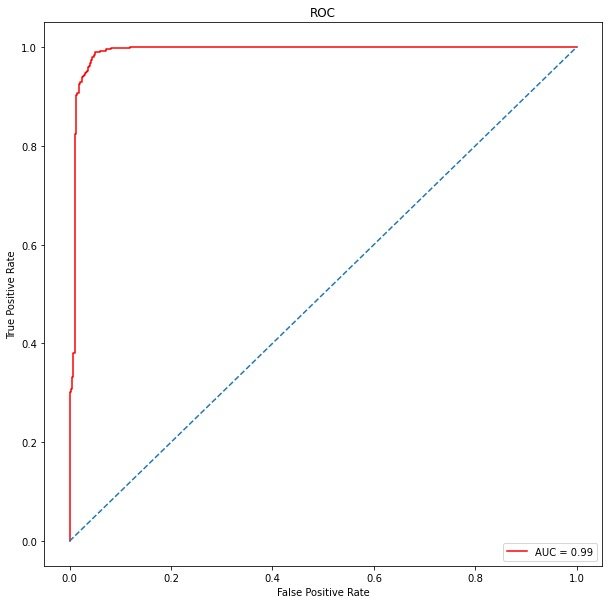
0.9903474434835382
ROC曲线
import matplotlib.pyplot as plt
plt.figure(figsize=(10,10))
plt.title("ROC")  # Receiver Operating Characteristic
plt.plot(false_positive_rate,
         true_positive_rate,
         color="red",
         label="AUC = %0.2f"%roc_auc
        )

plt.legend(loc="lower right")
plt.plot([0,1],[0,1],linestyle="--")
plt.axis("tight")
# 真阳性:预测类别为1的positive;预测正确True
plt.ylabel("True Positive Rate")
# 假阳性:预测类别为1的positive;预测错误False
plt.xlabel("False Positive Rate")
下面是对逻辑回归模型进行校正。这里的校正主要就是采取网格搜索的方法来选取最佳的参数,然后进行下一步的建模。网格搜索的过程:
from sklearn.linear_model import LogisticRegression
from sklearn.model_selection import cross_val_score
from sklearn import metrics

# 未优化的模型
LR_model= LogisticRegression()
# 待确定的参数
tuned_parameters = "C":[0.001,0.01,0.1,1,10,100,1000],
                    "penalty":['l1','l2']  # 选择不同的正则方式,防止过拟合

# 网格搜索模块
from sklearn.model_selection import GridSearchCV
# 加入网格搜索功能
LR = GridSearchCV(LR_model, tuned_parameters,cv=10)
# 搜索之后再建模
LR.fit(X_train, y_train)

# 确定参数
print(LR.best_params_)

'C': 100, 'penalty': 'l2'
查看优化后的预测情况:

混淆矩阵和AUC情况:

ROC曲线情况:
from sklearn.metrics import roc_curve, auc
false_positive_rate, true_positive_rate, thresholds = roc_curve(y_test, y_prob)

#roc_auc = auc(false_positive_rate, true_positive_rate)

import matplotlib.pyplot as plt
plt.figure(figsize=(10,10))
plt.title("ROC")  # Receiver Operating Characteristic
plt.plot(false_positive_rate,
         true_positive_rate,
         color="red",
         label="AUC = %0.2f"%roc_auc
        )

plt.legend(loc="lower right")
plt.plot([0,1],[0,1],linestyle="--")
plt.axis("tight")
# 真阳性:预测类别为1的positive;预测正确True
plt.ylabel("True Positive Rate")
# 假阳性:预测类别为1的positive;预测错误False
plt.xlabel("False Positive Rate")

模型2:高斯朴素贝叶斯
建模
from sklearn.naive_bayes import GaussianNB
model_naive = GaussianNB()

# 建模
model_naive.fit(X_train, y_train)

# 预测概率
y_prob = model_naive.predict_proba(X_test)[:,1]
y_pred = np.where(y_prob > 0.5,1,0)
model_naive.score(X_test,y_pred)

# 结果
1
预测值和真实值不等的数量:111个

交叉验证
scores = cross_val_score(model_naive,
                        X,
                        y,
                        cv=10,
                        scoring="accuracy"
                       )
scores
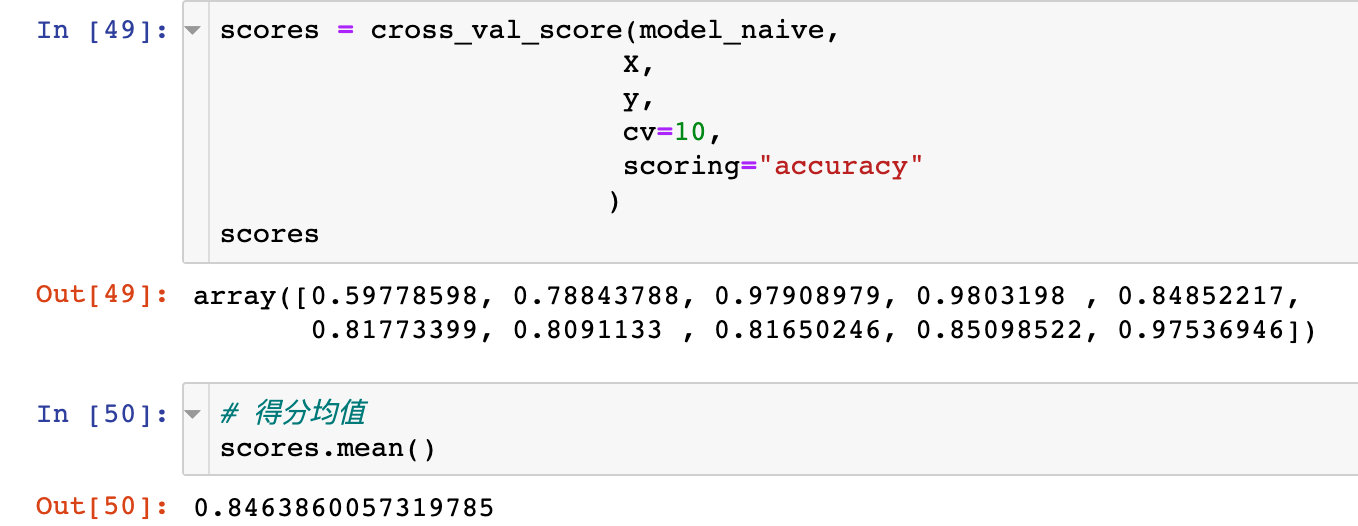
混淆矩阵和AUC

真假阳性
# 导入评价模块
from sklearn.metrics import roc_curve, auc

# 评价指标
false_positive_rate, true_positive_rate, thresholds = roc_curve(y_test, y_prob)

# roc曲线面积
roc_auc = auc(false_positive_rate, true_positive_rate)
roc_auc

# 结果
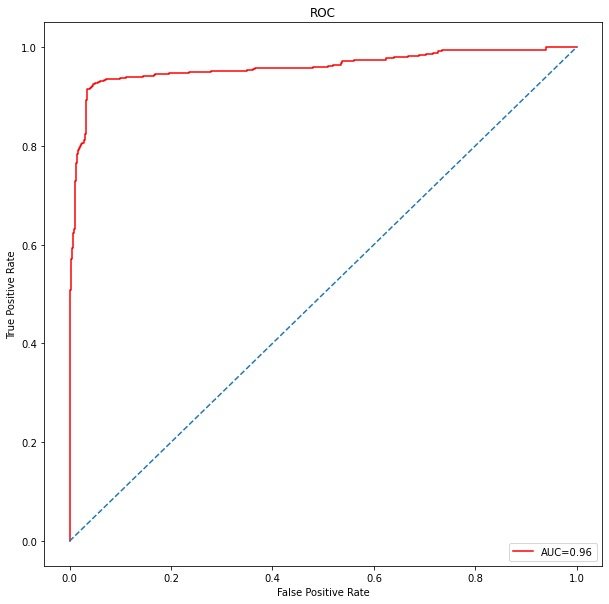
0.9592201486876043
ROC曲线
AUC的值才0.96
# 绘图
import matplotlib.pyplot as plt
plt.figure(figsize=(10,10))

plt.title("ROC")
plt.plot(false_positive_rate,true_positive_rate,color="red",label="AUC=%0.2f"%roc_auc)

plt.legend(loc="lower right")
plt.plot([0,1],[0,1],linestyle='--')

plt.axis("tight")
plt.xlabel('False Positive Rate')
plt.ylabel('True Positive Rate')
plt.show()
模型3:支持向量机SVM
默认参数下的支持向量机过程
建模过程
from sklearn.svm import SVC
svm_model = SVC()

tuned_parameters =
    'C': [1, 10, 100,500, 1000],
    'kernel': ['linear','rbf'],
    'C': [1, 10, 100,500, 1000],
    'gamma': [1,0.1,0.01,0.001, 0.0001],
    'kernel': ['rbf']
随机网格搜索-RandomizedSearchCV
from sklearn.model_selection import RandomizedSearchCV

# 建立随机搜索模型
model_svm = RandomizedSearchCV(
    svm_model,  # 待搜索模型
    tuned_parameters,  # 参数
    cv=10,  # 10折交叉验证
    scoring="accuracy",  # 评分标准
    n_iter=20  # 迭代次数
    )

# 训练模型
model_svm.fit(X_train,y_train)
RandomizedSearchCV(cv=10,
                   estimator=SVC(),
                   n_iter=20,
                   param_distributions='C': [1, 10, 100, 500, 1000],
                                        'gamma': [1, 0.1, 0.01, 0.001, 0.0001],
                                        'kernel': ['rbf'],
                   scoring='accuracy')
# 最佳得分效果
print(model_svm.best_score_)
1.0
得分最佳匹配参数:

# 预测
y_pred = model_svm.predict(X_test)

# 预测值和原始标签值计算:分类准确率
metrics.accuracy_score(y_pred, y_test)
# 结果
1
混淆矩阵
查看具体的混淆矩阵和预测情况:

ROC曲线
from sklearn.metrics import roc_curve, auc
false_positive_rate, true_positive_rate, thresholds = roc_curve(y_test, y_pred)
roc_auc = auc(false_positive_rate, true_positive_rate)

import matplotlib.pyplot as plt

plt.figure(figsize=(10,10))
plt.title('ROC')

plt.plot(false_positive_rate,true_positive_rate, color='red',label = 'AUC = %0.2f' % roc_auc)

plt.legend(loc = 'lower right')
plt.plot([0, 1], [0, 1],linestyle='--')

plt.axis('tight')
plt.ylabel('True Positive Rate')
plt.xlabel('False Positive Rate')

模型5:随机森林
建模拟合
from sklearn.ensemble import RandomForestClassifier

# 建模
model_RR = RandomForestClassifier()
# 拟合
model_RR.fit(X_train, y_train)
预测得分

混淆矩阵
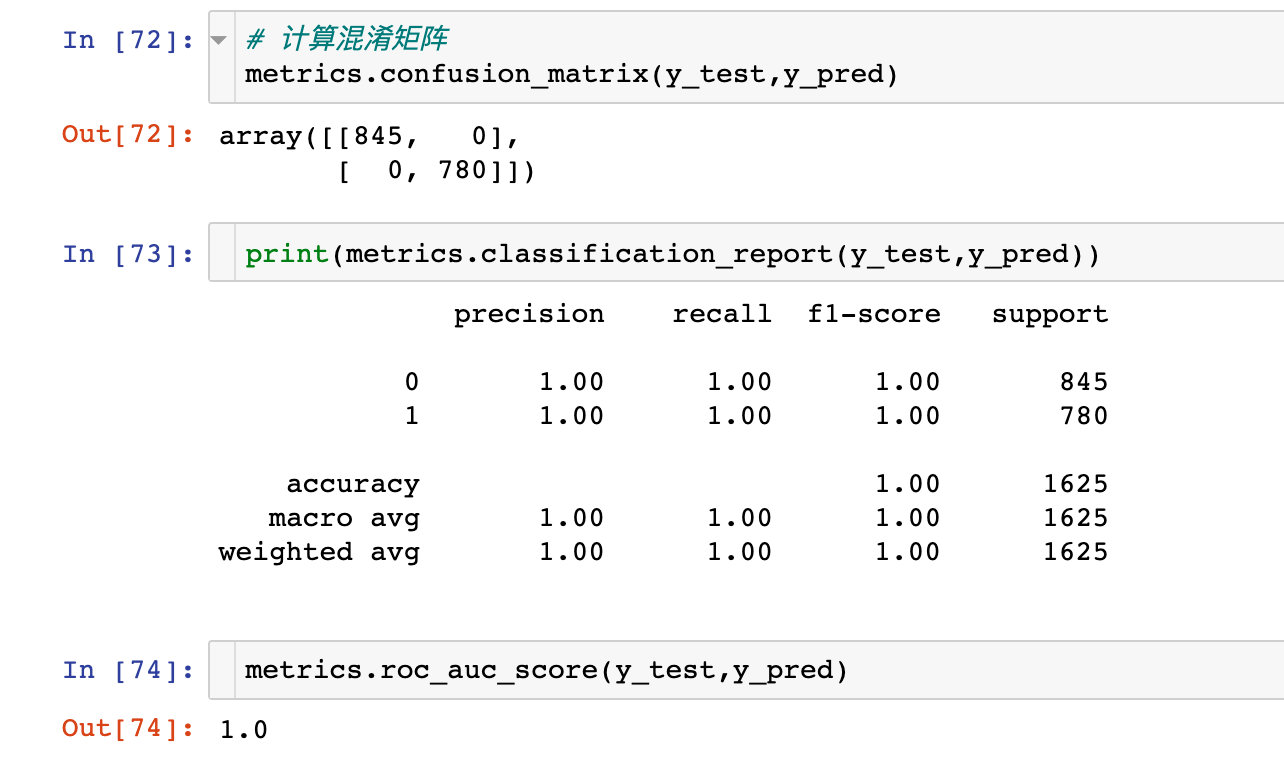
ROC曲线
from sklearn.metrics import roc_curve, auc

false_positive_rate, true_positive_rate, thresholds = roc_curve(y_test, y_prob)

roc_auc = auc(false_positive_rate, true_positive_rate)
roc_auc  # 1

import matplotlib.pyplot as plt
plt.figure(figsize=(10,10))
plt.title('ROC')

plt.plot(false_positive_rate,true_positive_rate, color='red',label = 'AUC = %0.2f' % roc_auc)

plt.legend(loc = 'lower right')
plt.plot([0, 1], [0, 1]以上是关于基于6种监督学习(逻辑回归+决策树+随机森林+SVM+朴素贝叶斯+神经网络)的毒蘑菇分类的主要内容,如果未能解决你的问题,请参考以下文章