深入理解BatchNorm的原理代码实现以及BN在CNN中的应用
Posted 白马金羁侠少年
tags:
篇首语:本文由小常识网(cha138.com)小编为大家整理,主要介绍了深入理解BatchNorm的原理代码实现以及BN在CNN中的应用相关的知识,希望对你有一定的参考价值。
深入理解BatchNorm的原理、代码实现以及BN在CNN中的应用
BatchNorm是算法岗面试中几乎必考题,本文将带你理解BatchNorm的原理和代码实现,以及详细介绍BatchNorm在CNN中的应用。
文章目录
一、BatchNorm论文
论文题目:Batch Normalization: Accelerating Deep Network Training byReducing Internal Covariate Shift
论文地址:https://arxiv.org/pdf/1502.03167.pdf
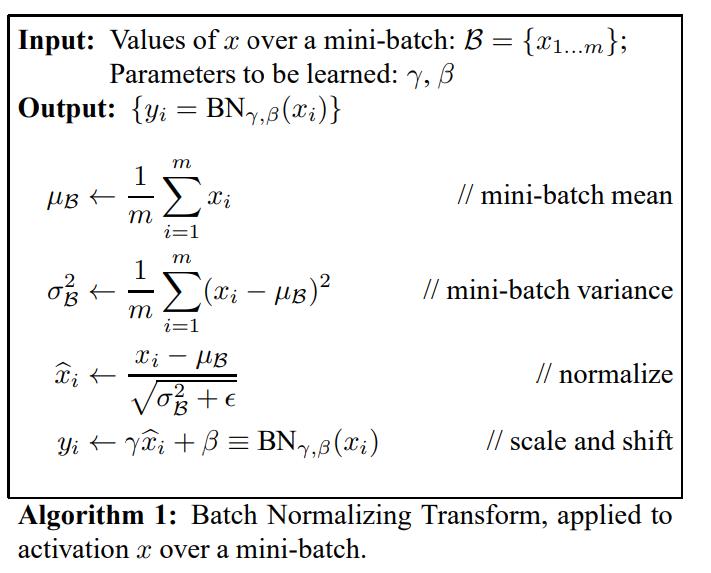
BatchNorm伪代码如下:
二、BatchNorm代码
y
=
x
−
mean
(
x
)
Var
(
x
)
+
e
p
s
∗
gamma
+
beta
\\mathrmy=\\fracx-\\operatornamemean(x)\\sqrt\\operatornameVar(x)+e p s * \\operatornamegamma+\\operatornamebeta
y=Var(x)+epsx−mean(x)∗gamma+beta
根据数据维度的不同,PyTorch中的BatchNorm有不同的形式:
2.1 torch.nn.BatchNorm1d
官方文档:torch.nn.BatchNorm1d
torch.nn.BatchNorm1d(num_features, eps=1e-05, momentum=0.1, affine=True, track_running_stats=True, device=None, dtype=None)
- 2D input: (mini_batch, num_feature),常见的结构化数据,如,房价预测问题中x的特征数有100个,torch.nn.BatchNorm1d(100)
- 3D input: (mini_batch, num_feature, additional_channel),使用时 torch.nn.BatchNorm1d(num_feature),不过这种维度一般不常用
2.2 torch.nn.BatchNorm2d
官方文档:torch.nn.BatchNorm2d
torch.nn.BatchNorm2d(num_features, eps=1e-05, momentum=0.1, affine=True, track_running_stats=True, device=None, dtype=None)
- 4D input: (mini_batch, num_feature_map, p, q),常用于CV的图像数据,如CIFAR10(3x32x32),torch.nn.BatchNorm2d(3)
2.3 BatchNorm层的参数γ,β和统计量
Batch Norm层有可学习的参数γ和β,以及统计量running mean和running var
- (可学习参数)γ : weight of BatchNorm
- (可学习参数)β : bias of BatchNorm
- (统计量)running mean: 预测阶段会使用这个均值
- (统计量)running var: 预测阶段会使用这个方差
pytorch中用state_dict()可以查看上面这些信息
print("--- 4D:(mini_batch, num_feature, p, q) ---")
m = nn.BatchNorm2d(3, momentum=0.1)  # 例如, CIFAR10数据集是三通道的,3x32x32
print(m.state_dict().keys())
# 输出:odict_keys(['weight', 'bias', 'running_mean', 'running_var', 'num_batches_tracked'])
2.3.1 train模式
在pytorch中可以使用
model.train()将BatchNorm层切换到train模式。
在train模式下参数γ和β会随着网络的反向传播进行梯度更新,而统计量running mean和running var则会用一种特定的方式进行更新。在Pytorch中的更新方式如下:
x ^ new = ( 1 − \\hatx_\\text new =(1- x^new =(1− momentum ) × x ^ + ) \\times \\hatx+ )×x^+ momentum × x t \\times x_t ×xt
- x ^ \\hatx x^: running mean or running variance
- x t x_t xt: input mean and variance(训练时的第t个batch的均值和方差)
- 默认momentum为0.1
2.3.2 eval模式
在pytorch中可以使用
model.eval()将BatchNorm层切换到eval模式。
在eval模式下,我们的模型不可能再等到预测的样本数量达到一个batch时,再进行归一化,而是直接使用train模式得到的统计量running mean和running var进行归一化。
2.4 代码:Pytorch实战演练
import torch
import torch.nn as nn

bs = 64

print("Pytorch Batch Norm Layer详解")
print("--- 2D input:(mini_batch, num_feature) ---")
# With Learnable Parameters
m = nn.BatchNorm1d(400)  # 例如,房价预测:x的特征数是400,y是房价
# Without Learnable Parameters(无学习参数γ和β)
# m = nn.BatchNorm1d(100, affine=False)
inputs = torch.randn(bs, 400)
print(m(inputs).shape)


print("Batch Norm层的γ和β是要训练学习的参数")
print("γ:", m.state_dict()['weight'].shape)  # gammar
print("β:", m.state_dict()['bias'].shape)  # beta
print("")


print("--- 3D input:(mini_batch, num_feature, other_channel) ---")
m = nn.BatchNorm1d(32)
inputs = torch.randn(bs, 32, 32)  # 这种格式的数据不常用
print(m(inputs).shape)

print("Batch Norm层的γ和β是要训练学习的参数")
print("γ:", m.state_dict()['weight'].shape)  # gammar
print("β:", m.state_dict()['bias'].shape)  # beta
print("")


print("--- 4D input:(mini_batch, num_feature, H, W) ---")
m = nn.BatchNorm2d(3)  # 例如, CIFAR10数据集是三通道的,3x32x32

inputs = torch.randn(bs, 3, 32, 32)
print(m(inputs).shape)

print("Batch Norm层的γ和β是要训练学习的参数")
print("γ:", m.state_dict()['weight'].shape)  # gammar
print("β:", m.state_dict()['bias'].shape)  # beta
print("Batch Norm层的running_mean和running_var是统计量(主要用于预测阶段)")
print("running_mean:", m.state_dict()['running_mean'].shape)
print("running_var:", m.state_dict()['running_var'].shape)
输出:
Pytorch Batch Norm Layer详解
--- 2D input:(mini_batch, num_feature) ---
torch.Size([64, 400])
Batch Norm层的γ和β是要训练学习的参数
γ: torch.Size([400])
β: torch.Size([400])

--- 3D input:(mini_batch, num_feature, other_channel) ---
torch.Size([64, 32, 32])
Batch Norm层的γ和β是要训练学习的参数
γ: torch.Size([32])
β: torch.Size([32])

--- 4D input:(mini_batch, num_feature, H, W) ---
torch.Size([64, 3, 32, 32])
Batch Norm层的γ和β是要训练学习的参数
γ: torch.Size([3])
β: torch.Size([3])
Batch Norm层的running_mean和running_var是统计量(主要用于预测阶段)
running_mean: torch.Size([3])
running_var: torch.Size([3])
三、BatchNorm在CNN中的应用
我们在第二部分的代码中发现,BatchNorm2d的参数γ和β数量是跟特征图的数量是一致的,并不是我们直观认为的num_feature*H*W个参数,这是为什么呢?
《百面机器学习》P221是这样解释的:
BatchNorm批量归一化在卷积神经网络中应用时,需要注意卷积神经网络的参数共享机制。每一个卷积核的参数在不同位置的神经元当中是共享的,因此同一个特征图的所有神经元也应该被一起归一化!
- 换句话说就是,你一个特征图用的是共享的卷积核参数,所以这个特征图中的每个神经元(共H*W个)也应该共享参数 γ , β \\gamma, \\beta γ,β。如果有 f f f个卷积核,就对应 f f f个特征图和 f f f组不同的 γ \\gamma γ和 β \\beta β参数
下面的解释来自hjimce
- 假如某一层卷积层有6个特征图,每个特征图的大小是
100*100,这样就相当于这一层网络有6*100*100个神经元,如果采用BN,就会有6*100*100个参数γ、β,这样岂不是太恐怖了。因此卷积层上的BN使用,其实也是使用了类似权值共享的策略,把一整张特征图当做一个神经元进行处理。- 卷积神经网络经过卷积后得到的是一系列的特征图,如果min-batch sizes为m,那么网络某一层输入数据可以表示为四维矩阵(m,f,p,q),m为min-batch sizes,f为特征图个数,p、q分别为特征图的宽高。在cnn中我们可以把每个特征图看成是一个特征处理,因此在使用Batch Normalization,mini-batch size 的大小相当于
m*p*q,于是对于每个特征图都只有一对可学习参数:γ、β。
3.1 图解:卷积神经网络中的BatchNorm
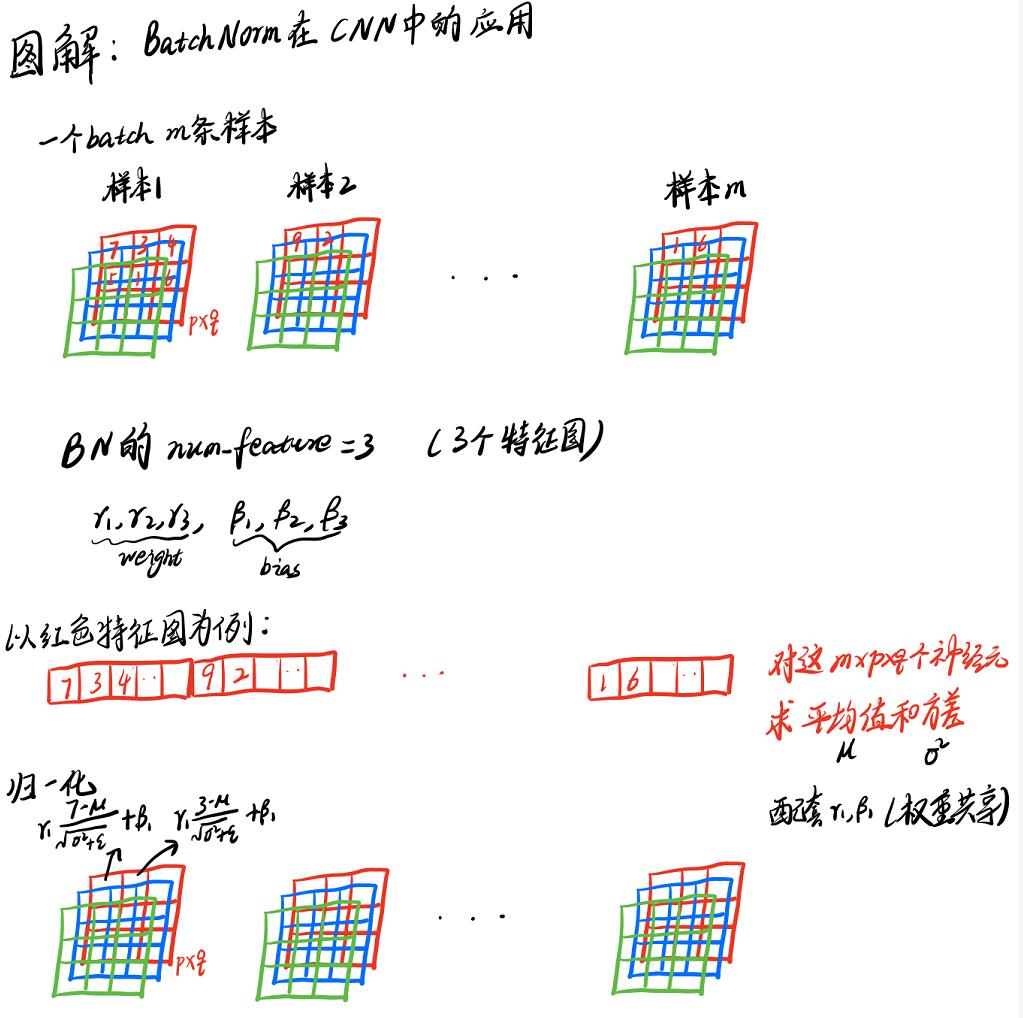
这里我特意画了一个图来让大家看清楚CNN中Batchnorm到底是怎么做的

总结来说:
- 对于某个特征图而言,一个batch共有m个这样的特征图,并且每个特征图有
p*q个神经元,把所有的m*p*q个神经元拉直,然后求得平均值和方差。 - 对m个这样特征图的
p*q个神经元的每个神经元,利用求出的平均值和方差做下数据变换。
下面是来自于Keras卷积层的BN实现的一小段主要源码:
# Keras BatchNorm
input_shape = self.input_shape
reduction_axes = list(range(len(input_shape)))
del reduction_axes[self.axis]
broadcast_shape = [1] * len(input_shape)
broadcast_shape[self.axis] = input_shape[self.axis]
if train:
    m = K.mean(X, axis=reduction_axes)
    brodcast_m = K.reshape(m, broadcast_shape)
    std = K.mean(K.square(X - brodcast_m) + self.epsilon, axis=reduction_axes)
    std = K.sqrt(std)
    brodcast_std = K.reshape(std, broadcast_shape)
    mean_update = self.momentum * self.running_mean + (1-self.momentum) * m
    std_update = self.momentum * self.running_std + (1-self.momentum) * std
    self.updates = [(self.running_mean, mean_update),
                    (self.running_std, std_update)]
    X_normed = (X - brodcast_m) / (brodcast_std + self.epsilon)
else:
    brodcast_m = K.reshape(self.running_mean, broadcast_shape)
    brodcast_std = K.reshape(self.running_std, broadcast_shape)
    X_normed = ((X - brodcast_m) /
                (brodcast_std + self.epsilon))
out = K.reshape(self.gamma, broadcast_shape) * X_normed + K.reshape(self.beta, broadcast_shape)
附:pytorch中取mean的操作
import torch

bs = 64
a = torch.randn(bs, 100, 32, 28)
# 将轴0,2,3的元素都放在一起取平均值
print(torch.mean(a, axis=(0, 2, 3)).shape)  # torch.Size([100])
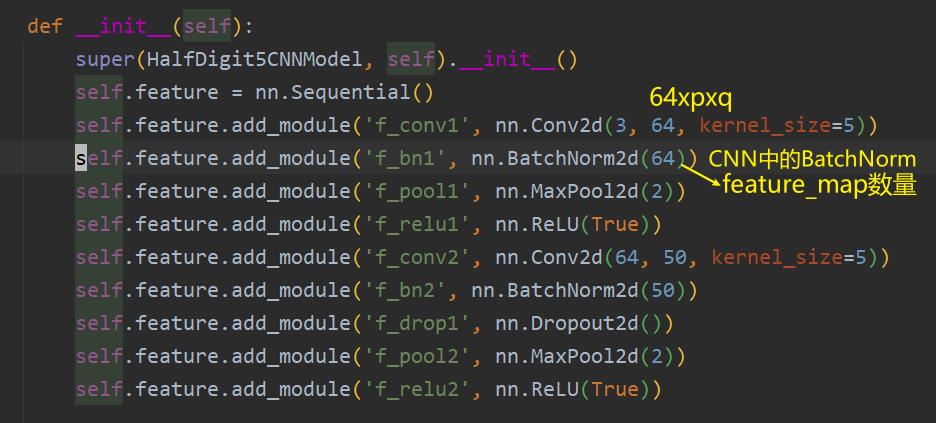
附:CNN网络中的BatchNorm2d

四、BatchNorm的优缺点
BN的优点:
- 解决内部协变量偏移,简单来说训练过程中,各层分布不同,增大了学习难度,BN缓解了这个问题。当然后来也有论文证明BN有作用和这个没关系,而是可以使损失平面更加的平滑,从而加快收敛速度。
- 缓解了梯度饱和问题(如果使用sigmoid这种含有饱和区间的激活函数的话),加快收敛。
BN的缺点
- Batch size比较小的时候,效果会比较差。因为他是用一个batch中的均值和方差来模拟全部数据的均值和方差。比如你一个batch只有2个样本,那你两个样本的均值和方差就不能很好地代表全班人的均值和方差,所以效果肯定就不好。
- BN是计算机视觉CV的标配,但在自然语音处理NLP中效果一般较差,取而代之的是LN。关于LayerNorm的详解,可以参考我另一篇博客:深入理解NLP中LayerNorm的原理以及LN的代码详解
五、参考资料
[1] 李宏毅2021机器学习 第5节 Batch Normalization(学习笔记)
[2] 深度学习(二十九)Batch Normalization 学习笔记 (讲得挺全面的)
[3] BatchNormalization、LayerNormalization、InstanceNorm、GroupNorm简介(不同Norm的对比)
[4] BatchNorm behaves different in train() and eval() #5406
[5] BatchNorm2d原理、作用及其pytorch中BatchNorm2d函数的参数讲解
[6] 神经网络之BN层
[7] 5 分钟理解 BatchNorm
[8] Pytorch的BatchNorm层使用中容易出现的问题
[9] 【深度学习】深入理解Batch Normalization批标准化
[10] BN踩坑记–谈一下Batch Normalization的优缺点和适用场景
以上是关于深入理解BatchNorm的原理代码实现以及BN在CNN中的应用的主要内容,如果未能解决你的问题,请参考以下文章