忙活半天只为了看雪--送给大家的冬至礼物
Posted PythonNotJava
tags:
篇首语:本文由小常识网(cha138.com)小编为大家整理,主要介绍了忙活半天只为了看雪--送给大家的冬至礼物相关的知识,希望对你有一定的参考价值。
快到冬至了,没想到今年人虽身处北方(靠近太行山一带),但我们这仍未有雪,很是难受。
囿于凛冬茫茫大雾之中,倒不如踏雪寻梅;奈何翘首不见雪,只得自立而为之。
好了好了,废话少说,上原理。
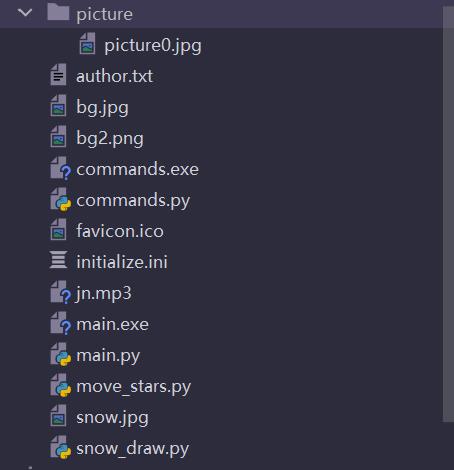
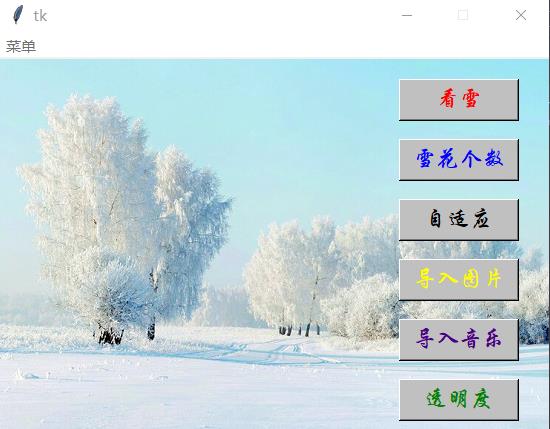
简介一下我的运行原理:commands.py是右图各种按钮的功能文件,功能包括--------主程序、调整雪花个数、窗口自适应图片大小比例、导入别的图片、修改图片透明度、修改背景音乐、修复注册机(这个在菜单栏)、snow_draw.py是主程序(也就是下雪)、main.py是将各种程序集成的用户交互页面文件。initialize.ini是初始化配置文件,用于调整各种设置,这里的jpg、MP3等我就不多说了……
上代码:
按钮功能文件-----commands.py
我在这个按钮文件里添加了一个注册机,用于文件读取出错时的重新注册,实则是对初始化文件的重新写入。另外,按钮功能修改后的设置,都需要重新启动用户窗口才能奏效,(这算是一个小bug),修改图片什么的,只需要导入他们的路径即可,就算出错了,我这里也提供了对应的报错提醒。
# 一系列按钮操作函数
from tkinter.messagebox import *
import tkinter
from configobj import ConfigObj, ParseError
import os
from PIL import Image, ImageTk
from tkinter.scrolledtext import ScrolledText
import sys

# 调整雪花个数按钮
def snow_num():
    window = tkinter.Tk()
    window.resizable(False, False)
    window.geometry('300x200')

    label = tkinter.Label(window, text='请输入个数', bg='silver', fg='red')
    label.place(x=10, y=50)
    entry = tkinter.Entry(window)
    entry.place(x=100, y=50)

    def got():
        a = entry.get()
        try:
            if int(a):
                if 250 >= int(a) >= 50:
                    config = ConfigObj('initialize.ini', encoding='utf-8')
                    config['num'] = int(a)
                    config.write()
                    showinfo(message='修改完毕!')
                else:
                    showerror(message='雪花限制数目不能低于50,也不能高于250')
        except ValueError:
            e = ValueError('您输入的不是整数')
            showerror(message=e)

    def deleted():
        entry.delete(0, 'end')

    button = tkinter.Button(window, text='确定', bg='silver', fg='red', font=('黑体', 18), command=got)
    button.place(x=10, y=100)
    button1 = tkinter.Button(window, text='清除', bg='silver', fg='red', font=('黑体', 18), command=deleted)
    button1.place(x=200, y=100)
    window.mainloop()

# 导入图片
def import_image():
    window = tkinter.Tk()
    window.resizable(False, False)
    window.geometry('800x200')

    label = tkinter.Label(window, text='图片路径', bg='silver', fg='red')
    # E:\\Pycharm专业版Projects\\文档操作助手\\Tkinter_for_Opening\\bg.jpg
    label.place(x=10, y=50)
    entry = tkinter.Entry(window, width=70)
    entry.place(x=100, y=50)

    def got():
        e = entry.get()
        if os.path.exists(e):
            config = ConfigObj('initialize.ini', encoding='utf-8')
            # 当然了,这里可以灵活的调整为多种图片的重影效果
            config['back_image'] = e
            config['back_image2'] = e
            config.write()
            showinfo(message='修改完毕!')
        else:
            showerror(message=FileExistsError('找不到此文件!'))
    def deleted():
        entry.delete(0, 'end')

    button = tkinter.Button(window, text='确定', bg='silver', fg='red', font=('黑体', 18), command=got)
    button.place(x=10, y=100)
    button1 = tkinter.Button(window, text='清除', bg='silver', fg='red', font=('黑体', 18), command=deleted)
    button1.place(x=650, y=100)
    window.mainloop()

# 图片自适应
def fit():
    window = tkinter.Tk()
    window.resizable(False, False)
    window.geometry('800x200')

    label = tkinter.Label(window, text='图片路径', bg='silver', fg='red')
    # E:\\Pycharm专业版Projects\\文档操作助手\\Tkinter_for_Opening\\bg.jpg
    label.place(x=10, y=50)
    entry = tkinter.Entry(window, width=70)
    entry.place(x=100, y=50)

    def got():
        e = entry.get()
        if os.path.exists(e):
            config = ConfigObj('initialize.ini', encoding='utf-8')
            # 当然了,这里可以灵活的调整为多种图片的重影效果
            config['back_image'] = e
            config['back_image2'] = e
            image = Image.open(e)
            bg_image = ImageTk.PhotoImage(image)
            width = bg_image.width()
            height = bg_image.height()
            # 获得比例
            k = width/height
            if width > 600 and height > 400:
                config['width'] = 600
                config['height'] = 400
                config.write()
                showinfo(message='修改完毕!')
            elif width < 600 and height >= 400:
                config['width'] = width
                config['height'] = int(float(width * k))
                config.write()
                showinfo(message='修改完毕!')
            elif width >= 600 and height <= 400:
                config['width'] = int(float(height * k))
                config['height'] = height
                config.write()
                showinfo(message='修改完毕!')
        else:
            showerror(message=FileExistsError('找不到此文件!'))
    def deleted():
        entry.delete(0, 'end')

    button = tkinter.Button(window, text='确定', bg='silver', fg='red', font=('黑体', 18), command=got)
    button.place(x=10, y=100)
    button1 = tkinter.Button(window, text='清除', bg='silver', fg='red', font=('黑体', 18), command=deleted)
    button1.place(x=650, y=100)
    window.mainloop()

# 导入音乐
def music():
    window = tkinter.Tk()
    window.resizable(False, False)
    window.geometry('800x200')

    label = tkinter.Label(window, text='音乐路径', bg='silver', fg='red')
    # E:\\Pycharm专业版Projects\\文档操作助手\\Tkinter_for_Opening\\bg.jpg
    label.place(x=10, y=50)
    entry = tkinter.Entry(window, width=70)
    entry.place(x=100, y=50)

    def got():
        e = entry.get()
        if os.path.exists(e):
            config = ConfigObj('initialize.ini', encoding='utf-8')
            # 当然了,这里可以灵活的调整为多种图片的重影效果
            config['back_music'] = e
            config.write()
            showinfo(message='修改完毕!')
        else:
            showerror(message=FileExistsError('找不到此文件!'))
    def deleted():
        entry.delete(0, 'end')

    button = tkinter.Button(window, text='确定', bg='silver', fg='red', font=('黑体', 18), command=got)
    button.place(x=10, y=100)
    button1 = tkinter.Button(window, text='清除', bg='silver', fg='red', font=('黑体', 18), command=deleted)
    button1.place(x=650, y=100)
    window.mainloop()

# 修改图片透明度
def alpha():
    window = tkinter.Tk()
    window.resizable(False, False)
    window.geometry('200x200')

    label = tkinter.Label(window, text='设置透明度', bg='silver', fg='red')
    # E:\\Pycharm专业版Projects\\文档操作助手\\Tkinter_for_Opening\\bg.jpg
    label.place(x=10, y=50)
    entry = tkinter.Entry(window, width=10)
    entry.place(x=100, y=50)

    def got():
        e = entry.get()
        try:
            if int(e):
                if 0 <= int(e) <= 255:
                    config = ConfigObj('initialize.ini', encoding='utf-8')
                    config['alpha'] = e
                    config.write()
                    showinfo(message='修改完毕!')
                else:
                    showerror(message='请输入0~255以内的整数')
        except ValueError:
            showerror(message=ValueError('请输入0~255以内的整数'))
    def deleted():
        entry.delete(0, 'end')

    button = tkinter.Button(window, text='确定', bg='silver', fg='red', font=('黑体', 18), command=got)
    button.place(x=10, y=100)
    button1 = tkinter.Button(window, text='清除', bg='silver', fg='red', font=('黑体', 18), command=deleted)
    button1.place(x=100, y=100)
    window.mainloop()

# 重置注册机
def reg():
    window = tkinter.Tk()
    window.resizable(False, False)
    window.geometry('200x200')
    def regs():
        try:
            config = ConfigObj('initialize.ini', encoding='utf-8')
            config['width'] = 600
            config['height'] = 400
            config['num'] = 200
            config['back_image'] = 'bg.jpg'
            config['back_image2'] = 'bg2.png'
            config['back_music'] = 'jn.mp3'
            config['alpha'] = 120
            config['snow_color'] = [192, 192, 192]
            showinfo(message='修改完毕!')
            config.write()
        except ParseError:
            config = open('initialize.ini', 'w', encoding='utf-8')
            config.write('width = 600\\nheight = 400\\nnum = 200\\nback_image = bg.jpg\\n'
                         'back_image2 = bg2.png\\nback_music = jn.mp3\\n'
                         'alpha = 120\\n'
                         'snow_color = 192, 192, 192')
            config.close()
            showinfo(message='修改完毕!')
    button = tkinter.Button(window, text='重置', bg='yellow', fg='indigo', font=('黑体', 18), command=regs)
    button.place(x=10, y=70)
    button1 = tkinter.Button(window, text='算了', bg='silver', fg='blue', font=('黑体', 18), command=sys.exit)
    button1.place(x=100, y=70)
    window.mainloop()

# 关于
def about():
    window = tkinter.Tk()
    window.resizable(False, False)
    window.geometry('400x400')
    a = open('author.txt', 'r', encoding='utf-8')
    f = a.read()
    a.close()
    view_text = ScrolledText(window, font=('宋体', 12), fg='black', bg='silver')
    view_text.insert('0.0', f)
    view_text.place(x=10, y=5, height=380, width=380)
    window.mainloop()

if __name__ == '__main__':
    reg()
主程序(下雪)----snow_draw.py
这里原理很简单,就是使用了pygame模块来进行制作,从下列代码可以看出,我使用了三次图片并且放在了不同起点,这里是为了产生图片的重影效果(我不会告诉你这个由来是我忘记删掉一张图片调用而产生意外美感之举),制作雪到下雪的原理很简单,我都在注释中写了。
另外,这个下雪程序是需要用q键退出的,s键还可以对当前雪景页面进行截图并自动保存
import sys

import pygame
import random
import os.path as path
# 一个读取初始化文件的模块
from configobj import ConfigObj

# 获得初始化ini文件内容
config = ConfigObj('initialize.ini', encoding='utf-8')

def main():
    # 初始化pygame
    pygame.init()
    width = int(config['width'])
    height = int(config['height'])
    SIZE = width * 2, height * 2
    screen = pygame.display.set_mode(SIZE, pygame.NOFRAME)

    # 根据背景图片的大小,设置屏幕长宽
    image = pygame.image.load(config['back_image'])
    # 图片透明度,为了制造下面重影效果,建议透明度偏向低值
    image.set_alpha(int(config['alpha']))
    image2 = pygame.image.load(config['back_image2']).convert()
    image2.set_colorkey((255, 255, 255))

    # 雪花列表
    snow_list = []


    # 初始化雪花:(x坐标, y坐标), x轴速度, y轴速度
    for i in range(int(config['num'])):
        x = random.randrange(0, SIZE[0])
        y = random.randrange(0, SIZE[1])
        # 让雪有两种下落趋势--左下或者右下
        speed_x = random.randint(-1, 1)
        speed_y = random.randint(1, 4)
        snow_list.append([x, y, speed_x, speed_y])
    # 刷新帧率,控制速度
    clock = pygame.time.Clock()

    # 背景音乐
    pygame.mixer.init()
    pygame.mixer.music.load(config['back_music'])
    pygame.mixer.music.play()
    # 游戏主循环
    while True:

        screen.fill((0, 0, 0))

        # 重影效果
        screen.blit(pygame.transform.scale(image2, SIZE), (-width/2, 0))
        screen.blit(pygame.transform.scale(image, SIZE), (0, 0))
        screen.blit(image, (0, 0))

        # 事件检测
        for event in pygame.event.get():
            if event.type == pygame.QUIT:
                sys.exit()
            if event.type == pygame.KEYDOWN:
                # 按q键退出
                if event.key == event.key == pygame.K_q:
                    sys.exit()
                # 按s键截图
                if event.key == pygame.K_s:
                    list_file = []
                    list_ooo = list(range(1000))
                    for num_in in list_ooo:
                        if path.isfile('picture/picture' + str(num_in) + '.jpg'):
                            continue
                        else:
                            list_file.append(num_in)
                    pygame.image.save(screen, 'picture/picture' + str(list_file[0]) + '.jpg')

        # 随机下雪
        for i in range(len(snow_list)):
            a = config['snow_color']
            pygame.draw.circle(
                # 显示
                screen,
                # 颜色
                [int(f) for f in a],
                # 降落点
                snow_list[i][:2],
                # 雪花半径
                snow_list[i][3],
                # 充实雪花颗粒
                0
            )

            # 移动雪花位置(下一次循环起效)
            snow_list[i][0] += snow_list[i][2]
            snow_list[i][1] += snow_list[i][3]

            # 如果雪花落出屏幕,可以让雪不停的下
            if snow_list[i][1] > SIZE[1]:
                snow_list[i][1] = random.randrange(-50, -10)
                snow_list[i][0] = random.randrange(0, SIZE[0])

        # 刷新屏幕
        pygame.display.flip()
        clock.tick(20)

if __name__ == '__main__':
    main()
用户(集成)面板----main.py
这个就不多说了吧……
# 用户窗口
import tkinter
from PIL import ImageTk,Image
import snow_draw
import commands

root = tkinter.Tk()
size = 500, 400
root.geometry(f'size[0]xsize[1]')
root.resizable(False, False)
# root.config(bg='silver')

# 我们将定义如下功能:开始、调整雪花个数、窗口自适应图片大小比例、导入别的图片、修改图片透明度、修改背景音乐、修复注册机
# 如上功能由按钮事件触发的,将会随着窗口变化而改变按钮自适应(由于源代码开源,使用者可能考虑修改用户界面的大小,这里我因此灵活点)

# 先导入界面背景图片
image = Image.open('snow.jpg')
bg_image = ImageTk.PhotoImage(image)
width = bg_image.width()
height = bg_image.height()
root.geometry('%dx%d+0+0' % (width, height))
background_label = tkinter.Label(root, image=bg_image)
background_label.place(x=0, y=0, relwidth=1, relheight=1)

# 制作按钮
# 开始按钮
button10 = tkinter.Button(root, text='看雪', font=('华文行楷', 14),
                         bg='silver', fg='red', width=int(float(size[0] * 0.02)), height=int(float(0.0025 * size[1])),
                          command=snow_draw.main)
button10.place(x=int(float(size[0] * 0.8)), y=int(float(0.05 * size[1])))

# 调整雪花个数按钮
button11 = tkinter.Button(root, text='雪花个数', font=('华文行楷', 14),
                         bg='silver', fg='blue', width=int(float(size[0] * 0.02)), height=int(float(0.0025 * size[1])),
                          command=commands.snow_num)

button11.place(x=int(float(size[0] * 0.8)), y=int(float(0.20 * size[1])))

# 雪花窗口图片自适应图片按钮
button12 = tkinter.Button(root, text='自适应', font=('华文行楷', 14),
                         bg='silver', fg='black', width=int(float(size[0] * 0.02)), height=int(float(0.0025 * size[1])),
                          command=commands.fit)
button12.place(x=int(float(size[0] * 0.8)), y=int(float(0.35 * size[1])))

# 导入别的图片
button13 = tkinter.Button(root, text='导入图片', font=('华文行楷', 14),
                         bg='silver', fg='yellow', width=int(float(size[0] * 0.02)), height=int(float(0.0025 * size[1])),
                          command=commands.import_image)
button13.place(x=int(float(size[0] * 0.8)), y=int(float(0.5 * size[1])))

# 导入别的背景音乐
button14 = tkinter.Button(root, text='导入音乐', font=('华文行楷', 14),
                         bg='silver', fg='indigo', width=int(float(size[0] * 0.02)), height=int(float(0.0025 * size[1])),
                          command=commands.music)
button14.place(x=int(float(size[0] * 0.8)), y=int(float(0.65 * size[1])))

# 修改图片透明度
button15 = tkinter.Button(root, text='透明度', font=('华文行楷', 14),
                         bg='silver', fg='green', width=int(float(size[0] * 0.02)), height=int(float(0.0025 * size[1])),
                          command=commands.alpha)
button15.place(x=int(float(size[0] * 0.8)), y=int(float(0.8 * size[1])))

# 菜单
menu = tkinter.Menu(root)
root['menu'] = menu
f1 = tkinter.Menu(menu, tearoff=False)
f1.add_command(label='重置注册机', command=commands.reg)
f1.add_command(label='关于', command=commands.about)
menu.add_cascade(label='菜单', menu=f1)
root.mainloop()
最最基础的初始化文件---initialize.ini
这类文件非常好用,可以动态的自行修改调用,而没有必要去代码里修改调用然后打包、打包……
对ini文件的操作,可以使用内置的configobj模块进行操作,调用模块中ConfigObj类实质生成一个字典,从我在上面的源代码可知,大部分的按钮操作其实都是对字典的操作。
下面简介一下各个键值对的作用:
width = 600                # 下雪屏幕的默认宽度(最大600)
height = 400               # 下雪屏幕的默认高度(最大400)
num = 200                  # 默认雪花数目(50到250)
back_image = bg.jpg        # 下雪屏幕背景图片1
back_image2 = bg2.png      # 下雪屏幕背景图片2
back_music = jn.mp3        # 背景音乐
alpha = 120                # 下雪屏幕背景图片2的透明度(0到255)
snow_color = 192, 192, 192 # 雪花的颜色(三个值都是0到255),因为在屏幕上显示,为了更加逼真,用的默认值为银色的RGB值
另外,我在这个初始化文件里面添加了雪花颜色的RGB值修改,但并没有提供用来操作的相关程序,用户只需手动修改即可,修改上述的键值对万一出错不必担心,上述的commands.py提供了重新注册机,只需一步,你又可以看雪了
width = 600
height = 400
num = 200
back_image = bg.jpg
back_image2 = bg2.png
back_music = jn.mp3
alpha = 120
snow_color = 192, 192, 192
最后看一下效果吧:
 呃……这里有点不清楚....
欧克,到这里详解就差不多了(当然了,这里我没有提供相关的素材),如果你在你的环境中运行不成功,你可以通过我在下方提供的链接进行下载,如需转载,请备上转载地址哦。如果你还有什么疑问,请在下方留言哦,请多多指教。
最后, 在这里跟大家分享一下我个人的交流群,欢迎各位各阶段友友们进群,一起讨论交流,群里还会不定时进行资源分享和抽奖哦,以下为QQ群号:719560645.
这里备注一下:阿里云盘那个是安装包(完全形式),若链接失效请留言或者私信。
以上是关于忙活半天只为了看雪--送给大家的冬至礼物的主要内容,如果未能解决你的问题,请参考以下文章


 https://github.com/PythonnotJava/snow.git